Difference between revisions of "SOP-MES0074 CMMS Asset"
| Line 197: | Line 197: | ||
*'''Machine Type<br>''' | *'''Machine Type<br>''' | ||
*'''Owning Dept.<br>''' | *'''Owning Dept.<br>''' | ||
| − | *'''Site | + | *'''Site <br>''' |
| + | *''' Location<br>''' | ||
*'''Production Line<br>''' | *'''Production Line<br>''' | ||
*'''Location #<br>''' | *'''Location #<br>''' | ||
Revision as of 16:56, 17 March 2017
42Q Home > Shop Floor Control > Configuration > CMMS Asset
This edition applies to Cirrus and all subsequent releases and modifications until otherwise indicated in new revisions.
Contents
- 1 Asset
- 1.1 Asset Sub-Module
- 1.1.1 Searching/Filtering Assets
- 1.1.2 Adding Assets
- 1.1.3 Editing an Asset
- 1.1.3.1 Edit Asset: General Tab
- 1.1.3.2 Edit Asset: Group Tab
- 1.1.3.3 Edit Asset: Attachment Tab
- 1.1.3.4 Edit Asset: Boc Tab
- 1.1.3.5 Edit Asset: Checklist Tab
- 1.1.3.6 Edit Asset: PM Calendar List Tab
- 1.1.3.7 Edit Asset: History Status Tab
- 1.1.3.8 Edit Asset: Calibration Tab
- 1.1.3.9 Edit Asset: Calibration History Tab
- 1.1.3.10 Edit Asset: History Tab
- 1.1.3.11
- 1.2 Attachment Tab
- 1.3 Production Line Sub-module
- 1.4 Location
- 1.5 Machine Type
- 1.6 Checklist
- 1.7 Problem
- 1.8 Problem Type
- 1.9 Problem Category
- 1.1 Asset Sub-Module
- 2 Document Revision History
Asset
The Asset module is designed for administrators. Approved users can configure details related to a plant's assets, as well as perform administration-related actions. There are six sub-modules in the Asset portal available to local system administrators. Refer to the table below for sub-module names and corresponding functions:
| Sub-module Name | Function |
| Asset |
|
| Production Line |
|
| Location |
|
| Machine Type |
|
| Checklist |
|
| Problem |
|
| Problem Type |
|
| Problem Category |
|
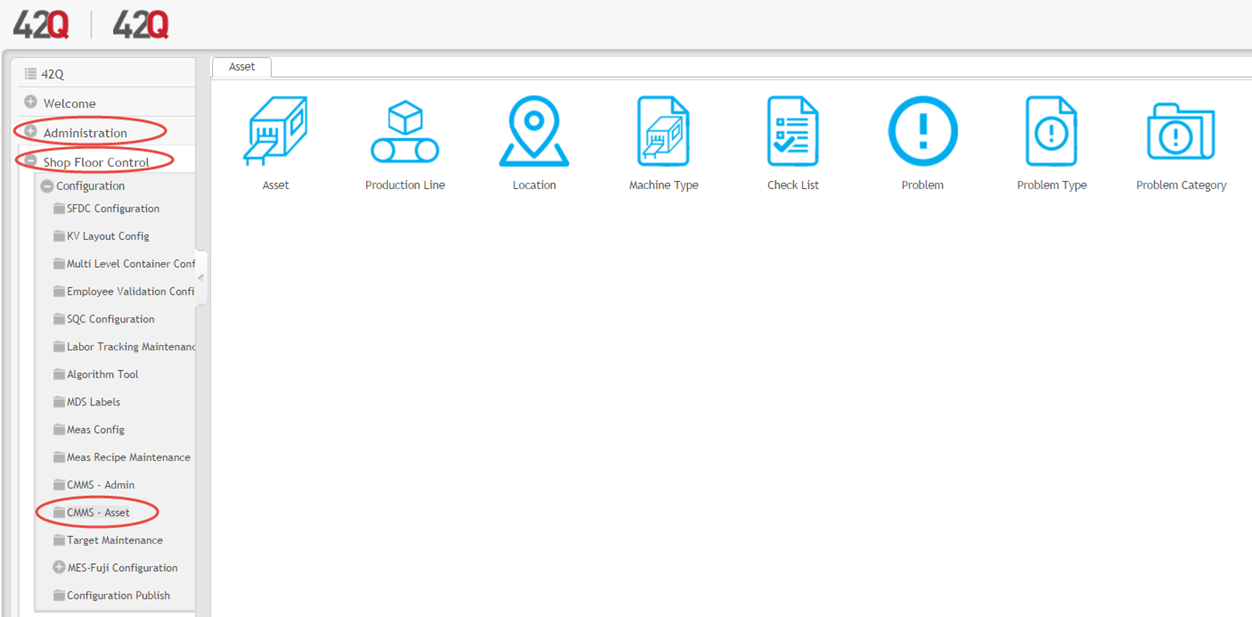
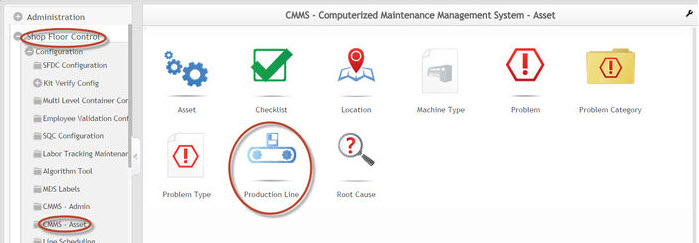
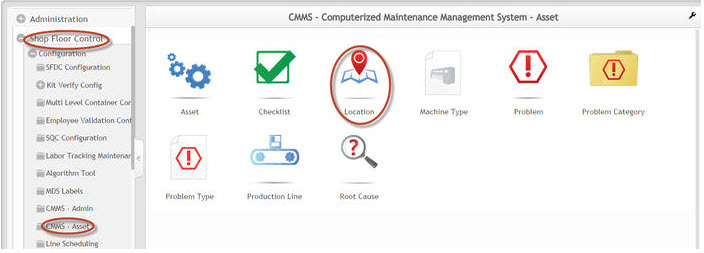
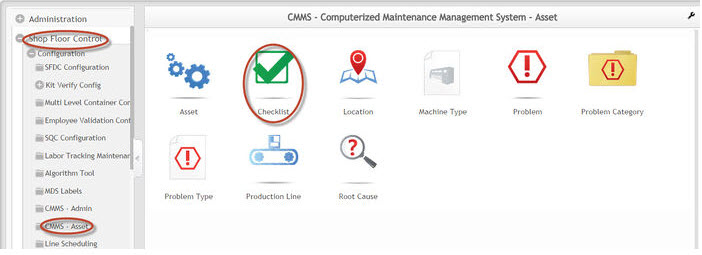
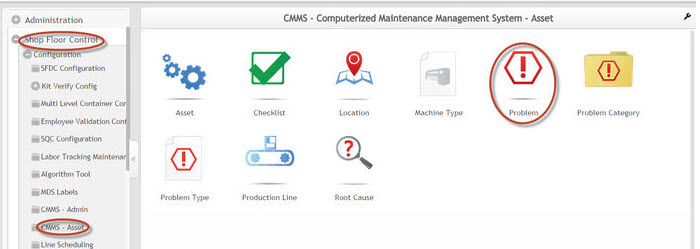
1. The CMMS Asset Module is accessed by selecting: Administration > Shop Floor Control > Configuration > CMMS-Asset
Figure 1: CMMS Asset Module
2. Now the user is able to access all available sub-modules.
Asset Sub-Module
The Asset sub-module allows users to view assets and to perform various tasks related to asset management. Users can search/filter the Asset List; add/edit assets; and export/copy asset information onto local drives.
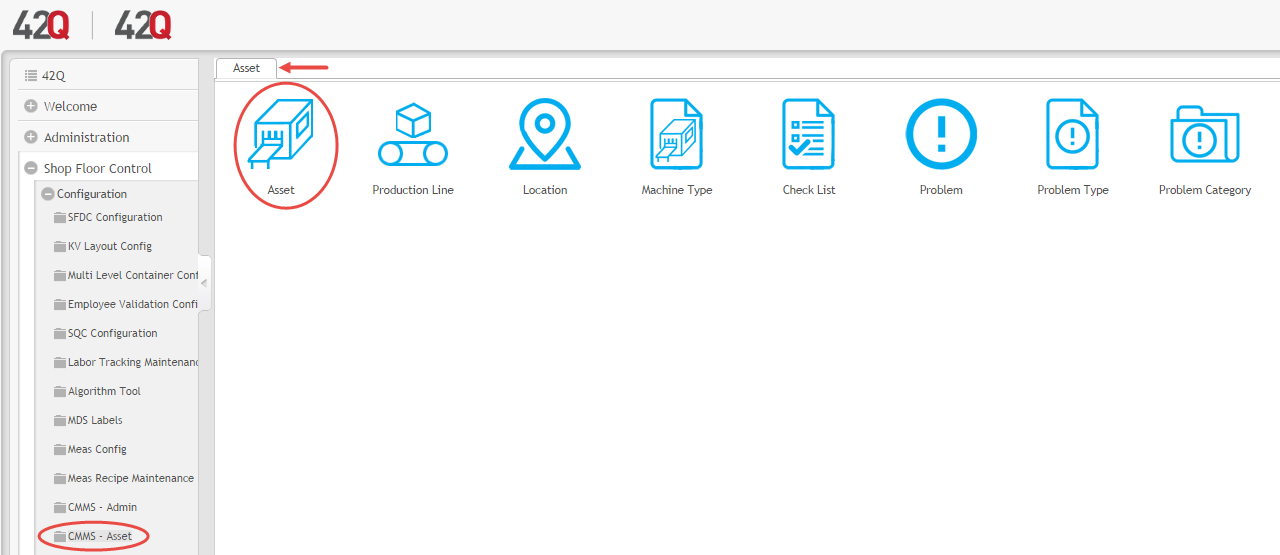
1. To access the Asset sub-module, navigate to CMMS-Asset > Asset
Figure 2: CMMS Asset
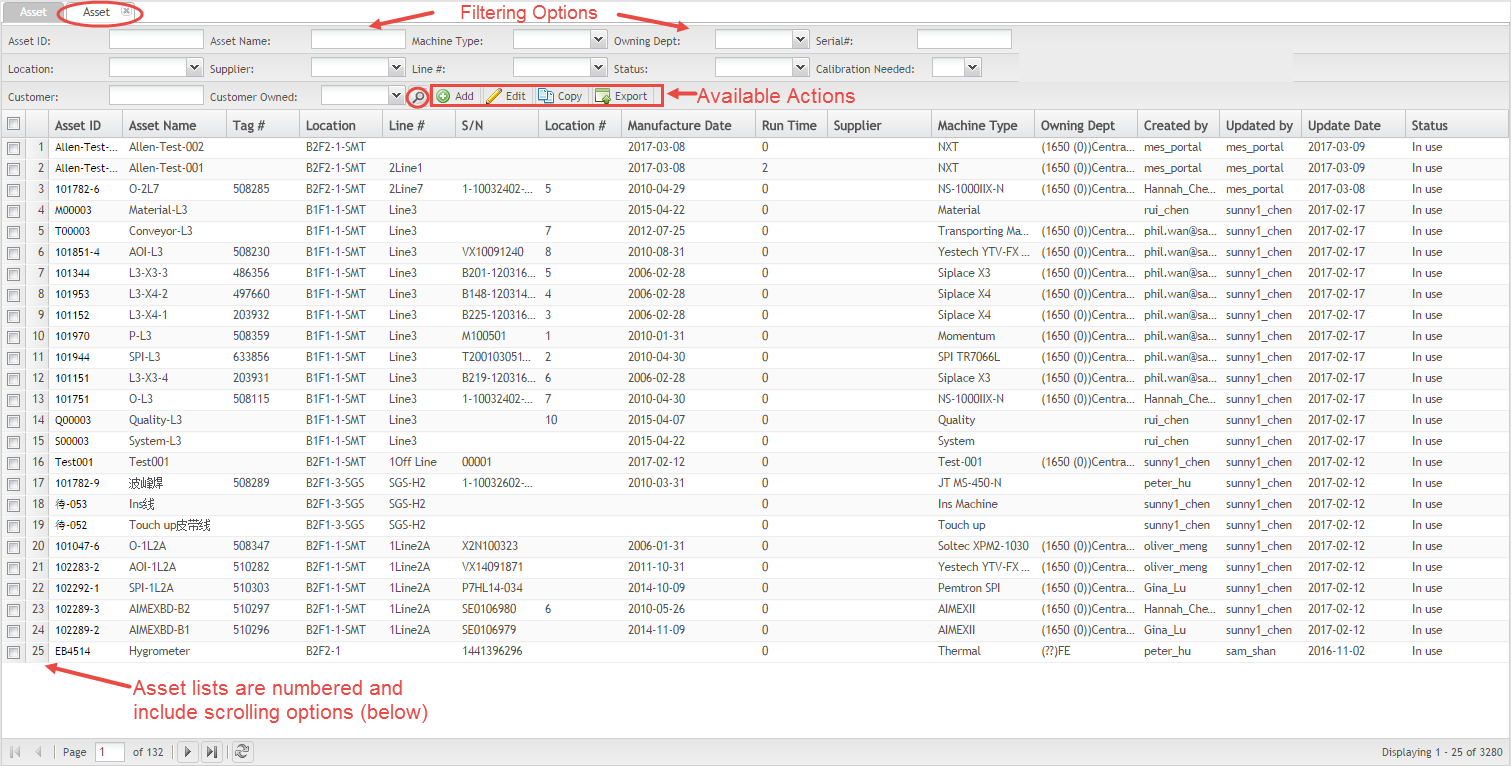
2. The Asset List displays all existing assets.
Figure 3: Asset List Page Main Menu
Searching/Filtering Assets
Under the Asset sub-module, users can search and filter the assets list. To search/filter the entries in the list:
1. Specify the search criteria by using the filters provided:
- Asset ID
- Asset Name
- Machine Type
- Owning Department
- Serial #
- Location
- Supplier
- Line #
- Status
- Calibration Needed
- Customer
- Customer Owned
2. Select the search icon (e.g. magnifying glass).
Adding Assets
Under the Asset sub-module, users can add assets to the asset list. To add an asset:
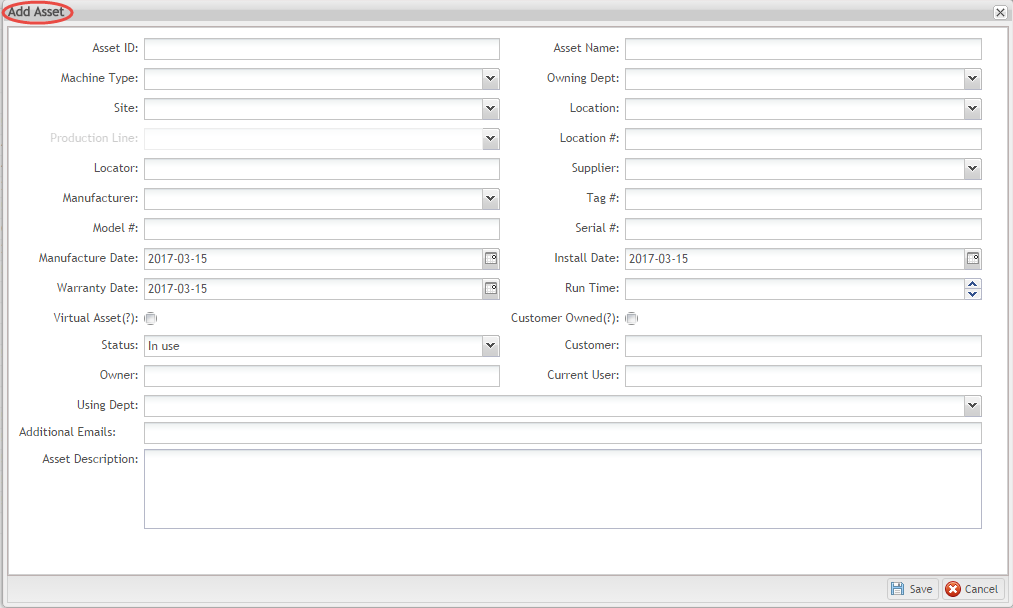
1. Select Add from the Asset List menu. The Add Asset window appears.
NOTE: Configuration can be completed within either the add or edit functions. Configuration tasks can also be completed within the Work Order & Preventive Maintenance module.(Administration > Shop Floor Control > Configuration > Work Order & Preventive Maintenance).
Figure 4: Add Asset
2. Enter the asset information into the appropriate fields:
- Asset ID: Enter the asset ID number here. Take note that the asset ID cannot be changed or edited once it is established in the system.
- Asset Name: Designation for the asset.
- Machine Type: Machine type from the drop-down list.
- Owning Dept.: Department to which the asset belongs.
- Site: Location of the Asset. A drop-down list is available in a tree format with all sites listed.
- Location: Location for the asset. The Production Line drop-down list becomes available once this field is completed. Production Lines assigned to the specified location will populate.
- Production Line: This field is disabled unless a shop floor is selected in the Location Number field, as the Production Line options are based upon the shop floor location.
- Location Number: The numbered ID associated with the Location for the asset.
- Locator: Shelf where the asset is placed.
- Supplier: Displays all available suppliers in local system. Select one from the drop-down list.
- Manufacturer: Displays all available manufacturers in local system. Select one from the drop-down list.
- Tag #: represents tag's number.
- Model #: represents model’s number.
- Serial #: represents serial’s number.
- Manufacture Date: Date on which the asset was manufactured. The current date is selected by default. yyyy/mm/dd
- Install Date: Date on which the asset is installed. The current date is selected by default.
- Warranty Date: Date on which the warranty period of the asset ends. The current date is selected by default.
- Run Time: The time (in hours) the asset has been running.
- Virtual Asset(?): Checkbox. Default is unchecked.
- Customer Owned(?): Checkbox. Default is unchecked.
- Status: Asset status can be Obsolete, In Use, or Spare.
- Customer: Company purchasing product created with the asset.
- Owner: Department in charge of Asset maintenance and repair
- Current User: Machine operator responsible for the line where the asset exists.
- Using Department: Department who uses the asset. This field is optional.
- Additional Emails: Add user emails who need to know about production changes. An application of additional emails might be a customer outside of the company, who would not receive email notifications automatically.
- Asset Description: This field is optional. Include any additional information about the asset here.
Editing an Asset
1. Select an asset from the list.
2. Select Edit. This opens the Edit Asset Properties pop-up window.
3. There are ten Tabs available for edit/configuration: General, Group, Attachment, Boc, Checklist, PM Calendar List, History Status, Calibration, Calibration History, and History Tracking.
4. The General Tab is is displayed by default.
Figure 5: Edit Asset Properties Pop-Up Window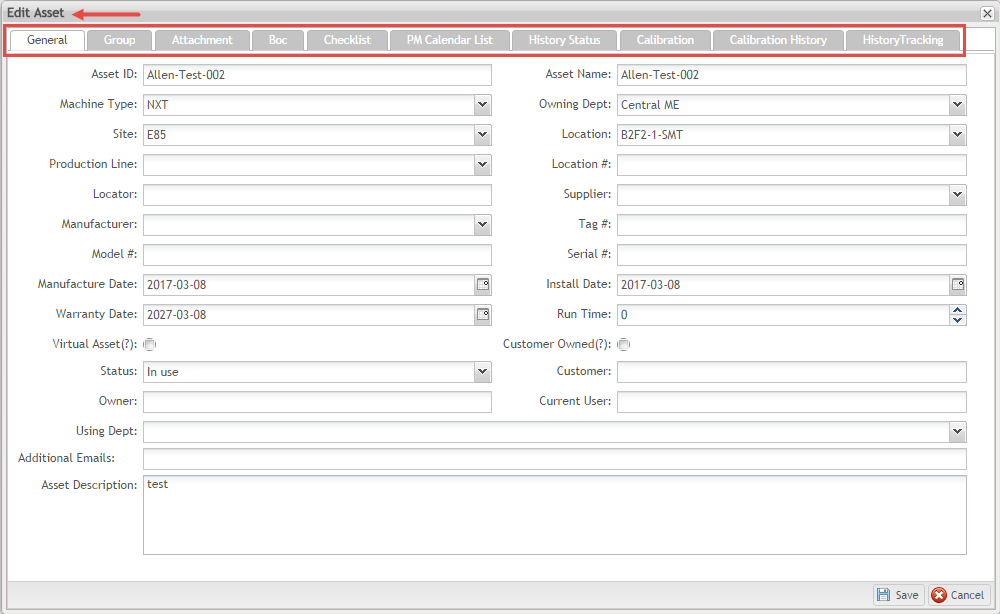
Edit Asset: General Tab
Under the General Tab of the Edit Asset properties pop-up window, the user may edit all of the property fields that were defined when the Asset was created: (see Section 1.1.2. Adding Assets for a complete explanation of each property.)
- Asset ID
- Asset Name
- Machine Type
- Owning Dept.
- Site
- Location
- Production Line
- Location #
- Locator
- Supplier
- Manufacturer
- Tag#
- Model#
- Serial#
- Manufacture Date
- Install Date
- Warranty Date
- Run Time
- Virtual
- Asset
- Customer Owned
- Status
- Customer
- Owner
- Current User
- Using Department
- Additional Emails
- Asset Description
Edit Asset: Group Tab
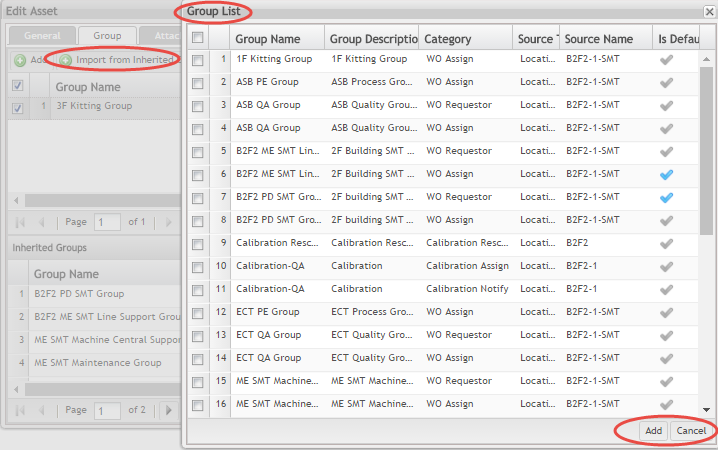
1. Using the Group Tab, users can assign groups to the selected asset. There are four actions within the Group Tab: Add A Group; Import from an Inherited Group; Delete; or Assign as Default Group.
Figure 6: Edit Asset: Group Tab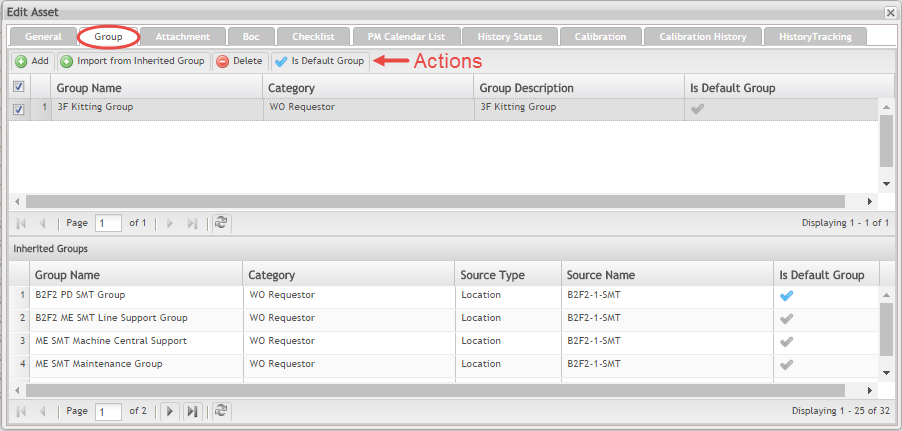
Add a Group
2. Choose the green Add button.
3. The Group List pop-up window displays.
4. Selected Groups appear in the top portion of the tab.
5. Groups to be added (Inherited Groups) are listed on the bottom portion of the tab.
Figure 7: Edit Asset: Group List Pop-up Window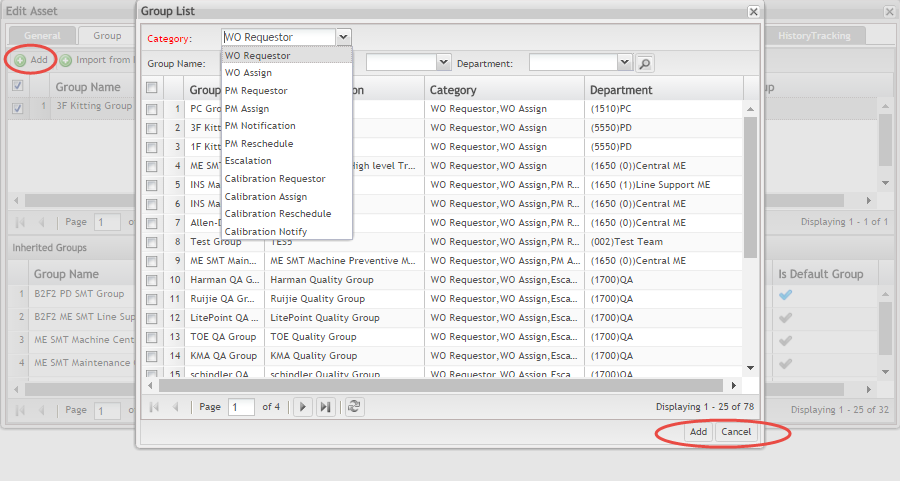
6. Choose the work category being assigned to the asset from the available drop-down menu. NOTE: The Category field is marked with red text to flag the task. This is an important demarcation.
7. Categories include:
- Work Order Requestor
- WO Assign
- PM Requestor
- PM Assign
- PM Notification
- PM Reschedule
- Escalation
- Calibration Requestor
- Calibration Assign
- Calibration Reschedule
- Calibration Notify
8.Search groups using filtering agents on the top menu bar: Group Name, Category, Department
9. Or select the group line directly by activating the checkbox next to its listing.
10. Select Add to save or Cancel to abort.
11. Once added, the new group will display on the top section of the Group Tab.
Import from an Inherited Group
- Selected the Import from Inherited Group button.
- A pop-up window displays.
- Choose the Inherited Group.
- Select Add to save or Cancel to abort.
- Once added, the Group will appear in the top portion of the Group Tab.
Figure 8: Import from an Inherited Group
Delete/Default
1. Selected groups can be deleted within the Group Tab of Edit Asset.
2. To delete:
- Select the Group by activating the checkmark next to its name.
- Choose delete.
3. Users can also change the status of a group within the Group Tab of Edit Asset.
4. To mark the group as the Default Group:
- Select the Group by activating the checkmark next to its name.
- Choose “Is Default Group.”
- A blue checkmark will appear next to the Group list.
- Users may removed default status by selecting the “Is Default Group” again.
- Groups that are not the default group are noted by a grey check mark next to the Group List.
Figure 9: Edit Asset: Group Tab: Delete a Group/Mark as Default
Edit Asset: Attachment Tab
Edit Asset: Boc Tab
Edit Asset: Checklist Tab
Edit Asset: PM Calendar List Tab
Edit Asset: History Status Tab
Edit Asset: Calibration Tab
Edit Asset: Calibration History Tab
Edit Asset: History Tab
Attachment Tab
Figure 5: Attachment
| It is a list with: |
|
|
|
| From this tab the user is able to see and download the files configured in the Machine Type module. |
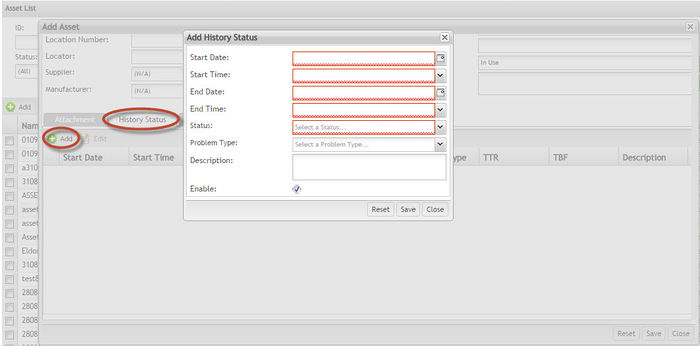
History Status Tab
Figure 6: History Status
| History status is generated by system automatically when closing a work order. It CANNOT be edited, as well as changing active status. History status inputted manually can be edit. |
|
|
|
|
|
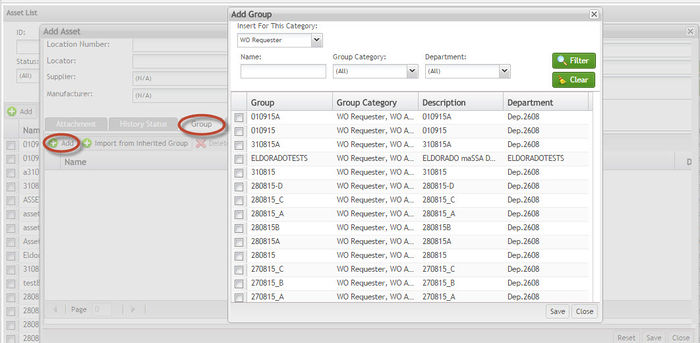
Group Tab
| Under the Group Tab, users may view groups to assign to the given asset. |
Figure 7: Add Group
This function is used to assign groups to Category.
| 1. Select the category from drop down list; |
| 2. Select the group or groups (mark the checkbox) to be assigned to the chosen category ; |
| 3. Select Save to confirm. |
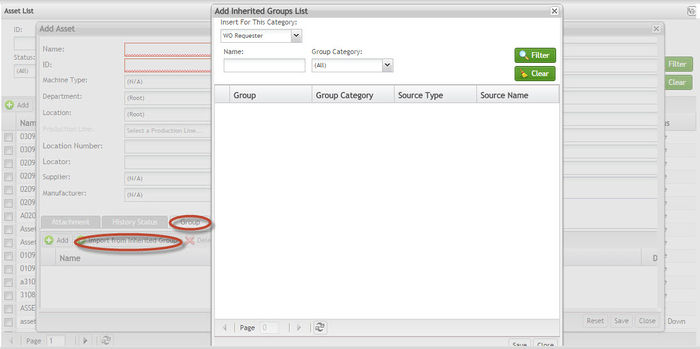
Figure 8: Inherited Groups
This list displays the configuration done in the Add Group function. The user is able to select a configuration and save it for the chosen group. This configuration will be used during the work order configuration.
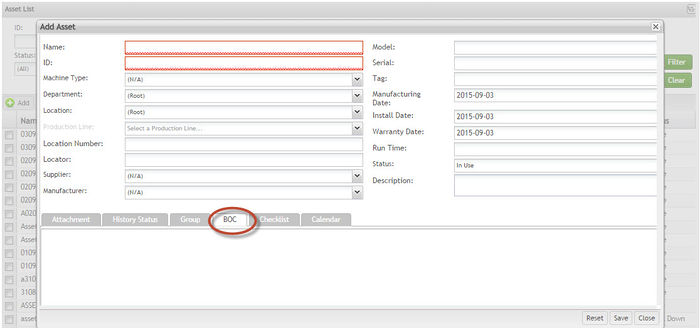
BOC (Bill of Material) Tab
Figure 9: BOC Tab
| This tab displays a tree view with Part number and Spare qty. |
| If the machine type has a BOC configuration, it will be automatically loaded in the BOC Tab. |
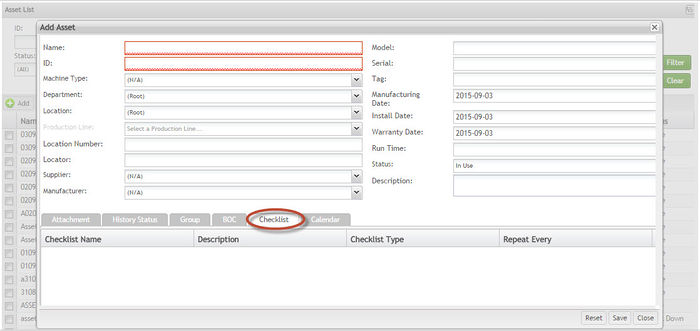
Checklist Tab
Figure 10: Checklist Tab
It is only a view (it displays if configured in the Checklist Module to the asset).
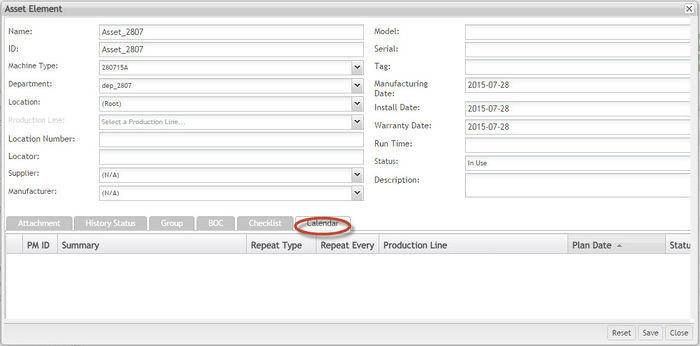
Calendar
Figure 11: Asset Element
Once the fields have been entered, select Save to finish or Close to abort.
Deleting an Asset
The user may delete an asset if it is not assigned to a work order or production Line. To delete an asset, select the asset to be deleted and select Delete.
Figure 13: Delete Asset Pop-Up
[Image:SOP-5-I-MES0074-C CMMS Asset-WIKI 13.jpg|700px|SOP-5-I-MES0074-C CMMS Asset-WIKI 13.jpg]]
Select Yes to confirm or No to abort.
Production Line Sub-module
The Production sub-module allows users to view, add, edit and delete production lines.
1. To access the Production Line sub-module, navigate to CMMS-Asset > Production Line
Figure 14: CMMS Production Line
2. The Production Line List displays all existing assets.
Figure 15: Production Line List Page
[Image:SOP-5-I-MES0074-C CMMS Asset-WIKI 15.jpg|700px|SOP-5-I-MES0074-C CMMS Asset-WIKI 15.jpg]]
Searching/Filtering Production Line
| Under the Production Line sub-module, users can search and filter the Production Line list. To search/filter the entries in the list |
| 1. Specify the search criteria by using the filters provided: |
|
|
| 2. Select Filter. |
Adding Production Lines
From the Production Line sub-module, users can Add, Edit, and Delete production lines.
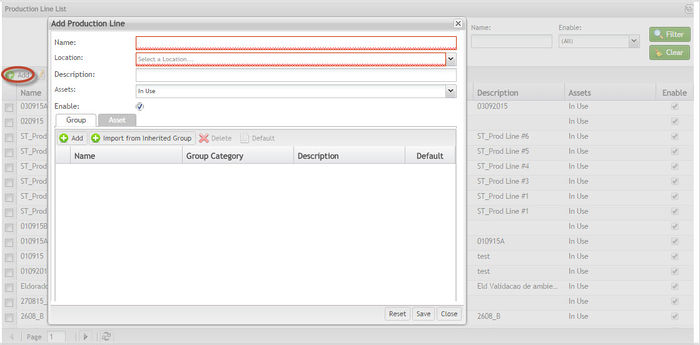
Figure 16: Add Production Line
To add a Production line
1. From the Production Line list, select Add. The Add a Production Line pop-up appears.
2. Complete the fields provided:
- Name: Name for a line - mandatory
- Location: location’s name where the production line is. Drop down tree with 3º level’s locations list from Location - mandatory.
- Description: any additional information needed for the line - optional.
- Assets: In Use or Spare – mandatory. Default is In Use.
- Enable: default is on.
NOTE: Group and Assets TABs are not required during creation of production line configuration.
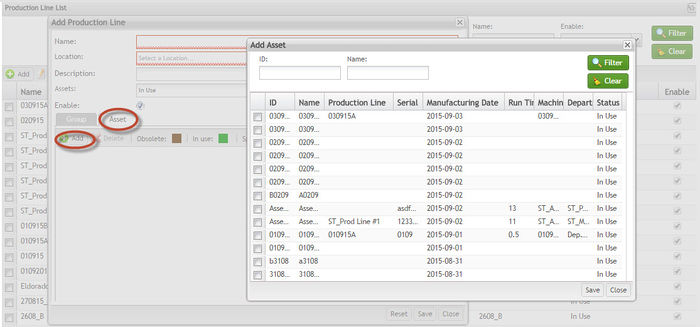
1. Under the Asset Tab, assets can be added or deleted. Assets are displayed in a block and their status is reflected by the color: blue-grey denotes In Maintenance; brown denotes Obsolete; Green denotes in use; Pink indicates Spare, and Orange indicates Break Down. The tab supports a drag-and-drop function that can be used to change the sequence of the assets.
Figure 17: Add Production Line – Asset Tab
- Adding Assets:
- To add (assign) an asset selects Add from the Assets Tab menu. The Add Asset pop-up appears.
- From the Add Asset pop-up select one or more assets to be added. Select Save to add the assets or close the window to cancel.
- Deleting Assets:
- To delete an asset, select an asset listed under the Asset Tab.
- Select delete from the Asset Tab menu.
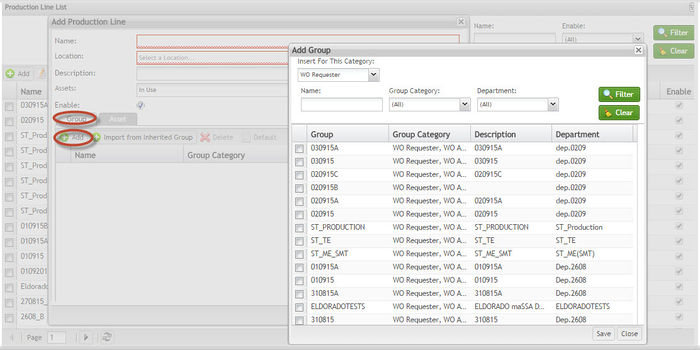
2. Under the Group Tab, groups can be added or removed from a production line. Groups that may be added are those that are in charge of the given production line:
Figure 18: Add Production Line – Group Tab
- Adding a Group
- To add a group to a production line, from the Group Tab select Add. Note that the group to be added must already have been created in Shop Floor Control > Configuration > CMMS Config > Group.
- From the Group List, (1) select a Group Category from the Insert From This Category drop-down menu. (2) Check the group name from the list to be added. (3) Select Save to complete or Close to abort.
- NOTE: The user has to add the PM Assign, PM Requester, PM Reschedule group category for each production line.
- Importing from Inherited Group
- To import a group to a production line, from the Add Inherited Groups List select group and select Save.
- Deleting a Group
- To delete a group assigned to a production line, from the Group Tab select the item to be deleted and select Delete.
3. Once the added the production line is complete, select Save to apply the changes; otherwise select Close to abort.
Editing Production Lines
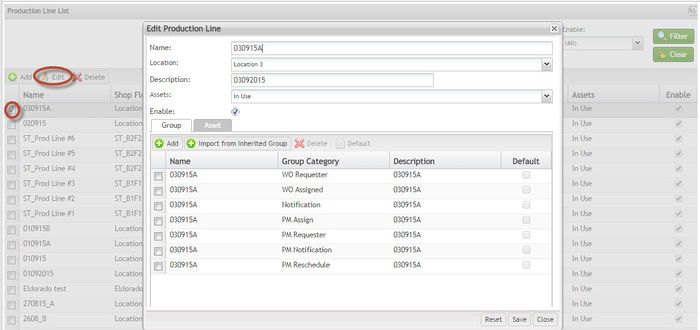
Figure 19: Edit Production Line
To edit a production line
1. Select a production line from the Production Line list and click Edit. The Edit Production Line pop-up appears.
2. Edit the necessary fields and select Save to confirm.
NOTE: The same rules to add a production line is valid to edit. Please see the Adding Production Lines topic for further information.
Attention: It is not allowed to inactivate a production line if it is being used by asset, work order with status (ASSIGNED, WIP, WAITING FOR PARTS and WAITING FOR BUY OFF) or preventive maintenance.
Deleting Production Lines
Production Line information can be deleted.
To delete the production line
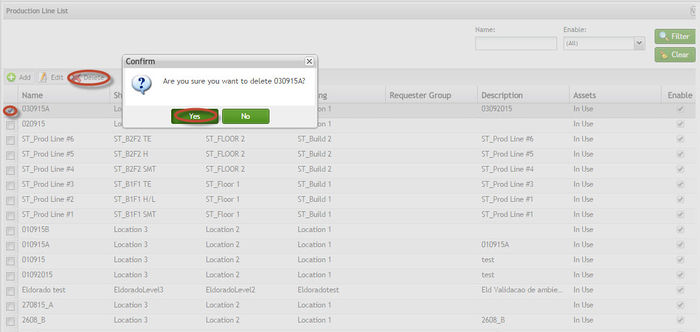
Figure 20: Delete Production Line
1. Select a production line from the Production Line list.
2. Select Delete from the Production Line menu. A confirmation message displays.
3. Click Yes to delete or No to abort.
NOTE: If the Production Line is being used in another table, it is not allowed to delete.
Location
The Location sub-module can be used to view, add, edit and delete locations.
Figure 21: Location Sub-Module Page
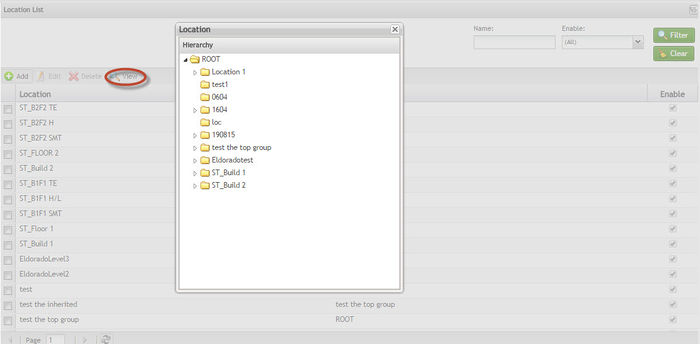
Viewing Locations
Locations are listed and can be viewed as belonging to folders and subfolders under a hierarchy.
Figure 22: Viewing Locations
Adding Locations
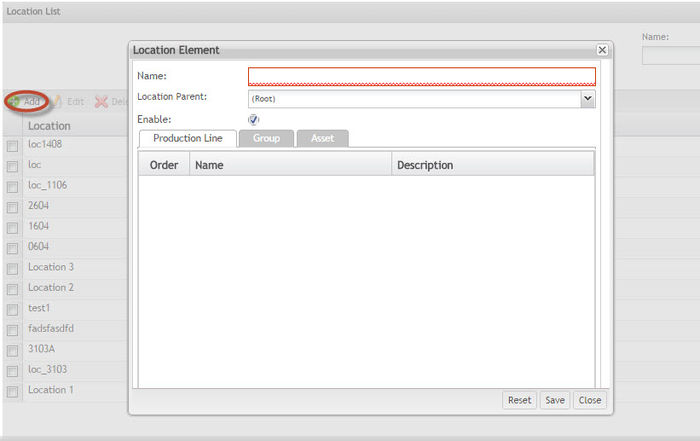
A location can be added to (sub) folders. To add a location:
1. Click on Add button in the top of the page.
2. Enter a name into the Name field.
3. Click on the Location parent (sub) folder where the location is to be added. Root is default.
4. Enable are selected by default.
5. Select Save to finish or Close to abort.
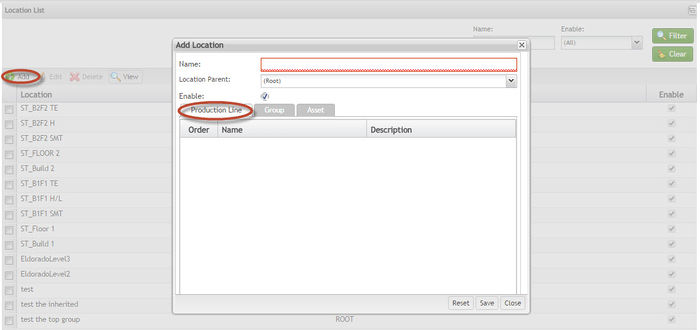
The user is able to assign the Production Lines, Groups or Assets during the Location addition or back to this during the edit action.
Figure 23: Adding Location
Assigning Groups, Production Lines, and Assets byclicking in the available tabs:
1. Under the Production Line tab, multiple production lines are placed in ascending order beginning at 1. This order can be modified by clicking and dragging a production line to an earlier or later point in the order.
Figure 24: Adding Location – Production Line Tab
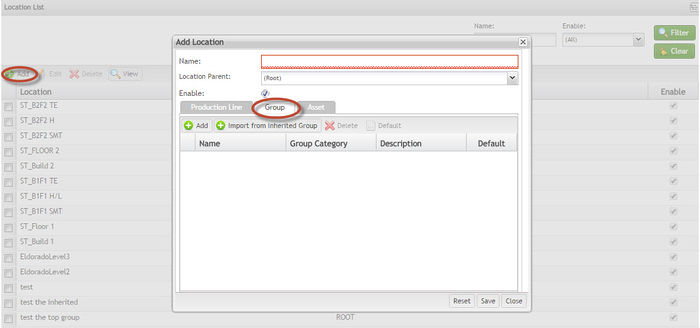
2. Under the Group tab, groups in charge of the given location can be added to or deleted from a location:
Figure 25: Adding Location – Group Tab
- Adding a Group
- To add a group to a production line, from the Group Tab select Add.
- From the Group List, check the groups to add to the production line then select Save to complete or Close to abort.
- Importing from Inherited Group
- To import a group to a production line, from the inherited Groups List Tab select group and select Save.
- Deleting a Group
- To delete a group assigned to a production line, from the Group Tab select the item to be deleted and select Delete.
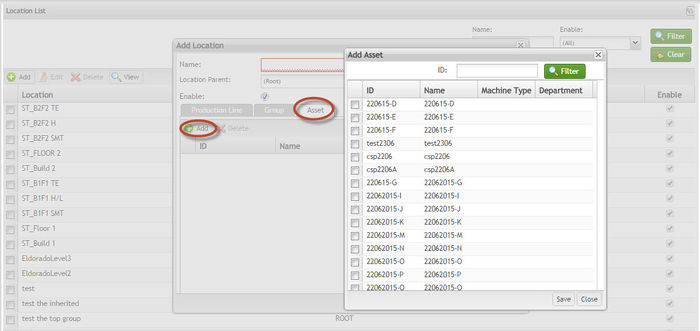
3. Under the Asset tab, Assets can be added or deleted from the location.
Figure 26: Adding Location – Asset Tab
- Adding Assets:
- To add (assign) an asset selects Add from the Assets Tab menu. The Add Asset pop-up appears.
- From the Add Asset pop-up select one or more assets to add. Select Save to add the assets or Close to cancel.
- Deleting Assets:
- To delete an asset, select an asset listed under the Assets Tab.
- Select delete from the Asset Tab menu.
Editing Locations
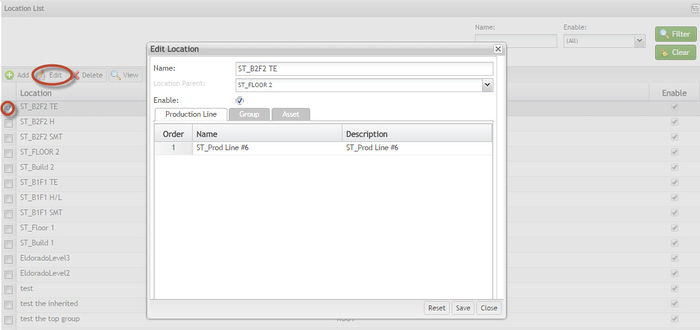
Figure 27: Edit Location
To edit a Location
1. Select a location from the Location list and click on Edit. The Edit Location pop-up appears.
2. Edit the necessary fields and select Save to confirm.
NOTE: The same rules to add a location is valid to edit. Please see the Adding Location topic for further information.
Attention: It is not allowed to inactivate a location if it is being used by asset, production line, preventive maintenance or escalation modules.
Deleting Locations
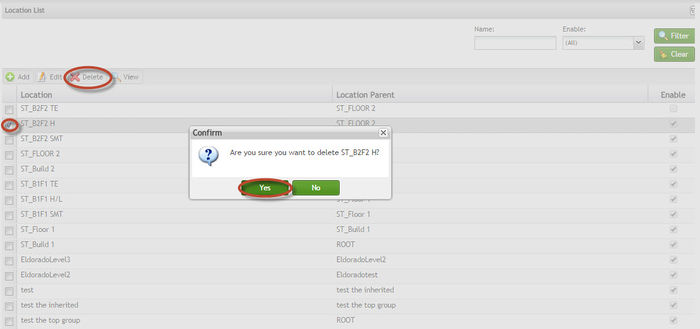
Figure 28: Delete Location
1. Select the location from the list to be deleted and select Delete. Select Edit.
2. A confirmation message pop-up appears. Select Yes to delete or No to cancel.
NOTE: If the Location is being used in another table, it is not allowed to delete.
Machine Type
The machine type sub-module can be used to Search, Add, Edit and Delete machine types.
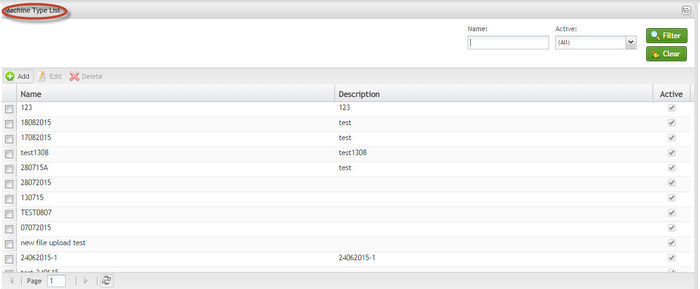
Figure 29: Machine Type Sub-Module Page
The following fields are available:
- Name: name of the machine type.
- Description: Additional details.
- Active: If machine is active, this should display checked.
Searching Machine Types
To perform a search
1. Type in one or more characters for the machine type for which one is looking into the search bar at the top of the sub-module page. Click the Filter button.
2. Any entries matching the search should appear in the results.
Adding a Machine Type
To add a machine type
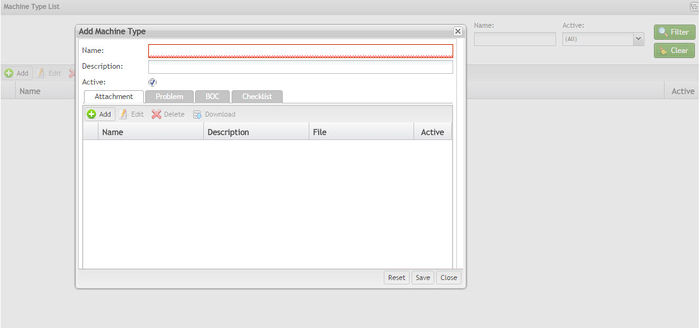
1. Select Add in the Machine Type sub-module page. The Add Machine Type pop up displays.
2. Enter the Machine Type and a description of the machine type in the Description box.
3. Active: If machine is active, this should display checked.
NOTE: The Machine Type name cannot be changed once saved.
4. Select Save to complete or Close to abort.
Figure 30: Add a New Machine Type
The user is able to set the following items when is adding the machine time:
1. Under the Attachment tab, the user may upload an attachment, edit an attachment, activate an attachment, or download an attachment.
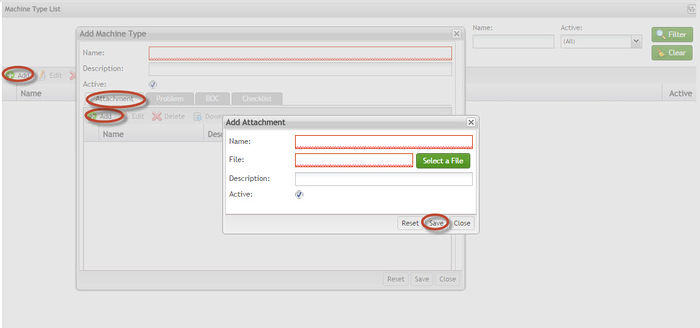
- Uploading (adding) an Attachment:
- Select Add from the Attachment menu. An Add Attachment pop-up should appear.
Figure 31: Attachment Tab
- Enter Name for the attachment.
- For File, click Select a File and browse the local drive for the desired attachment.
- Check whether the attachment is Active.
- Enter a description of the attachment in the Description box.
- Select Save to complete or select Close to abort.
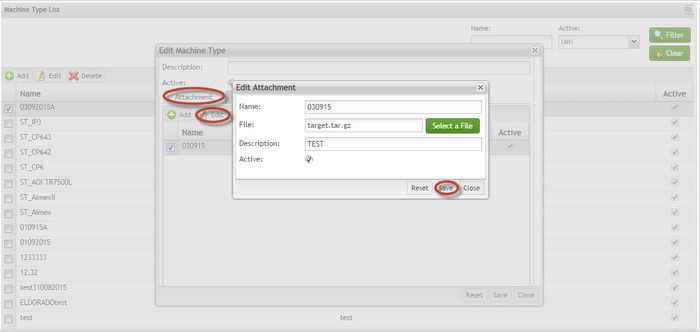
- Editing an Attachment
- Select an attachment from the Attachment list.
- Click Edit in the Attachment menu. The Edit Attachment pop-up should appear.
Figure 32: Edit This Attachment Pop-Up
- Edit the Name.
- Under File, select to upload a different attachment.
- Change whether the attachment is listed as Active.
- Edit the Description box if necessary.
- Select Save to complete the edit, or select Close to abort.
- Deleting an Attachment
- Select an attachment from the Attachment list.
- Click Delete in the Attachment menu. A Confirm message pop-up should appear.
- Click Yes to confirm or No to abort.
- Downloading an Attachment
- Select an attachment from the Attachment list.
- Click Download in the Attachment menu. Choose the folder in the local machine to save the file.
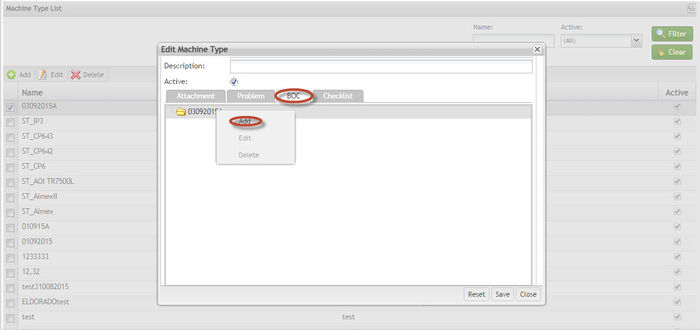
2. Under the Boc tab, the user can Add, Edit, and Enable/Disable BOCs.
- Adding a BOC:
- Right click one of the BOCs in the BOC list.
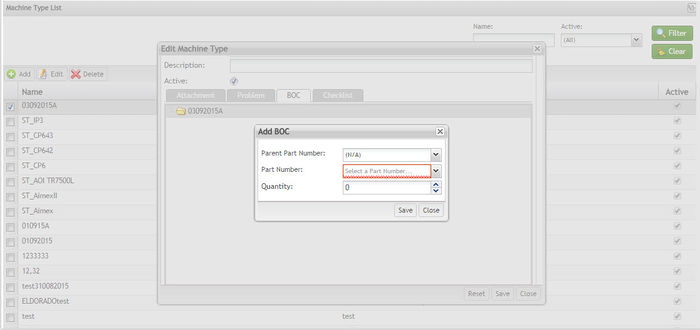
- Select Add. The Add BOC pop-up should appear.
Figure 33: Add a New BOC
Figure 34: Add a New BOC Pop-Up
- Select the Parent Part Number from the drop-down list. This must display N/A if no Part Number is available for this BOC.
- Select a Part number.
- Enter the Quantity for the new BOC.
- Select Save to finish or Close to abort.
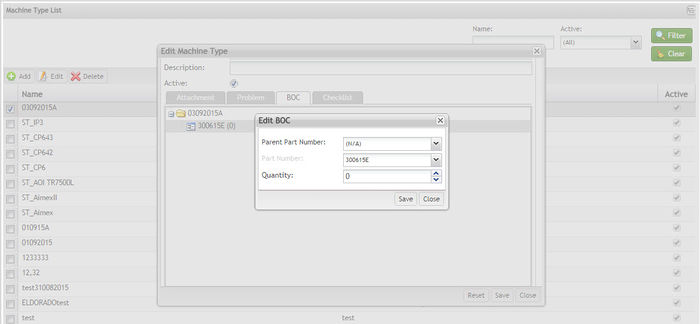
- Editing a BOC:
- Right click one of the BOCs in the BOC list.
- Select Edit from the pop-up menu. The Edit BOC pop-up should appear.
Figure 35: Edit BOC Pop-Up
- Select Parent Part Number from the drop-down list.
- Enter the Quantity for the BOC.
- Select Save to finish or Close to abort.
- Deleting a BOC:
- Right click one of the BOCS in the BOC list.
- Select Delete from the pop-up menu. A confirmation message displays. Click Yes to confirm or No to abort.
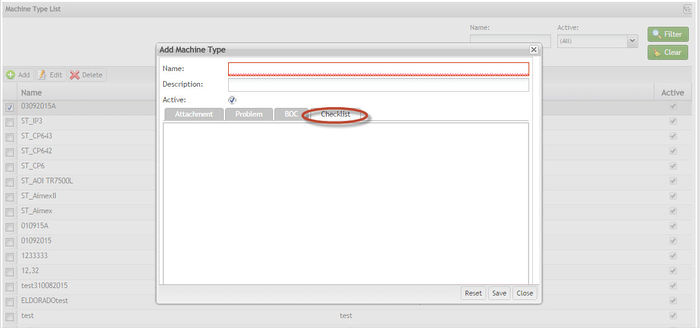
3. Under the Checklist tab, the user can view checklist information pertaining to the machine type.
Figure 36: Checklist Tab
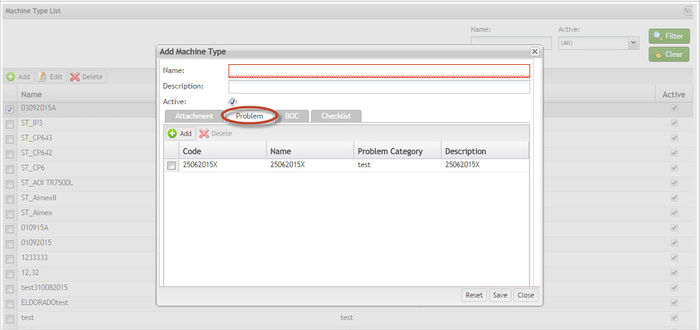
4. Under the Problem tab, the user can Add or Delete problem information.
Figure 37: Add a New Problem
- Adding a Problem
- Select Add from the Problem menu. The Add Problem pop-up should appear.
- Select a problem category item from the list provided. A list of problem codes and problem names should then appear.
- Check the problem code and name that apply, then select Save to finish or Close to abort.
- Deleting a Problem
- Select an entry from the list under the Problem tab. Click Delete.
- A Confirm message pop-up should appear.
- Click Yes to confirm or No to abort.
Editing a Machine Type
To edit a machine type
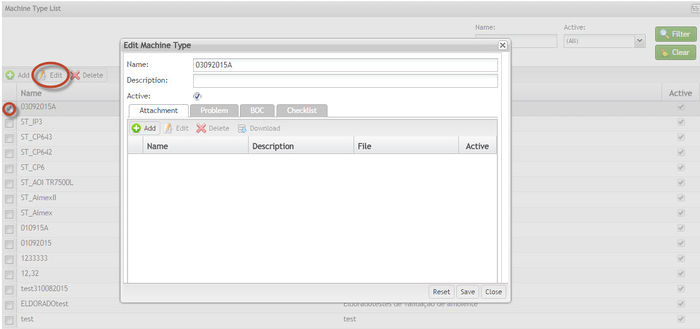
1. Select a machine type from the Machine Type list.
2. Select Edit. An Edit Machine Type pop-up should appear that contains the following tabs: Attachment, BOC, Checklist, and Problem. NOTE: Because checklists are assigned to machine types, adding, or deleting them must be done from the Machine Type tab under Edit Checklist in the Check List sub-module.
NOTE: See Adding Machine Type topic for further information.
Figure 38: Edit This Machine Type
Attention: It is not allowed to inactivate a machine type if it is being used by asset.
Deleting a Machine Type
To delete a Machine Type
1. Select a machine type from the Machine Type list.
2. Click Delete.
3. A confirmation message is displayed. Click Yes to confirm or No to abort.
NOTE: The system verifies if machine type is being used in another table. If so, it is not allowed to delete.
Checklist
From the Check List sub-module, users can search/filter, add, edit and delete checklists.
Figure 39: Check List Sub-Module Access
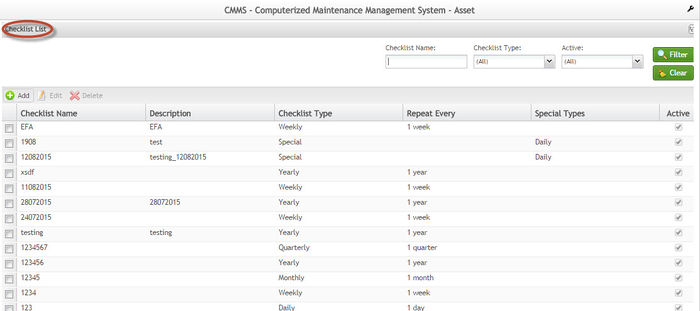
Figure 40: Check List Sub-Module List
The main purpose of this feature is to create, delete and edit check list for machines/Asset.
Searching/Filtering the Check List
To search/filter checklists
1. From the Check List sub-module page, enter the name of a check list into the Check List Name field and select a check list type from the Check List Type field.
2. Select the filter icon.
Adding a Check List
The available fields are:
- Checklist Name: name given to the checklist
- Description: Additional details
- Checklist Type: Special, or daily, or monthly, or weekly, or half-year, or quarterly or yearly;
- Repeat Every: number of repetitions in days, week, months, year (depends what was previously chosen in the Checklist type FIELD)
- Special Types: If the Checklist type is special, here should display all types separated by commas.
- Active: checkbox to enable or disable a group
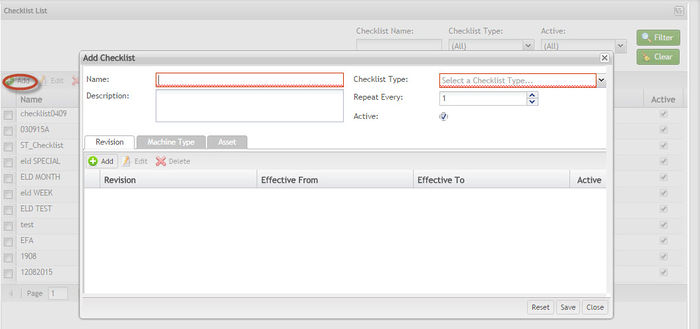
Figure 41: Add a Checklist
To add a check list
1. Select Add from the Check List sub-module menu. The Add Checklist popup appears.
2. Enter Checklist Name.
3. Enter a Description of the checklist in the box provided.
4. Select a Checklist Type from the drop-down list. NOTE: If the selected Checklist Type is Special, the Repeat Every field can only be set to 1. Users must go to Checklist Revision tab > Schedule Type to set the type for each checklist item to Daily, Weekly, Monthly, Yearly, Quarterly, Half Year, or None.
5. Enter days to repeat in the Repeat Every field.
6. Select Save to finish or select Close to abort.
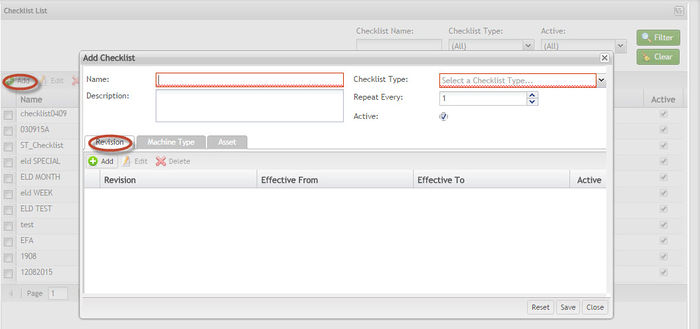
The user is able to assign Revisions, Machine Types and Assets during the Checklist creation through the available tabs (Revision, Machine Type and Asset) in the page.
Figure 42: Revision Tab
1. Under the Revision tab, the user can:
- To add a revision
- Select Add from the Checklist Revision tab. The Add Revision pop-up appears.
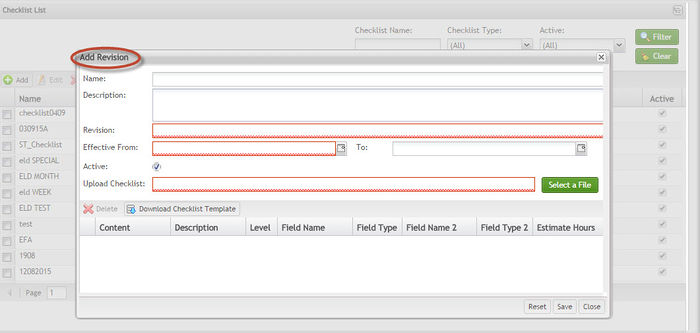
Figure 43: Add (Revision)
- Complete the empty fields (the Name and Description fields are automatically provided):
1. Revision
2. Effective From-To dates
3. Active
- If necessary, the checklist template may be downloaded as a CSV file and then filled out by selecting Download Checklist Template.
- Upload a checklist file by using the Select File function. Select the checklist to be uploaded from the local drive and click Open. Upload Checklist field permits the user to select a checklist template to upload. Users can obtain a template by selecting Download Checklist Template and downloading the CSV file to the local drive. NOTE: Please note that the template for the spreadsheet will vary somewhat depending on whether the checklist is a Special type. Special checklist templates contain an additional Schedule Type column, where the type of each items in the checklist can be set to Daily, Weekly, Monthly, Yearly, Quarterly, Half Year, or None.
- The uploaded checklist items should now appear in the list. NOTE: Select rows of the checklist can be deleted by selecting the row from the list and clicking Delete.
- Once the checklist has been uploaded as desired, click Save to complete or Close to abort.
- To edit a revision
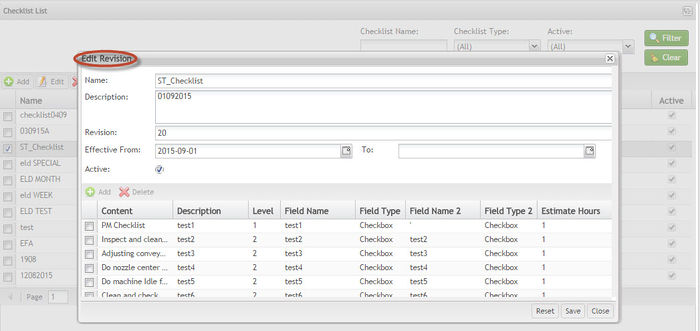
- Select Edit from the Checklist Revision tab. The Edit pop-up appears.
Figure 44: Edit (Revision)
- Edit all fields as needed (Name and Description fields cannot be modified):
- Revision: Denotes the version of the given checklist.
- Effective from: Denotes the start time and end time of the checklist revision.
- To delete, select a row from the list and click Delete.
- To enable or disable a revision
1. Select a revision under the Checklist Revision tab.
2. Select Enable/Disable. This will enable the revision if it was disabled, or disable the revision if it was enabled.
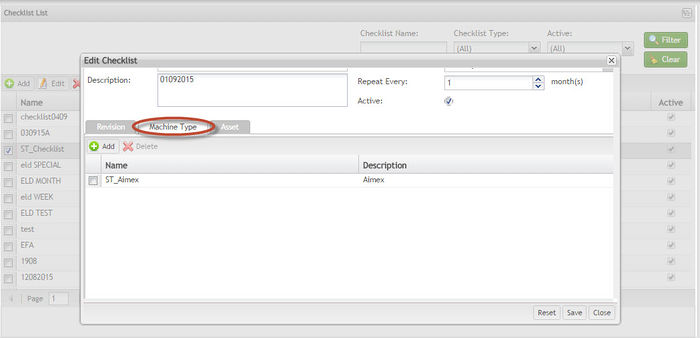
2. Under the Machine Type Tab the user can add or delete machine types:
Figure 45: Add/Edit (Machine Type)
- Adding machine types:
- From the Machine Type tab, select Add from the menu. The Add Machine Type pop up displays.
- Search or browse the list for machine types to add and select them.
- Select Add to add a machine type or select Close to abort.
- Deleting machine types:
- From the Machine Type tab select machine types to be deleted from the list.
- Select Delete from the menu provided. The machine type entry is deleted from the list.
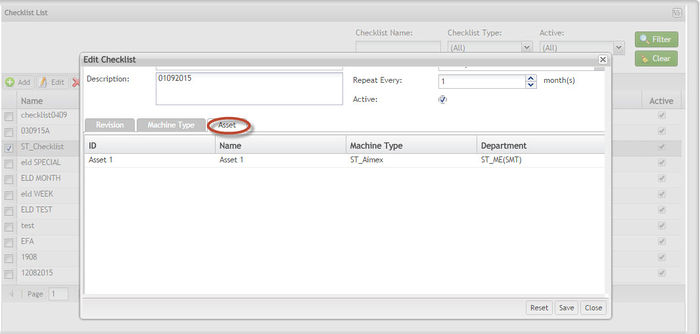
3. Under the Asset Tab the user may view the assets for the respective machine types that were added in the Machine Type tab.
Figure 46: View (Asset)
Download Checklist Template
For the Download Checklist Template, note the following fields that are provided in the spreadsheet:
- Content: The step name that describes the purpose of the step.
- Description: A more detailed explanation of what the operator needs to perform, such as the procedure and tools involved.
- Level: The level of the checklist item. While most will be designated the same level (e.g., 1) there may be more complex items that require designating sub-levels (e.g., 2 or 3).
- check_field_name: Designation for the check field name (e.g., Status, Good/Bad)
- check_field_type: Specifies the check field type (i.e., "CheckBox", "Number", or "Text"). For CheckBox, there is a box to be checked. For Number, the field will only take a numerical input. For Text, fields may be alphanumeric.
- check_field_name2: Optional field intended for special cases where a history record of the check field needs to be provided alongside the new value.
- check_field_type2: The check field type for the second check field name.
- estimate_hours: Optional field that allows for numerically defining the estimated hours for the task.
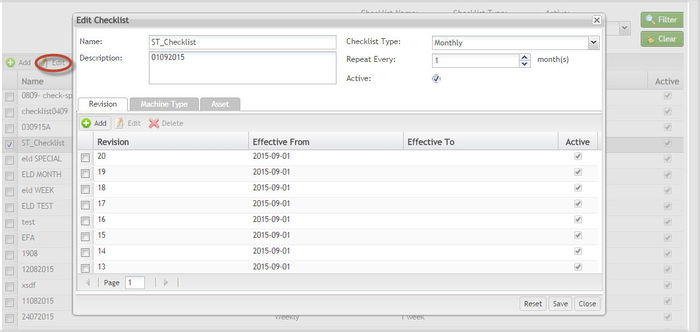
Editing a Check List
To edit a check list:
1. Select an item from the Check List sub-module page. The Edit option should become available in the menu.
2. Select Edit from the menu. The Edit Checklist page appears in which there are four tabs: Checklist Revision, Machine Type, and Asset.
3. For further information, see the Adding Machine time. The same rules are applicable.
Figure 47: Edit Checklist
Attention: It is not allowed to inactivate a checklist if it is being used by work order with status (ASSIGNED, WIP, WAITING FOR PARTS or WAITING FOR BUY OFF).
Deleting a Check List
To delete a Check List
1. Select a checklist from the Checklist list.
2. Click Delete.
3. A confirmation message is displayed. Click Yes to confirm or No to abort.
NOTE: The system verifies if machine type is being used in another table. If so, it is not allowed to delete.
Problem
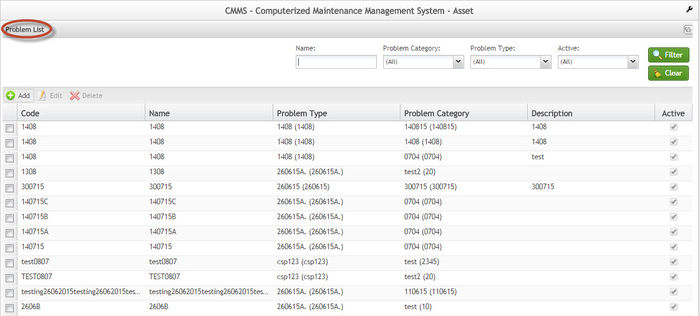
Under the Problem sub-module, users can search, add, edit and delete problem entries. Problems are defined as the parts that went wrong in some manner, which include software problems and hardware problems. Each problem has its own Problem Code, though they are not necessarily unique. While a problem can belong to multiple categories, it can belong to only one problem type. Examples of problem categories are Manufacture Problem, Quality Problem, or Energy Problem.
Figure 48: Problem Sub-Module Access
Figure 49: Problem List
Searching Problems
The Problem list can be searched by users. To search the problem list
1. Use the respective filters to limit the list to one or more entries:
- Enter a Problem Name into the respective field.
- Select a Problem Type from the respective drop-down list.
- Select a Problem Category from the respective drop-down list.
- Select Active or Inactive Problems.
2. Select the filter icon. Only entries matching the search criteria should be listed.
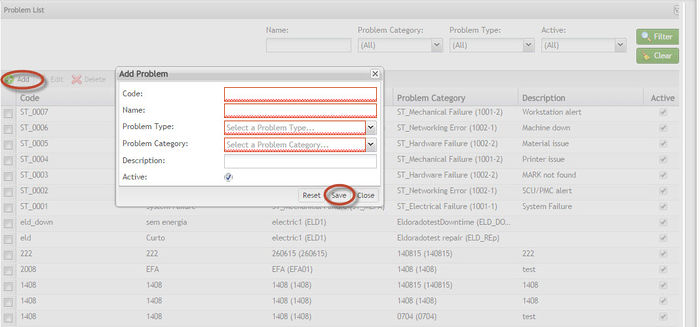
Adding Problem Entries
Under the Problem sub-module, users can add problem entries. To add new problem entries
1. Select Add from the Problem sob-module menu. The Add Problem page appears.
2. Complete the fields provided:
- Select a Problem Category from the respective drop-down list.
- Select a Problem Type from the respective drop-down list.
- Enter a Problem Code in the respective field.
- Enter a Problem Name in the respective field.
- Enter a Description in the box provided.
- In the Active checkbox select whether the problem will be active.
3. Select Save to finish or select Close to abort.
Figure 50: Add a Problem
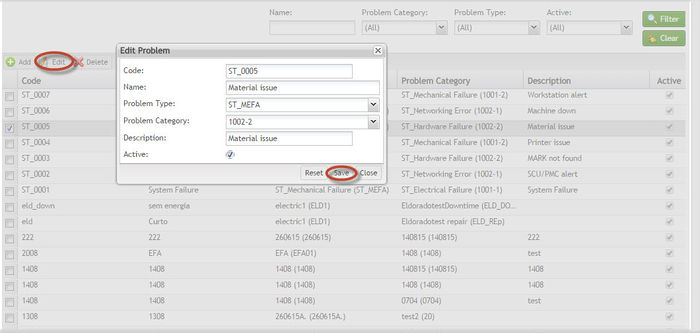
Editing Problem Entries
Entries in the Problem sub-module can be edited. To edit a problem
1. Select a problem from the list. The Edit function in the menu should become available.
2. Select Edit. The Edit Problem Type page appears.
3. Edit the Problem Category by selecting a different item from the respective drop-down list.
4. Edit the Problem Type by selecting a different item from the drop-down list.
5. Edit the Problem Code entry.
6. Edit the Problem Name entry.
7. Edit the Description.
8. Check or uncheck the Active box.
9. Select Save to finish; otherwise, select Close to abort.
Figure 51: Edit Problem Pop-Up
Attention: It is not allowed to inactivate a problem if it is being used by work order with status (ASSIGNED, WIP, WAITING FOR PARTS or WAITING FOR BUY OFF).
Deleting Problem Entries
To delete Problem Entries
1. Select a problem from the Problem list.
2. Click Delete.
3. A confirmation message is displayed. Click Yes to confirm or No to abort.
NOTE: The system verifies if the problem is being used in another table. If so, it is not allowed to delete.
Problem Type
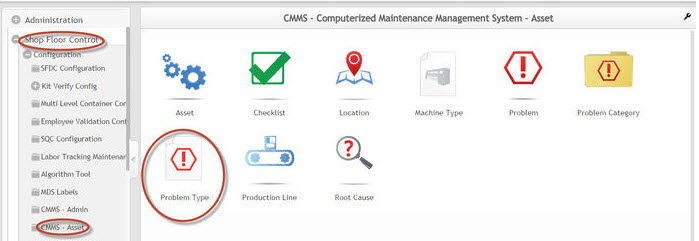
The Problem Type menu is available under Asset. From the Problem Type menu, users can Add, Edit, and Delete problem types.
Figure 52: Problem Type Sub-Module Access
Adding a Problem Type
To add a problem type
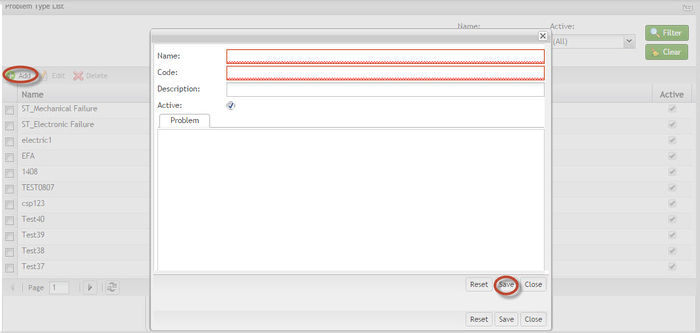
1. From the Problem Type page, select Add. The Add a New Problem Type pop-up appears.
2. Enter a Problem Type Code.
3. Enter aProblem Type Name.
4. Enter a Description in the box provided.
5. Check whether the problem type is Active or not.
6. Select Save to finish or Close to abort.
Figure 53: Add a New Problem Type Pop-Up
Editing a Problem Type
Problem type entries may be edited.
To edit a problem type
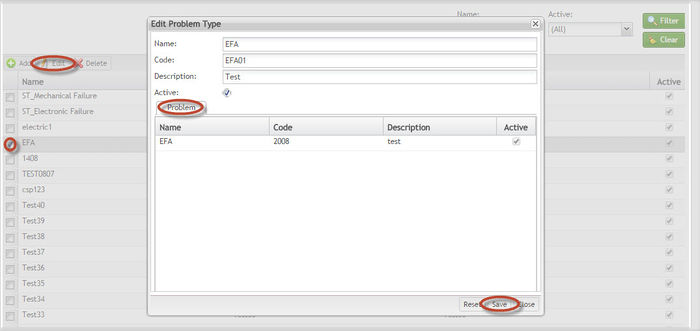
1. Select a problem type entry from the list. The Edit function should become available.
2. Select Edit. The Edit Problem Type pop-up appears, which includes two tabs: General and Problem.
3. In the General tab, the user may
- Edit the Problem Type Code.
- Edit the Problem Type Name.
- Edit the Description.
- Check or uncheck whether the problem type is Active.
4. Under the Problem tab the user can view the problems that have been assigned to the given problem type.
5. Select Save, otherwise, select Close to abort.
Figure 54: Edit Problem Type
Attention: It is not allowed to inactivate a problem type if it is being used by problem.
Deleting a Problem Type
To delete a Problem Type
1. Select a Problem Type from the list.
2. Click Delete.
3. A confirmation message is displayed. Click Yes to confirm or No to abort.
NOTE: The system verifies if the problem type is being used in another table. If so, it is not allowed to delete.
Problem Category
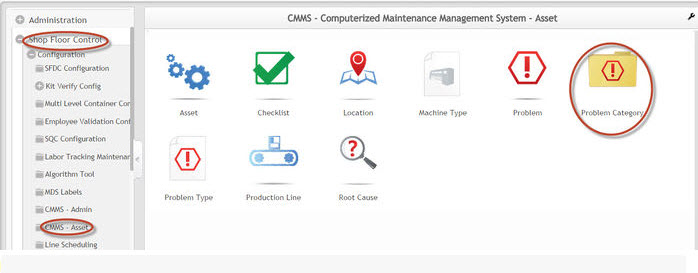
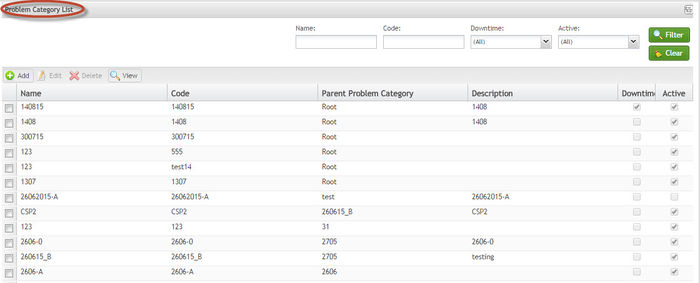
Under Problem Category, users can organize problems into a categorical hierarchy. From the Problem Category page, users may Add or Edit,View and Delete problem categories. Problem categories are divided by problem attribute. Problem categories include manufacture problems, production problems, process problems, quality problems, and energy problems.
Figure 55: Problem Category
Figure 56: Problem Category List
Adding a Problem Category
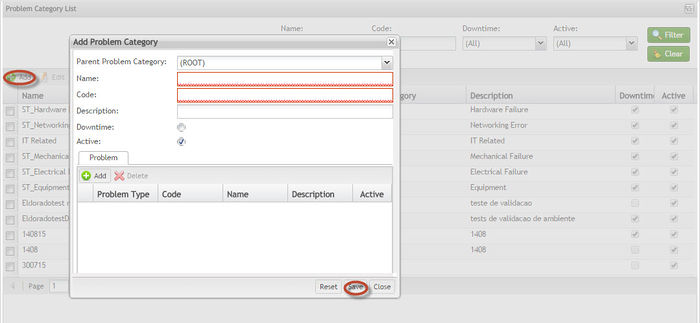
To add a problem category, enter the values for the fields:
1. Name: name given to the Problem Category;
2. Code: code given to the Problem Category;
3. Parent Problem Category: name of the problem category parent;
4. Description: additional details;
5. Downtime: information should me marked if this category belongs to downtime. If not, belongs to Repair;
6. Active: information should me marked if register is active.
Figure 57: Adding Problem Category
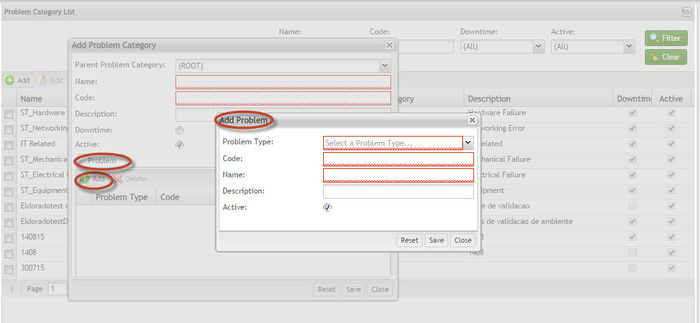
The user is able to assign Problems during the Problem Category creation through the available tab (Problem) in the page.
Figure 58: Adding Problem Category
1. Under the Problem tab the user can Add or Delete a problems for the given problem category.
- To add a problem
- Select Add from the Problem tab. The Add Problem pop-up appears.
- Select a Problem Type from the drop-down list.
- Enter a Problem Code. NOTE: Problem codes are not unique; therefore, each problem can potentially have multiple problem categories.
- Enter a Problem Name.
- Enter a Description in the box provided.
- Select whether the Problem is Active or not.
- Select Save to finish or Close to abort.
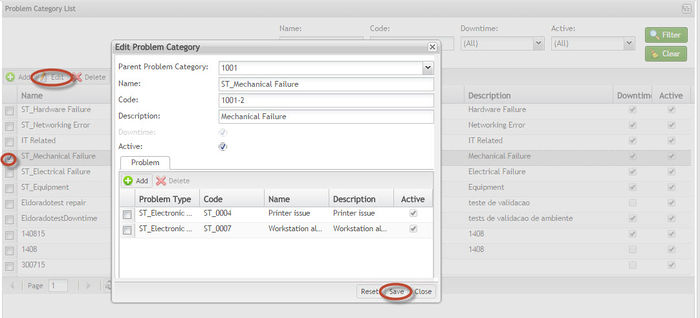
Editing a Problem Category
To edit a problem category
1. Select a problem category from the list and select Edit.
2. The Edit Problem Category page should appear included the tabs Problem.
3. Edit the necessary information and select Save to finish, otherwise, Close.
Figure 59: Edit a Problem Category
See Adding Problem Category for further information. The same rules are applicable for edit.
Attention: It is not allowed to inactivate if a problem category if it is being used by problem.
Deleting a Problem Category
To delete a Problem Category
1. Select a Problem Category from the list.
2. Click Delete.
3. A confirmation message is displayed. Click Yes to confirm or No to abort.
NOTE: The system verifies if the problem type is being used in another table. If so, it is not allowed to delete.
Document Revision History
| Date | Author | Title | Version | Change Reference |
| 09/08/2015 | Elaine Fonaro | Technical Writer | v 1.0 | This is the first revision of CMMS Asset for Cirrus |
| 10/21/2015 | Dane Parker | Technical Writer | V1.0 | Grammar Review |
| 03/23/2016 | Elaine Fonaro | Technical Writer | V1.0 | Attention Notes were included for the following topics:
|
| 04/20/2016 | Elaine Fonaro | Technical Writer | V1.0 | Added Attention Notes about the rule for Inactivate functionality. |

