Difference between revisions of "SOP-42Q-MES0049 SMT Part Traceability"
Dane parker (talk | contribs) (Created page with "=== Convert SMT Program to Picklist === '''Figure 1: Convert SMT Program to Picklist – Main Menu''' [[Image:Convert SMT Program to Picklist-Main Menu.jpg|500px|Convert SMT ...") |
Dane parker (talk | contribs) |
||
| Line 1: | Line 1: | ||
| − | + | == Convert SMT Program to Picklist == | |
'''Figure 1: Convert SMT Program to Picklist – Main Menu''' | '''Figure 1: Convert SMT Program to Picklist – Main Menu''' | ||
| Line 11: | Line 11: | ||
<br> | <br> | ||
| − | + | == Select SMT Program File == | |
'''Figure 2: SMT Program File Selection Window''' | '''Figure 2: SMT Program File Selection Window''' | ||
| Line 20: | Line 20: | ||
#Click “'''Select Picklist'''” button to locate the desired material placement file. | #Click “'''Select Picklist'''” button to locate the desired material placement file. | ||
| − | #Select the SMT program file name. Please refer to SMT job profile which prepared by SMT Engineer for the file name for each | + | #Select the SMT program file name. Please refer to SMT job profile which prepared by SMT Engineer for the file name for each |
SMT machine. | SMT machine. | ||
| + | |||
#Click “'''Open'''” button. Details of the picklist will be shown. | #Click “'''Open'''” button. Details of the picklist will be shown. | ||
| Line 35: | Line 36: | ||
<br> | <br> | ||
| − | + | == Material(s) Selection for Traceability in EZ-Picklist == | |
'''Figure 4:''' '''Material(s) Selection Option in EZ-Picklist''' | '''Figure 4:''' '''Material(s) Selection Option in EZ-Picklist''' | ||
| Line 45: | Line 46: | ||
*Select the 1st production side and/or 2nd production side (as per picklist setup for production environment): | *Select the 1st production side and/or 2nd production side (as per picklist setup for production environment): | ||
| − | :*In case the selected picklist is intended for a double-sided board which have one or multiple common materials in both sides, | + | :*In case the selected picklist is intended for a double-sided board which have one or multiple common materials in both sides, |
refer to green-framed items in below figure, there are 2 items of the same '''Part Number''' in the picklist, which means, this is a | refer to green-framed items in below figure, there are 2 items of the same '''Part Number''' in the picklist, which means, this is a | ||
| − | double-sided board, side 1 and side 2 have one common material. | + | double-sided board, side 1 and side 2 have one common material. |
| − | :*To make no confusion during the production for such boards, we need to configurate which item needs to be used in which | + | :*To make no confusion during the production for such boards, we need to configurate which item needs to be used in which |
side. As common material items share the same part number but match with different board numbers, we can simply | side. As common material items share the same part number but match with different board numbers, we can simply | ||
| − | match board numbers with sides to realize the configuration of items to sides.<br> | + | match board numbers with sides to realize the configuration of items to sides.<br> |
'''Figure 5: Double sided board with the same material handled in the same station''' | '''Figure 5: Double sided board with the same material handled in the same station''' | ||
| Line 67: | Line 68: | ||
[[Image:EZpicklist - Confirm board number on a side.png|500px|EZpicklist - Confirm board number on a side.png]] | [[Image:EZpicklist - Confirm board number on a side.png|500px|EZpicklist - Confirm board number on a side.png]] | ||
| − | :*This dialog box allows user to perform board-number-to-side mapping for common material(s). There will be 3 options | + | :*This dialog box allows user to perform board-number-to-side mapping for common material(s). There will be 3 options |
| − | available in the drop-down list, refer to below figure: | + | available in the drop-down list, refer to below figure: |
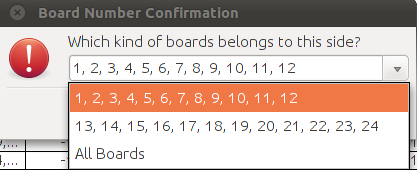
[[Image:EZpicklist - Confirm board number drop-down list.png]] | [[Image:EZpicklist - Confirm board number drop-down list.png]] | ||
| − | ::*Board Number Goup 1: Board numbers of one side, auto detected and grouped by system. For normal panel | + | ::*Board Number Goup 1: Board numbers of one side, auto detected and grouped by system. For normal panel |
| − | production(with all boards up or down), user can select this one.<br> | + | production(with all boards up or down), user can select this one.<br> |
| − | ::*Board Number Group 2: Board numbers of the other side, auto detected and grouped by sytem. For normal panel | + | ::*Board Number Group 2: Board numbers of the other side, auto detected and grouped by sytem. For normal panel |
| − | production(with all boards up or down), user can select this one.<br> | + | production(with all boards up or down), user can select this one.<br> |
| − | ::*'''All Boards''': With all board numbers included, that is to say, boar number group 1 plus board number group 2. | + | ::*'''All Boards''': With all board numbers included, that is to say, boar number group 1 plus board number group 2. |
This option is designated for mirror-board production, with some boards up and some boards down and all are populated at | This option is designated for mirror-board production, with some boards up and some boards down and all are populated at | ||
| − | the same time.<br> | + | the same time.<br> |
| − | :*Simply select an option as per actual production and click on '''OK''' to confirm. Take note that board numbers for the other side | + | :*Simply select an option as per actual production and click on '''OK''' to confirm. Take note that board numbers for the other side |
| − | will therefore be confirm and no further confirmation needed once one is done.<br> | + | will therefore be confirm and no further confirmation needed once one is done.<br> |
| − | :*In case the selected picklist is for single-sided board, no confirmation is needed and system will simply check materials for | + | :*In case the selected picklist is for single-sided board, no confirmation is needed and system will simply check materials for |
| − | the selected side as per default configuration. | + | the selected side as per default configuration. |
<br> | <br> | ||
| Line 105: | Line 106: | ||
#Click “'''Send'''” button to send the picklist to PTS server. | #Click “'''Send'''” button to send the picklist to PTS server. | ||
| − | <br> | + | <br> |
| − | + | == Confirm the Picklist Successfully Generated == | |
'''Figure 8: Successful Prompt upon Completed Picklist Conversion''' | '''Figure 8: Successful Prompt upon Completed Picklist Conversion''' | ||
| − | [[Image:Successful Prompt upon Completed Picklist Conversion.jpg|500px|Successful Prompt upon Completed Picklist | + | [[Image:Successful Prompt upon Completed Picklist Conversion.jpg|500px|Successful Prompt upon Completed Picklist Conversion.jpg]]<br> |
| − | |||
| − | Conversion.jpg]]<br> | ||
<br> | <br> | ||
| Line 122: | Line 121: | ||
<br> | <br> | ||
| − | + | == Generate Loading List == | |
'''Figure 9: Loading List Option in EZ-Picklist''' | '''Figure 9: Loading List Option in EZ-Picklist''' | ||
| Line 134: | Line 133: | ||
<u>'''Note:'''</u> <br> | <u>'''Note:'''</u> <br> | ||
| − | *Default path for Loading List report is customizable. Local plant can simply contact PTS team to do the | + | *Default path for Loading List report is customizable. Local plant can simply contact PTS team to do the |
customization. | customization. | ||
| − | |||
| − | default one, local plant can also contact PTS team to switch to '''Template 2'''. | + | *There are two available templates for Loading List report, refer to below '''Template 1''' and '''Template 2'''. '''Template 1''' is the |
| + | |||
| + | default one, local plant can also contact PTS team to switch to '''Template 2'''. | ||
'''Figure 10: Available Loading List templates<br>''' | '''Figure 10: Available Loading List templates<br>''' | ||
| − | {| cellpadding="2" style="border: 1px solid darkgray; width: 453px; height: 148px; | + | {| cellpadding="2" class="FCK__ShowTableBorders" style="border: 1px solid darkgray; width: 453px; height: 148px;" |
|- align="center" | |- align="center" | ||
! style="border: 1px solid rgb(119, 119, 119);" | | ! style="border: 1px solid rgb(119, 119, 119);" | | ||
Revision as of 15:04, 21 January 2014
Contents
Convert SMT Program to Picklist
Figure 1: Convert SMT Program to Picklist – Main Menu
- Select “EZPicklist” menu under “SMT Machine” main functional module.
Select SMT Program File
Figure 2: SMT Program File Selection Window
- Click “Select Picklist” button to locate the desired material placement file.
- Select the SMT program file name. Please refer to SMT job profile which prepared by SMT Engineer for the file name for each
SMT machine.
- Click “Open” button. Details of the picklist will be shown.
Figure 3: Full Picklist Details Window
All SSCI part number, station, feeder, count, and designator are encoded in SMT placement program which were prepared by
SMT Engineer.
Material(s) Selection for Traceability in EZ-Picklist
Figure 4: Material(s) Selection Option in EZ-Picklist
- Select the 1st production side and/or 2nd production side (as per picklist setup for production environment):
- In case the selected picklist is intended for a double-sided board which have one or multiple common materials in both sides,
refer to green-framed items in below figure, there are 2 items of the same Part Number in the picklist, which means, this is a
double-sided board, side 1 and side 2 have one common material.
- To make no confusion during the production for such boards, we need to configurate which item needs to be used in which
side. As common material items share the same part number but match with different board numbers, we can simply
match board numbers with sides to realize the configuration of items to sides.
Figure 5: Double sided board with the same material handled in the same station
- Click on 1st Side or 2nd side option in this instance, a dialog box like below will prompt:
Figure 6: Board number confirmation
- This dialog box allows user to perform board-number-to-side mapping for common material(s). There will be 3 options
available in the drop-down list, refer to below figure:
- Board Number Goup 1: Board numbers of one side, auto detected and grouped by system. For normal panel
production(with all boards up or down), user can select this one.
- Board Number Group 2: Board numbers of the other side, auto detected and grouped by sytem. For normal panel
production(with all boards up or down), user can select this one.
- All Boards: With all board numbers included, that is to say, boar number group 1 plus board number group 2.
This option is designated for mirror-board production, with some boards up and some boards down and all are populated at
the same time.
- Simply select an option as per actual production and click on OK to confirm. Take note that board numbers for the other side
will therefore be confirm and no further confirmation needed once one is done.
- In case the selected picklist is for single-sided board, no confirmation is needed and system will simply check materials for
the selected side as per default configuration.
- Select the High Value option, Lead Free option checkbox associated to each individual material part number if required.
Figure 7: Material(s) Sending Option in EZ-Picklist
- Click “Send” button to send the picklist to PTS server.
Confirm the Picklist Successfully Generated
Figure 8: Successful Prompt upon Completed Picklist Conversion
- After the picklist is submitted to server, message prompt “Complete” will display as shown in Figure 6.
- Click “Confirm” button to confirm it.
Generate Loading List
Figure 9: Loading List Option in EZ-Picklist
- Click “Loading List” button to send the picklist to default path: C:\pts\loadinglist\ (Windows); /temp/loadinglist (Linux) .
Note:
- Default path for Loading List report is customizable. Local plant can simply contact PTS team to do the
customization.
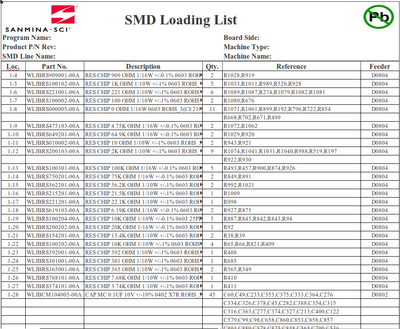
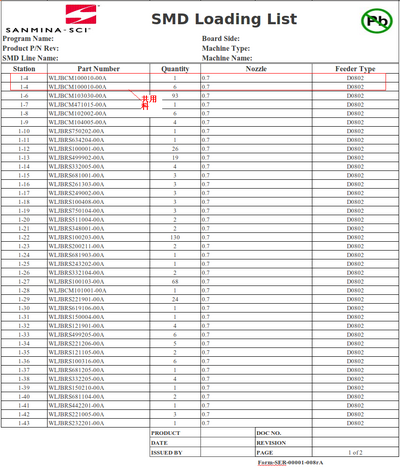
- There are two available templates for Loading List report, refer to below Template 1 and Template 2. Template 1 is the
default one, local plant can also contact PTS team to switch to Template 2.
Figure 10: Available Loading List templates
| Template 1(Default) | Template 2(Adding Nozzle Info) |
Please be noted that this Surface Mount Devices (SMD) Loading List cannot be used as a control document without stamp/sign
by authorized personnel defined by plant such as SMT production line supervisor/team leader. This is designed to be used for
materials loading reference only.
Figure 11: Confirm the Loading List Successfully Generated
- After the Loading list is generated successfully, message prompt “Complete” will display as shown in Figure 8.
- Click “Confirm” button to confirm.


