Difference between revisions of "42Q-MES0182-A Labor Maintenance"
| (8 intermediate revisions by the same user not shown) | |||
| Line 115: | Line 115: | ||
# | # | ||
| − | |||
| + | === <span class="mw-headline" id="_Add"> Add</span> === | ||
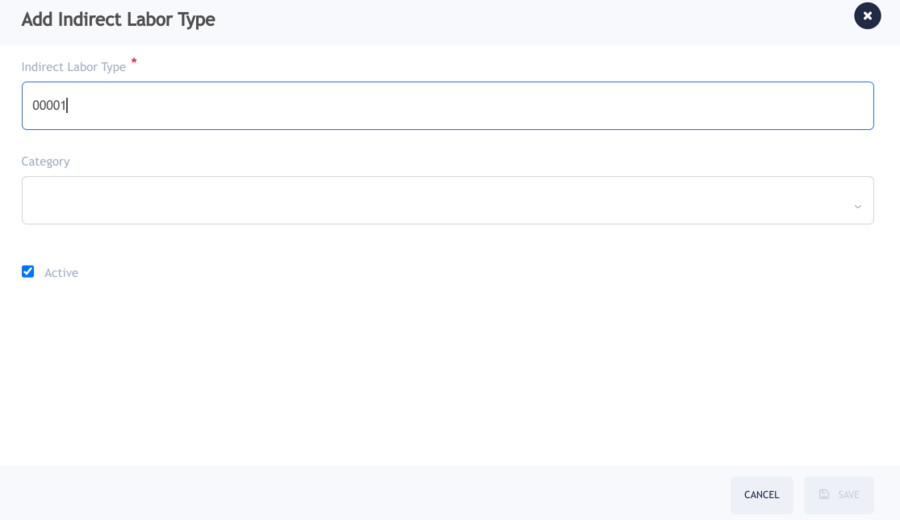
| − | + | To Add a new indirect labor type select the [[File:LM Add icon.png]] button where users can add the type and category. | |
| + | |||
| + | '''Save '''or'''cancel '''to continue. | ||
| + | |||
| + | | ||
| − | |||
| − | |||
'''Figure 8: Add a new Indirect Type ''' | '''Figure 8: Add a new Indirect Type ''' | ||
| − | + | '''[[File:LM AddnewIndirectType.png|900px]]''' | |
| | ||
| − | |||
| − | + | === <span class="mw-headline" id="Edit">Edit </span> === | |
| − | === | ||
| + | The pencil icon ( to edit) can be located on the top of the screen or once the labor has selected the menu on the right will show the viable options such as '''Edit, Activate, Deactivate, '''and'''Delete.'''<br/> | ||
| − | |||
| − | |||
'''Figure 9: Edit Indirect Type Labor ''' | '''Figure 9: Edit Indirect Type Labor ''' | ||
| + | |||
| + | [[File:LM EditIndirectTypeLabor.png|900px]] | ||
| | ||
'''Figure 10: Edit Indirect Labor Type''' | '''Figure 10: Edit Indirect Labor Type''' | ||
| + | |||
| + | [[File:LM EditIndirectLaborType.png|900px]] | ||
| + | |||
| + | |||
| + | === <span class="mw-headline" id="Activate_and_Deactivate">Activate and Deactivate </span> === | ||
| + | |||
| + | The status of the indirect labor is shown in <span style="color:#27ae60;">green</span> as '''Active''' and <span style="color:#c0392b;">red</span> and '''Inactive''', the user is able to manage whether they want certain labor s active or not by selecting the[[File:LM Icons.png]] icons. | ||
| | ||
| − | | + | '''Figure 11: Activate and Deactivate Indirect Type Labors ''' |
| + | |||
| + | '''[[File:LM ActivateandDeactivateIndirectTypeLabors.png|900px]]''' | ||
| + | |||
| + | Users can also '''Delete''' a Labor by using the (trash can) icon. | ||
| + | |||
| − | + | == <span class="mw-headline" id="Add_Labor">Add Labor</span> == | |
| − | === | ||
| − | | + | The [[File:LM AL icon.png]] button allows users to add direct and indirect labor. Once the user selects this option a new screen will show the following fields: '''User ID, User, Start Date, End Date, Absolute Time''' '''(minutes), Labor Type, Process, '''and'''Location.''' |
| − | |||
| − | |||
| − | ''' | ||
| − | | + | <br/> '''Figure 12: Add Labor ''' |
| − | ''' | + | '''[[File:LM AddLabor .png|900px]]''' |
| − | |||
| − | |||
| − | |||
| − | + | Once the '''User ID''' is typed in, the user field will be automatically filled with the User name and vice versa, this tool also allows the users to search for the user name and crews. | |
| − | ''' | ||
| − | |||
| − | |||
| | ||
| − | |||
| − | |||
'''Figure 13: User ID and User name ''' | '''Figure 13: User ID and User name ''' | ||
| + | |||
| + | '''[[File:LM UserIDandUsername.png|900px]]''' | ||
| + | |||
| + | '''<u>Note:</u>''' Start time and End time are not greater than the current time (configured plant timezone). | ||
| + | |||
| + | All <span style="color:#c0392b;">*</span> marked are mandatory fields. Based on the Client, the Location will be filtered. For the Process, it only uses the client to know which database it should connect to. '''Save '''or'''Cancel '''to continue. | ||
| | ||
| − | |||
| − | |||
| − | |||
| − | |||
| − | |||
| + | == <span class="mw-headline" id="Edit_.2F_Delete_Labor"><span class="mw-headline" id="Edit_.2F_Delete_Labor">Edit / Delete Labor </span></span> == | ||
| + | |||
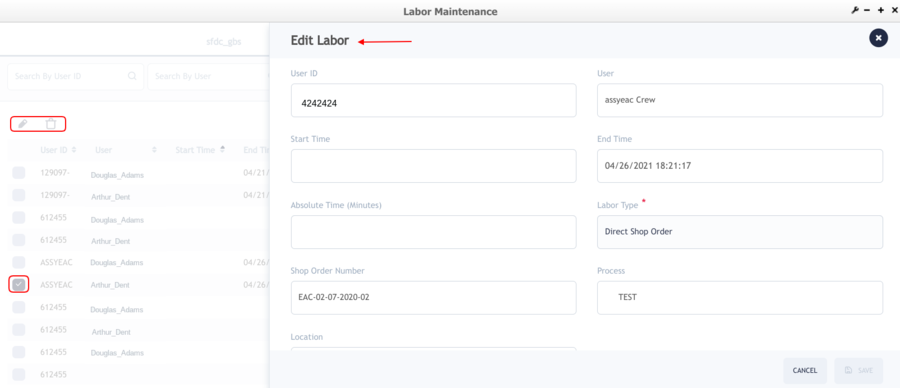
| + | To edit a Labor, the user can select the [[File:LM edit icon.png|LM edit icon.png]] icon on top of the labor list. | ||
| + | |||
| + | Once the user selects the icon a new window will show the available options to edit: '''Start Time, End Time Absolute Time (minutes), Shop Order Number, '''and '''Serial Number. '''<br/> | ||
| − | |||
| − | |||
| − | |||
| − | |||
'''Figure 14: Edit Labor''' | '''Figure 14: Edit Labor''' | ||
| + | |||
| + | [[File:LM EditLabor.png|900px|LM EditLabor.png]] | ||
| + | |||
| + | | ||
| | ||
| | ||
| + | |||
| + | If the users add the '''Start Time '''and the '''Absolute Time (Minutes) '''the '''End Time''' will be automatically calculated on the screen. | ||
| + | |||
| + | '''Save''' or '''Cancel''' to continue.<br/> | ||
| + | |||
| + | '''<u>Note:</u> '''Users are not able to add a new direct unit (serial) only editing the existing record. | ||
| | ||
| − | + | == <span class="mw-headline" id="Add_Indirect_Labor">Add Indirect Labor</span> == | |
| − | ''' | + | When selecting a'''Labor Type (as Indirect) '''another field will be shown below to allow the user to '''ADD''' a new value or choose from a drop-down list of the available Indirect Labor types.<br/> |
| − | |||
| − | ''' | ||
| − | | ||
| − | |||
| − | |||
| − | |||
| − | |||
| − | |||
'''Figure 15: Selecting a Labor Type''' | '''Figure 15: Selecting a Labor Type''' | ||
| + | |||
| + | '''[[File:LM SelectingaLaborType.png|900px]]''' | ||
| | ||
'''Figure 16: ADD an Indirect Labor''' | '''Figure 16: ADD an Indirect Labor''' | ||
| + | |||
| + | [[File:LM ADDIndirectLabor.png|900px]] | ||
| | ||
| | ||
| + | |||
| + | === <span class="mw-headline" id="View_columns">View columns </span> === | ||
| + | |||
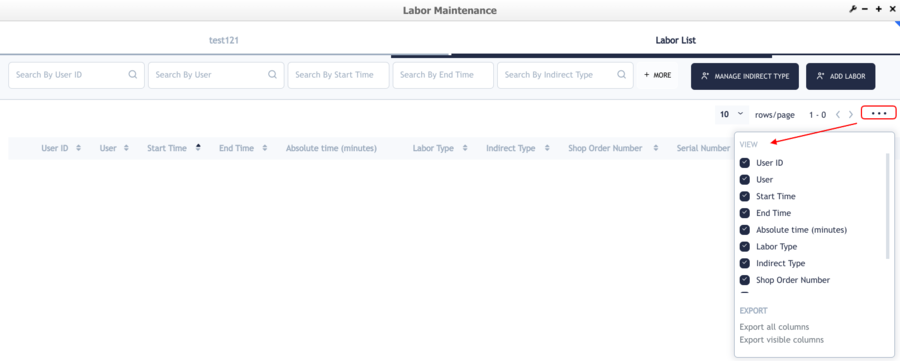
| + | The three dots on the right side of the screen will allow the user to view options based on the filter configuration. | ||
| | ||
| − | + | '''Figure 17: View Columns ''' | |
| − | + | ||
| + | [[File:LM ViewColums.png|900px]] | ||
| + | |||
| + | | ||
| − | | + | |
| − | |||
| − | |||
| − | |||
| | ||
| − | |||
| − | |||
| − | + | ==== <span class="mw-headline" id="Export"><span class="mw-headline" id="Export">Export</span></span> ==== | |
| − | + | ||
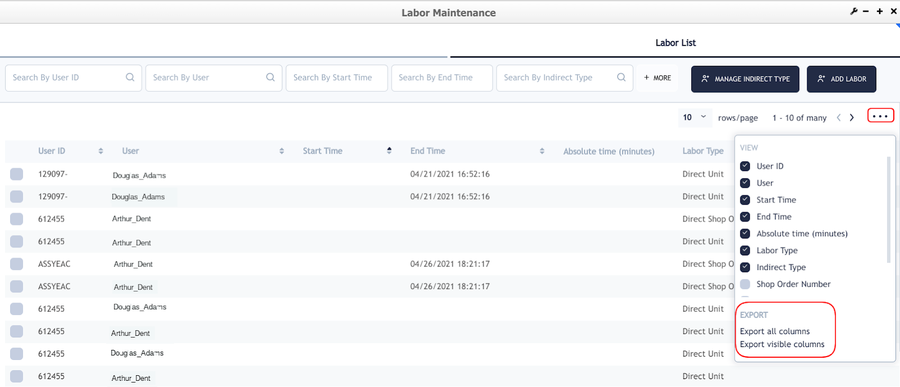
| + | Based on profile permission, the '''Export''' button is enabled/disabled. The same applies to other buttons in the list;'''Add Labor, Manage Indirect Type''', etc. | ||
''' ''' | ''' ''' | ||
| − | '''Figure 18:''' | + | '''Figure 18: Export''' |
| + | |||
| + | '''[[File:LM Export.png|900px|LM Export.png]]''' | ||
| + | |||
| + | | ||
| + | |||
| + | '''<u>Note:</u> '''Based on profile permission, the Export button is enabled/disabled. The same applies to other buttons like Add Labor, Manage Indirect Type, etc. | ||
| + | |||
| + | | ||
| + | |||
| + | ---- | ||
| + | |||
| + | | ||
Latest revision as of 21:16, 14 February 2023
42Q Home > Shop Floor Control > Configuration > Labor Maintenance
Contents
Introduction
Labor Maintenance is an Administrative driven portlet, which allows to change and modify the time registered by the operators tracked in Production Workbench and OEE Workbench.
Prerequisites
In order to use this portlet, a shop order has to be scanned in Production Workbench or OEE Workbench so that it can be reflected in Labor Maintenance. After the shop order is scanned it will be shown on the main page of this portal for the user to select.
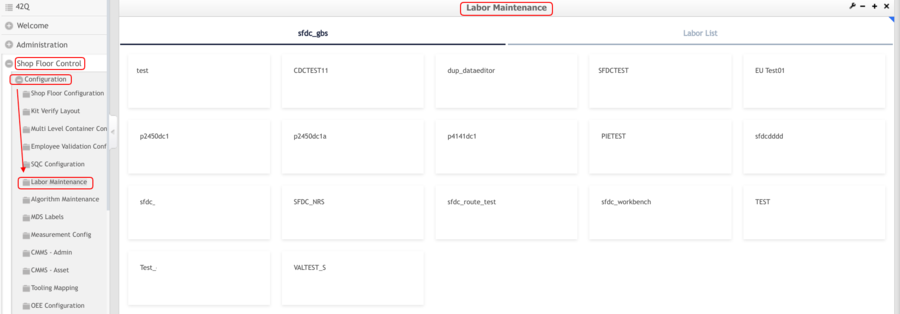
To access Labor Tracking Maintenance go to: Shop Floor Control > Configuration > Labor Maintenance
Figure 1: Labor Maintenance
Users can select the client they want to work on from the list on the main page, as the figure above shows.
Labor Maintenance
Users with appropriate privileges can select the Labor Maintenance portlet to manage employees' registered time, and add and update labor.
Labor Maintenance allows administrators to maintain the direct labor tracked by a regular or a crew user associated with a shop order.
Filter
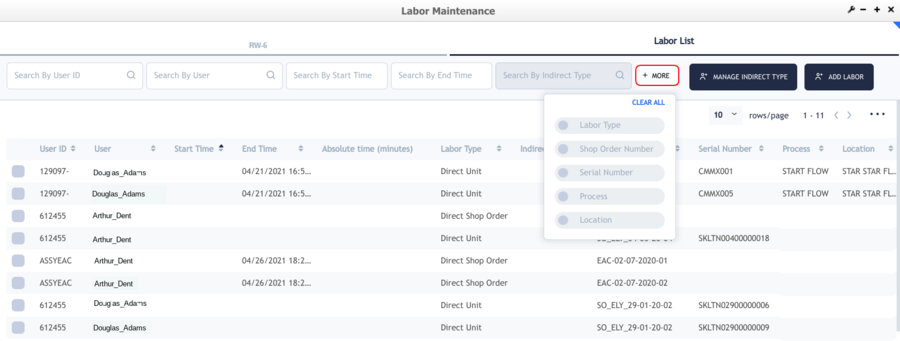
After selecting the client, users will be able to see a default set of filters, such as: User ID, User, Start Date, End Date, and Indirect Type.
Note: The time zone for the Start Date and End Date is taken from the previous configurations made in Plant Maintenance.
Figure 2: Filter
Also, using the ![]() button more options can be added, such asLabor Type, Shop Order Number, Serial Number, Process, andLocation to make the search more specific.
button more options can be added, such asLabor Type, Shop Order Number, Serial Number, Process, andLocation to make the search more specific.
Figure 3: +More
Labor Type
By adding the Labot Type search option from the+More button, users will be able to filter by Shop Order Number, Serial Number, Process, andLocation.
Figure 4: Labor Type
Users can select one or multiple options and they will appear on the screen menu.
Figure 5: Labor Types
Manage indirect Type
The ![]() button allows users to view the Indirect Type Labors by Type, Category, andStatus (Active or Inactive).
button allows users to view the Indirect Type Labors by Type, Category, andStatus (Active or Inactive).
Figure 6: Filter Indirect Type
Also allows users to Add, Edit, Activate, or Deactivate Indirect Labors.
Figure 7: Indirect Type List
Add
To Add a new indirect labor type select the ![]() button where users can add the type and category.
button where users can add the type and category.
Save orcancel to continue.
Figure 8: Add a new Indirect Type
Edit
The pencil icon ( to edit) can be located on the top of the screen or once the labor has selected the menu on the right will show the viable options such as Edit, Activate, Deactivate, andDelete.
Figure 9: Edit Indirect Type Labor
Figure 10: Edit Indirect Labor Type
Activate and Deactivate
The status of the indirect labor is shown in green as Active and red and Inactive, the user is able to manage whether they want certain labor s active or not by selecting the![]() icons.
icons.
Figure 11: Activate and Deactivate Indirect Type Labors
Users can also Delete a Labor by using the (trash can) icon.
Add Labor
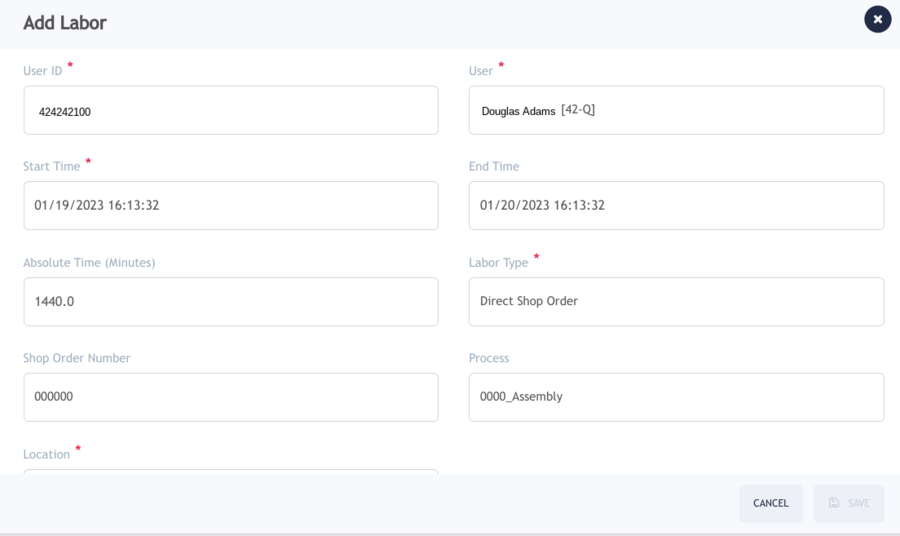
The ![]() button allows users to add direct and indirect labor. Once the user selects this option a new screen will show the following fields: User ID, User, Start Date, End Date, Absolute Time (minutes), Labor Type, Process, andLocation.
button allows users to add direct and indirect labor. Once the user selects this option a new screen will show the following fields: User ID, User, Start Date, End Date, Absolute Time (minutes), Labor Type, Process, andLocation.
Figure 12: Add Labor
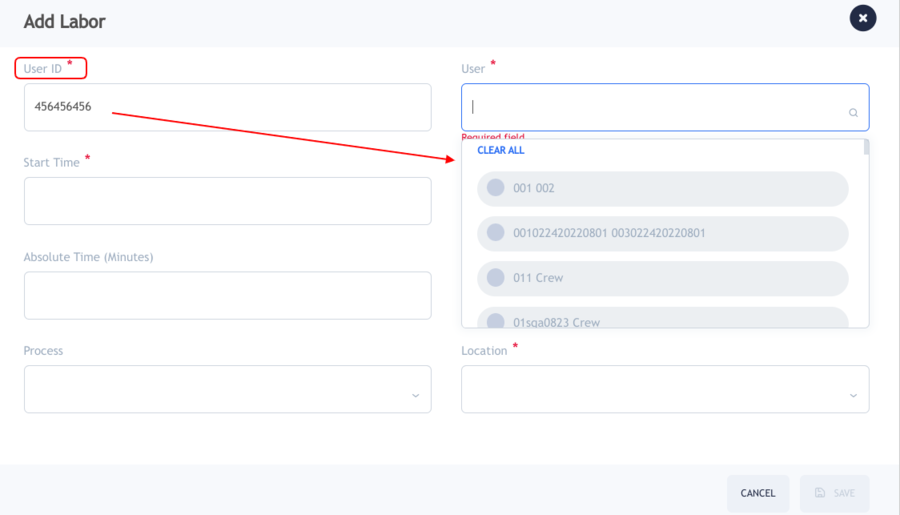
Once the User ID is typed in, the user field will be automatically filled with the User name and vice versa, this tool also allows the users to search for the user name and crews.
Figure 13: User ID and User name
Note: Start time and End time are not greater than the current time (configured plant timezone).
All * marked are mandatory fields. Based on the Client, the Location will be filtered. For the Process, it only uses the client to know which database it should connect to. Save orCancel to continue.
Edit / Delete Labor
To edit a Labor, the user can select the ![]() icon on top of the labor list.
icon on top of the labor list.
Once the user selects the icon a new window will show the available options to edit: Start Time, End Time Absolute Time (minutes), Shop Order Number, and Serial Number.
Figure 14: Edit Labor
If the users add the Start Time and the Absolute Time (Minutes) the End Time will be automatically calculated on the screen.
Save or Cancel to continue.
Note: Users are not able to add a new direct unit (serial) only editing the existing record.
Add Indirect Labor
When selecting aLabor Type (as Indirect) another field will be shown below to allow the user to ADD a new value or choose from a drop-down list of the available Indirect Labor types.
Figure 15: Selecting a Labor Type
Figure 16: ADD an Indirect Labor
View columns
The three dots on the right side of the screen will allow the user to view options based on the filter configuration.
Figure 17: View Columns
Export
Based on profile permission, the Export button is enabled/disabled. The same applies to other buttons in the list;Add Labor, Manage Indirect Type, etc.
Figure 18: Export
Note: Based on profile permission, the Export button is enabled/disabled. The same applies to other buttons like Add Labor, Manage Indirect Type, etc.
