Difference between revisions of "42Q-MES0178-A Measurement Instance Admin"
| (31 intermediate revisions by the same user not shown) | |||
| Line 1: | Line 1: | ||
| − | <small>[[42Q_Cloud-Based_MES/MOMS|42Q Home]] > [[Administration|Administration]] > | + | |
| − | <p style="text-align: center;">''' '''</p> <center>'''Administration'''</center> <center>''' | + | <small>[[42Q_Cloud-Based_MES/MOMS|42Q Home]] > [[Administration|Administration]] > Measurement Instance Admin</small> |
| + | <p style="text-align: center;">''' '''</p> <center><center>'''Administration'''</center> <center>'''Measurement Instance Admin'''</center> <center>'''Version MES 15.82'''</center> <center><br/> <br/> </center> </center> | ||
| + | | ||
| + | |||
| + | | ||
| + | |||
| + | |||
| + | = <span class="mw-headline" id=".E2.80.8BIntroduction"><span class="mw-headline" id=".E2.80.8BIntroduction">''''''Introduction</span></span> = | ||
| + | |||
| + | Test Integration (Measurement) application is a flexible, extensible, high-performance software solution designed to be an integration platform between test equipment (AOI, AXI, 5DX, FP, ICT, FCT, System Test, Burn-In, etc.) and MES. | ||
| + | |||
| + | Measurement provides a common gateway for automating simple and complex task chains. It also provides a centralized repository for test parametric data collection and reporting. | ||
| + | |||
| + | Measurement allows engineering to design and build powerful, quick, and error-free mechanisms that automatically perform checks against data available in current or previous test outputs in any MES application. | ||
| + | |||
| + | The basic off-the-shelf solution provides AutoLog mechanisms (to PASS/FAIL UUT - Unit Under Test), test step mapping to symptom codes (allowing Pareto of symptoms, grouping similar faults, etc., as well as link key process indicators to SPC monitored attributes (allowing for a broad range of statistical process control techniques to be used to take actions based on deviations, control charts, CPK analysis, etc.) and test parametric data collection reported DHR (Device History Report). This feature also provides tabular "measures vs. specs" reports that can be imported into Minitab for histogram, dispersion, control charts, and normal distribution-curve creation thereby giving engineering statistical reporting over volumetric test data. | ||
| + | |||
| + | | ||
| + | |||
| + | = <span class="mw-headline" id="Measurement_Instance_Admin"><span class="mw-headline" id="Measurement_Instance_Admin">Measurement Instance Admin</span></span> = | ||
| + | |||
| + | Measurement Instance Admin can be accessed from the 42Q page. | ||
| + | |||
| + | To access, go to '''Administration> Meas Instance Admin''' | ||
| + | |||
| + | Once accessing this portlet, the screen will show the menu with three options: '''Instances''', '''Users''', and '''Packages'''. | ||
| + | |||
| + | <br/> '''Figure 1: Main screen ''' | ||
| + | |||
| + | [[File:MeasAdmin MainPage.png|900px|MeasAdmin MainPage.png]] | ||
| + | |||
| + | == <span class="mw-headline" id=".E2.80.8BInstances_https:.2F.2Flh7-rt.googleusercontent.com.2Fdocsz.2FAD_4nXfaUPc6P6TRok5sVJahnd_62esI7bjNYct5UTlg-6GnJ-0l7z3eZxb_aJ69XYX3cShJjjfUwXhvebnD6HgFs2gChgm4LZPozdlU7Ufv9mjhmNlW_SkebESsiSSAde40SiYh6PkTN1d-pYLwFWnVqUpaFxbk.3Fkey.3DD9E2ks4jeBdXxIpKgVU-Dg">Instances [[File:MeasAdmin Logo1.png]]</span> == | ||
| + | |||
| + | An instance is used to handle a group of jobs (Parsers) that are responsible for: | ||
| + | |||
| + | * | ||
| + | Importing test results from many channel types | ||
| + | |||
| + | * | ||
| + | Processing test results | ||
| + | |||
| + | *Communicating to SFDC | ||
| + | |||
| + | <u>'''Note:'''</u> Only Global Administrator users can manage instances (Projects). | ||
| + | |||
| + | | ||
| + | |||
| + | As a Measurement installation, an instance is composed of a Measurement Engine Service, a Measurement Database, and Parsers. An instance may have multiple Projects running in the same server reaching different Measurement databases as well as different MESR databases. | ||
| + | |||
| + | To access the Instance module, go to the Measurement administration page at the top menu and click the Instances tile. | ||
| + | |||
| + | | ||
| + | |||
| + | === <span class="mw-headline" id=".E2.80.8BSearch_2"><span class="mw-headline" id=".E2.80.8BSearch"><span class="mw-headline" id=".E2.80.8BSearch"><span class="mw-headline" id=".E2.80.8BSearch"><span class="mw-headline" id=".E2.80.8BSearch"><span class="mw-headline" id=".E2.80.8BSearch"><span class="mw-headline" id=".E2.80.8BSearch"><span class="mw-headline" id=".E2.80.8BSearch"><span class="mw-headline" id=".E2.80.8BSearch"><span class="mw-headline" id=".E2.80.8BSearch">Search</span></span></span></span></span></span></span></span></span></span> === | ||
| + | |||
| + | The Instance module also offers the ability to filter instance items. To search for an instance, click the '''Expand''' button [[File:MIA mini icon.png|MIA mini icon.png]] on the left of the Search Panel at the top of the instance’s list. Fill in the appropriate filter fields, and click on the '''Search''' button. | ||
| + | |||
| + | Measurement provides filtering instances by '''Alias''' and '''Server''' '''Name'''. | ||
| + | |||
| + | '''Figure 2: Search''' | ||
| + | |||
| + | '''[[File:MIA Search.png|900px|MIA Search.png]]''' | ||
| + | |||
| + | | ||
| + | |||
| + | To unfilter the instance list, clear the text from the alias and server name fields and click the Search button again. | ||
| + | |||
| + | | ||
| + | |||
| + | === <span class="mw-headline" id="Instances_List"><span class="mw-headline" id="Instances_List"><span class="mw-headline" id="Instances_List"><span class="mw-headline" id="Instances_List"><span class="mw-headline" id="Instances_List"><span class="mw-headline" id="Instances_List"><span class="mw-headline" id="Instances_List">Instances List</span></span></span></span></span></span></span> === | ||
| + | |||
| + | Upon accessing the Instance module, Measurement loads and displays all instances. To see instance information, expand the instance item by clicking the Expand button [[File:MIA mini icon.png|MIA mini icon.png]] on the left of the instance name. | ||
| + | |||
| + | | ||
| + | |||
| + | '''Figure 3: Instances List''' | ||
| + | |||
| + | '''[[File:MIA InstancesList.png|x345px|MIA InstancesList.png]]''' | ||
| + | |||
| + | | ||
| + | |||
| + | | ||
| + | |||
| + | === <span class="mw-headline" id=".E2.80.8BCreate_a_new_instance"><span class="mw-headline" id=".E2.80.8BCreate_a_new_instance"><span class="mw-headline" id=".E2.80.8BCreate_a_new_instance"><span class="mw-headline" id=".E2.80.8BCreate_a_new_instance"><span class="mw-headline" id=".E2.80.8BCreate_a_new_instance"><span class="mw-headline" id=".E2.80.8BCreate_a_new_instance"><span class="mw-headline" id=".E2.80.8BCreate_a_new_instance">Create a new instance</span></span></span></span></span></span></span> === | ||
| + | |||
| + | To install a new instance on a site, go to the Instances module and click the New button [[File:MIA mini icon1.png|MIA mini icon1.png]] at the top right. | ||
| + | |||
| + | | ||
| + | |||
| + | '''Figure 4: Create Instances ''' | ||
| + | |||
| + | '''[[File:MIA CreateInstances.png|900px|MIA CreateInstances.png]]''' | ||
| + | |||
| + | | ||
| + | |||
| + | Once the button is used, a new screen will pop up, showing the different fields: | ||
| + | |||
| + | *'''Alias:''' An organizational name was given to an instance to identify it on the tool. | ||
| + | *'''Server Name:''' Server name configured on the OS from the Measurement server that is configured with the given instance. | ||
| + | *'''Remote Desktop User: '''The username on the server used to remotely connect to the desktop. This is used if necessary to access for the purpose of troubleshooting. | ||
| + | *'''Remote Desktop Password: '''User password to remote connect on the desktop. This is used if necessary to access for the purpose of troubleshooting. | ||
| + | *'''Connection String: '''Measurement database connection string used to run Measurement configuration modules. | ||
| + | *'''Token: '''Automatically generated unique identifier. | ||
| + | *'''URL: '''URL of the instance. | ||
| + | *'''Version: '''Core version. | ||
| + | *'''Site name: '''Desired name for the Site. | ||
| + | |||
| + | <br/> '''Figure 5: Create an Instance ''' | ||
| + | |||
| + | [[File:MIA CreateanInstance.png|900px|MIA CreateanInstance.png]] | ||
| + | |||
| | ||
| − | + | '''<u>Note:</u>'''At a minimum, the mandatory fields [[File:MIA mini icon2.png|MIA mini icon2.png]] must be completed. | |
| − | + | ||
| + | Click the '''Save''' button when done to save changes, or click the '''Close''' button to abandon changes. | ||
| + | |||
| + | Upon clicking the Save button, Measurement will display the new instance on the list. | ||
| − | |||
| − | |||
| | ||
| − | |||
| − | |||
| − | + | === <span class="mw-headline" id=".E2.80.8BEdit_an_instance"><span class="mw-headline" id=".E2.80.8BEdit_an_instance"><span class="mw-headline" id=".E2.80.8BEdit_an_instance"><span class="mw-headline" id=".E2.80.8BEdit_an_instance"><span class="mw-headline" id=".E2.80.8BEdit_an_instance">Edit an instance</span></span></span></span></span> === | |
| + | |||
| + | To change an instance value click the Edit button [[File:MIA mini icon3.png|MIA mini icon3.png]] at the right side of the instance item. | ||
| | ||
| − | + | '''Figure 6: Edit an Instance''' | |
| − | Measurement Instance | + | [[File:MIA EditanInstance.png|900px|MIA EditanInstance.png]] |
| + | |||
| + | | ||
| + | |||
| + | '''The Update Instance screen with allowable fields to modify.'''<br/> | ||
| + | |||
| + | '''Figure 7: Update Instance''' | ||
| + | |||
| + | '''[[File:MIA UpdateInstance.png|900px|MIA UpdateInstance.png]]''' | ||
| + | |||
| + | | ||
| + | |||
| + | Click the Update button when done to save changes, or click the Close button to abandon changes. | ||
| + | |||
| + | Upon clicking the Update button, Measurement validates the changed values, stores the data (if valid), and refreshes the instances list after closing the Update Instances screen. | ||
| + | |||
| + | | ||
| + | |||
| + | === <span class="mw-headline" id="Remove_an_instance"><span class="mw-headline" id="Remove_an_instance"><span class="mw-headline" id="Remove_an_instance"><span class="mw-headline" id="Remove_an_instance"><span class="mw-headline" id="Remove_an_instance">Remove an instance</span></span></span></span></span> === | ||
| + | |||
| + | This feature is used when a Measurement installation is no longer necessary in a plant or is merged between installations. | ||
| + | |||
| + | An instance removal does not erase any test result data from the Measurement database. Removing an instance only removes the web access to this database. If it is necessary to erase measurement or parametric data, the user is advised to contact the Measurement support team. | ||
| + | |||
| + | To remove an instance from the list, click on the Delete button [[File:MIA mini icon4.png|MIA mini icon4.png]] at the right side of the instance item. | ||
| + | |||
| + | | ||
| + | |||
| + | '''Figure 8: Remove an Instance''' | ||
| + | |||
| + | '''[[File:MIA RemoveanInstance.png|900px|MIA RemoveanInstance.png]]''' | ||
| + | |||
| + | A confirmation box is displayed. If the operation is confirmed, then the Instance is removed from the list and from the Measurement database. List items are refreshed without the removed Instance. | ||
| + | |||
| + | | ||
| + | |||
| + | |||
| + | = <span class="mw-headline" id="Users"><span class="mw-headline" id="Users"><span class="mw-headline" id="Users"><span class="mw-headline" id="Users"><span class="mw-headline" id="Users"><span class="mw-headline">Users [[File:MeasAdmin Logo2.png]]</span></span></span></span></span></span> = | ||
| + | |||
| + | To access the '''User Management '''module, select the Users icon from the '''Measurement''' '''Administration''' screen. | ||
| + | |||
| + | The following roles are available via the access control module within Measurement: | ||
| + | |||
| + | *'''Instance Administrator: '''A user with the ability to manage instance-related configuration, such as Shop Floor Configuration and Instance Configuration Groups. | ||
| + | *'''User:''' A user with the ability to manage all configurations containing inaccessible instances. | ||
| + | *'''Operator: '''A user with the ability to use checklist and activity monitor modules inaccessible instances. | ||
| + | |||
| + | | ||
| + | |||
| + | == <span class="mw-headline" id=".E2.80.8B.E2.80.8BSearch_for_a_user"><span class="mw-headline" id=".E2.80.8B.E2.80.8BSearch_for_a_user"><span class="mw-headline" id=".E2.80.8B.E2.80.8BSearch_for_a_user"><span class="mw-headline" id=".E2.80.8B.E2.80.8BSearch_for_a_user"><span class="mw-headline" id=".E2.80.8B.E2.80.8BSearch_for_a_user">Search for a user</span></span></span></span></span> == | ||
| + | |||
| + | Upon entering the Measurement User Management module, Measurement loads all users on the application from all instances. The following information is shown: | ||
| + | |||
| + | *'''Username: '''The active directory username or Measurement account name. | ||
| + | *'''User ID: '''The user ID number; is used in the Checklist module to send when registering a test. | ||
| + | *'''Instances: '''The Instance list to which the user has access. | ||
| + | *'''Permission:''' The Role (and associated abilities) to which the user is assigned. | ||
| + | |||
| + | Click the '''Search''' button to filter the results according to the filter criteria specified. | ||
| + | |||
| + | To erase the filter, clean up all filters and click the '''Search''' button. | ||
| + | |||
| + | | ||
| + | |||
| + | '''Figure 9: User search''' | ||
| + | |||
| + | [[File:MIA UserSearch.png|900px|MIA UserSearch.png]] | ||
| + | |||
| + | | ||
| + | |||
| + | | ||
| + | |||
| + | === <span class="mw-headline" id=".E2.80.8BEdit_a_user_account"><span class="mw-headline" id=".E2.80.8BEdit_a_user_account"><span class="mw-headline" id=".E2.80.8BEdit_a_user_account"><span class="mw-headline" id=".E2.80.8BEdit_a_user_account"><span class="mw-headline" id=".E2.80.8BEdit_a_user_account">Edit a user account</span></span></span></span></span> === | ||
| + | |||
| + | To change a user’s permissions or role, their account must be edited. This action requires Global or Instance Administrator permission. | ||
| + | |||
| + | To edit a user account, click the Edit button referencing the user’s item on the list. | ||
| + | |||
| + | | ||
| + | |||
| + | '''Figure 10: Edit user account ''' | ||
| + | |||
| + | '''[[File:MIA EditUserAccount .png|900px|MIA EditUserAccount .png]]''' | ||
| + | |||
| + | | ||
| + | |||
| + | | ||
| + | |||
| + | '''Figure 11: Update User''' | ||
| + | |||
| + | '''[[File:MIA UpdateUser.png|900px|MIA UpdateUser.png]]''' | ||
| + | |||
| + | | ||
| + | |||
| + | Click the Save button when done, or click the Close button to abandon changes. | ||
| + | |||
| + | Upon clicking the Save button, Measurement will validate the information, store the data in the Measurement database, close the screen, and reload the user’s list with the updated user. | ||
| + | |||
| + | | ||
| + | |||
| + | |||
| + | = <span class="mw-headline" id="Packages"><span class="mw-headline" id="Packages"><span class="mw-headline" id="Packages"><span class="mw-headline" id="Packages">Packages [[File:MeasAdmin Logo3.png]]</span></span></span></span> = | ||
| + | |||
| + | Upon accessing the Packages module, the users will be able to see the different search options: | ||
| + | |||
| + | *'''Package''' | ||
| + | *'''Creator''' | ||
| + | *'''Plants Using ''' | ||
| + | *'''Creation Date''' | ||
| + | |||
| + | '''Figure 12: Packages''' | ||
| + | |||
| + | '''[[File:MIA Packages.png|900px|MIA Packages.png]]''' | ||
| + | |||
| + | | ||
| + | |||
| + | '''The below part of the page shows the users the result of the performed search.''' '''Once the user clicks on their wanted option, a new screen will pop up showing the information of the package.''' | ||
| + | |||
| + | | ||
| + | |||
| + | '''Figure 13: Open Package''' | ||
| − | + | [[File:MIA OpenPackage .png|900px|MIA OpenPackage .png]] | |
| | ||
| − | + | ---- | |
| + | |||
| + | | ||
Latest revision as of 14:42, 24 October 2024
42Q Home > Administration > Measurement Instance Admin
Contents
Introduction
Test Integration (Measurement) application is a flexible, extensible, high-performance software solution designed to be an integration platform between test equipment (AOI, AXI, 5DX, FP, ICT, FCT, System Test, Burn-In, etc.) and MES.
Measurement provides a common gateway for automating simple and complex task chains. It also provides a centralized repository for test parametric data collection and reporting.
Measurement allows engineering to design and build powerful, quick, and error-free mechanisms that automatically perform checks against data available in current or previous test outputs in any MES application.
The basic off-the-shelf solution provides AutoLog mechanisms (to PASS/FAIL UUT - Unit Under Test), test step mapping to symptom codes (allowing Pareto of symptoms, grouping similar faults, etc., as well as link key process indicators to SPC monitored attributes (allowing for a broad range of statistical process control techniques to be used to take actions based on deviations, control charts, CPK analysis, etc.) and test parametric data collection reported DHR (Device History Report). This feature also provides tabular "measures vs. specs" reports that can be imported into Minitab for histogram, dispersion, control charts, and normal distribution-curve creation thereby giving engineering statistical reporting over volumetric test data.
Measurement Instance Admin
Measurement Instance Admin can be accessed from the 42Q page.
To access, go to Administration> Meas Instance Admin
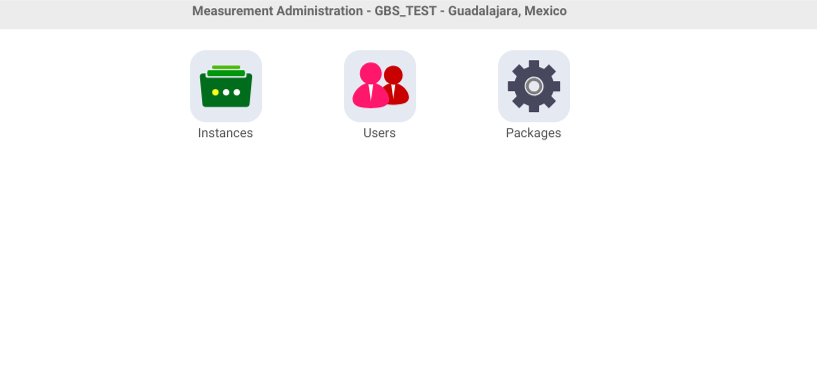
Once accessing this portlet, the screen will show the menu with three options: Instances, Users, and Packages.
Figure 1: Main screen
Instances 
An instance is used to handle a group of jobs (Parsers) that are responsible for:
Importing test results from many channel types
Processing test results
- Communicating to SFDC
Note: Only Global Administrator users can manage instances (Projects).
As a Measurement installation, an instance is composed of a Measurement Engine Service, a Measurement Database, and Parsers. An instance may have multiple Projects running in the same server reaching different Measurement databases as well as different MESR databases.
To access the Instance module, go to the Measurement administration page at the top menu and click the Instances tile.
Search
The Instance module also offers the ability to filter instance items. To search for an instance, click the Expand button ![]() on the left of the Search Panel at the top of the instance’s list. Fill in the appropriate filter fields, and click on the Search button.
on the left of the Search Panel at the top of the instance’s list. Fill in the appropriate filter fields, and click on the Search button.
Measurement provides filtering instances by Alias and Server Name.
Figure 2: Search
To unfilter the instance list, clear the text from the alias and server name fields and click the Search button again.
Instances List
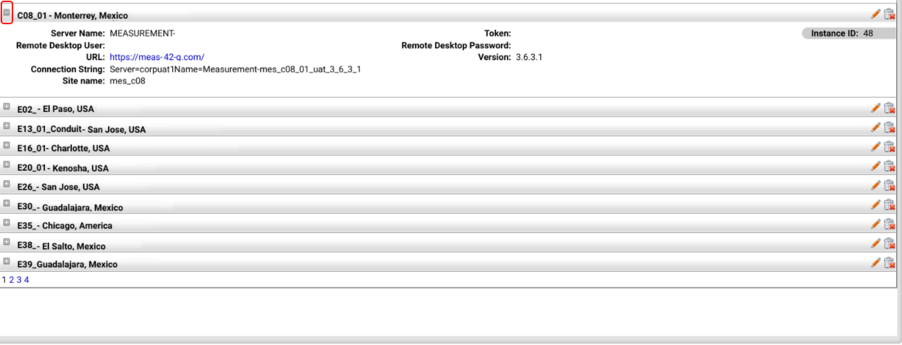
Upon accessing the Instance module, Measurement loads and displays all instances. To see instance information, expand the instance item by clicking the Expand button ![]() on the left of the instance name.
on the left of the instance name.
Figure 3: Instances List
Create a new instance
To install a new instance on a site, go to the Instances module and click the New button ![]() at the top right.
at the top right.
Figure 4: Create Instances
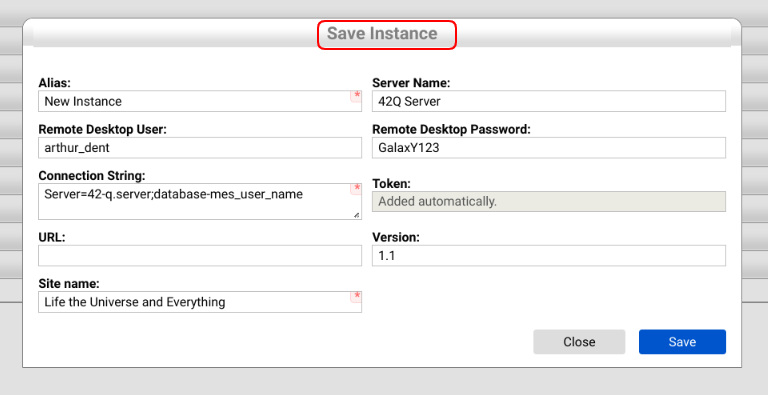
Once the button is used, a new screen will pop up, showing the different fields:
- Alias: An organizational name was given to an instance to identify it on the tool.
- Server Name: Server name configured on the OS from the Measurement server that is configured with the given instance.
- Remote Desktop User: The username on the server used to remotely connect to the desktop. This is used if necessary to access for the purpose of troubleshooting.
- Remote Desktop Password: User password to remote connect on the desktop. This is used if necessary to access for the purpose of troubleshooting.
- Connection String: Measurement database connection string used to run Measurement configuration modules.
- Token: Automatically generated unique identifier.
- URL: URL of the instance.
- Version: Core version.
- Site name: Desired name for the Site.
Figure 5: Create an Instance
Note:At a minimum, the mandatory fields ![]() must be completed.
must be completed.
Click the Save button when done to save changes, or click the Close button to abandon changes.
Upon clicking the Save button, Measurement will display the new instance on the list.
Edit an instance
To change an instance value click the Edit button ![]() at the right side of the instance item.
at the right side of the instance item.
Figure 6: Edit an Instance
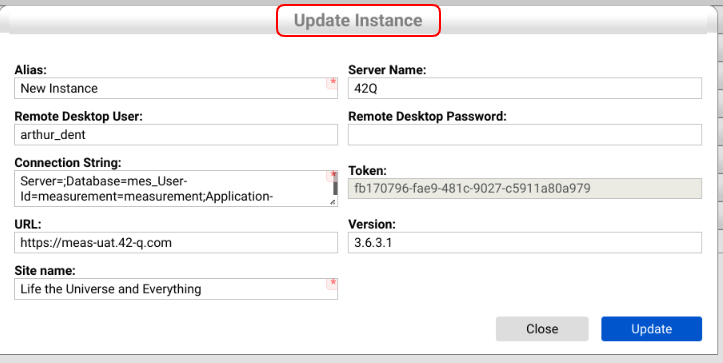
The Update Instance screen with allowable fields to modify.
Figure 7: Update Instance
Click the Update button when done to save changes, or click the Close button to abandon changes.
Upon clicking the Update button, Measurement validates the changed values, stores the data (if valid), and refreshes the instances list after closing the Update Instances screen.
Remove an instance
This feature is used when a Measurement installation is no longer necessary in a plant or is merged between installations.
An instance removal does not erase any test result data from the Measurement database. Removing an instance only removes the web access to this database. If it is necessary to erase measurement or parametric data, the user is advised to contact the Measurement support team.
To remove an instance from the list, click on the Delete button ![]() at the right side of the instance item.
at the right side of the instance item.
Figure 8: Remove an Instance
A confirmation box is displayed. If the operation is confirmed, then the Instance is removed from the list and from the Measurement database. List items are refreshed without the removed Instance.
Users 
To access the User Management module, select the Users icon from the Measurement Administration screen.
The following roles are available via the access control module within Measurement:
- Instance Administrator: A user with the ability to manage instance-related configuration, such as Shop Floor Configuration and Instance Configuration Groups.
- User: A user with the ability to manage all configurations containing inaccessible instances.
- Operator: A user with the ability to use checklist and activity monitor modules inaccessible instances.
Search for a user
Upon entering the Measurement User Management module, Measurement loads all users on the application from all instances. The following information is shown:
- Username: The active directory username or Measurement account name.
- User ID: The user ID number; is used in the Checklist module to send when registering a test.
- Instances: The Instance list to which the user has access.
- Permission: The Role (and associated abilities) to which the user is assigned.
Click the Search button to filter the results according to the filter criteria specified.
To erase the filter, clean up all filters and click the Search button.
Figure 9: User search
Edit a user account
To change a user’s permissions or role, their account must be edited. This action requires Global or Instance Administrator permission.
To edit a user account, click the Edit button referencing the user’s item on the list.
Figure 10: Edit user account
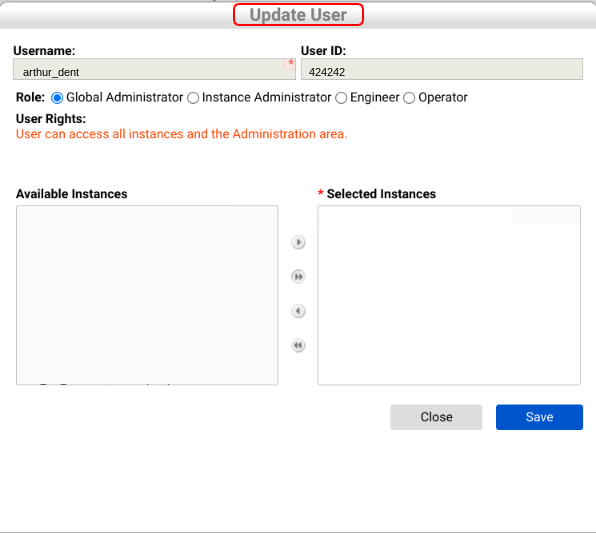
Figure 11: Update User
Click the Save button when done, or click the Close button to abandon changes.
Upon clicking the Save button, Measurement will validate the information, store the data in the Measurement database, close the screen, and reload the user’s list with the updated user.
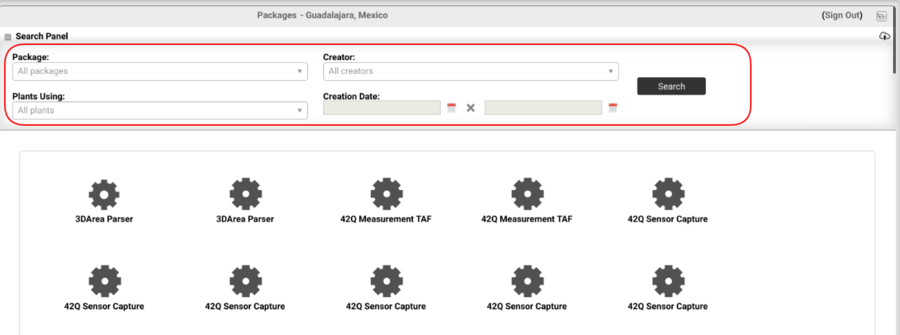
Packages 
Upon accessing the Packages module, the users will be able to see the different search options:
- Package
- Creator
- Plants Using
- Creation Date
Figure 12: Packages
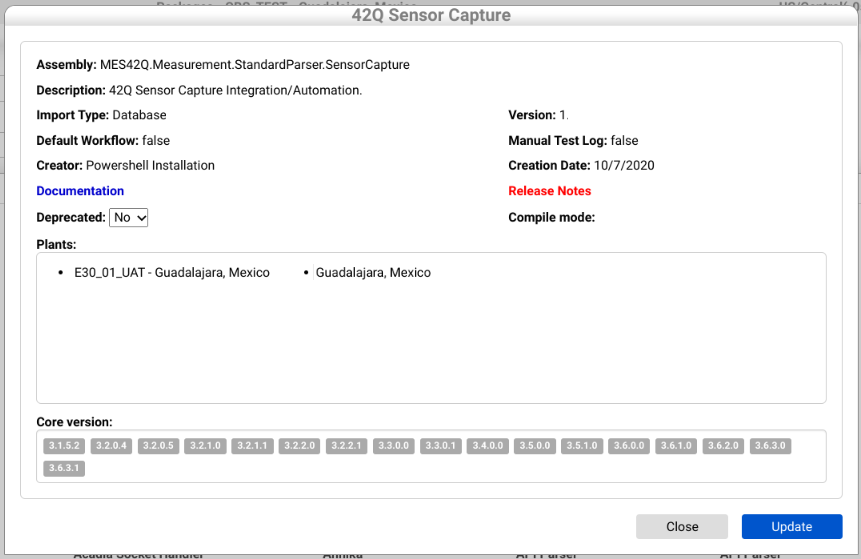
The below part of the page shows the users the result of the performed search. Once the user clicks on their wanted option, a new screen will pop up showing the information of the package.
Figure 13: Open Package
