Difference between revisions of "How to use Target Maintenance"
| (8 intermediate revisions by 2 users not shown) | |||
| Line 1: | Line 1: | ||
| + | | ||
| − | = <span class="mw-headline" id="Summary"><span class="mw-headline" id="Summary"><span class="mw-headline" id="Summary"><span class="mw-headline" id="Summary"><span class="mw-headline" id="Summary"><span class="mw-headline" id="Summary"><span class="mw-headline" id="Summary">Summary</span></span></span></span></span></span></span> = | + | = <span class="mw-headline" id="Summary"><span class="mw-headline" id="Summary"><span class="mw-headline" id="Summary"><span class="mw-headline" id="Summary"><span class="mw-headline" id="Summary"><span class="mw-headline" id="Summary"><span class="mw-headline" id="Summary"><span class="mw-headline" id="Summary"><span class="mw-headline" id="Summary">Summary</span></span></span></span></span></span></span></span></span> = |
| − | <br/> '''Target Maintenance''' is a portlet capable of '''managing and maintaining spreadsheets faster and more efficiently'''.<br/> '''Provides help with any MES Application customization''' | + | <br/> '''Target Maintenance''' is a portlet capable of '''managing and maintaining spreadsheets faster and more efficiently'''.<br/> '''Provides help with any MES Application customization '''to the users.<br/> Target Maintenance takes care of managing '''Targets''', these Targets are meant to be used as a source of any custom data. This portlet '''supports opening Targets that have thousands of lines in pagination mode''' (the limit number of lines is configurable) as well as add, filter, rename and delete Targets from the Target List, among many other features. |
| | ||
| − | |||
| − | {| border="1" class="wikitable" | + | |
| + | = <span class="mw-headline" id="Benefits_of_Target_Maintenance"><span class="mw-headline" id="Benefits_of_Target_Maintenance"><span class="mw-headline" id="Benefits_of_Target_Maintenance">Benefits of Target Maintenance</span></span></span> = | ||
| + | |||
| + | {| border="1" class="wikitable" style="width: 1069px;" | ||
|- | |- | ||
| − | | | + | | style="background-color: rgb(255, 153, 102);" | |
| − | [[File:HTUTM Report.png|30x30px]] | + | [[File:HTUTM Report.png|30x30px|HTUTM Report.png]] |
| − | | | + | | style="background-color: rgb(255, 255, 102); width: 346px;" | |
| − | [[File:HTUTM Info Icon.png|30x30px]] | + | [[File:HTUTM Info Icon.png|30x30px|HTUTM Info Icon.png]] |
| − | | | + | | style="background-color: rgb(102, 204, 102); width: 334px;" | |
| − | [[File:HTUTM Distinguish.png|30x30px]] | + | [[File:HTUTM Distinguish.png|30x30px|HTUTM Distinguish.png]] |
|- | |- | ||
| Line 24: | Line 27: | ||
'''Manage and Maintain spreadsheets faster''' and more efficiently | '''Manage and Maintain spreadsheets faster''' and more efficiently | ||
| − | | | + | | style="width: 346px;" | |
'''Help''' with any '''MES Application customization''' | '''Help''' with any '''MES Application customization''' | ||
| − | | | + | | style="width: 334px;" | |
'''Create data''' and '''define the data type''' | '''Create data''' and '''define the data type''' | ||
| Line 36: | Line 39: | ||
| | ||
| − | = <span class="mw-headline" id="How_to_Access_Target_Maintenance_Portlet.3F"><span class="mw-headline" id="How_to_Access_Target_Maintenance_Portlet.3F"><span class="mw-headline" id="How_to_Access_Target_Maintenance_Portlet.3F"><span class="mw-headline" id="How_to_Access_Target_Maintenance_Portlet.3F">How to | + | = <span class="mw-headline" id="How_to_Access_Target_Maintenance_Portlet.3F"><span class="mw-headline" id="How_to_Access_Target_Maintenance_Portlet.3F"><span class="mw-headline" id="How_to_Access_Target_Maintenance_Portlet.3F"><span class="mw-headline" id="How_to_Access_Target_Maintenance_Portlet.3F"><span class="mw-headline" id="How_to_Access_Target_Maintenance_Portlet.3F">How to access Target Maintenance Portlet</span></span></span></span></span> = |
To access the Target Maintenance portlet, the user must sign into the '''42Q Portal''' and then select the '''Shop Floor Control > Configuration''' expandable heading located in the menu on the left of the screen, and then select '''Target Maintenance'''. | To access the Target Maintenance portlet, the user must sign into the '''42Q Portal''' and then select the '''Shop Floor Control > Configuration''' expandable heading located in the menu on the left of the screen, and then select '''Target Maintenance'''. | ||
| Line 48: | Line 51: | ||
| | ||
| − | = <span class="mw-headline" id="How_to_Filter_a_Target.3F"><span class="mw-headline" id="How_to_Filter_a_Target.3F"><span class="mw-headline" id="How_to_Filter_a_Target.3F"><span class="mw-headline" id="How_to_Filter_a_Target.3F">How to | + | = <span class="mw-headline" id="How_to_Filter_a_Target.3F"><span class="mw-headline" id="How_to_Filter_a_Target.3F"><span class="mw-headline" id="How_to_Filter_a_Target.3F"><span class="mw-headline" id="How_to_Filter_a_Target.3F"><span class="mw-headline" id="How_to_Filter_a_Target.3F">How to filter a Target</span></span></span></span></span> = |
The user can filter the available targets by '''Target Name'''. To filter the target list, enter the '''Target Name''' and then select '''Filter'''. | The user can filter the available targets by '''Target Name'''. To filter the target list, enter the '''Target Name''' and then select '''Filter'''. | ||
| Line 60: | Line 63: | ||
| | ||
| − | = <span class="mw-headline" id="How_to_Add_a_Target.3F"><span class="mw-headline" id="How_to_Add_a_Target.3F"><span class="mw-headline" id="How_to_Add_a_Target.3F"><span class="mw-headline" id="How_to_Add_a_Target.3F">How to | + | = <span class="mw-headline" id="How_to_Add_a_Target.3F"><span class="mw-headline" id="How_to_Add_a_Target.3F"><span class="mw-headline" id="How_to_Add_a_Target.3F"><span class="mw-headline" id="How_to_Add_a_Target.3F"><span class="mw-headline" id="How_to_Add_a_Target.3F">How to add a Target</span></span></span></span></span> = |
To add a target, select the '''Add''' icon located next to the Target List tab, the '''Target Form''' pop-up window will display, then enter the '''Target Name''' (it is not allowed the “/” character); if there is a target to import, select it from the local path when the user selects the checkbox '''Save Imported Data Right Away''' (selected by default), the imported target will be exactly as it is (with lines and columns filled); when left unselected, the target will be imported with only the columns and so no values are filled, finally, select '''Save''' to complete. | To add a target, select the '''Add''' icon located next to the Target List tab, the '''Target Form''' pop-up window will display, then enter the '''Target Name''' (it is not allowed the “/” character); if there is a target to import, select it from the local path when the user selects the checkbox '''Save Imported Data Right Away''' (selected by default), the imported target will be exactly as it is (with lines and columns filled); when left unselected, the target will be imported with only the columns and so no values are filled, finally, select '''Save''' to complete. | ||
| Line 74: | Line 77: | ||
| | ||
| − | = <span class="mw-headline" id="How_to_Manage_Targets.3F"><span class="mw-headline" id="How_to_Manage_Targets.3F"><span class="mw-headline" id="How_to_Manage_Targets.3F"><span class="mw-headline" id="How_to_Manage_Targets.3F">How to | + | |
| + | = <span class="mw-headline" id="How_to_manage_Targets.3F"><span class="mw-headline" id="How_to_Manage_Targets.3F"><span class="mw-headline" id="How_to_Manage_Targets.3F"><span class="mw-headline" id="How_to_Manage_Targets.3F"><span class="mw-headline" id="How_to_Manage_Targets.3F"><span class="mw-headline" id="How_to_Manage_Targets.3F"><span class="mw-headline" id="How_to_Manage_Targets.3F"><span class="mw-headline" id="How_to_Manage_Targets.3F"><span class="mw-headline" id="How_to_Manage_Targets.3F"><span class="mw-headline" id="How_to_Manage_Targets.3F"><span class="mw-headline" id="How_to_Manage_Targets.3F">How to manage Targets</span></span></span></span></span></span></span></span></span></span></span> = | ||
Users can manage targets by double-clicking the target name in the Target List, this will display the '''Target Maintenance Page'''. | Users can manage targets by double-clicking the target name in the Target List, this will display the '''Target Maintenance Page'''. | ||
| Line 98: | Line 102: | ||
|- | |- | ||
| | | | ||
| − | + | [[File:HTUTM Add Column Icon.png|30x30px|HTUTM Add Column Icon.png]] | |
'''Create column''' | '''Create column''' | ||
| Line 107: | Line 111: | ||
|- | |- | ||
| | | | ||
| − | + | [[File:HTUTM Add Line Icon.png|30x30px|HTUTM Add Line Icon.png]] | |
| − | '''Create line''' | + | ''' Create line''' |
| | | | ||
| Line 116: | Line 120: | ||
|- | |- | ||
| | | | ||
| − | + | [[File:HTUTM Delete Line Icon.png|30x30px|HTUTM Delete Line Icon.png]] | |
| − | '''Delete line''' | + | ''' Delete line''' |
| | | | ||
| Line 125: | Line 129: | ||
|- | |- | ||
| | | | ||
| − | + | [[File:HTUTM Copy Line Icon.png|30x30px|HTUTM Copy Line Icon.png]] | |
| − | '''Copy line''' | + | ''' Copy line''' |
| | | | ||
| Line 134: | Line 138: | ||
|- | |- | ||
| | | | ||
| − | + | [[File:HTUTM Reset Tab Icon.png|30x30px|HTUTM Reset Tab Icon.png]] | |
| − | '''Reset table''' | + | ''' Reset table''' |
| | | | ||
| Line 143: | Line 147: | ||
|- | |- | ||
| | | | ||
| − | + | [[File:HTUTM Delete Tab Icon.png|30x30px|HTUTM Delete Tab Icon.png]] | |
| − | '''Delete table''' | + | ''' Delete table''' |
| | | | ||
| Line 152: | Line 156: | ||
|- | |- | ||
| | | | ||
| − | + | [[File:HTUTM Save Tab Icon.png|30x30px|HTUTM Save Tab Icon.png]] | |
| − | '''Save table''' | + | ''' Save table''' |
| | | | ||
| Line 161: | Line 165: | ||
|- | |- | ||
| | | | ||
| − | ''' | + | ''' [[File:HTUTM Export Tab Icon.png|30x30px|HTUTM Export Tab Icon.png]]''' |
| − | '''Export table''' | + | ''' Export table''' |
| | | | ||
| Line 170: | Line 174: | ||
|- | |- | ||
| | | | ||
| − | + | [[File:HTUTM Import Tab Icon.png|30x30px|HTUTM Import Tab Icon.png]] | |
'''Import table''' | '''Import table''' | ||
| Line 183: | Line 187: | ||
| | ||
| − | = How to | + | = <span class="mw-headline" id="How_to_Delete_a_Column.3F">How to delete a column</span> = |
To delete a column, simply roll the cursor over the column name and select '''Delete Column''' from the drop-down menu, then select '''Save''' in the '''Manage Tab''' section to complete. | To delete a column, simply roll the cursor over the column name and select '''Delete Column''' from the drop-down menu, then select '''Save''' in the '''Manage Tab''' section to complete. | ||
| Line 191: | Line 195: | ||
'''Figure 5: Delete Column''' | '''Figure 5: Delete Column''' | ||
| − | [[File:Delete Column.png|700px]] | + | [[File:Delete Column.png|700px|Delete Column.png]] |
'''<u>Note</u>:''' If the table is at Verification In Progress, just the 2nd user entries will be deleted. | '''<u>Note</u>:''' If the table is at Verification In Progress, just the 2nd user entries will be deleted. | ||
| Line 197: | Line 201: | ||
| | ||
| − | = How to | + | = <span class="mw-headline" id="How_to_Edit_a_Column.3F">How to edit a column</span> = |
To edit a column, roll the cursor over the appropriate column name and select '''Edit Name Column''' from the drop-down menu. | To edit a column, roll the cursor over the appropriate column name and select '''Edit Name Column''' from the drop-down menu. | ||
| Line 205: | Line 209: | ||
'''Figure 6: Edit Column''' | '''Figure 6: Edit Column''' | ||
| − | '''[[File:Edit Column.png|700px]]''' | + | '''[[File:Edit Column.png|700px|Edit Column.png]]''' |
| | ||
| Line 213: | Line 217: | ||
| | ||
| − | <br/> '''Figure 7: Edit Column Form'''<br/> [[File:Edit Column Form.png|700px]] | + | <br/> '''Figure 7: Edit Column Form'''<br/> [[File:Edit Column Form.png|700px|Edit Column Form.png]] |
| + | |||
| + | | ||
| + | |||
| + | ---- | ||
| | ||
Latest revision as of 22:31, 4 October 2022
Contents
Summary
Target Maintenance is a portlet capable of managing and maintaining spreadsheets faster and more efficiently.
Provides help with any MES Application customization to the users.
Target Maintenance takes care of managing Targets, these Targets are meant to be used as a source of any custom data. This portlet supports opening Targets that have thousands of lines in pagination mode (the limit number of lines is configurable) as well as add, filter, rename and delete Targets from the Target List, among many other features.
Benefits of Target Maintenance
|
Manage and Maintain spreadsheets faster and more efficiently |
Help with any MES Application customization |
Create data and define the data type |
How to access Target Maintenance Portlet
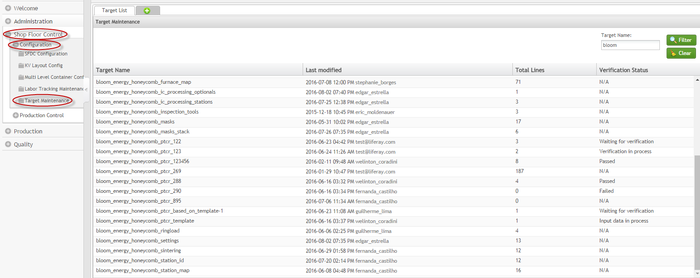
To access the Target Maintenance portlet, the user must sign into the 42Q Portal and then select the Shop Floor Control > Configuration expandable heading located in the menu on the left of the screen, and then select Target Maintenance.
Figure 1: Access Target Maintenance
How to filter a Target
The user can filter the available targets by Target Name. To filter the target list, enter the Target Name and then select Filter.
Note: To begin a new search, select Clear to empty the fields and re-enter information into the available fields.
How to add a Target
To add a target, select the Add icon located next to the Target List tab, the Target Form pop-up window will display, then enter the Target Name (it is not allowed the “/” character); if there is a target to import, select it from the local path when the user selects the checkbox Save Imported Data Right Away (selected by default), the imported target will be exactly as it is (with lines and columns filled); when left unselected, the target will be imported with only the columns and so no values are filled, finally, select Save to complete.
Figure 3: Add Targets
How to manage Targets
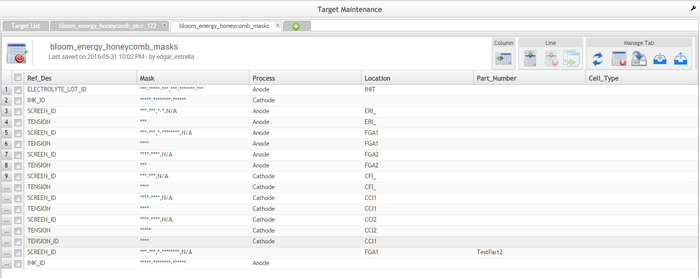
Users can manage targets by double-clicking the target name in the Target List, this will display the Target Maintenance Page.
Figure 4: Target Maintenance Page
TARGET MENU OPTIONS
|
ACTION |
FUNCTIONALITY |
|
Create column |
Creates a column. |
|
Create line |
Creates a line that will be inserted at the end of the table. |
|
Delete line |
Deletes a selected line. |
|
Copy line |
Copies a selected line. |
|
Reset table |
Clears any update performed and restores the original table values. |
|
Delete table |
Deletes a table. |
|
Save table |
Saves any changes made in the target. |
|
Export table |
Downloads a table as a .CSV file that will be saved locally by the user. |
|
Import table |
Uploads a selected target. |
Note: To save any table update, the user needs to select Save in the Manage Tab section.
How to delete a column
To delete a column, simply roll the cursor over the column name and select Delete Column from the drop-down menu, then select Save in the Manage Tab section to complete.
Figure 5: Delete Column
Note: If the table is at Verification In Progress, just the 2nd user entries will be deleted.
How to edit a column
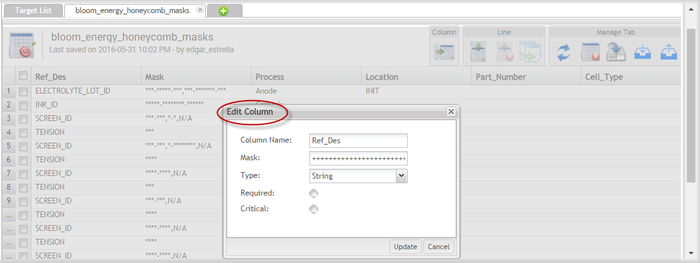
To edit a column, roll the cursor over the appropriate column name and select Edit Name Column from the drop-down menu.
Figure 6: Edit Column
The Edit Column Form will display. Edit the necessary fields and select Update to complete.


