Difference between revisions of "SOP-MES0018 Multi-Level Containerization Configuration"
| (32 intermediate revisions by 3 users not shown) | |||
| Line 1: | Line 1: | ||
| − | <small>[[42Q_Cloud-Based_MES/MOMS|42Q Home]] > [[Shop_Floor_Control|Shop Floor Control]] > [[Configuration|Configuration]] > Multi-Level Containerization Configuration</small><br/> | + | <small>[[42Q_Cloud-Based_MES/MOMS|42Q Home]] > [[Shop_Floor_Control|Shop Floor Control]] > [[Configuration|Configuration]] > Multi-Level Containerization Configuration</small><br/> |
| | ||
| Line 7: | Line 7: | ||
| | ||
| − | <center>''' | + | <center>'''Shop Floor Control'''</center> <center>'''Configuration'''</center> <center>'''Multi-Level Containerization Configuration'''</center> <center>'''Version MES15.77'''</center> <center>'''Version H1'''</center> <center> </center> |
| | ||
| − | <center> | + | <center> </center> |
| − | + | == <span class="mw-headline" id="Shop_Floor_Control"><span class="mw-headline" id="Shop_Floor_Control"><span class="mw-headline" id="Shop_Floor_Control"><span class="mw-headline" id="Shop_Floor_Control"><span class="mw-headline" id="Shop_Floor_Control"><span class="mw-headline" id="Shop_Floor_Control"><span class="mw-headline" id="Shop_Floor_Control"><span class="mw-headline" id="Shop_Floor_Control"><span class="mw-headline" id="Shop_Floor_Control"><span class="mw-headline" id="Shop_Floor_Control"><span class="mw-headline" id="Shop_Floor_Control">Shop Floor Control</span></span></span></span></span></span></span></span></span></span></span> == | |
| − | | + | As its name implies, the Shop Floor Data Collection system is responsible for the collection of data from the shop floor. The collected information is then stored in the Manufacturing Execution System (MES). Specifically, the real-time information collected by SFDC is utilized by Reporting and MES Web to create quality control reports. The SFDC system uses manual and automated barcode scanning to monitor and collect data for a product line or plant. Thus SFDC plays an important role in maintaining unit histories and directing product movement on the manufacturing floor. |
| − | + | The system provides Access Control between the modules of the application, including the functionalities of each screen. The current version has a Shop Floor Configuration page that provides access to all submodule pages and their functionalities (view, add, edit, delete, print, and generate output files). | |
| − | + | | |
| − | + | | |
| − | == Multi-Level Containerization Configuration == | + | == <span class="mw-headline" id="Multi-Level_Containerization_Configuration"><span class="mw-headline" id="Multi-Level_Containerization_Configuration"><span class="mw-headline" id="Multi-Level_Containerization_Configuration"><span class="mw-headline" id="Multi-Level_Containerization_Configuration"><span class="mw-headline" id="Multi-Level_Containerization_Configuration"><span class="mw-headline" id="Multi-Level_Containerization_Configuration"><span class="mw-headline" id="Multi-Level_Containerization_Configuration"><span class="mw-headline" id="Multi-Level_Containerization_Configuration"><span class="mw-headline" id="Multi-Level_Containerization_Configuration"><span class="mw-headline" id="Multi-Level_Containerization_Configuration"><span class="mw-headline" id="Multi-Level_Containerization_Configuration"><span class="mw-headline" id="Multi-Level_Containerization_Configuration"><span class="mw-headline" id="Multi-Level_Containerization_Configuration"><span class="mw-headline" id="Multi-Level_Containerization_Configuration"><span class="mw-headline" id="Multi-Level_Containerization_Configuration"><span class="mw-headline" id="Multi-Level_Containerization_Configuration"><span class="mw-headline" id="Multi-Level_Containerization_Configuration"><span class="mw-headline" id="Multi-Level_Containerization_Configuration"><span class="mw-headline" id="Multi-Level_Containerization_Configuration">Multi-Level Containerization Configuration</span></span></span></span></span></span></span></span></span></span></span></span></span></span></span></span></span></span></span> == |
Containerization tracks the placement of serial numbers in a container, box, or carton. If a container is opened, any serial number entry that follows the container configuration will be attached to the open container. As performed by SFDC Containerization, all units added to the container must be at status 30 (Completed). | Containerization tracks the placement of serial numbers in a container, box, or carton. If a container is opened, any serial number entry that follows the container configuration will be attached to the open container. As performed by SFDC Containerization, all units added to the container must be at status 30 (Completed). | ||
| − | Depending on the configuration, the application allows adding units with the same revision as the first serial added to the container. Container quantities are defined by part number. Once a unit is containerized, it cannot be scanned at any other data collector, except if a serial number is scanned at a start station | + | Depending on the configuration, the application allows adding units with the same revision as the first serial added to the container. Container quantities are defined by part number. Once a unit is containerized, it cannot be scanned at any other data collector, except if a serial number is scanned at a start station on Shop Floor, then it will be removed from the container. It is not recommended, it is better if users remove units from containers first. |
Container definitions are specified by part number, level (container or lot), capacity, project ID, active flag, serial algorithm procedure or serial mask, and description. Multi-Level Containerization creates and modifies container definitions. | Container definitions are specified by part number, level (container or lot), capacity, project ID, active flag, serial algorithm procedure or serial mask, and description. Multi-Level Containerization creates and modifies container definitions. | ||
| − | This document explains the application user interface, data fields, and configuration requirements. | + | This document explains the application user interface, data fields, and configuration requirements. This module allows the user to perform actions like create, print/export filtered results, edit, copy, delete, view, or print/export container configuration. |
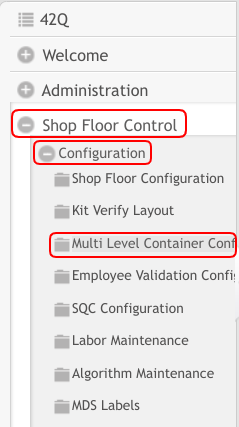
| − | + | To access the Multi-Level Containerization page, navigate to '''Shop Floor Control > Configuration > Multi-Level Containerization Configuration'''. The main Multi-Level Containerization Configuration page is displayed. | |
| − | + | | |
| − | |||
| − | |||
| − | |||
| − | |||
| − | |||
| − | |||
| − | |||
| − | |||
'''Figure 1: Multi-Level Containerization Configuration''' | '''Figure 1: Multi-Level Containerization Configuration''' | ||
| − | [[File: | + | '''[[File:Multi-Level Containerization Configuration.png|Multi-Level Containerization Configuration.png]]''' |
| | ||
| − | === Container List === | + | === <span class="mw-headline" id="Container_List"><span class="mw-headline" id="Container_List"><span class="mw-headline" id="Container_List"><span class="mw-headline" id="Container_List"><span class="mw-headline" id="Container_List"><span class="mw-headline" id="Container_List"><span class="mw-headline" id="Container_List"><span class="mw-headline" id="Container_List"><span class="mw-headline" id="Container_List"><span class="mw-headline" id="Container_List"><span class="mw-headline" id="Container_List"><span class="mw-headline" id="Container_List"><span class="mw-headline" id="Container_List"><span class="mw-headline" id="Container_List"><span class="mw-headline" id="Container_List"><span class="mw-headline" id="Container_List"><span class="mw-headline" id="Container_List"><span class="mw-headline" id="Container_List"><span class="mw-headline" id="Container_List">Container List</span></span></span></span></span></span></span></span></span></span></span></span></span></span></span></span></span></span></span> === |
The '''Container List''' displays all container levels and allows performing the following actions: | The '''Container List''' displays all container levels and allows performing the following actions: | ||
| Line 58: | Line 50: | ||
*'''Delete a Container Configuration''' | *'''Delete a Container Configuration''' | ||
*'''Print/Export details of a Container Configuration''' | *'''Print/Export details of a Container Configuration''' | ||
| + | |||
| + | | ||
Note that it is possible to execute two actions from the Task Panel: | Note that it is possible to execute two actions from the Task Panel: | ||
| Line 66: | Line 60: | ||
| | ||
| − | === Filter Settings === | + | === <span class="mw-headline" id="Filter_Settings"><span class="mw-headline" id="Filter_Settings"><span class="mw-headline" id="Filter_Settings"><span class="mw-headline" id="Filter_Settings"><span class="mw-headline" id="Filter_Settings"><span class="mw-headline" id="Filter_Settings"><span class="mw-headline" id="Filter_Settings"><span class="mw-headline" id="Filter_Settings"><span class="mw-headline" id="Filter_Settings"><span class="mw-headline" id="Filter_Settings"><span class="mw-headline" id="Filter_Settings"><span class="mw-headline" id="Filter_Settings"><span class="mw-headline" id="Filter_Settings"><span class="mw-headline" id="Filter_Settings"><span class="mw-headline" id="Filter_Settings"><span class="mw-headline" id="Filter_Settings"><span class="mw-headline" id="Filter_Settings"><span class="mw-headline" id="Filter_Settings"><span class="mw-headline" id="Filter_Settings">Filter Settings</span></span></span></span></span></span></span></span></span></span></span></span></span></span></span></span></span></span></span> === |
1. To perform searches, enter information into one or more of the following fields: | 1. To perform searches, enter information into one or more of the following fields: | ||
| Line 79: | Line 73: | ||
*'''Active''' (All, No, Yes): NO implies inactive for containerization. Default=YES. | *'''Active''' (All, No, Yes): NO implies inactive for containerization. Default=YES. | ||
| + | |||
| + | | ||
2. Enter the information and select '''Filter'''. | 2. Enter the information and select '''Filter'''. | ||
| + | |||
| + | | ||
'''Figure 2: Multi-Level Filter Settings''' | '''Figure 2: Multi-Level Filter Settings''' | ||
| − | [[File: | + | [[File:Multi-Level Filter Settings.png|900px|Multi-Level Filter Settings.png]] |
| | ||
| Line 92: | Line 90: | ||
| | ||
| − | === Edit Container Configuration === | + | === <span class="mw-headline" id="Edit_Container_Configuration"><span class="mw-headline" id="Edit_Container_Configuration"><span class="mw-headline" id="Edit_Container_Configuration"><span class="mw-headline" id="Edit_Container_Configuration"><span class="mw-headline" id="Edit_Container_Configuration"><span class="mw-headline" id="Edit_Container_Configuration"><span class="mw-headline" id="Edit_Container_Configuration"><span class="mw-headline" id="Edit_Container_Configuration"><span class="mw-headline" id="Edit_Container_Configuration"><span class="mw-headline" id="Edit_Container_Configuration"><span class="mw-headline" id="Edit_Container_Configuration"><span class="mw-headline" id="Edit_Container_Configuration"><span class="mw-headline" id="Edit_Container_Configuration"><span class="mw-headline" id="Edit_Container_Configuration"><span class="mw-headline" id="Edit_Container_Configuration"><span class="mw-headline" id="Edit_Container_Configuration"><span class="mw-headline" id="Edit_Container_Configuration"><span class="mw-headline" id="Edit_Container_Configuration"><span class="mw-headline" id="Edit_Container_Configuration">Edit Container Configuration</span></span></span></span></span></span></span></span></span></span></span></span></span></span></span></span></span></span></span> === |
1. To edit a Container Configuration, select the box to the left of the container level and then select '''Edit'''. | 1. To edit a Container Configuration, select the box to the left of the container level and then select '''Edit'''. | ||
| − | '''Figure 3: Container Configuration- Edit''' | + | |
| + | |||
| + | '''Figure 3: Container Configuration - Edit''' | ||
| − | [[File: | + | '''[[File:Container Configuration- Edit.png|700px|Container Configuration- Edit.png]]''' |
| | ||
| − | 2. A Warning box displays alerting the user that all containers will be affected by the changes to configuration. | + | 2. A Warning box displays alerting the user that all containers will be affected by the changes to the configuration. |
| − | 3. Select '''OK '''to continue. | + | 3. Select '''OK '''to continue. The Container Configuration Maintenance screen displays: |
| − | |||
| − | The Container Configuration Maintenance screen displays: | ||
| | ||
| Line 112: | Line 110: | ||
'''Figure 4: Container Configuration Maintenance''' | '''Figure 4: Container Configuration Maintenance''' | ||
| − | [[File:Container | + | '''[[File:Container Config Maintenance.png|700px|Container Config Maintenance.png]]''' |
| | ||
| Line 119: | Line 117: | ||
5. Select '''Save''' to confirm, '''Reset''' to clear the fields, or '''Cancel '''to exit. | 5. Select '''Save''' to confirm, '''Reset''' to clear the fields, or '''Cancel '''to exit. | ||
| + | |||
| + | | ||
All the container configuration information is updated according to the updates applied and the container configuration is displayed in the container configuration's list. | All the container configuration information is updated according to the updates applied and the container configuration is displayed in the container configuration's list. | ||
| Line 124: | Line 124: | ||
'''Container Level, Part Number, '''and '''Project ID''' cannot be edited, as they are the keys of the record. | '''Container Level, Part Number, '''and '''Project ID''' cannot be edited, as they are the keys of the record. | ||
| − | '''Note''': For further information about the fields, see the next topics. | + | |
| + | |||
| + | <u>'''Note''':</u> For further information about the fields, see the next topics. | ||
| | ||
'''Close Container Option''': the user must enable the Shipping Level option, to be able to auto export the closed containers. | '''Close Container Option''': the user must enable the Shipping Level option, to be able to auto export the closed containers. | ||
| + | |||
| + | | ||
'''Figure 5: Closed Container. Export container''' | '''Figure 5: Closed Container. Export container''' | ||
| − | [[File:Closed Container. Export container.png|700px|Closed Container. Export container]] | + | [[File:Closed Container.Export container.png|700px|Closed Container.Export container.png]] |
| + | |||
| + | | ||
When the user closes the container it will be auto exported and a message will be sent confirming that the container was exported and closed, as well as the email with the XML file. | When the user closes the container it will be auto exported and a message will be sent confirming that the container was exported and closed, as well as the email with the XML file. | ||
| Line 140: | Line 146: | ||
| | ||
| − | === Copy Container Configuration === | + | === <span class="mw-headline" id="Copy_Container_Configuration"><span class="mw-headline" id="Copy_Container_Configuration"><span class="mw-headline" id="Copy_Container_Configuration"><span class="mw-headline" id="Copy_Container_Configuration"><span class="mw-headline" id="Copy_Container_Configuration"><span class="mw-headline" id="Copy_Container_Configuration"><span class="mw-headline" id="Copy_Container_Configuration"><span class="mw-headline" id="Copy_Container_Configuration"><span class="mw-headline" id="Copy_Container_Configuration"><span class="mw-headline" id="Copy_Container_Configuration"><span class="mw-headline" id="Copy_Container_Configuration"><span class="mw-headline" id="Copy_Container_Configuration"><span class="mw-headline" id="Copy_Container_Configuration"><span class="mw-headline" id="Copy_Container_Configuration"><span class="mw-headline" id="Copy_Container_Configuration"><span class="mw-headline" id="Copy_Container_Configuration"><span class="mw-headline" id="Copy_Container_Configuration"><span class="mw-headline" id="Copy_Container_Configuration"><span class="mw-headline" id="Copy_Container_Configuration">Copy Container Configuration</span></span></span></span></span></span></span></span></span></span></span></span></span></span></span></span></span></span></span> === |
1. To copy a Container Configuration, select the box to the left of the Container level and select '''Copy'''. | 1. To copy a Container Configuration, select the box to the left of the Container level and select '''Copy'''. | ||
| Line 150: | Line 156: | ||
'''Figure 6: Container Configuration-Copy''' | '''Figure 6: Container Configuration-Copy''' | ||
| − | [[File: | + | '''[[File:Container Configuration - Copy.png|900px|Container Configuration - Copy.png]]''' |
| | ||
| Line 158: | Line 164: | ||
| | ||
| − | === Delete Container Configuration === | + | === <span class="mw-headline" id="Delete_Container_Configuration"><span class="mw-headline" id="Delete_Container_Configuration"><span class="mw-headline" id="Delete_Container_Configuration"><span class="mw-headline" id="Delete_Container_Configuration"><span class="mw-headline" id="Delete_Container_Configuration"><span class="mw-headline" id="Delete_Container_Configuration"><span class="mw-headline" id="Delete_Container_Configuration"><span class="mw-headline" id="Delete_Container_Configuration"><span class="mw-headline" id="Delete_Container_Configuration"><span class="mw-headline" id="Delete_Container_Configuration"><span class="mw-headline" id="Delete_Container_Configuration"><span class="mw-headline" id="Delete_Container_Configuration"><span class="mw-headline" id="Delete_Container_Configuration"><span class="mw-headline" id="Delete_Container_Configuration"><span class="mw-headline" id="Delete_Container_Configuration"><span class="mw-headline" id="Delete_Container_Configuration"><span class="mw-headline" id="Delete_Container_Configuration"><span class="mw-headline" id="Delete_Container_Configuration"><span class="mw-headline" id="Delete_Container_Configuration">Delete Container Configuration</span></span></span></span></span></span></span></span></span></span></span></span></span></span></span></span></span></span></span> === |
1. To delete a Container Configuration, select the box to the left of the container level and select '''Delete'''. | 1. To delete a Container Configuration, select the box to the left of the container level and select '''Delete'''. | ||
| Line 166: | Line 172: | ||
'''Figure 7: Container Configuration-Delete''' | '''Figure 7: Container Configuration-Delete''' | ||
| − | [[File: | + | '''[[File:Container Configuration-Delete.png|700px|Container Configuration-Delete.png]]''' |
| | ||
| Line 176: | Line 182: | ||
| | ||
| + | | ||
| − | === View Container Configuration === | + | === <span class="mw-headline" id="View_Container_Configuration"><span class="mw-headline" id="View_Container_Configuration"><span class="mw-headline" id="View_Container_Configuration"><span class="mw-headline" id="View_Container_Configuration"><span class="mw-headline" id="View_Container_Configuration"><span class="mw-headline" id="View_Container_Configuration"><span class="mw-headline" id="View_Container_Configuration"><span class="mw-headline" id="View_Container_Configuration"><span class="mw-headline" id="View_Container_Configuration"><span class="mw-headline" id="View_Container_Configuration"><span class="mw-headline" id="View_Container_Configuration"><span class="mw-headline" id="View_Container_Configuration"><span class="mw-headline" id="View_Container_Configuration"><span class="mw-headline" id="View_Container_Configuration"><span class="mw-headline" id="View_Container_Configuration"><span class="mw-headline" id="View_Container_Configuration"><span class="mw-headline" id="View_Container_Configuration"><span class="mw-headline" id="View_Container_Configuration"><span class="mw-headline" id="View_Container_Configuration">View Container Configuration</span></span></span></span></span></span></span></span></span></span></span></span></span></span></span></span></span></span></span> === |
1. To view a Container Configuration, select the box to the left of a container level and select '''View'''. | 1. To view a Container Configuration, select the box to the left of a container level and select '''View'''. | ||
| Line 187: | Line 194: | ||
'''Figure 8: Container Configuration-View''' | '''Figure 8: Container Configuration-View''' | ||
| − | [[File:Container Configuration | + | '''[[File:Container Configuration View.png|900px|Container Configuration View.png]]''' |
| | ||
| − | '''Note:''' All the fields are read-only. | + | <u>'''Note:'''</u> All the fields are read-only. |
| | ||
| − | === Print/Export Container Configuration === | + | === <span class="mw-headline" id="Print.2FExport_Container_Configuration"><span class="mw-headline" id="Print.2FExport_Container_Configuration"><span class="mw-headline" id="Print.2FExport_Container_Configuration"><span class="mw-headline" id="Print.2FExport_Container_Configuration"><span class="mw-headline" id="Print.2FExport_Container_Configuration"><span class="mw-headline" id="Print.2FExport_Container_Configuration"><span class="mw-headline" id="Print.2FExport_Container_Configuration"><span class="mw-headline" id="Print.2FExport_Container_Configuration"><span class="mw-headline" id="Print.2FExport_Container_Configuration"><span class="mw-headline" id="Print.2FExport_Container_Configuration"><span class="mw-headline" id="Print.2FExport_Container_Configuration"><span class="mw-headline" id="Print.2FExport_Container_Configuration"><span class="mw-headline" id="Print.2FExport_Container_Configuration"><span class="mw-headline" id="Print.2FExport_Container_Configuration"><span class="mw-headline" id="Print.2FExport_Container_Configuration"><span class="mw-headline" id="Print.2FExport_Container_Configuration"><span class="mw-headline" id="Print.2FExport_Container_Configuration"><span class="mw-headline" id="Print.2FExport_Container_Configuration"><span class="mw-headline" id="Print.2FExport_Container_Configuration">Print/Export Container Configuration</span></span></span></span></span></span></span></span></span></span></span></span></span></span></span></span></span></span></span> === |
1. To print or export a Container Configuration, select the box to the left of a container level and then select '''Print/Export'''. | 1. To print or export a Container Configuration, select the box to the left of a container level and then select '''Print/Export'''. | ||
| Line 203: | Line 210: | ||
'''Figure 9: Container Configuration-Print/Export''' | '''Figure 9: Container Configuration-Print/Export''' | ||
| − | [[File:Container Configuration- | + | '''[[File:Container Configuration - Print.Export.png|800px|Container Configuration - Print.Export.png]]''' |
| − | + | | |
| − | + | 2. A report is generated and downloaded automatically as PDF: | |
| | ||
| − | '''Figure 10: Container Configuration-Report''' | + | '''Figure 10: Container Configuration - Report''' |
| + | |||
| + | [[File:Container Configuration-Report.png|900px|Container Configuration-Report.png]] | ||
| − | + | | |
| − | '''Note''': The column Algorithm is changed to Container Mask only when the Container mask is filled. | + | <u>'''Note''':</u> The column Algorithm is changed to Container Mask only when the Container mask is filled. |
| | ||
| Line 221: | Line 230: | ||
'''Figure 11: Container Configuration Level > 100 - Report''' | '''Figure 11: Container Configuration Level > 100 - Report''' | ||
| − | [[File:Container Configuration-Report Level maior.png| | + | [[File:Container Configuration-Report Level maior.png|900px|Container Configuration-Report Level maior]] |
| − | + | | |
| − | + | 3. In the viewer screen, select '''Save''' or '''Print''' to save or print the report result. | |
| | ||
| − | + | | |
| | ||
| − | |||
| − | |||
| − | 1. To | + | === <span class="mw-headline" id="Add_Multi-Level_Configuration_Containers:_Level_.3E100"><span class="mw-headline" id="Add_Multi-Level_Configuration_Containers:_Level_.3E100"><span class="mw-headline" id="Add_Multi-Level_Configuration_Containers:_Level_.3E100"><span class="mw-headline" id="Add_Multi-Level_Configuration_Containers:_Level_.3E100"><span class="mw-headline" id="Add_Multi-Level_Configuration_Containers:_Level_.3E100"><span class="mw-headline" id="Add_Multi-Level_Configuration_Containers:_Level_.3E100"><span class="mw-headline" id="Add_Multi-Level_Configuration_Containers:_Level_.3E100"><span class="mw-headline" id="Add_Multi-Level_Configuration_Containers:_Level_.3E100"><span class="mw-headline" id="Add_Multi-Level_Configuration_Containers:_Level_.3E100"><span class="mw-headline" id="Add_Multi-Level_Configuration_Containers:_Level_.3E100"><span class="mw-headline" id="Add_Multi-Level_Configuration_Containers:_Level_.3E100"><span class="mw-headline" id="Add_Multi-Level_Configuration_Containers:_Level_.3E100"><span class="mw-headline" id="Add_Multi-Level_Configuration_Containers:_Type.3E100"><span class="mw-headline" id="Add_Multi-Level_Configuration_Containers:_Type.3E100"><span class="mw-headline" id="Add_Multi-Level_Configuration_Containers:_Type.3E100"><span class="mw-headline" id="Add_Multi-Level_Configuration_Containers:_Type.3E100"><span class="mw-headline" id="Add_Multi-Level_Configuration_Containers:_Type.3E100"><span class="mw-headline" id="Add_Multi-Level_Configuration_Containers:_Type.3E100"><span class="mw-headline" id="Add_Multi-Level_Configuration_Containers:_Type.3E100"><span class="mw-headline" id="Add_Multi-Level_Configuration_Containers:_Type.3E100"><span class="mw-headline" id="Add_Multi-Level_Configuration_Containers:_Type.3E100"><span class="mw-headline" id="Add_Multi-Level_Configuration_Containers:_Type.3E100">Add Multi-Level Configuration Containers: Level >100</span></span></span></span></span></span></span></span></span></span></span></span></span></span></span></span></span></span></span></span></span></span> === |
| + | |||
| + | 1. To create a new Container Configuration, select the '''Add '''button located above the container level list on the Container Configuration Maintenance main page. | ||
2. The Container Configuration Maintenance screen is displayed: | 2. The Container Configuration Maintenance screen is displayed: | ||
| Line 242: | Line 251: | ||
| | ||
| − | '''Figure 12: Container | + | '''Figure 12: Add Container and Container Level Configurations''' |
| − | [[File: | + | [[File:Add Container and Container Level Configurations.png|900px|Add Container and Container Level Configurations.png]] |
| | ||
| − | + | The following fields are displayed just for containers >100: | |
| − | *'''Container Level''' | + | *'''Container Level''' |
| + | *'''Level Description''' | ||
| + | *'''Part Number''' | ||
| + | *'''Project ID''' | ||
| + | *''' Active''' | ||
| + | *'''Capacity''' | ||
| + | *'''Label Program ''' | ||
| + | *'''Disable printing when the container is not full''' (checking this option, the container configuration will print only when the container is full). | ||
| + | | ||
| − | + | The following checkboxes are displayed as Multi-Level Container Rule: | |
| − | + | *'''Revision Controlled''': If selected only one revision can be containerized together. Please correct and check the default value. | |
| + | *'''Shop Order Controlled''': If selected only units from a single shop order to be containerized together – default No; | ||
| + | *'''Shipping Level''': If selected, defines that a specific container is the Shipping level of containerization – default No; | ||
| + | *'''Auto Close''': Yes / No – default No; | ||
| + | *'''Multi Part''': Allow multiple part numbers in a container. It is possible to add elements from another part number, but it must have the same Project Id. | ||
| − | + | | |
| − | |||
| − | + | The user can define the '''Container Dimensions''' by entering the <span style="color:#c0392b;">tare weight</span> (kg), height (m), length (m), volume (m3), and width (m). Selecting the Dimension per Unit flag, it is possible to fill for each configuration container. If the dimension is in a different measure, the data will be converted. | |
| | ||
| − | ''' | + | Two new fields are available under the '''Validation''' section: '''Close Container''' and '''Add Element'''. |
| + | |||
| + | | ||
| − | + | These two Combobox were created to allow users to add validations different from the default ones. The values in these fields are all Operations available for a specific Site/Plant that are configured by Customization, according to their needs. The user only needs to select which operation will be assigned. The Operations should be assigned to one Tag, previously in order to be displayed on the option list. | |
| | ||
| − | The | + | Container Configuration fields Description: |
| + | |||
| + | *'''Container Level''': defines the container level (99 to 999) – default is Empty. For this topic, the level used is 99(LOT). The default Container Levels, 99 - LOT, 100 - CONTAINER, 110 - SKID, and 120 - PALLET cannot be edited or deleted, it is created automatically by the application. | ||
| | ||
| − | + | SFDC Lot Rules Description: | |
| − | + | *'''Algorithm: '''not used when Serial Mask is specified. The field can contain either (i) a predefined program filename or (ii) an algorithm number if the algorithm was defined using the Algorithm Maintenance – default N/A; | |
| + | *'''Container Mask''': not used when the Serial Algorithm Procedure is specified. Up to 30 characters in length. The mask of the serial number for the container or lot. Using a serial mask, container serialization schemes can be different per part number – default Empty; | ||
| | ||
| − | The user is able to | + | 3. To manage the container levels, select the corresponding icon. The Container Level screen is displayed and the user is able to Add, Edit or Delete container levels. |
| | ||
| − | + | '''Figure 13: Manage Icon and Container Level Window''' | |
| − | + | '''[[File:Manage Icon and Container Level Window.png|700px|Manage Icon and Container Level Window.png]]''' | |
| − | + | | |
| | ||
| − | + | ==== <span class="mw-headline" id="Add_Container_Level"><span class="mw-headline" id="Add_Container_Level"><span class="mw-headline" id="Add_Container_Level"><span class="mw-headline" id="Add_Container_Level"><span class="mw-headline" id="Add_Container_Level"><span class="mw-headline" id="Add_Container_Level"><span class="mw-headline" id="Add_Container_Level"><span class="mw-headline" id="Add_Container_Level"><span class="mw-headline" id="Add_Container_Level"><span class="mw-headline" id="Add_Container_Level"><span class="mw-headline" id="Add_Container_Level"><span class="mw-headline" id="Add_Container_Level"><span class="mw-headline" id="Add_Container_Level"><span class="mw-headline" id="Add_Container_Level"><span class="mw-headline" id="Add_Container_Level"><span class="mw-headline" id="Add_Container_Level"><span class="mw-headline" id="Add_Container_Level"><span class="mw-headline" id="Add_Container_Level"><span class="mw-headline" id="Add_Container_Level"><span class="mw-headline" id="Add_Container_Level"><span class="mw-headline" id="Add_Container_Level"><span class="mw-headline" id="Add_Container_Level">Add Container Level</span></span></span></span></span></span></span></span></span></span></span></span></span></span></span></span></span></span></span></span></span></span> ==== | |
| − | + | 1. To add a container level, select '''Add''' located above the Container Level list in the Container Level screen (Figure 12). | |
| − | + | 2. The '''Add Container Level''' window displays: | |
| − | 3. Enter the '''Container Level''' with a value between | + | 3. Enter the '''Container Level''' with a value between 100 to 999 and the '''Level Description''' with a value that does not exist in the database. |
4. Select '''OK '''to complete. | 4. Select '''OK '''to complete. | ||
| Line 306: | Line 331: | ||
| | ||
| − | ==== Edit a Container Level ==== | + | ==== <span class="mw-headline" id="Edit_a_Container_Level"><span class="mw-headline" id="Edit_a_Container_Level"><span class="mw-headline" id="Edit_a_Container_Level"><span class="mw-headline" id="Edit_a_Container_Level"><span class="mw-headline" id="Edit_a_Container_Level"><span class="mw-headline" id="Edit_a_Container_Level"><span class="mw-headline" id="Edit_a_Container_Level"><span class="mw-headline" id="Edit_a_Container_Level"><span class="mw-headline" id="Edit_a_Container_Level"><span class="mw-headline" id="Edit_a_Container_Level"><span class="mw-headline" id="Edit_a_Container_Level"><span class="mw-headline" id="Edit_a_Container_Level"><span class="mw-headline" id="Edit_a_Container_Level"><span class="mw-headline" id="Edit_a_Container_Level"><span class="mw-headline" id="Edit_a_Container_Level"><span class="mw-headline" id="Edit_a_Container_Level"><span class="mw-headline" id="Edit_a_Container_Level"><span class="mw-headline" id="Edit_a_Container_Level"><span class="mw-headline" id="Edit_a_Container_Level"><span class="mw-headline" id="Edit_a_Container_Level"><span class="mw-headline" id="Edit_a_Container_Level"><span class="mw-headline" id="Edit_a_Container_Level">Edit a Container Level</span></span></span></span></span></span></span></span></span></span></span></span></span></span></span></span></span></span></span></span></span></span> ==== |
'''Edit Container Level''': (maintenance button) can be performed at any time except for a default value or a container definition that already exists for that level; otherwise, if there are no definitions, editing a container level is allowed. | '''Edit Container Level''': (maintenance button) can be performed at any time except for a default value or a container definition that already exists for that level; otherwise, if there are no definitions, editing a container level is allowed. | ||
| + | |||
| + | | ||
'''Type 99 (LOT) cannot be edited'''. If a definition already exists, then the container level cannot be modified. | '''Type 99 (LOT) cannot be edited'''. If a definition already exists, then the container level cannot be modified. | ||
| Line 320: | Line 347: | ||
| | ||
| − | '''Figure | + | '''Figure 14: Edit Container Level''' |
| − | [[File: | + | [[File:Edit Container Level.png|700px|Edit Container Level.png]] |
| | ||
| − | + | ==== <span class="mw-headline" id="Delete_Container_Level"><span class="mw-headline" id="Delete_Container_Level"><span class="mw-headline" id="Delete_Container_Level"><span class="mw-headline" id="Delete_Container_Level"><span class="mw-headline" id="Delete_Container_Level"><span class="mw-headline" id="Delete_Container_Level"><span class="mw-headline" id="Delete_Container_Level"><span class="mw-headline" id="Delete_Container_Level"><span class="mw-headline" id="Delete_Container_Level"><span class="mw-headline" id="Delete_Container_Level"><span class="mw-headline" id="Delete_Container_Level"><span class="mw-headline" id="Delete_Container_Level"><span class="mw-headline" id="Delete_Container_Level"><span class="mw-headline" id="Delete_Container_Level"><span class="mw-headline" id="Delete_Container_Level"><span class="mw-headline" id="Delete_Container_Level"><span class="mw-headline" id="Delete_Container_Level"><span class="mw-headline" id="Delete_Container_Level"><span class="mw-headline" id="Delete_Container_Level"><span class="mw-headline" id="Delete_Container_Level"><span class="mw-headline" id="Delete_Container_Level"><span class="mw-headline" id="Delete_Container_Level">Delete Container Level</span></span></span></span></span></span></span></span></span></span></span></span></span></span></span></span></span></span></span></span></span></span> ==== | |
| − | + | '''Delete Container Level''': (maintenance button) can be performed at any time except for a default value or a container definition that already exists for that level. | |
| − | + | Also, all types without a container configuration associated can be deleted. | |
| − | + | | |
1. To delete a container level, select the box to the left of the desired container level, and then select '''Delete'''. | 1. To delete a container level, select the box to the left of the desired container level, and then select '''Delete'''. | ||
| Line 342: | Line 369: | ||
| | ||
| − | '''Figure | + | '''Figure 15: Delete Container Level''' |
| − | [[File: | + | '''[[File:Delete Container Level.png|700px|Delete Container Level.png]]''' |
| | ||
| − | === | + | === <span class="mw-headline" id="Print.2FExport_All_Filtered_Container_Configurations"><span class="mw-headline" id="Print.2FExport_All_Filtered_Container_Configurations"><span class="mw-headline" id="Print.2FExport_All_Filtered_Container_Configurations"><span class="mw-headline" id="Print.2FExport_All_Filtered_Container_Configurations"><span class="mw-headline" id="Print.2FExport_All_Filtered_Container_Configurations"><span class="mw-headline" id="Print.2FExport_All_Filtered_Container_Configurations"><span class="mw-headline" id="Print.2FExport_All_Filtered_Container_Configurations"><span class="mw-headline" id="Print.2FExport_All_Filtered_Container_Configurations"><span class="mw-headline" id="Print.2FExport_All_Filtered_Container_Configurations"><span class="mw-headline" id="Print.2FExport_All_Filtered_Container_Configurations"><span class="mw-headline" id="Print.2FExport_All_Filtered_Container_Configurations"><span class="mw-headline" id="Print.2FExport_All_Filtered_Container_Configurations"><span class="mw-headline" id="Print.2FExport_All_Filtered_Container_Configurations"><span class="mw-headline" id="Print.2FExport_All_Filtered_Container_Configurations"><span class="mw-headline" id="Print.2FExport_All_Filtered_Container_Configurations"><span class="mw-headline" id="Print.2FExport_All_Filtered_Container_Configurations"><span class="mw-headline" id="Print.2FExport_All_Filtered_Container_Configurations"><span class="mw-headline" id="Print.2FExport_All_Filtered_Container_Configurations"><span class="mw-headline" id="Print.2FExport_All_Filtered_Container_Configurations">Print/Export All Filtered Container Configurations</span></span></span></span></span></span></span></span></span></span></span></span></span></span></span></span></span></span></span> === |
| − | + | 1. To '''Print/Export''' all Filtered Container Configurations, select the Print icon located on the Multi-Level Container Configuration main page. | |
| − | |||
| − | + | 2. Select a program from the '''Open with '''drop-down list, then select '''OK.''' | |
| − | |||
| − | |||
| − | |||
| − | |||
| − | |||
| − | ''' | ||
| − | |||
| − | |||
| | ||
| − | + | '''Figure 17: Print/Export All Filtered Container Configurations''' | |
| − | |||
| − | + | '''[[File:Print-Export All Filtered Container Configurations.png|700px|Print-Export All Filtered Container Configurations.png]]''' | |
| − | |||
| − | |||
| − | |||
| − | |||
| − | |||
| − | |||
| − | |||
| − | |||
| − | |||
| − | |||
| − | |||
| − | |||
| − | |||
| − | |||
| − | |||
| − | |||
| − | |||
| − | |||
| − | |||
| − | |||
| − | |||
| − | |||
| − | |||
| − | |||
| − | |||
| − | |||
| − | |||
| − | |||
| − | |||
| | ||
| − | + | A report is generated: | |
| − | |||
| − | |||
| − | |||
| − | |||
| − | |||
| − | |||
| | ||
| − | '''Figure | + | '''Figure 18: Container Configuration Report''' |
| − | [[File: | + | [[File:Container Configurations Report.png|900px|Container Configurations Report.png]] |
| | ||
| − | + | 3. The user can perform some actions (print, save, fit page…) by selecting the buttons at the top of the report. | |
| | ||
| − | + | = <span class="mw-headline" id="Packing_Station_Multi-Level_Containerization"><span class="mw-headline" id="Packing_Station_Multi-Level_Containerization"><span class="mw-headline" id="Packing_Station_Multi-Level_Containerization"><span class="mw-headline" id="Packing_Station_Multi-Level_Containerization"><span class="mw-headline" id="Packing_Station_Multi-Level_Containerization"><span class="mw-headline" id="Packing_Station_Multi-Level_Containerization"><span class="mw-headline" id="Packing_Station_Multi-Level_Containerization"><span class="mw-headline" id="Packing_Station_Multi-Level_Containerization"><span class="mw-headline" id="Packing_Station_Multi-Level_Containerization"><span class="mw-headline" id="Packing_Station_Multi-Level_Containerization"><span class="mw-headline" id="Packing_Station_Multi-Level_Containerization"><span class="mw-headline" id="Packing_Station_Multi-Level_Containerization"><span class="mw-headline" id="Packing_Station_Multi-Level_Containerization"><span class="mw-headline" id="Packing_Station_Multi-Level_Containerization"><span class="mw-headline" id="Packing_Station_Multi-Level_Containerization"><span class="mw-headline" id="Packing_Station_Multi-Level_Containerization"><span class="mw-headline" id="Packing_Station_Multi-Level_Containerization">Packing Station Multi-Level Containerization</span></span></span></span></span></span></span></span></span></span></span></span></span></span></span></span></span> = | |
| − | + | The '''Packing Station Multi-Level Containerization''' functionality allows regular users to create a pallet (higher container) without using commands, all users need to do is scan a container. | |
| | ||
| − | + | To enable the '''Multi-Level Container''' function, users must follow the step list below: | |
| − | + | #Click on the '''Configuration''' icon. | |
| + | #Mark the '''Multi-Level CNTNR''' checkbox. | ||
| + | #Click on the '''tick''' icon button. | ||
| − | + | <br/> '''Figure 19: Multi-Level CNTNR Configuration in Production Workbench''' | |
| − | + | '''[[File:Multi-Level CNTNR Configuration in Production Workbench.png|900px|Multi-Level CNTNR Configuration in Production Workbench.png]]''' | |
| − | + | <br/> <br/> To use the Multi-Level Container function, users must go to: '''Production > Production Workbench''', then, click on the '''Container Information''' icon. Notice that a new checkbox called '''Multi-level Container''' will display. | |
| − | |||
| − | |||
| − | |||
| − | |||
| − | |||
| − | |||
| − | |||
| − | |||
| − | |||
| − | |||
| − | |||
| − | |||
| − | |||
| − | |||
| − | |||
| − | |||
| − | |||
| − | |||
| − | |||
| − | |||
| − | |||
| − | |||
| − | |||
| − | |||
| − | |||
| − | |||
| − | |||
| − | |||
| − | |||
| − | |||
| − | |||
| − | |||
| − | |||
| − | |||
| − | |||
| − | |||
| − | |||
| − | |||
| − | |||
| − | |||
| − | |||
| − | |||
| − | |||
| − | |||
| − | |||
| − | |||
| − | |||
| − | |||
| − | |||
| − | |||
| − | |||
| − | |||
| − | |||
| − | |||
| − | |||
| − | |||
| − | |||
| − | |||
| − | |||
| − | |||
| − | |||
| − | |||
| − | |||
| − | |||
| − | |||
| − | |||
| − | |||
| − | |||
| − | |||
| − | |||
| − | |||
| − | |||
| − | |||
| − | |||
| − | |||
| − | |||
| − | |||
| − | - Container | + | When the '''Multi-level Container''' is checked and the user scans a container or a serial number, a pop-up window will display to allow users to select the container configuration. |
| − | + | When the '''Multi-level Container''' is unchecked, the container will take the previous configuration saved in the local storage. | |
| − | + | | |
| − | + | '''Figure 20: Multi-Level Container Option''' | |
| − | |||
| − | |||
| − | |||
| − | |||
| − | |||
| − | |||
| − | |||
| − | |||
| − | [[ | + | '''[[File:Multi-Level Container Option.png|Multi-Level Container Option.png]]''' |
Latest revision as of 20:43, 31 May 2023
42Q Home > Shop Floor Control > Configuration > Multi-Level Containerization Configuration
Contents
- 1 Shop Floor Control
- 2 Multi-Level Containerization Configuration
- 2.1 Container List
- 2.2 Filter Settings
- 2.3 Edit Container Configuration
- 2.4 Copy Container Configuration
- 2.5 Delete Container Configuration
- 2.6 View Container Configuration
- 2.7 Print/Export Container Configuration
- 2.8 Add Multi-Level Configuration Containers: Level >100
- 2.9 Print/Export All Filtered Container Configurations
- 3 Packing Station Multi-Level Containerization
Shop Floor Control
As its name implies, the Shop Floor Data Collection system is responsible for the collection of data from the shop floor. The collected information is then stored in the Manufacturing Execution System (MES). Specifically, the real-time information collected by SFDC is utilized by Reporting and MES Web to create quality control reports. The SFDC system uses manual and automated barcode scanning to monitor and collect data for a product line or plant. Thus SFDC plays an important role in maintaining unit histories and directing product movement on the manufacturing floor.
The system provides Access Control between the modules of the application, including the functionalities of each screen. The current version has a Shop Floor Configuration page that provides access to all submodule pages and their functionalities (view, add, edit, delete, print, and generate output files).
Multi-Level Containerization Configuration
Containerization tracks the placement of serial numbers in a container, box, or carton. If a container is opened, any serial number entry that follows the container configuration will be attached to the open container. As performed by SFDC Containerization, all units added to the container must be at status 30 (Completed).
Depending on the configuration, the application allows adding units with the same revision as the first serial added to the container. Container quantities are defined by part number. Once a unit is containerized, it cannot be scanned at any other data collector, except if a serial number is scanned at a start station on Shop Floor, then it will be removed from the container. It is not recommended, it is better if users remove units from containers first.
Container definitions are specified by part number, level (container or lot), capacity, project ID, active flag, serial algorithm procedure or serial mask, and description. Multi-Level Containerization creates and modifies container definitions.
This document explains the application user interface, data fields, and configuration requirements. This module allows the user to perform actions like create, print/export filtered results, edit, copy, delete, view, or print/export container configuration.
To access the Multi-Level Containerization page, navigate to Shop Floor Control > Configuration > Multi-Level Containerization Configuration. The main Multi-Level Containerization Configuration page is displayed.
Figure 1: Multi-Level Containerization Configuration
Container List
The Container List displays all container levels and allows performing the following actions:
- Filter Data
- Edit a Container Configuration
- Copy a Container Configuration
- View a Container Configuration
- Delete a Container Configuration
- Print/Export details of a Container Configuration
Note that it is possible to execute two actions from the Task Panel:
- Add a new Container Configuration
- Print/Export all Filtered Container Configurations
Filter Settings
1. To perform searches, enter information into one or more of the following fields:
- Container Level: Predefined container levels are: "99 LOT", "100 BOX", "110 SKID" and "120 PALLET"; levels 101-999 are Multi-Level Containers.
- Level Description: The default description for the level.
- Part Number: A number that serves to uniquely identify a part (product).
- Project ID: The project identification number.
- Active (All, No, Yes): NO implies inactive for containerization. Default=YES.
2. Enter the information and select Filter.
Figure 2: Multi-Level Filter Settings
3. To clear the fields' contents, select Clear to start a new filter.
Edit Container Configuration
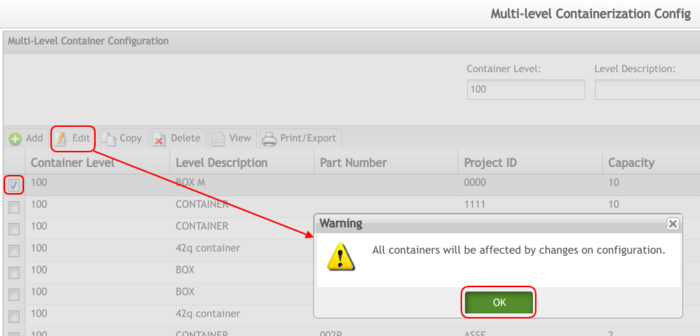
1. To edit a Container Configuration, select the box to the left of the container level and then select Edit.
Figure 3: Container Configuration - Edit
2. A Warning box displays alerting the user that all containers will be affected by the changes to the configuration.
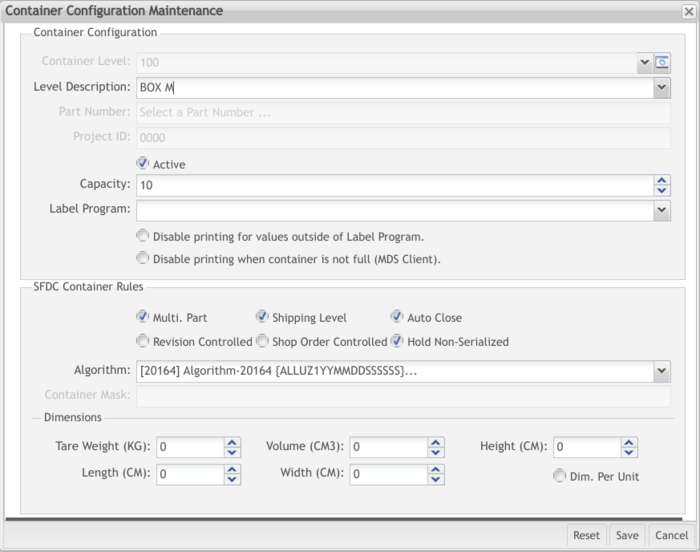
3. Select OK to continue. The Container Configuration Maintenance screen displays:
Figure 4: Container Configuration Maintenance
4. Edit the Container's information as desired.
5. Select Save to confirm, Reset to clear the fields, or Cancel to exit.
All the container configuration information is updated according to the updates applied and the container configuration is displayed in the container configuration's list.
Container Level, Part Number, and Project ID cannot be edited, as they are the keys of the record.
Note: For further information about the fields, see the next topics.
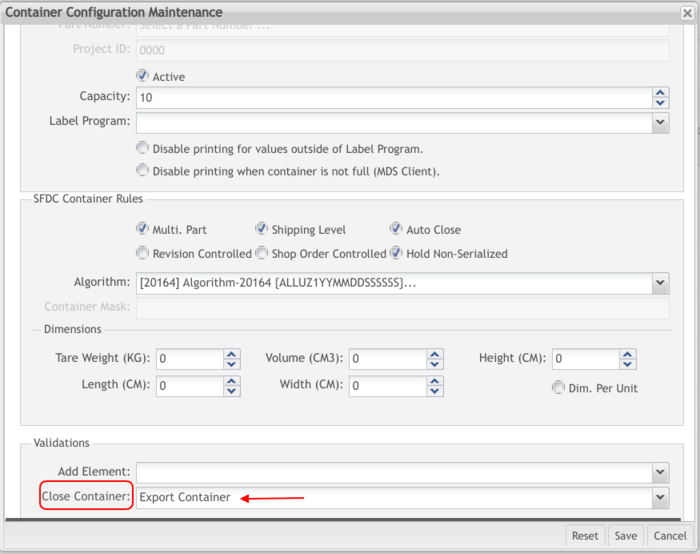
Close Container Option: the user must enable the Shipping Level option, to be able to auto export the closed containers.
Figure 5: Closed Container. Export container
When the user closes the container it will be auto exported and a message will be sent confirming that the container was exported and closed, as well as the email with the XML file.
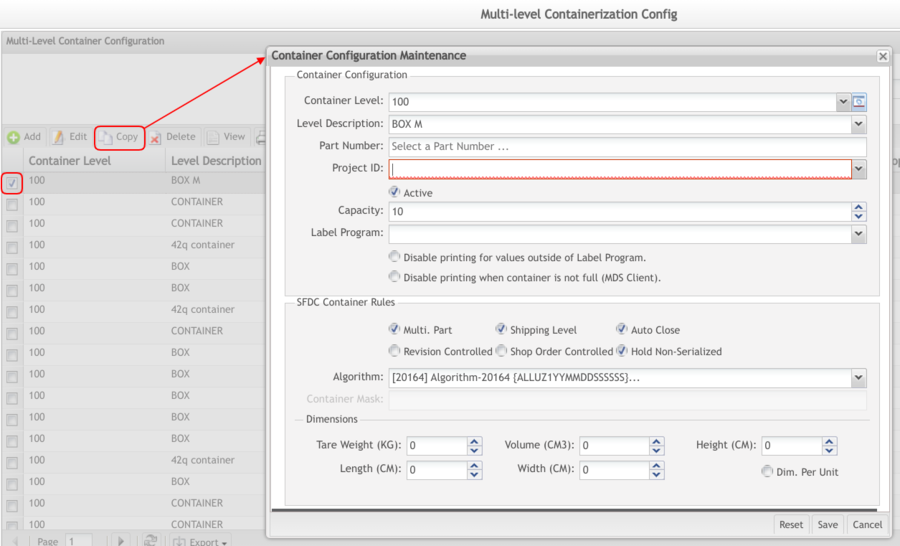
Copy Container Configuration
1. To copy a Container Configuration, select the box to the left of the Container level and select Copy.
2. The Container Configuration Maintenance window is displayed:
Figure 6: Container Configuration-Copy
3. Change the necessary information and select Ok. The new Container configuration created is displayed in the Container Configuration List.
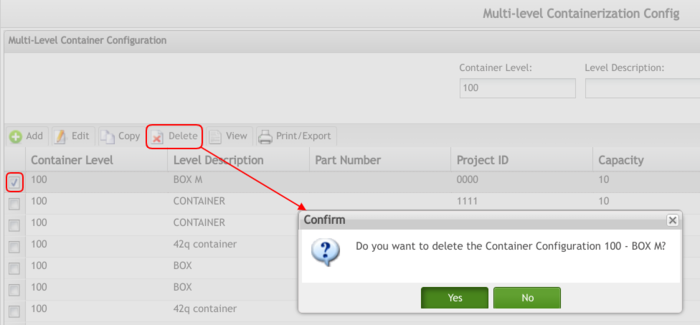
Delete Container Configuration
1. To delete a Container Configuration, select the box to the left of the container level and select Delete.
Figure 7: Container Configuration-Delete
2. A confirmation message displays. Select Yes to confirm the deletion or No to cancel.
3. The Container Configuration will be deleted from the containers list.
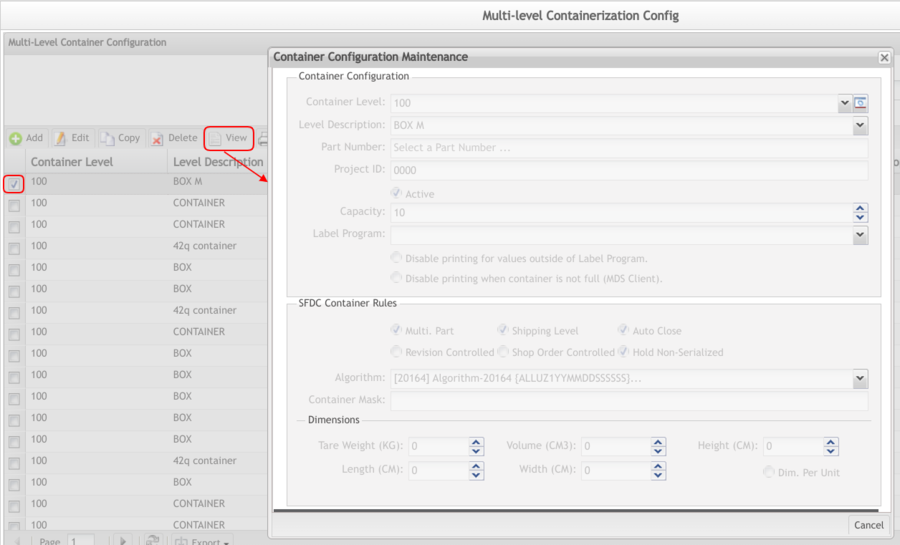
View Container Configuration
1. To view a Container Configuration, select the box to the left of a container level and select View.
2. The container configuration maintenance window displays:
Figure 8: Container Configuration-View
Note: All the fields are read-only.
Print/Export Container Configuration
1. To print or export a Container Configuration, select the box to the left of a container level and then select Print/Export.
Figure 9: Container Configuration-Print/Export
2. A report is generated and downloaded automatically as PDF:
Figure 10: Container Configuration - Report
Note: The column Algorithm is changed to Container Mask only when the Container mask is filled.
Figure 11: Container Configuration Level > 100 - Report
3. In the viewer screen, select Save or Print to save or print the report result.
Add Multi-Level Configuration Containers: Level >100
1. To create a new Container Configuration, select the Add button located above the container level list on the Container Configuration Maintenance main page.
2. The Container Configuration Maintenance screen is displayed:
Figure 12: Add Container and Container Level Configurations
The following fields are displayed just for containers >100:
- Container Level
- Level Description
- Part Number
- Project ID
- Active
- Capacity
- Label Program
- Disable printing when the container is not full (checking this option, the container configuration will print only when the container is full).
The following checkboxes are displayed as Multi-Level Container Rule:
- Revision Controlled: If selected only one revision can be containerized together. Please correct and check the default value.
- Shop Order Controlled: If selected only units from a single shop order to be containerized together – default No;
- Shipping Level: If selected, defines that a specific container is the Shipping level of containerization – default No;
- Auto Close: Yes / No – default No;
- Multi Part: Allow multiple part numbers in a container. It is possible to add elements from another part number, but it must have the same Project Id.
The user can define the Container Dimensions by entering the tare weight (kg), height (m), length (m), volume (m3), and width (m). Selecting the Dimension per Unit flag, it is possible to fill for each configuration container. If the dimension is in a different measure, the data will be converted.
Two new fields are available under the Validation section: Close Container and Add Element.
These two Combobox were created to allow users to add validations different from the default ones. The values in these fields are all Operations available for a specific Site/Plant that are configured by Customization, according to their needs. The user only needs to select which operation will be assigned. The Operations should be assigned to one Tag, previously in order to be displayed on the option list.
Container Configuration fields Description:
- Container Level: defines the container level (99 to 999) – default is Empty. For this topic, the level used is 99(LOT). The default Container Levels, 99 - LOT, 100 - CONTAINER, 110 - SKID, and 120 - PALLET cannot be edited or deleted, it is created automatically by the application.
SFDC Lot Rules Description:
- Algorithm: not used when Serial Mask is specified. The field can contain either (i) a predefined program filename or (ii) an algorithm number if the algorithm was defined using the Algorithm Maintenance – default N/A;
- Container Mask: not used when the Serial Algorithm Procedure is specified. Up to 30 characters in length. The mask of the serial number for the container or lot. Using a serial mask, container serialization schemes can be different per part number – default Empty;
3. To manage the container levels, select the corresponding icon. The Container Level screen is displayed and the user is able to Add, Edit or Delete container levels.
Figure 13: Manage Icon and Container Level Window
Add Container Level
1. To add a container level, select Add located above the Container Level list in the Container Level screen (Figure 12).
2. The Add Container Level window displays:
3. Enter the Container Level with a value between 100 to 999 and the Level Description with a value that does not exist in the database.
4. Select OK to complete.
5. The new container level will be displayed in the containers level list and the user will be able to select it when creating/editing a container configuration.
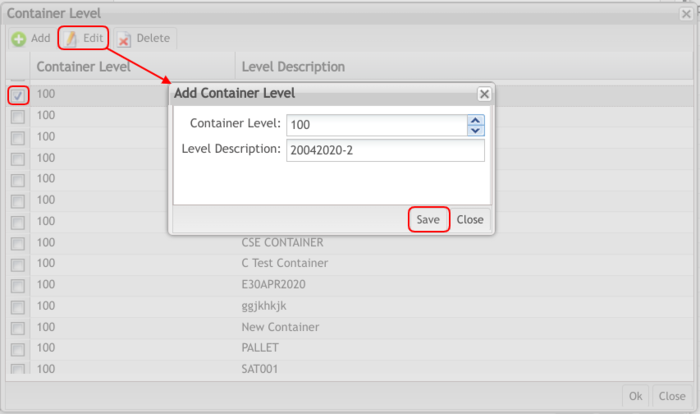
Edit a Container Level
Edit Container Level: (maintenance button) can be performed at any time except for a default value or a container definition that already exists for that level; otherwise, if there are no definitions, editing a container level is allowed.
Type 99 (LOT) cannot be edited. If a definition already exists, then the container level cannot be modified.
1. To edit a container level, select the box to the left of the desired container level, and then select Edit.
2. The Add Container Level window displays and is available to edit.
3. Edit the information and then select Save to confirm or Close to cancel.
Figure 14: Edit Container Level
Delete Container Level
Delete Container Level: (maintenance button) can be performed at any time except for a default value or a container definition that already exists for that level.
Also, all types without a container configuration associated can be deleted.
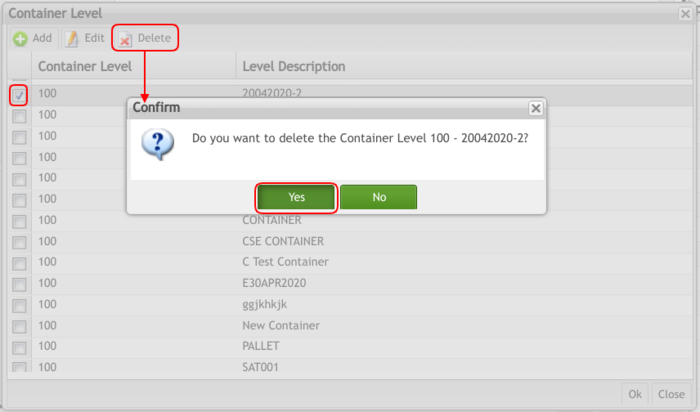
1. To delete a container level, select the box to the left of the desired container level, and then select Delete.
2. A confirm screen displays.
3. Select Yes to confirm deletion or No to cancel.
Figure 15: Delete Container Level
Print/Export All Filtered Container Configurations
1. To Print/Export all Filtered Container Configurations, select the Print icon located on the Multi-Level Container Configuration main page.
2. Select a program from the Open with drop-down list, then select OK.
Figure 17: Print/Export All Filtered Container Configurations
A report is generated:
Figure 18: Container Configuration Report
3. The user can perform some actions (print, save, fit page…) by selecting the buttons at the top of the report.
Packing Station Multi-Level Containerization
The Packing Station Multi-Level Containerization functionality allows regular users to create a pallet (higher container) without using commands, all users need to do is scan a container.
To enable the Multi-Level Container function, users must follow the step list below:
- Click on the Configuration icon.
- Mark the Multi-Level CNTNR checkbox.
- Click on the tick icon button.
Figure 19: Multi-Level CNTNR Configuration in Production Workbench
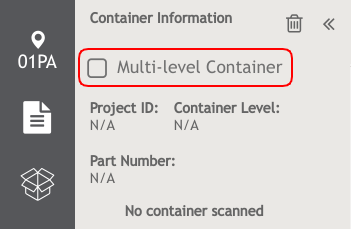
To use the Multi-Level Container function, users must go to: Production > Production Workbench, then, click on the Container Information icon. Notice that a new checkbox called Multi-level Container will display.
When the Multi-level Container is checked and the user scans a container or a serial number, a pop-up window will display to allow users to select the container configuration.
When the Multi-level Container is unchecked, the container will take the previous configuration saved in the local storage.
Figure 20: Multi-Level Container Option
