Difference between revisions of "SOP-42Q-MES0147 Integration Scanning"
Helena wang (talk | contribs) |
|||
| (8 intermediate revisions by 2 users not shown) | |||
| Line 1: | Line 1: | ||
| + | |||
| + | <small>[[42Q_Cloud-Based_MES/MOMS|42Q Home]] > [[Production|Production]] > Integration Scanning</small> | ||
| + | |||
<!----- Conversion time: 7.966 seconds. | <!----- Conversion time: 7.966 seconds. | ||
| Line 20: | Line 23: | ||
You have 3 H1 headings. You may want to use the "H1 -> H2" option to demote all headings by one level. | You have 3 H1 headings. You may want to use the "H1 -> H2" option to demote all headings by one level. | ||
| − | -----> | + | -----> |
| + | |||
| | ||
| | ||
| − | = Fuji Integration Scanning Process = | + | = <span class="mw-headline" id="_Fuji_Integration_Scanning_Process"> Fuji Integration Scanning Process</span> = |
| | ||
| − | This function allows the user to scan a panel within the Fuji Integration UI. With this function, users can scan a panel or batch boards on hand-load workstations. Before scanning, an employee number and scan location must be entered. The system will then validate the information with PTS and SFDC. Once the scan panel is validated,the data will be written into SFDC and PTS. | + | This function allows the user to scan a panel within the Fuji Integration UI. With this function, users can scan a panel or batch boards on hand-load workstations. Before scanning, an employee number and scan location must be entered. The system will then validate the information with PTS and SFDC. Once the scan panel is validated, the data will be written into SFDC and PTS. |
| − | '''<span style="text-decoration:underline;">NOTE</span>''': Upon entering a valid employee number and scan location, the system will | + | '''<span style="text-decoration:underline;">NOTE</span>''': Upon entering a valid employee number and scan location, the system will log in and retrieve the configuration for SFDC and PTS automatically. See [[MES_Fuji_Configuration|MES-Fuji Configuration]].<br/> |
'''Figure 1: Get Configuration Logic''' | '''Figure 1: Get Configuration Logic''' | ||
| − | [[File:1- Get Configuration Logic.png|800px]] | + | [[File:1- Get Configuration Logic.png|800px|1- Get Configuration Logic.png]] |
| | ||
| − | '''<span style="text-decoration:underline;"> | + | '''<span style="text-decoration:underline;">Note</span>''': If a user forgets to log out of the SFDC system, that device will be locked and cannot be used by other locations or PCs until the previous user logs out. |
| − | '''<span style="text-decoration:underline;"> | + | '''<span style="text-decoration:underline;">Note</span>''': If values are changed in configuration settings (i.e., WO, Location Mapping), the changes will not be updated until the operator rescans their Employee ID and Scan Location to log in again. |
| | ||
| Line 47: | Line 51: | ||
'''Figure 2: Integration Scan Board Logic''' | '''Figure 2: Integration Scan Board Logic''' | ||
| − | [[File:2- Integration Scan Board Logic.png|800px]] | + | [[File:2- Integration Scan Board Logic.png|800px|2- Integration Scan Board Logic.png]] |
| | ||
| + | | ||
| − | = Integration Scanning = | + | = <span class="mw-headline" id="_Integration_Scanning"> Integration Scanning</span> = |
| | ||
| Line 82: | Line 87: | ||
| | ||
| − | == Resubmit Scanning information == | + | |
| + | |||
| + | == <span class="mw-headline" id="_Resubmit_Scanning_information"> Resubmit Scanning information</span> == | ||
| | ||
| Line 96: | Line 103: | ||
[[File:5- Confirm Resubmit Example A.png|800px|5- Confirm Resubmit Example A.png]] | [[File:5- Confirm Resubmit Example A.png|800px|5- Confirm Resubmit Example A.png]] | ||
| − | <u>''' | + | <u>'''Note'''</u>: The pop-up message states, “Board Barcode is not enough 2, Are you sure want to submit?” |
| − | *Select'''Yes '''to submit the scanned board information into the system. | + | *Select '''Yes '''to submit the scanned board information into the system. |
| − | *Select'''No''' to Cancel. The scanned board information will not submit to the system. | + | *Select '''No''' to Cancel. The scanned board information will not submit to the system. |
<ol start="2"> | <ol start="2"> | ||
| − | <li>The scanned board information should submit into FujiTrax, SFDC, and PTS as expected (if the'''Use PTS, Use SFDC, Use FUJI''' options are selected at the screen Panel Configuration). However, if one of the three fails, the user can select '''Resubmit '''to submit the failed board information'''into the system again. (See '''Figure 6''')'''</li> | + | <li>The scanned board information should submit into FujiTrax, SFDC, and PTS as expected (if the '''Use PTS, Use SFDC, Use FUJI''' options are selected at the screen Panel Configuration). However, if one of the three fails, the user can select '''Resubmit '''to submit the failed board information '''into the system again. (See '''Figure 6''')'''</li> |
</ol> | </ol> | ||
| − | '''<span style="text-decoration:underline;"> | + | '''<span style="text-decoration:underline;">Note</span>''': In example B, do not change any information or select any other action before selecting '''Resubmit'''. |
| | ||
| Line 116: | Line 123: | ||
User can click the '''Resubmit''' button or scan ‘ssssssss’(8 s’s) in the '''Command''' textfiled to submit again. | User can click the '''Resubmit''' button or scan ‘ssssssss’(8 s’s) in the '''Command''' textfiled to submit again. | ||
| − | + | | |
| | ||
| + | |||
| + | == <span class="mw-headline" id="_Skip_Setting"> Skip Setting</span> == | ||
The skip setting is used to skip a board in a panel. Currently, if a board needs to be skipped in the panel, a series of 8 a’s or A’s can be used to replace the board in the panel. | The skip setting is used to skip a board in a panel. Currently, if a board needs to be skipped in the panel, a series of 8 a’s or A’s can be used to replace the board in the panel. | ||
| Line 137: | Line 146: | ||
#When '''Skip Setting''' default is '''No''', scan the board barcodes one by one. (See '''Figure 7''') | #When '''Skip Setting''' default is '''No''', scan the board barcodes one by one. (See '''Figure 7''') | ||
| − | #When the '''Skip Setting '''is set'''to '''T,the first board barcode will be read as the panel barcode'''('''panelbarcode'''). '''The second board barcode will default as'''panelbarcode_2'''. ( | + | #When the '''Skip Setting '''is set'''to '''T,the first board barcode will be read as the panel barcode'''('''panelbarcode'''). '''The second board barcode will default as '''panelbarcode_2'''. (See '''Figure '''''8''''')''''' |
| − | <br/> | + | <br/> ''' ''' |
'''Figure 8: Scan Two Side- T Skip''' | '''Figure 8: Scan Two Side- T Skip''' | ||
| − | [[File:8- Scan Two Side- T Skip.png|800px|8- Scan Two Side- T Skip.png]] | + | '''[[File:8- Scan Two Side- T Skip.png|800px|8- Scan Two Side- T Skip.png]]''' |
| − | | + | ''' ''' |
<ol start="3"> | <ol start="3"> | ||
| − | <li>When the | + | <li>When the Skip Setting is set toB, set 1 as the Panel Barcode, and B to skip.The system will ask to set the Panel barcode. (See '''Figure 9''),'''''and then succeed scanned barcode, please see'''''Figure 10'''.<br/> ''' '''''</li> |
</ol> | </ol> | ||
'''Figure 9: Scan Two Side- B skip''' | '''Figure 9: Scan Two Side- B skip''' | ||
| − | [[File:9- Scan Two Side- B skip.png|800px|9- Scan Two Side- B skip.png]] | + | '''[[File:9- Scan Two Side- B skip.png|800px|9- Scan Two Side- B skip.png]]''' |
| − | | + | ''' ''' |
Once the board’s barcode is valid , select submit and the information will be sent to PTS, SFDC, and FujiTrax successfully. The message “Scanning Success” will display to verify. | Once the board’s barcode is valid , select submit and the information will be sent to PTS, SFDC, and FujiTrax successfully. The message “Scanning Success” will display to verify. | ||
| − | | + | ''' ''' |
'''Figure 10: Scan Success''' | '''Figure 10: Scan Success''' | ||
| − | [[File:10- Scan Success.png|800px|10- Scan Success.png]] | + | '''[[File:10- Scan Success.png|800px|10- Scan Success.png]]''' |
| − | | + | ''' ''' |
| − | == SFDC Logout == | + | == <span class="mw-headline" id="_SFDC_Logout"> SFDC Logout</span> == |
| | ||
| Line 181: | Line 190: | ||
*If a user forgets to log out of the SFDC system, the same device ID/Location cannot be logged into on another PC or NetDC. | *If a user forgets to log out of the SFDC system, the same device ID/Location cannot be logged into on another PC or NetDC. | ||
| − | *If a setting is changed (work order, location mapping, panel setting), the changes will not be reflected until the operator scans the Badge Number and PTS Workstation to log in again. | + | *If a setting is changed (work order, location mapping, panel setting), the changes will not be reflected until the operator scans the Badge Number and PTS Workstation to log in again. |
| − | = | + | |
| + | |||
| + | = <span class="mw-headline" id="Fujitrax_Loading_Material_Verify">Fujitrax Loading Material Verify</span> = | ||
| | ||
| Line 213: | Line 224: | ||
*If the line mapping is valid, this interface will first compare the BOM-List of the FujiTrax line (Part Number/Designator) with the PTS BOM in the PTS database before the loading material process begins. | *If the line mapping is valid, this interface will first compare the BOM-List of the FujiTrax line (Part Number/Designator) with the PTS BOM in the PTS database before the loading material process begins. | ||
| − | == | + | == <span class="mw-headline" id="_Compare_PTS_BOM_and_Fujitrax_BOM_List"> Compare PTS BOM and Fujitrax BOM List</span> == |
| | ||
| Line 223: | Line 234: | ||
'''Figure 12: Compare BOM Chart''' | '''Figure 12: Compare BOM Chart''' | ||
| − | [[File:12- Compare BOM Chart.png|800px]] | + | [[File:12- Compare BOM Chart.png|800px|12- Compare BOM Chart.png]] |
| − | == | + | == <span class="mw-headline" id="_Fujitrax_Loading_Material_Verify"> Fujitrax Loading Material Verify</span> == |
| | ||
| Line 257: | Line 268: | ||
'''Figure 13: Loading Error Log''' | '''Figure 13: Loading Error Log''' | ||
| − | [[File:13- Loading Error Log.png|800px]] | + | [[File:13- Loading Error Log.png|800px|13- Loading Error Log.png]] |
The error log messages are displayed in the format “Material EXX-XXXX not found”, adjacent to its corresponding function name, MES-FUJI. | The error log messages are displayed in the format “Material EXX-XXXX not found”, adjacent to its corresponding function name, MES-FUJI. | ||
| − | |||
| − | |||
| | ||
| − | + | ---- | |
| − | |||
| − | |||
| − | |||
| − | |||
| − | |||
| − | |||
| − | |||
| − | |||
| − | |||
| − | |||
| − | |||
| − | |||
| − | |||
| − | |||
| − | |||
| | ||
Latest revision as of 17:11, 12 March 2024
42Q Home > Production > Integration Scanning
Contents
Fuji Integration Scanning Process
This function allows the user to scan a panel within the Fuji Integration UI. With this function, users can scan a panel or batch boards on hand-load workstations. Before scanning, an employee number and scan location must be entered. The system will then validate the information with PTS and SFDC. Once the scan panel is validated, the data will be written into SFDC and PTS.
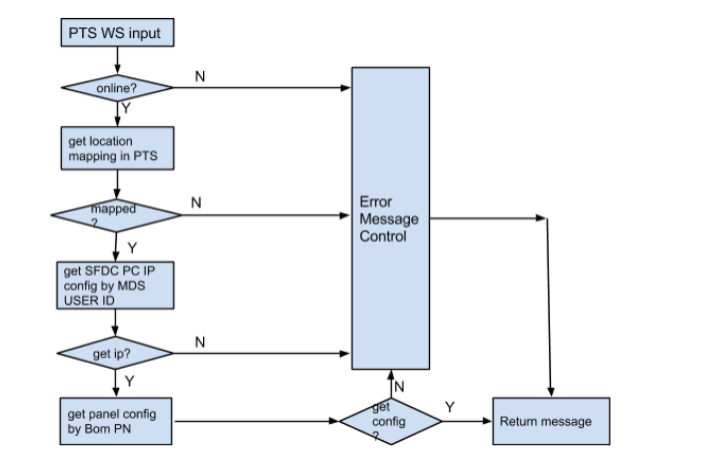
NOTE: Upon entering a valid employee number and scan location, the system will log in and retrieve the configuration for SFDC and PTS automatically. See MES-Fuji Configuration.
Figure 1: Get Configuration Logic
Note: If a user forgets to log out of the SFDC system, that device will be locked and cannot be used by other locations or PCs until the previous user logs out.
Note: If values are changed in configuration settings (i.e., WO, Location Mapping), the changes will not be updated until the operator rescans their Employee ID and Scan Location to log in again.
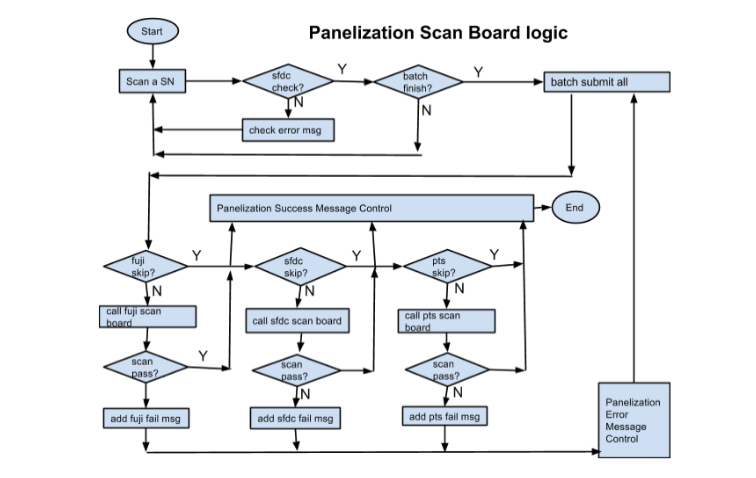
Figure 2: Integration Scan Board Logic
Integration Scanning
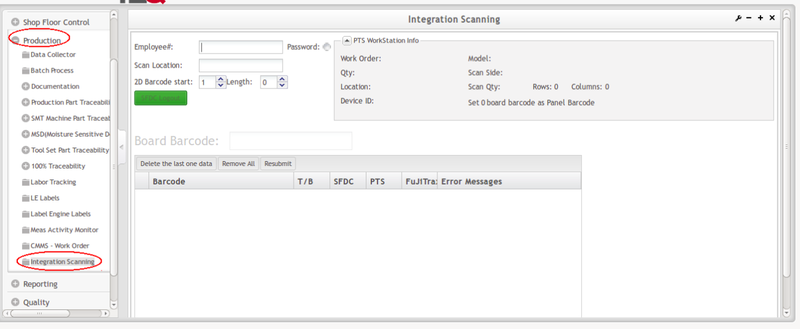
- To access Integration Scanning, navigate to Production > Integration Scanning. (See Figure 3)
Figure 3: Integration Scanning
- Enter an Employee# and Scan Location . Enter the password if the Password check button is selected.The PTS workstation information will display automatically. (The workstation will set the location mapping and the on-line status).
- Enter the 2D Barcode start and Length to set the 2D barcode regulation.
- Enter or scan the board barcode. If the barcode is invalid or if it already exists, an error message will display stating “Invalid board serial.” (See Figure 4)
- Select Delete the Last One Data to delete the last line from the list.
- Select Remove All to delete all lines from the list.
- Select Resubmit to submit the scan board information again.
NOTE: Please set the barcode regulation within SFDC if the Use SFDC option is selected at the screen Panel Configuration .
NOTE: If the Employee# or Scan location is invalid, an error message will display.
Figure 4: Invalid Board Serial
Resubmit Scanning information
Only need to use the Resubmit function for the following reasons:
- When the actual scanned board numbers are less than the set scanned board numbers, selecting Resubmit will submit the board barcode information to the system. A pop-up will display to confirm the action. (See Figure 5)
Figure 5: Confirm Resubmit Example A
Note: The pop-up message states, “Board Barcode is not enough 2, Are you sure want to submit?”
- Select Yes to submit the scanned board information into the system.
- Select No to Cancel. The scanned board information will not submit to the system.
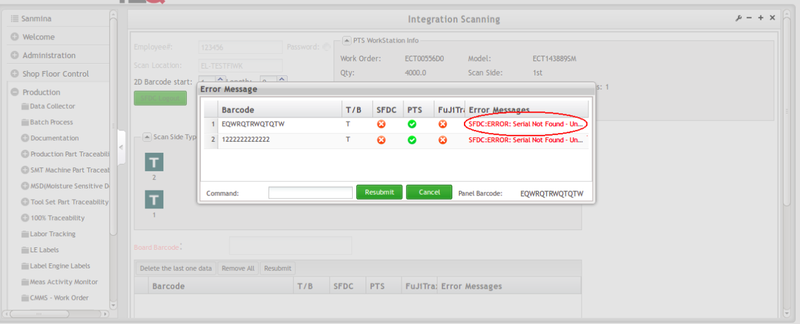
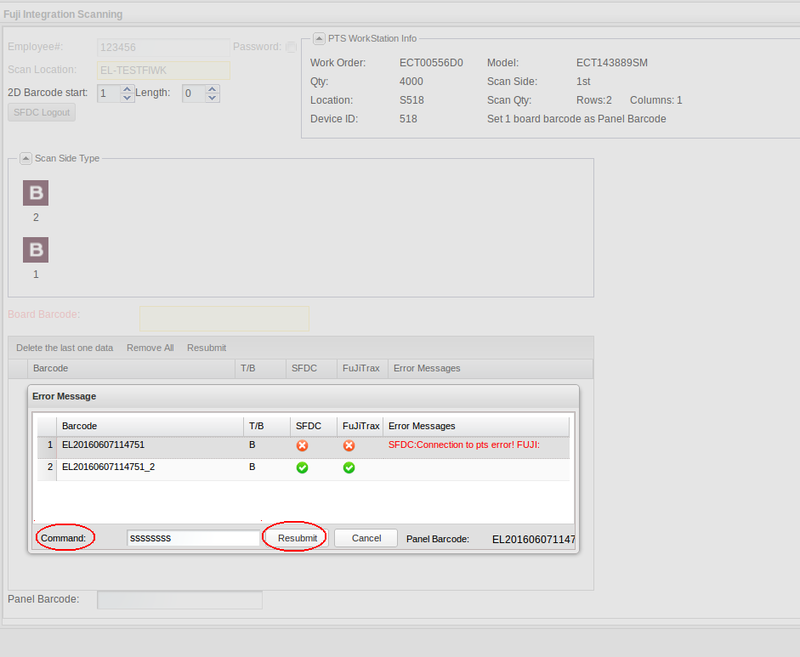
- The scanned board information should submit into FujiTrax, SFDC, and PTS as expected (if the Use PTS, Use SFDC, Use FUJI options are selected at the screen Panel Configuration). However, if one of the three fails, the user can select Resubmit to submit the failed board information into the system again. (See Figure 6)
Note: In example B, do not change any information or select any other action before selecting Resubmit.
Figure 6: Resubmit Example B
User can click the Resubmit button or scan ‘ssssssss’(8 s’s) in the Command textfiled to submit again.
Skip Setting
The skip setting is used to skip a board in a panel. Currently, if a board needs to be skipped in the panel, a series of 8 a’s or A’s can be used to replace the board in the panel.
Example: If there are 4 boards (A1,A2,A3,A4) in the panel, and one needs to be deleted, the user can replace the board to be deleted with a series of 8 a’s or A’s (aaaaaaaa, AAAAAAAA) to skip the board. If A1 is set as the panel barcode, then the skipped board barcode will be ‘A1_3’.
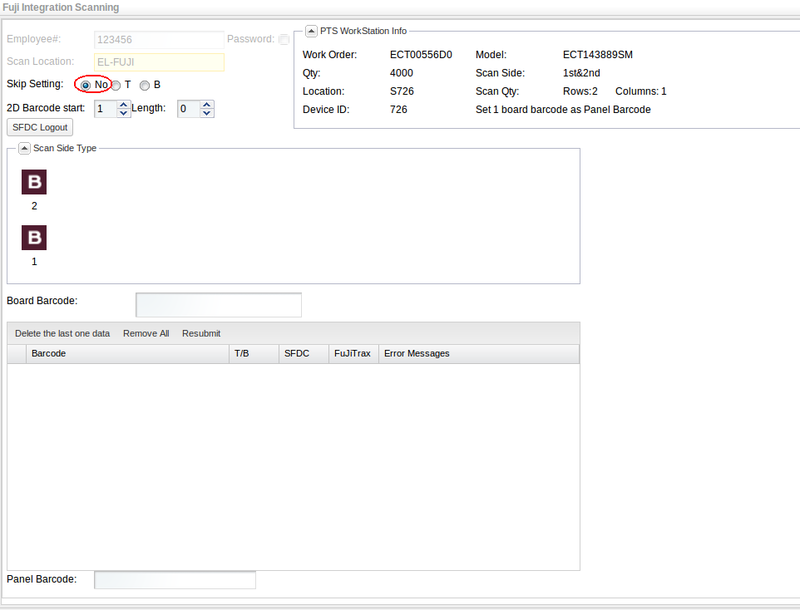
- Scan 1&&2 Side Board: In the PTS workstation setup page, if the scan side is set to 1&&2, the integration scan page will show the item Skip setting, which will not show when the scan side is not 1&&2. (See Figure 7)
Figure 7: Scan Two Side-Main
The following will explain the item Skip Setting when it is NO for T and B separately.
- When Skip Setting default is No, scan the board barcodes one by one. (See Figure 7)
- When the Skip Setting is setto T,the first board barcode will be read as the panel barcode(panelbarcode). The second board barcode will default as panelbarcode_2. (See Figure 8)
Figure 8: Scan Two Side- T Skip
- When the Skip Setting is set toB, set 1 as the Panel Barcode, and B to skip.The system will ask to set the Panel barcode. (See Figure 9),and then succeed scanned barcode, please seeFigure 10.
Figure 9: Scan Two Side- B skip
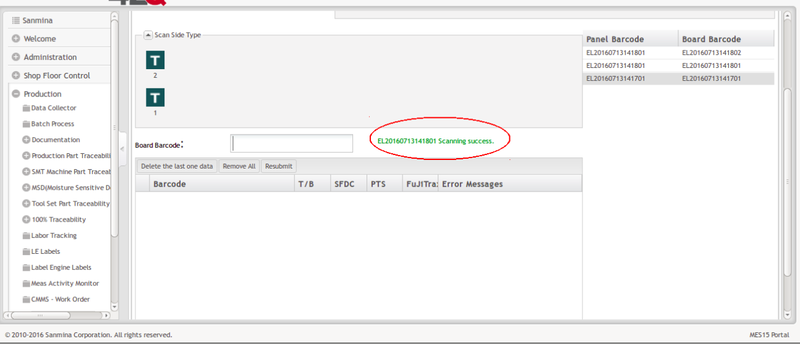
Once the board’s barcode is valid , select submit and the information will be sent to PTS, SFDC, and FujiTrax successfully. The message “Scanning Success” will display to verify.
Figure 10: Scan Success
SFDC Logout
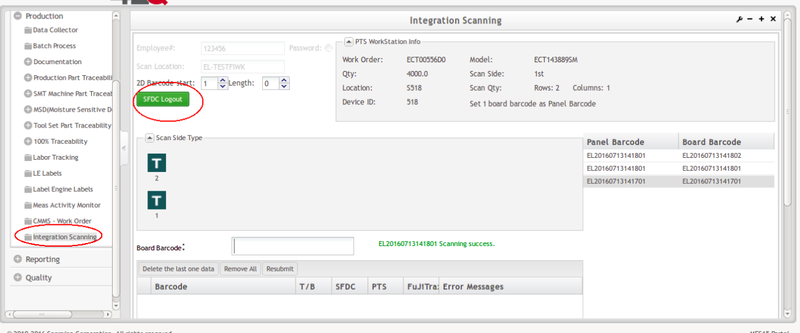
- To logout, select SFDC Logout.
NOTE: To change the scan location to scan panel, the user must first logout of SFDC.
Figure 11: SFDC Logout
- If a user forgets to log out of the SFDC system, the same device ID/Location cannot be logged into on another PC or NetDC.
- If a setting is changed (work order, location mapping, panel setting), the changes will not be reflected until the operator scans the Badge Number and PTS Workstation to log in again.
Fujitrax Loading Material Verify
The MES-Fuji interface also provides a loading material verification function. Fujitrax Host-Interface is called PTS Loading Material Validation in the MES-Fuji Interface. If the returned result is OK, the system will allow Fujitrax to load material successfully, otherwise, an error message will appear.
The checking scope is as follows:
| Check if the material exists. |
| Check if the material is depleted. |
| Check if the material is expired. |
| Check if the AML is expired. |
| Check if the material is in AML. |
| Check if the material has been placed on hold. |
| Compare the BOM to the Picklist . |
- You must set the Fuji-PTS line mapping or Production Line Setting first. See 1.6
- If the line mapping is valid, this interface will first compare the BOM-List of the FujiTrax line (Part Number/Designator) with the PTS BOM in the PTS database before the loading material process begins.
Compare PTS BOM and Fujitrax BOM List
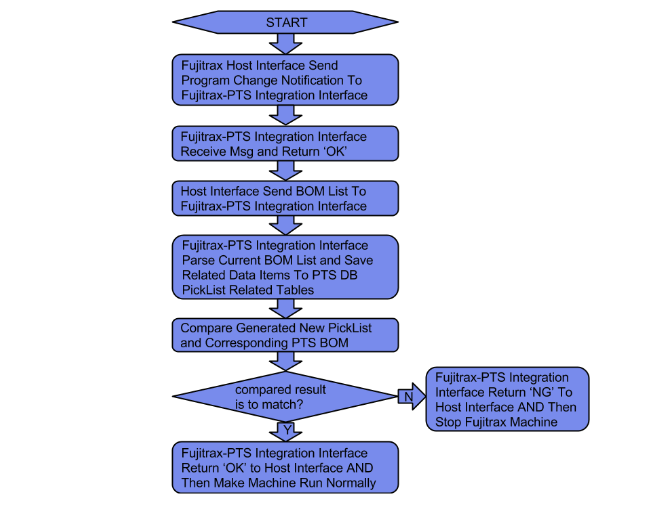
The FujiTrax Host interface sends PGChange to the Fujitrax-PTS interface. The Fujitrax-PTS interface will save/update the BOM List, and will then compare the Fujitrax BOM list with the PTS BOM list.
If the result is ‘NG’, the Fujitrax-PTS interface will send a command to stop the FujiTrax Machine and load material action not allowed. Otherwise, the machine will run normally, can load material. See Figure 12.
Figure 12: Compare BOM Chart
Fujitrax Loading Material Verify
After the line mapping and BOM comparion are passed, the load material verify process is executed.
The prerequisites for load material verification are as follows:
| Check if the material exists |
| Check if the material is depleted |
| Check if the material is expired |
| Check if the AML is expired |
| Check if the material is in AML |
| Check if the material has been held |
For example, consider the “Check if the material exists” prerequisite:
- If the material exists, then the load material will be successful and the light SMT machine light will be green.
- If the material does not exist, then the load material will fail and SMT machine light will be red. The Fujitrax-PTS interface generates error message into the log file, which can then be viewed by navigating to MES-Fuji Interface>Loading Error log. See Figure 13.
Figure 13: Loading Error Log
The error log messages are displayed in the format “Material EXX-XXXX not found”, adjacent to its corresponding function name, MES-FUJI.
