Difference between revisions of "SOP-42Q-MDS0083 Label Engine Labels"
(Created page with "<small>Cirrus > Production > LE Labels</small><br> 130px|Sanmina logo.png <br> <center>'''Label Engine Labels''' </center...") |
|||
| (151 intermediate revisions by 8 users not shown) | |||
| Line 1: | Line 1: | ||
| − | |||
| − | [[ | + | <small>[[42Q_Cloud-Based_MES/MOMS|42Q Home]] > [[Production|Production]] > Label Engine Labels</small> |
| − | + | | |
| − | <center>''' | + | <center>'''Production'''</center> <center>'''Label Engine Labels'''</center> <center>'''Version MES15.82'''</center> <center> </center> <center> </center> <center> </center> <center> </center> |
| − | |||
| − | <center> | ||
| − | |||
| − | < | + | = <span class="mw-headline" id="Introduction"><span class="mw-headline" id="Introduction"><span class="mw-headline" id="Introduction"><span class="mw-headline" id="Introduction"><span class="mw-headline" id="Introduction"><span class="mw-headline" id="Introduction"><span class="mw-headline" id="Introduction"><span class="mw-headline" id="Introduction"><span class="mw-headline" id="Introduction"><span class="mw-headline" id="Introduction"><span class="mw-headline" id="Introduction"><span class="mw-headline" id="Introduction"><span class="mw-headline" id="Introduction"><span class="mw-headline" id="Introduction"><span class="mw-headline" id="Introduction"><span class="mw-headline" id="Introduction"><span class="mw-headline" id="Introduction"><span class="mw-headline" id="Introduction"><span class="mw-headline" id="Introduction"><span class="mw-headline" id="Introduction"><span class="mw-headline" id="Introduction">Introduction</span></span></span></span></span></span></span></span></span></span></span></span></span></span></span></span></span></span></span></span></span> = |
| + | Label Engine Labels is a web application that gives plants the ability to create, update, and print labels without the need for IT resources. It enables plants to easily define and access various different data sources like MES, and MESR, along with a variety of other database types. It allows users to map label fields to these data sources in order to create dynamic labels. It also enables plants to extract statistical information about the labels that are managed in Label Engine, as well as monitor the audit information. | ||
| − | + | Users can create a label template or layout in the design tool (i.e.: For ZPL use BarOne or CodeSoft, and for RTF use Microsoft Office or another tool that provides RTF format.) of their choice. Using the design tool, they export the completed template as ZPL (Zebra Printer Language) or RTF (Rich Text Format). The template is uploaded to Label Engine and the fields in the template are mapped to data sources. At print time, Label Engine combines the template with the appropriate data to produce finished labels. | |
| − | |||
| − | Label Engine | + | The Label Engine Labels portlet allows the user to create, edit, copy, delete, and print labels. LE Admin History, LE Version History, and LE Print History reports can be viewed and/or printed from this page. LE Statistics Excel spreadsheets can also be created from the LE Labels page. |
| − | + | <br/> To access the LE Labels application, navigate to Production > Label Engine Labels. | |
| − | + | | |
| − | + | '''Figure 1: Accessing Label Engine Labels ''' | |
| − | + | [[File:LE prod Mainmenu.png|900px]] | |
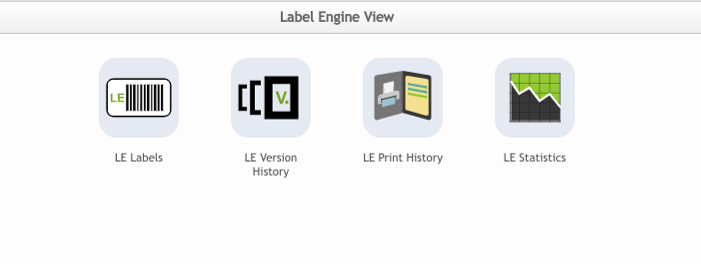
| − | + | <br/> <br/> Within the main screen of Label Engine View, the user will be able to see four different modules: | |
| − | ''' | + | '''LE Labels, LE Version History, LE Print History, and LE Statistics.''' |
| − | + | | |
| − | + | | |
| − | + | == <span class="mw-headline" id="LE_Labels"><span class="mw-headline" id="LE_Labels"><span class="mw-headline" id="LE_Labels"><span class="mw-headline" id="LE_Labels"><span class="mw-headline" id="LE_Labels"><span class="mw-headline" id="LE_Labels"><span class="mw-headline" id="LE_Labels"><span class="mw-headline" id="LE_Labels"><span class="mw-headline" id="LE_Labels"><span class="mw-headline" id="LE_Labels"><span class="mw-headline" id="LE_Labels"><span class="mw-headline" id="LE_Labels"><span class="mw-headline" id="LE_Labels"><span class="mw-headline" id="LE_Labels"><span class="mw-headline" id="LE_Labels"><span class="mw-headline" id="LE_Labels"><span class="mw-headline" id="LE_Labels"><span class="mw-headline" id="LE_Labels"><span class="mw-headline" id="LE_Labels"><span class="mw-headline" id="LE_Labels"><span class="mw-headline" id="LE_Labels"><span class="mw-headline" id="LE_Labels"><span class="mw-headline" id="LE_Labels_https:.2F.2Flh6.googleusercontent.com.2F9WcVP8b1Gf9Pf0xreH8VkQpUw4aExuYZVXOigUo9trICy7XB1L036Y1xe3M0CAH6S15uUcL09DMXwREmPqG5jC-8sHiQRX5PiGyG82Lp9P7MrRdSeQaFTo34CwCRibwaVdrCeKtkZD1GP5e-2Ds7BnKmuRGpwaQUoOx_sDjovQXUROhjpMg-JPT7lQ">LE Labels [[File:LE prod Labels Icon.png]]</span></span></span></span></span></span></span></span></span></span></span></span></span></span></span></span></span></span></span></span></span></span></span> == | |
| − | |||
| − | |||
| − | |||
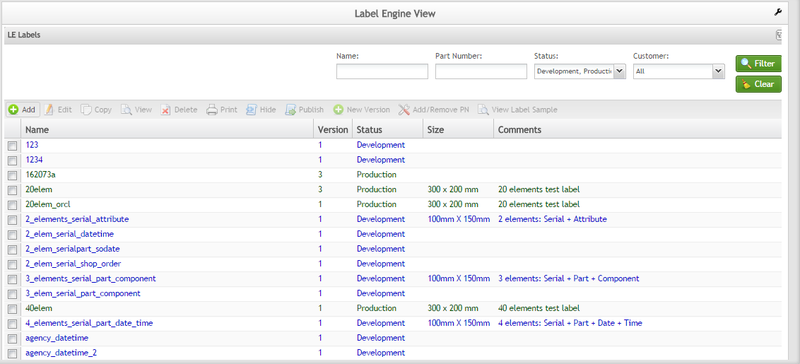
| − | + | <br/> To access the '''LE Labels, '''select the '''LE Labels '''from the '''Label Engine View '''menu'''.''' | |
| − | |||
| − | + | | |
| − | + | '''Figure 2: Label Engine Labels Main Page''' | |
| − | ''' | + | '''[[File:LabelEngineLabelsMP.png|800px|LabelEngineLabelsMP.png]]''' |
| − | + | | |
| − | + | The main screen of the LE Labels page contains all previously created labels. The labels are sorted by name and are color-coded according to their status. The following are the colors and their statuses: | |
| − | Label Engine keys in on values surrounded by $ (for example $partno$) to determine which label elements | + | *'''<span style="color:#27ae60;">Green</span>=Production''' |
| + | *'''<span style="color:#2980b9;">Blue</span>=Development''' | ||
| + | *'''<span style="color:#c0392b;">Red</span>=Hidden''' | ||
| + | *'''<span style="color:#663300;">Brown</span>=Deprecated''' | ||
| + | |||
| + | | ||
| + | |||
| + | <span class="mw-headline" id="Label_Template_File">'''Label Template File'''</span> | ||
| + | |||
| + | The first step of creating a label is done outside of the Label Engine. A label layout and design tool <span style="color:#e74c3c;">are</span> used to create the label template such that the finished label meets the customer's specifications. Typically the label specifications will cover such things as label media type, size, fonts, barcodes, tolerances, etc. Many different design tools exist and the choice of design tools is outside the boundaries of Label Engine.''' ''' | ||
| + | |||
| + | A suitable design tool '''MUST '''be able to produce or export '''ZPL '''code '''(Zebra Programming Language) '''for use on Zebra Printers, or '''RTF '''(rich text format) for use on sheet / LaserJet printers. | ||
| + | |||
| + | As such, printing labels through Label Engine are limited to supporting printers that support ZPL (i.e. Zebra printers) or RTF (i.e. LaserJet printers). | ||
| + | |||
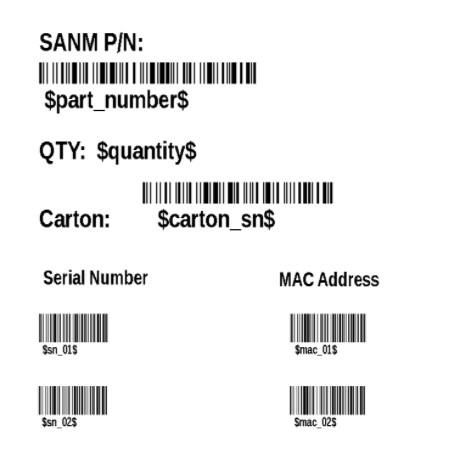
| + | Label Engine’s main purpose is to provide a means of populating placeholder fields in labels. Label Engine keys in on values surrounded by $ (for example $partno$) to determine which label elements are mappable within the Label Engine. At print time, these placeholders are replaced with real data by Label Engine before sending the label to the printer. Not all design software or barcode formats will allow the use of the $ character, and in such cases manually editing/cleaning the ZPL might be necessary. | ||
The ZPL or RTF file(s) are uploaded to Label Engine as part of the label creation process. | The ZPL or RTF file(s) are uploaded to Label Engine as part of the label creation process. | ||
| − | == | + | |
| + | |||
| + | <span class="mw-headline" id="Add_New_Label">Add New Label</span> | ||
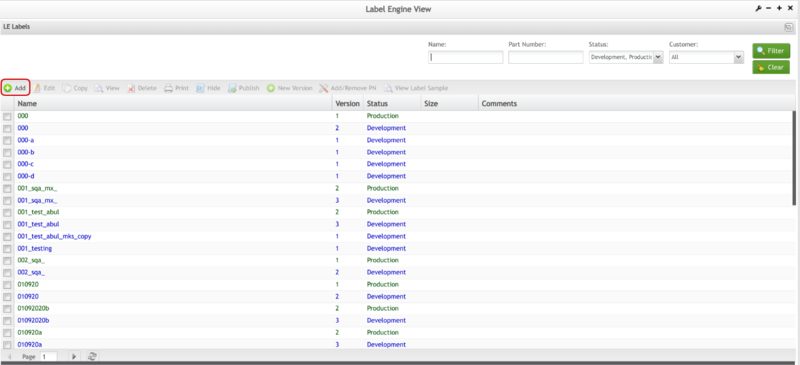
| − | + | To create a new label, select '''Add''' from the LE Labels main page. | |
| + | |||
| + | | ||
'''Figure 3: Add New Label''' | '''Figure 3: Add New Label''' | ||
| − | [[ | + | '''[[File:AddNewLabel.png|800px|AddNewLabel.png]]''' |
| + | |||
| + | | ||
| + | |||
| + | Enter the label name and customer and save the Label. Label names can only contain lower case characters, digits, and - (dash) and _ (underscores) all other characters and disallowed. Label names can not be changed after the first publishing of a label and label names MUST be unique so choose your name wisely. | ||
| − | + | | |
'''Figure 4: Save Label''' | '''Figure 4: Save Label''' | ||
| − | [[ | + | '''[[File:SaveLabel.png|800px|SaveLabel.png]]''' |
| − | + | | |
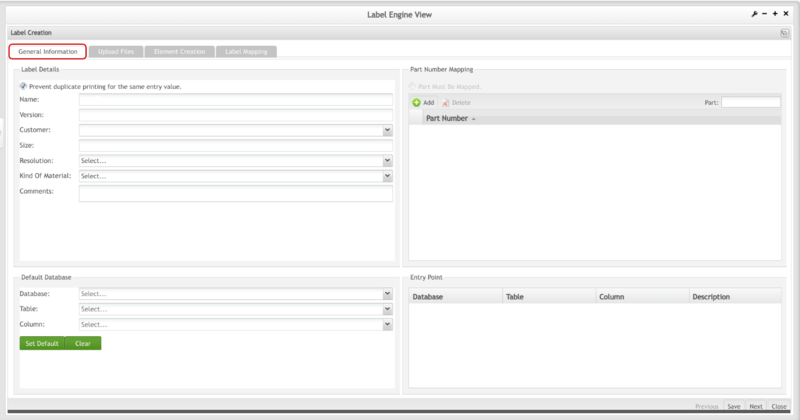
| − | ====General Information Tab==== | + | A General Information screen will display. There are three tabs located to the right of the '''General Information''' form '''(Upload Files, Element Creation, '''and'''Label Mapping). ''' |
| − | The general information tab contains the same parameters that were on the initial creation screen so that these values can be updated. | + | |
| + | | ||
| + | |||
| + | | ||
| + | |||
| + | ==== <span class="mw-headline" id="General_Information_Tab"><span class="mw-headline" id="General_Information_Tab"><span class="mw-headline" id="General_Information_Tab"><span class="mw-headline" id="General_Information_Tab"><span class="mw-headline" id="General_Information_Tab"><span class="mw-headline" id="General_Information_Tab"><span class="mw-headline" id="General_Information_Tab"><span class="mw-headline" id="General_Information_Tab"><span class="mw-headline" id="General_Information_Tab"><span class="mw-headline" id="General_Information_Tab"><span class="mw-headline" id="General_Information_Tab"><span class="mw-headline" id="General_Information_Tab"><span class="mw-headline" id="General_Information_Tab"><span class="mw-headline" id="General_Information_Tab"><span class="mw-headline" id="General_Information_Tab"><span class="mw-headline" id="General_Information_Tab"><span class="mw-headline" id="General_Information_Tab"><span class="mw-headline" id="General_Information_Tab"><span class="mw-headline" id="General_Information_Tab"><span class="mw-headline" id="General_Information_Tab"><span class="mw-headline" id="General_Information_Tab"><span class="mw-headline" id="General_Information_Tab"><span class="mw-headline" id="General_Information_Tab"><span class="mw-headline" id="General_Information_Tab">General Information Tab</span></span></span></span></span></span></span></span></span></span></span></span></span></span></span></span></span></span></span></span></span></span></span></span> ==== | ||
| + | |||
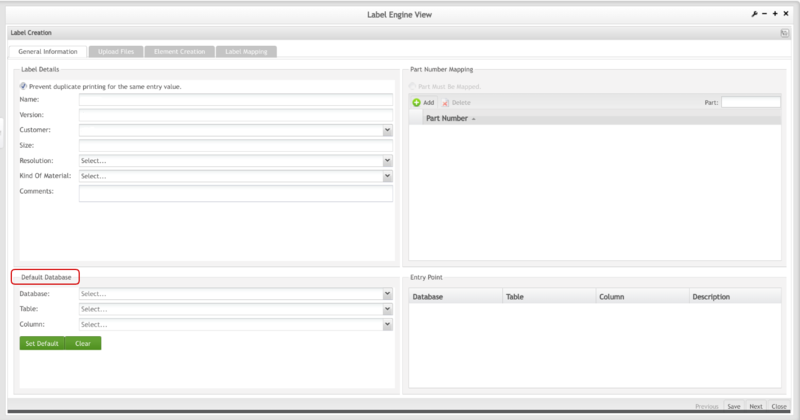
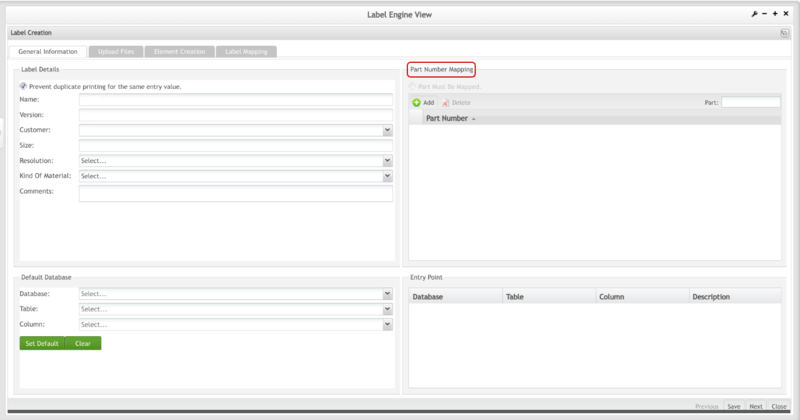
| + | The general information tab contains the same parameters that were on the initial creation screen so that these values can be updated. It also contains additional information in the database selection panel, and it contains additional controls to allow Parts to be associated with Labels. | ||
| + | |||
| + | | ||
'''Figure 5: General Information''' | '''Figure 5: General Information''' | ||
| − | [[ | + | '''[[File:GenerakInfo.png|800px|GeneralInfo.png]]''' |
| + | |||
| + | | ||
| + | |||
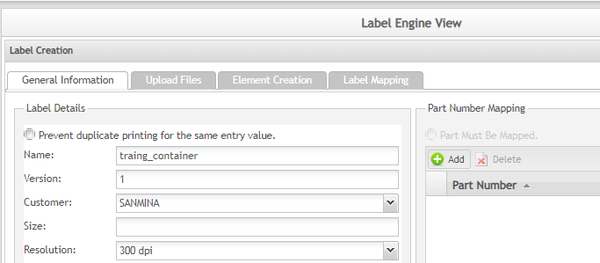
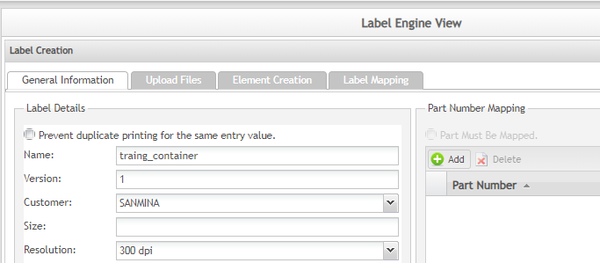
| + | The user will need to enter the following information in the '''General Information '''form: | ||
| + | |||
| + | *'''Name - '''the unique name for the label. Each label must have a unique name. Label names can only contain lowercase letters, numbers, and underscore, and the name is limited to 30 characters. Spaces are not permitted. The name is the key to printing labels using external web services. | ||
| + | *'''Version - '''Defines the current label version. | ||
| + | *'''Size - '''Enter the size of the label. | ||
| + | *'''Resolution -''' choose resolution based on the printer that will be used. | ||
| + | *'''Customer - '''select a customer for the label from the drop-down list. | ||
| + | *'''Kind of Material - '''Choose the material that the label will be printed: Kapton, paper, or polyester. | ||
| + | *'''Comments -''' label comments for any additional information. | ||
| + | *'''Duplicate Prevention - '''Use this to specify if the label should prevent printing this label more than once for any given "entry". This may be disabled due to administrative settings that are explained in the LE Admin SOP {put the link and proper name} | ||
| + | |||
| + | | ||
| + | |||
| + | ===== <span class="mw-headline" id="Default_Database_Mapping"><span class="mw-headline" id="Default_Database_Mapping"><span class="mw-headline" id="Default_Database_Mapping"><span class="mw-headline" id="Default_Database_Mapping"><span class="mw-headline" id="Default_Database_Mapping"><span class="mw-headline" id="Default_Database_Mapping"><span class="mw-headline" id="Default_Database_Mapping"><span class="mw-headline" id="Default_Database_Mapping"><span class="mw-headline" id="Default_Database_Mapping"><span class="mw-headline" id="Default_Database_Mapping"><span class="mw-headline" id="Default_Database_Mapping"><span class="mw-headline" id="Default_Database_Mapping"><span class="mw-headline" id="Default_Database_Mapping"><span class="mw-headline" id="Default_Database_Mapping"><span class="mw-headline" id="Default_Database_Mapping"><span class="mw-headline" id="Default_Database_Mapping"><span class="mw-headline" id="Default_Database_Mapping"><span class="mw-headline" id="Default_Database_Mapping"><span class="mw-headline" id="Default_Database_Mapping"><span class="mw-headline" id="Default_Database_Mapping"><span class="mw-headline" id="Default_Database_Mapping"><span class="mw-headline" id="Default_Database_Mapping"><span class="mw-headline" id="Default_Database_Mapping"><span class="mw-headline" id="Default_Database_Mapping">Default Database Mapping</span></span></span></span></span></span></span></span></span></span></span></span></span></span></span></span></span></span></span></span></span></span></span></span> ===== | ||
| + | |||
| + | By filling out the '''Default Database '''section it will allow the user to use the option '''Part Must be Mapped '''in the case the selected database is an MDS Database. Moreover, it will provide the user with an autocomplete part of the creation of an element. Once a database is selected, the '''Table '''and '''Column '''lists will become available. Using these drop-down lists, define which database element will be provided at print time. This is also referred to as the default "entry" value. | ||
| + | |||
| + | | ||
| + | |||
| + | '''Figure 6: Database Mapping''' | ||
| + | |||
| + | '''[[File:DatabaseMapping.png|800px|DatabaseMapping.png]]''' | ||
| − | + | | |
| − | + | ===== <span class="mw-headline" id="Part_Number_Mapping"><span class="mw-headline" id="Part_Number_Mapping"><span class="mw-headline" id="Part_Number_Mapping"><span class="mw-headline" id="Part_Number_Mapping"><span class="mw-headline" id="Part_Number_Mapping"><span class="mw-headline" id="Part_Number_Mapping"><span class="mw-headline" id="Part_Number_Mapping"><span class="mw-headline" id="Part_Number_Mapping"><span class="mw-headline" id="Part_Number_Mapping"><span class="mw-headline" id="Part_Number_Mapping"><span class="mw-headline" id="Part_Number_Mapping"><span class="mw-headline" id="Part_Number_Mapping"><span class="mw-headline" id="Part_Number_Mapping"><span class="mw-headline" id="Part_Number_Mapping"><span class="mw-headline" id="Part_Number_Mapping"><span class="mw-headline" id="Part_Number_Mapping"><span class="mw-headline" id="Part_Number_Mapping"><span class="mw-headline" id="Part_Number_Mapping"><span class="mw-headline" id="Part_Number_Mapping"><span class="mw-headline" id="Part_Number_Mapping"><span class="mw-headline" id="Part_Number_Mapping"><span class="mw-headline" id="Part_Number_Mapping"><span class="mw-headline" id="Part_Number_Mapping"><span class="mw-headline" id="Part_Number_Mapping"><span class="mw-headline" id="Part_Number_Mapping">Part Number Mapping</span></span></span></span></span></span></span></span></span></span></span></span></span></span></span></span></span></span></span></span></span></span></span></span></span> ===== | |
| − | |||
| − | |||
| − | |||
| − | |||
| − | |||
| − | |||
| − | + | Part number mapping allows the label to be associated with some Part Numbers. By having the Part Number informed in the '''Label Engine Print '''screen, it is very easy to find the label(s) that need to be printed by a Part Number. Depending on the Administrative configuration, Part Number mappings may be optional. Toggle the '''"Part Must Be Mapped" '''selection if the label should enforce part mapping at print time. If enabled and if the print time entry corresponds to a part that is NOT mapped to the label, the printing will be prevented. | |
| − | By | ||
| − | ''' | + | '''<u>Note</u>: '''This may be disabled due to administrative settings that are explained in the LE Admin SOP {put the link and proper name}. |
| − | + | | |
| − | + | Enter the Part Number in the '''Part '''field and select '''Add ''''to add the part in the Part Number list. To delete parts, select it, and select Delete. | |
| − | |||
| − | + | | |
'''Figure 7: Part Number Mapping''' | '''Figure 7: Part Number Mapping''' | ||
| − | [[ | + | '''[[File:PartNumberMapping.png|800px|PartNumberMapping.png]]''' |
| + | |||
| + | | ||
| + | |||
| + | Once you have provided all of the information on the '''General Information '''tab, select '''Save '''to commit your changes to the system, and then select '''Next. '''The user can also select the '''Upload Files '''tab. | ||
| + | |||
| + | | ||
| + | |||
| + | '''<u>Note</u>: '''Clear functionality will remove any data provided so you can start fresh. | ||
| + | |||
| + | | ||
| + | |||
| + | == <span class="mw-headline" id="Upload_Files_Tab"><span class="mw-headline" id="Upload_Files_Tab"><span class="mw-headline" id="Upload_Files_Tab"><span class="mw-headline" id="Upload_Files_Tab"><span class="mw-headline" id="Upload_Files_Tab"><span class="mw-headline" id="Upload_Files_Tab"><span class="mw-headline" id="Upload_Files_Tab"><span class="mw-headline" id="Upload_Files_Tab"><span class="mw-headline" id="Upload_Files_Tab"><span class="mw-headline" id="Upload_Files_Tab"><span class="mw-headline" id="Upload_Files_Tab"><span class="mw-headline" id="Upload_Files_Tab"><span class="mw-headline" id="Upload_Files_Tab"><span class="mw-headline" id="Upload_Files_Tab"><span class="mw-headline" id="Upload_Files_Tab"><span class="mw-headline" id="Upload_Files_Tab"><span class="mw-headline" id="Upload_Files_Tab"><span class="mw-headline" id="Upload_Files_Tab"><span class="mw-headline" id="Upload_Files_Tab"><span class="mw-headline" id="Upload_Files_Tab"><span class="mw-headline" id="Upload_Files_Tab"><span class="mw-headline" id="Upload_Files_Tab">Upload Files Tab</span></span></span></span></span></span></span></span></span></span></span></span></span></span></span></span></span></span></span></span></span></span> == | ||
| + | |||
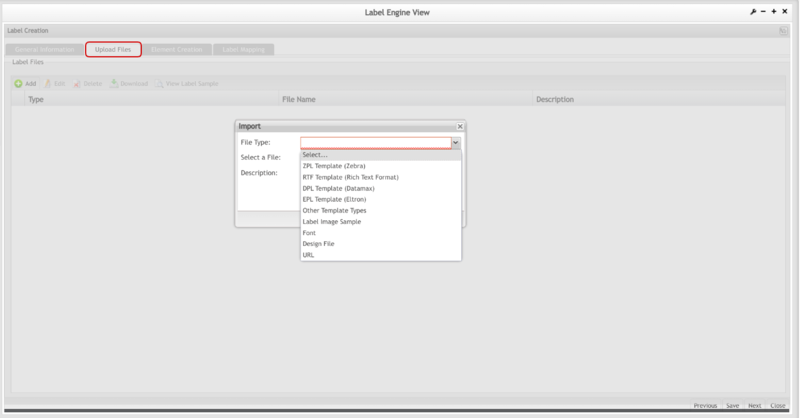
| + | The '''Upload Files '''tab allows the user to manage the files and links for the label. To be usable, a label '''must have a template file '''as this contains the layout and definition of the label. A label engine label can only contain a single template file. | ||
| + | |||
| + | Label Engine's primary purpose is to collect, or generate, data and inject this data into the appropriate places within the template file and print the resulting complete label. Any "'''variable'''" data in a label template needs to be identified as a '''template field'''. Template fields are delimited by $ (dollar sign) characters. Label Engine identifies the template fields as the text between the '''$$,''' for example, '''$sn$''' or '''$serial number$''' or '''$serial_number$''' would all be good template field identifiers as they are easy to understand what data is required. | ||
| + | |||
| + | When a template file is added to a label, '''Label Engine''' searches through the template and identifies a distinct list of template fields. '''Label Engine''' allows the label designer to "'''map'''" data to the template fields. | ||
| − | + | As there are different printer types, LE supports different template types. LE has support for the following template files: | |
| − | + | *'''ZPL '''(*.txt or *.zpl) are for use with printers supporting the Zebra Printing Language | |
| + | *'''RTF '''(*.rtf) are rich text format files, for use on sheet printers. | ||
| + | *'''DPL''' (*.txt or *.dpl) are for use with printers supporting the Datamax Printing Language | ||
| + | *'''EPL '''(*.txt or *.epl) are for use with printers supporting the Eltron Printing Language | ||
| + | *'''Other Template Types''' (*.txt) is a catch-all that will allow you to upload any text-based printing language command file that the destination printer will support. Some examples would be J-Script (Brady Printers), IPL (Intermec), etc. | ||
| − | + | Many different label design tools exist and the creation of the printer-specific template file is outside the scope of Label Engine. LE simply requires a text file containing identifiable template fields. Template files are typically printer-specific command files. The exception to this is RTF. RTF files are converted to PDF files which can be printed on most sheet/laser printers. | |
| − | + | '''Tip: '''It is possible to put multiple labels within a single template file. | |
| − | + | '''The other supported "files" that can be uploaded are:''' | |
| − | * | + | *'''Label Image Sample''' (*.jpg, *.jpeg, *.gif, *.png) are to include a static image of a sample label. A label will only allow you to include one image sample. |
| − | * Font | + | *'''Font '''(*.fnt) are fonts that are required on your label. Fonts only apply to ZPL labels. The list of existing fonts will be displayed from which you can reference the one(s) your label needs. If you need a font that has not yet been uploaded, you will be able to upload a new one. You can upload or link as many Font files as are needed for your label. |
| − | * | + | *'''URLs''' are not actually uploaded and they don't have any content within LE. URL is so you can reference information about the specs of the label, or anything else you feel warrants adding a reference to. Basically, this is to allow LE to be the place you manage your label. |
| − | * | ||
| − | + | | |
| − | + | '''Figure 8: Upload Files''' | |
| − | + | '''[[File:UploadFiles.png|800px|UploadFiles.png]]''' | |
| − | + | | |
| − | + | Most files will be uploaded from the user’s local computer. However, if the font was already uploaded to the server for use in a different label it will be possible to reference the existing font instead of uploading it again. | |
| + | |||
| + | | ||
| + | |||
| + | === <span class="mw-headline" id="Add_File"><span class="mw-headline" id="Add_File"><span class="mw-headline" id="Add_File"><span class="mw-headline" id="Add_File"><span class="mw-headline" id="Add_File"><span class="mw-headline" id="Add_File"><span class="mw-headline" id="Add_File"><span class="mw-headline" id="Add_File"><span class="mw-headline" id="Add_File"><span class="mw-headline" id="Add_File"><span class="mw-headline" id="Add_File"><span class="mw-headline" id="Add_File"><span class="mw-headline" id="Add_File"><span class="mw-headline" id="Add_File"><span class="mw-headline" id="Add_File"><span class="mw-headline" id="Add_File"><span class="mw-headline" id="Add_File"><span class="mw-headline" id="Add_File"><span class="mw-headline" id="Add_File"><span class="mw-headline" id="Add_File"><span class="mw-headline" id="Add_File"><span class="mw-headline" id="Add_File">Add File</span></span></span></span></span></span></span></span></span></span></span></span></span></span></span></span></span></span></span></span></span></span> === | ||
| + | |||
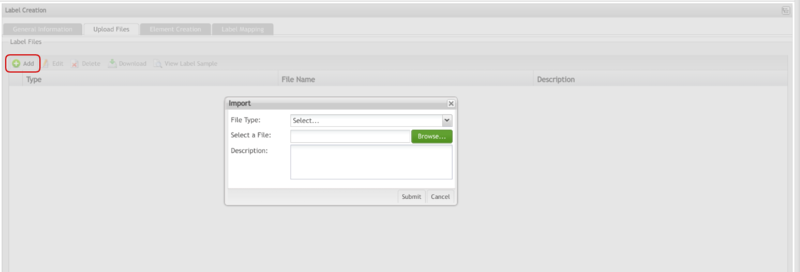
| + | To add a file to the label from your local computer, select '''Add '''from the '''Upload Files '''tab. | ||
| + | |||
| + | | ||
'''Figure 9: Add File''' | '''Figure 9: Add File''' | ||
| − | [[ | + | '''[[File:AddFile.png|800px|AddFile.png]]''' |
| + | |||
| + | | ||
| − | + | #Select '''Browse '''to browse and select the file to add to the label. | |
| + | #Add a description of the file. | ||
| + | #Select '''Save '''to confirm the addition, '''Reset '''to clear the fields''', '''or'''Cancel''' to cancel. | ||
| − | + | | |
| − | + | === <span class="mw-headline" id="Edit_File"><span class="mw-headline" id="Edit_File"><span class="mw-headline" id="Edit_File"><span class="mw-headline" id="Edit_File"><span class="mw-headline" id="Edit_File"><span class="mw-headline" id="Edit_File"><span class="mw-headline" id="Edit_File"><span class="mw-headline" id="Edit_File"><span class="mw-headline" id="Edit_File"><span class="mw-headline" id="Edit_File"><span class="mw-headline" id="Edit_File"><span class="mw-headline" id="Edit_File"><span class="mw-headline" id="Edit_File"><span class="mw-headline" id="Edit_File"><span class="mw-headline" id="Edit_File"><span class="mw-headline" id="Edit_File"><span class="mw-headline" id="Edit_File"><span class="mw-headline" id="Edit_File"><span class="mw-headline" id="Edit_File"><span class="mw-headline" id="Edit_File"><span class="mw-headline" id="Edit_File"><span class="mw-headline" id="Edit_File">Edit File </span></span></span></span></span></span></span></span></span></span></span></span></span></span></span></span></span></span></span></span></span></span> === | |
| − | + | For labels with files attached, the files can be edited as long as the label has not yet been published. | |
| − | + | #To edit a file, select the checkbox to the left of the file and then select '''Edit.''' | |
| − | + | | |
'''Figure 10: Edit File''' | '''Figure 10: Edit File''' | ||
| − | [[ | + | '''[[File:EditFile.png|800px|EditFile.png]]''' |
| − | 2 | + | |
| + | <ol start="2"> | ||
| + | <li>Once the '''Edit '''button is selected, the '''Edit Files Uploaded '''pop-up displays to edit.</li> | ||
| + | <li>Only the '''Description '''portion of the file is available to edit.</li> | ||
| + | <li>Change the description and then select OK to save changes or '''Cancel '''to exit.</li> | ||
| + | </ol> | ||
| − | + | | |
| − | + | === <span class="mw-headline" id="Delete_File"><span class="mw-headline" id="Delete_File"><span class="mw-headline" id="Delete_File"><span class="mw-headline" id="Delete_File"><span class="mw-headline" id="Delete_File"><span class="mw-headline" id="Delete_File"><span class="mw-headline" id="Delete_File"><span class="mw-headline" id="Delete_File"><span class="mw-headline" id="Delete_File"><span class="mw-headline" id="Delete_File"><span class="mw-headline" id="Delete_File"><span class="mw-headline" id="Delete_File"><span class="mw-headline" id="Delete_File"><span class="mw-headline" id="Delete_File"><span class="mw-headline" id="Delete_File"><span class="mw-headline" id="Delete_File"><span class="mw-headline" id="Delete_File"><span class="mw-headline" id="Delete_File"><span class="mw-headline" id="Delete_File"><span class="mw-headline" id="Delete_File"><span class="mw-headline" id="Delete_File"><span class="mw-headline" id="Delete_File">Delete File</span></span></span></span></span></span></span></span></span></span></span></span></span></span></span></span></span></span></span></span></span></span> === | |
| − | + | To delete a file attached to a label, select the checkbox to the left of the file name and select '''Delete.''' | |
| − | + | | |
'''Figure 11: Delete File''' | '''Figure 11: Delete File''' | ||
| − | [[ | + | '''[[File:DeleteFile.png|800px|DeleteFile.png]]''' |
| + | |||
| + | | ||
| − | + | A confirm box will display. Select '''Yes '''to confirm or '''No''' to exit. | |
| − | + | | |
| − | + | === <span class="mw-headline" id="Download_File"><span class="mw-headline" id="Download_File"><span class="mw-headline" id="Download_File"><span class="mw-headline" id="Download_File"><span class="mw-headline" id="Download_File"><span class="mw-headline" id="Download_File"><span class="mw-headline" id="Download_File"><span class="mw-headline" id="Download_File"><span class="mw-headline" id="Download_File"><span class="mw-headline" id="Download_File"><span class="mw-headline" id="Download_File"><span class="mw-headline" id="Download_File"><span class="mw-headline" id="Download_File"><span class="mw-headline" id="Download_File"><span class="mw-headline" id="Download_File"><span class="mw-headline" id="Download_File"><span class="mw-headline" id="Download_File"><span class="mw-headline" id="Download_File"><span class="mw-headline" id="Download_File"><span class="mw-headline" id="Download_File"><span class="mw-headline" id="Download_File"><span class="mw-headline" id="Download_File">Download File</span></span></span></span></span></span></span></span></span></span></span></span></span></span></span></span></span></span></span></span></span></span> === | |
| − | + | Under the Upload files tab, the user can download the files attached to a label to retain the information from the label. | |
| + | |||
| + | #To download the file, select the checkbox to the left of the file name and select '''Download.''' | ||
| + | |||
| + | | ||
'''Figure 12: Download File''' | '''Figure 12: Download File''' | ||
| − | [[ | + | '''[[File:DownloadFile.png|800px|DownloadFile.png]]''' |
| − | + | | |
| − | + | The download will be started automatically. | |
| − | + | | |
| − | + | === <span class="mw-headline" id="View_Label_Sample"><span class="mw-headline" id="View_Label_Sample"><span class="mw-headline" id="View_Label_Sample"><span class="mw-headline" id="View_Label_Sample"><span class="mw-headline" id="View_Label_Sample"><span class="mw-headline" id="View_Label_Sample"><span class="mw-headline" id="View_Label_Sample"><span class="mw-headline" id="View_Label_Sample"><span class="mw-headline" id="View_Label_Sample"><span class="mw-headline" id="View_Label_Sample"><span class="mw-headline" id="View_Label_Sample"><span class="mw-headline" id="View_Label_Sample"><span class="mw-headline" id="View_Label_Sample"><span class="mw-headline" id="View_Label_Sample"><span class="mw-headline" id="View_Label_Sample"><span class="mw-headline" id="View_Label_Sample"><span class="mw-headline" id="View_Label_Sample"><span class="mw-headline" id="View_Label_Sample"><span class="mw-headline" id="View_Label_Sample"><span class="mw-headline" id="View_Label_Sample"><span class="mw-headline" id="View_Label_Sample"><span class="mw-headline" id="View_Label_Sample"><span class="mw-headline" id="View_Label_Sample">View Label Sample</span></span></span></span></span></span></span></span></span></span></span></span></span></span></span></span></span></span></span></span></span></span></span> === | |
| + | |||
| + | The user can view a sample of the file that is attached to the label from the Upload Label tab. | ||
| + | |||
| + | #To preview a sample of the file, select the checkbox to the left of the file name, and select '''View Label Sample.''' | ||
| + | |||
| + | | ||
'''Figure 13: View Label Sample''' | '''Figure 13: View Label Sample''' | ||
| − | [[ | + | '''[[File:ViewLabelSample.png|700px|ViewLabelSample.png]]''' |
| + | <ol start="2"> | ||
| + | <li>A sample of the file is displayed on a new screen.</li> | ||
| + | </ol> | ||
| − | + | | |
| − | ===Element Creation Tab== | + | == <span class="mw-headline" id="Element_Creation_Tab"><span class="mw-headline" id="Element_Creation_Tab"><span class="mw-headline" id="Element_Creation_Tab"><span class="mw-headline" id="Element_Creation_Tab"><span class="mw-headline" id="Element_Creation_Tab"><span class="mw-headline" id="Element_Creation_Tab"><span class="mw-headline" id="Element_Creation_Tab"><span class="mw-headline" id="Element_Creation_Tab"><span class="mw-headline" id="Element_Creation_Tab"><span class="mw-headline" id="Element_Creation_Tab"><span class="mw-headline" id="Element_Creation_Tab"><span class="mw-headline" id="Element_Creation_Tab"><span class="mw-headline" id="Element_Creation_Tab"><span class="mw-headline" id="Element_Creation_Tab"><span class="mw-headline" id="Element_Creation_Tab"><span class="mw-headline" id="Element_Creation_Tab"><span class="mw-headline" id="Element_Creation_Tab"><span class="mw-headline" id="Element_Creation_Tab"><span class="mw-headline" id="Element_Creation_Tab"><span class="mw-headline" id="Element_Creation_Tab"><span class="mw-headline" id="Element_Creation_Tab"><span class="mw-headline" id="Element_Creation_Tab"><span class="mw-headline" id="Element_Creation_Tab">Element Creation Tab</span></span></span></span></span></span></span></span></span></span></span></span></span></span></span></span></span></span></span></span></span></span></span> == |
| − | |||
| − | + | The element creation tab is where users will create the "elements" of data that will be injected into the template at the print time via label mapping. | |
| − | + | <br/> '''Figure 14: Element Creation Tab''' | |
| − | + | '''[[File:ElementCreationTab.png|850px|ElementCreationTab.png]]''' | |
| − | ====Add Element=== | + | |
| − | To add an element, in the '''Element Creation''' tab, select ''' | + | |
| + | On this tab, the user can create the elements. Elements are built up of 'blocks' of data, and elements are what is ultimately injected into the template file at a print time replacing the $place_holder$ fields. | ||
| + | |||
| + | The application provides five functionalities '''(Constant Value, Date/Time, Database, Custom function, and Entry Value Block), '''from which the user is able to customize the elements. | ||
| + | |||
| + | | ||
| + | |||
| + | === <span class="mw-headline" id="Add_Element"><span class="mw-headline" id="Add_Element"><span class="mw-headline" id="Add_Element"><span class="mw-headline" id="Add_Element"><span class="mw-headline" id="Add_Element"><span class="mw-headline" id="Add_Element"><span class="mw-headline" id="Add_Element"><span class="mw-headline" id="Add_Element"><span class="mw-headline" id="Add_Element"><span class="mw-headline" id="Add_Element"><span class="mw-headline" id="Add_Element"><span class="mw-headline" id="Add_Element"><span class="mw-headline" id="Add_Element"><span class="mw-headline" id="Add_Element"><span class="mw-headline" id="Add_Element"><span class="mw-headline" id="Add_Element"><span class="mw-headline" id="Add_Element"><span class="mw-headline" id="Add_Element"><span class="mw-headline" id="Add_Element"><span class="mw-headline" id="Add_Element"><span class="mw-headline" id="Add_Element"><span class="mw-headline" id="Add_Element"><span class="mw-headline" id="Add_Element"><span class="mw-headline" id="Add_Element"><span class="mw-headline" id="Add_Element"><span class="mw-headline" id="Add_Element">Add Element</span></span></span></span></span></span></span></span></span></span></span></span></span></span></span></span></span></span></span></span></span></span></span></span></span></span> === | ||
| + | |||
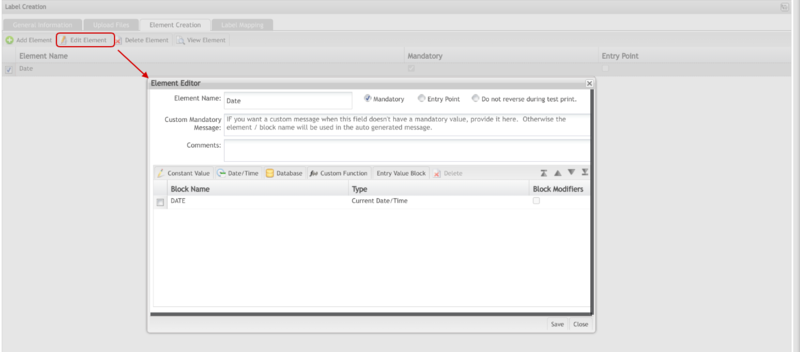
| + | <br/> To add an element, in the '''Element Creation '''tab, select the Add '''Element button.''' | ||
| + | |||
| + | | ||
'''Figure 15: Element Editor''' | '''Figure 15: Element Editor''' | ||
| − | [[ | + | '''[[File:ElementEditor.png|800px|ElementEditor.png]]''' |
| + | |||
| + | | ||
| + | |||
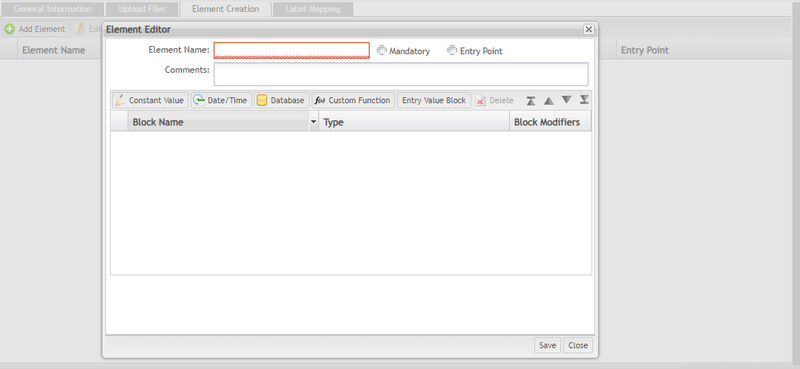
| + | The Element Editor is displayed and the user can input the necessary information to the new element. | ||
| + | |||
| + | '''Fill in the available fields:''' | ||
| + | |||
| + | '''Element Name: '''the name of the element; | ||
| + | |||
| + | '''Comments: '''any necessary information that the user wants; | ||
| + | |||
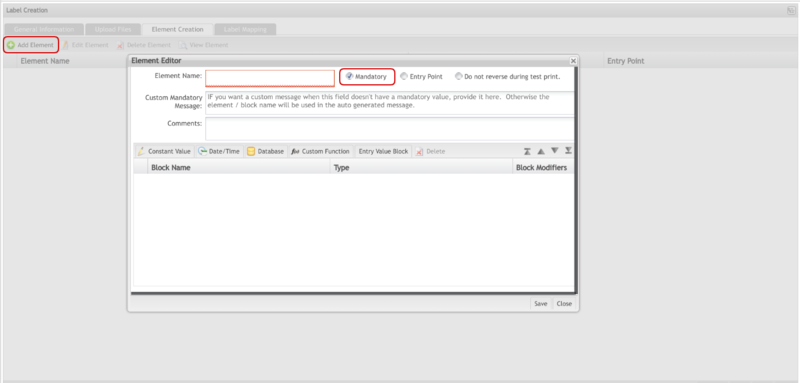
| + | '''Mandatory '''is a flag indicating that a non blank/non null value is required at print time. If the element value is empty at print time, the printing of the label is aborted and a message about the failure is recorded in the audit log and is reported back to the user. The default message contains a reference back to the element name. The element name is not always something that has meaning to an operator. To provide a more meaningful message (for the audit and the user response) LE allows the user to provide a mandatory custom message that will be used instead. When '''Mandatory '''is selected, an optional field, '''Custom Mandatory Message '''becomes available and this is where the label designer can provide the message to be used if a mandatory violation occurs. ''' ''' | ||
| − | + | | |
| − | + | '''<u>Note</u>:''' This Mandatory flag will be available at some of the functionalities and will be used for the same purpose. <br/> | |
| − | '''Element | + | '''Figure 16: Element Editor - Selecting Mandatory''' |
| − | ''' | + | '''[[File:ElementEditor-SM.png|800px|ElementEditor-SM.png]]''' |
| − | + | | |
| − | Checking ''' | + | Checking the '''Entry Point '''checkbox, it will be allowed to search values from two databases. It is used to set the database priority. |
| − | + | | |
| − | The available functionalities are described below: | + | The available functionalities are described below: |
| − | + | | |
| − | |||
| − | + | ==== <span class="mw-headline" id="Constant_Value"><span class="mw-headline" id="Constant_Value"><span class="mw-headline" id="Constant_Value"><span class="mw-headline" id="Constant_Value"><span class="mw-headline" id="Constant_Value"><span class="mw-headline" id="Constant_Value"><span class="mw-headline" id="Constant_Value"><span class="mw-headline" id="Constant_Value"><span class="mw-headline" id="Constant_Value"><span class="mw-headline" id="Constant_Value"><span class="mw-headline" id="Constant_Value"><span class="mw-headline" id="Constant_Value"><span class="mw-headline" id="Constant_Value"><span class="mw-headline" id="Constant_Value"><span class="mw-headline" id="Constant_Value"><span class="mw-headline" id="Constant_Value"><span class="mw-headline" id="Constant_Value"><span class="mw-headline" id="Constant_Value"><span class="mw-headline" id="Constant_Value"><span class="mw-headline" id="Constant_Value"><span class="mw-headline" id="Constant_Value"><span class="mw-headline" id="Constant_Value"><span class="mw-headline" id="Constant_Value"><span class="mw-headline" id="Constant_Value"><span class="mw-headline" id="Constant_Value"><span class="mw-headline" id="Constant_Value"><span class="mw-headline" id="Constant_Value">Constant Value</span></span></span></span></span></span></span></span></span></span></span></span></span></span></span></span></span></span></span></span></span></span></span></span></span></span></span> ==== | |
| − | + | | |
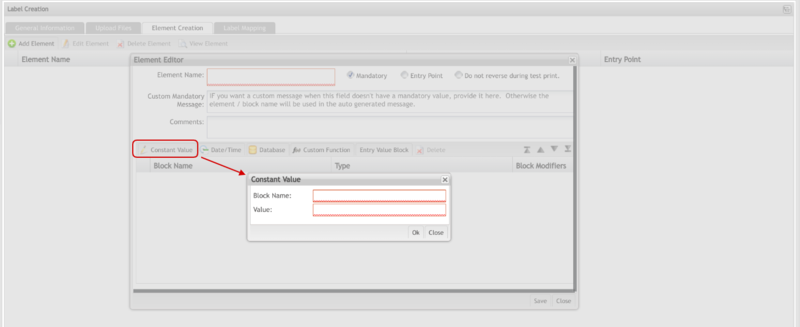
| − | ''' | + | '''Figure 17: Constant Value''' |
| − | ''' | + | '''[[File:ConstantValue.png|800px|ConstantValue.png]]''' |
| − | + | <br/> This functionality allows the user to create a constant value (fixed value) used for printing the value in the label. | |
| − | + | | |
| − | + | '''Block Name:''' this is the block title to be created; | |
| − | ''' | + | '''Value: '''Value to be printed in the label (any value type). Click on OK to finish'''.''' |
| − | + | | |
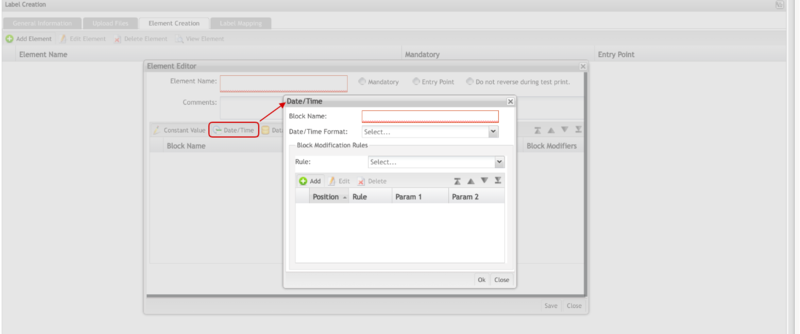
| − | + | ==== <span class="mw-headline" id="Date.2FTime"><span class="mw-headline" id="Date.2FTime"><span class="mw-headline" id="Date.2FTime"><span class="mw-headline" id="Date.2FTime"><span class="mw-headline" id="Date.2FTime"><span class="mw-headline" id="Date.2FTime"><span class="mw-headline" id="Date.2FTime"><span class="mw-headline" id="Date.2FTime"><span class="mw-headline" id="Date.2FTime"><span class="mw-headline" id="Date.2FTime"><span class="mw-headline" id="Date.2FTime"><span class="mw-headline" id="Date.2FTime"><span class="mw-headline" id="Date.2FTime"><span class="mw-headline" id="Date.2FTime"><span class="mw-headline" id="Date.2FTime"><span class="mw-headline" id="Date.2FTime"><span class="mw-headline" id="Date.2FTime"><span class="mw-headline" id="Date.2FTime"><span class="mw-headline" id="Date.2FTime"><span class="mw-headline" id="Date.2FTime"><span class="mw-headline" id="Date.2FTime"><span class="mw-headline" id="Date.2FTime"><span class="mw-headline" id="Date.2FTime"><span class="mw-headline" id="Date.2FTime"><span class="mw-headline" id="Date.2FTime"><span class="mw-headline" id="Date.2FTime"><span class="mw-headline" id="Date.2FTime"><span class="mw-headline" id="Date.2FTime"><span class="mw-headline" id="Date.2FTime">Date/Time</span></span></span></span></span></span></span></span></span></span></span></span></span></span></span></span></span></span></span></span></span></span></span></span></span></span></span></span></span> ==== | |
| − | + | This functionality will print the date and the time in the label. | |
| − | + | | |
| − | + | '''Figure 18: Date/Time''' | |
| − | ''' | + | '''[[File:DateandTime.png|800px|DateandTime.png]]''' |
| − | + | | |
| − | + | '''Block Name: '''Name of the block to be created; | |
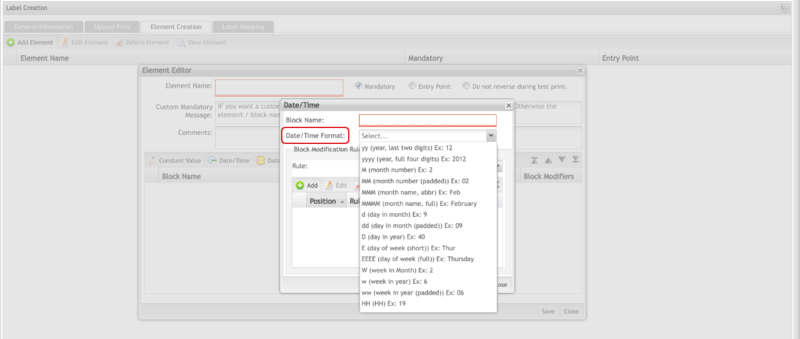
| − | + | '''Date/Time format: '''Select the format (from the available list) that will be printed in the label. | |
| − | + | | |
| − | + | '''Figure 19: Date/Time Format''' | |
| − | + | '''[[File:DateandTimeFormat.png|800px|DateandTimeFormat.png]]''' | |
| − | + | | |
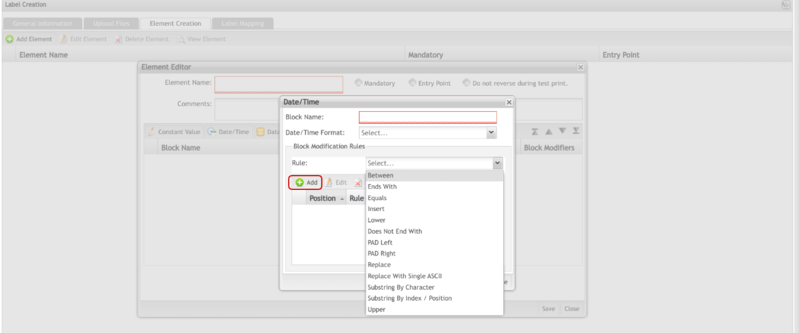
| − | + | '''Block Modification Rules:''' It allows the user to set the rules to the selected field (date/time) | |
| − | + | | |
| − | '''Figure 20: | + | '''Figure 20: Add Rule''' |
| − | [[ | + | '''[[File:AddRule.png|800px|AddRule.png]]''' |
| − | + | | |
| − | + | The rules can be used to set or modify previously assigned label fields. Dynamic data, such as system date or time, can be formatted and assigned to a label field. Rules allow for data to be combined or transformed based on runtime conditions. | |
| − | |||
| − | |||
| − | + | It displays the details of the business rules assigned to the selected label field in the Rules list. | |
| − | + | Multiple business rules can be applied to any field. To add business rules to a field, follow these steps: | |
| − | + | To add a rule, select an existing rule from the list and click on the '''Add''' button. The new rule will be added to the list. | |
| − | + | The order in which business rules are applied can be changed using the arrows in the lower section of the details section. As well, business rules can be deleted or updated using the appropriate action icons. | |
| − | + | | |
| − | + | ==== <span class="mw-headline" id="Database"><span class="mw-headline" id="Database"><span class="mw-headline" id="Database"><span class="mw-headline" id="Database"><span class="mw-headline" id="Database"><span class="mw-headline" id="Database"><span class="mw-headline" id="Database"><span class="mw-headline" id="Database"><span class="mw-headline" id="Database"><span class="mw-headline" id="Database"><span class="mw-headline" id="Database"><span class="mw-headline" id="Database"><span class="mw-headline" id="Database"><span class="mw-headline" id="Database"><span class="mw-headline" id="Database"><span class="mw-headline" id="Database"><span class="mw-headline" id="Database"><span class="mw-headline" id="Database"><span class="mw-headline" id="Database"><span class="mw-headline" id="Database"><span class="mw-headline" id="Database"><span class="mw-headline" id="Database"><span class="mw-headline" id="Database"><span class="mw-headline" id="Database"><span class="mw-headline" id="Database"><span class="mw-headline" id="Database">Database</span></span></span></span></span></span></span></span></span></span></span></span></span></span></span></span></span></span></span></span></span></span></span></span></span></span> ==== | |
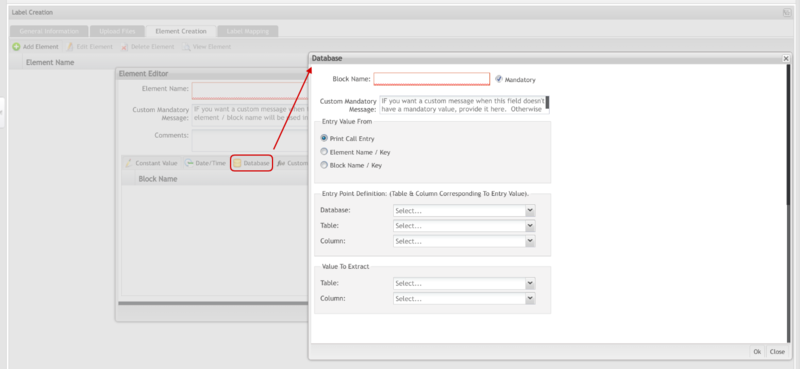
| − | + | This function loads the database information that will be printed on the label. | |
| − | + | | |
| − | '''Figure | + | '''Figure 21: Database''' |
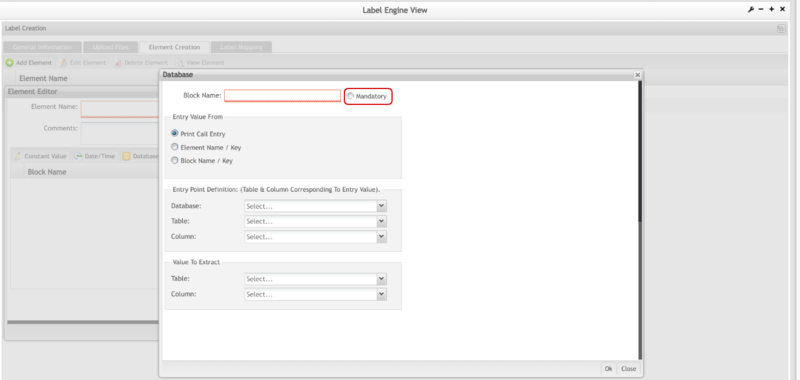
| − | [[ | + | '''[[File:Database.png|800px|Database.png]]''' |
| − | + | | |
| − | + | '''Entry Value From: '''This form informs where the input for the element comes from. The common value is'''Print Call Entry.''' | |
| − | |||
| − | |||
| − | ''' | + | *'''Print Call Entry: '''comes from the value used to print the label; |
| + | *'''Element Name/Key: '''comes from the element; | ||
| + | *'''Block Name/Key: '''comes from the block. | ||
| − | =====Entry Value Block===== | + | |
| + | |||
| + | '''The Entry Point Definition '''form displays the predefined values in the '''General Information.''' | ||
| + | |||
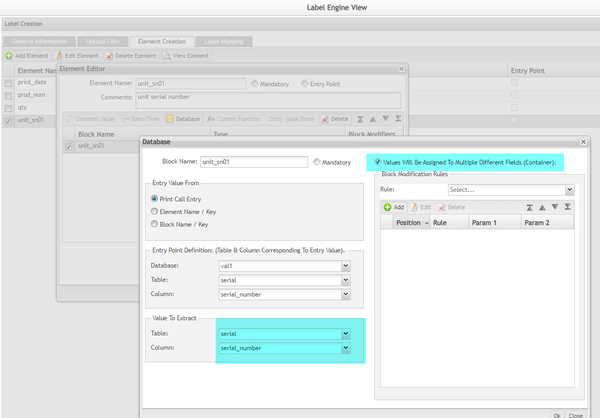
| + | '''Value To Extract: '''The user needs to select the '''Table '''and the '''Column to get the information to be printed on the label.''' | ||
| + | |||
| + | To provide a more meaningful message (for the audit and the user response) LE allows the user to provide a '''custom mandatory message '''that will be used instead.''' '''When the '''Mandatory '''checkbox is selected, an optional field, '''Custom Mandatory Message '''becomes available and this is where the label designer can provide the message to be used if a mandatory violation occurs. ''' ''' | ||
| + | |||
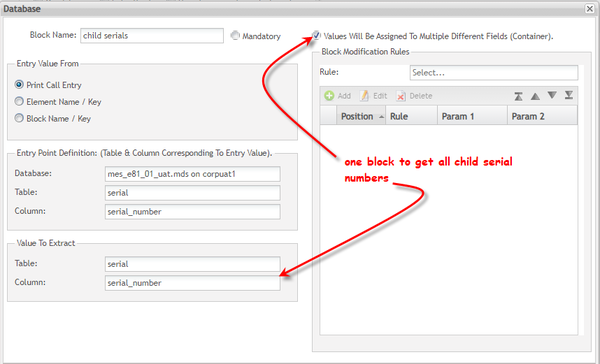
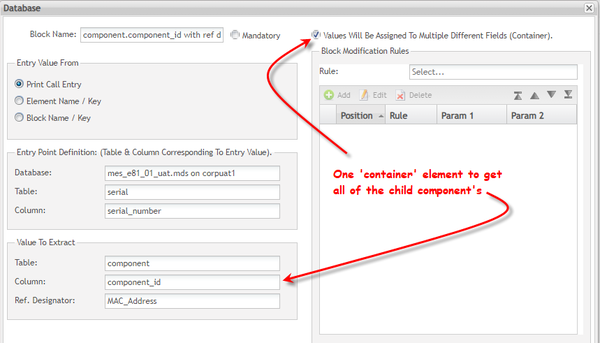
| + | '''<u>Note</u>: '''If the label is a Container Label, the user needs to select '''the Values Will Be Assigned To Different Fields '''option. | ||
| + | |||
| + | | ||
| + | |||
| + | '''Figure 22: Container Label Option''' | ||
| + | |||
| + | '''[[File:ContainerLabelOption.png|800px|ContainerLabelOption.png]]''' | ||
| + | |||
| + | | ||
| + | |||
| + | The '''Block Modification Rule '''was already explained in the '''Date/Time topic.''' | ||
| + | |||
| + | See '''Appendix D - Examples '''for more information. | ||
| + | |||
| + | | ||
| + | |||
| + | ==== <span class="mw-headline" id="Custom_Function"><span class="mw-headline" id="Custom_Function"><span class="mw-headline" id="Custom_Function"><span class="mw-headline" id="Custom_Function"><span class="mw-headline" id="Custom_Function"><span class="mw-headline" id="Custom_Function"><span class="mw-headline" id="Custom_Function"><span class="mw-headline" id="Custom_Function"><span class="mw-headline" id="Custom_Function"><span class="mw-headline" id="Custom_Function"><span class="mw-headline" id="Custom_Function"><span class="mw-headline" id="Custom_Function"><span class="mw-headline" id="Custom_Function"><span class="mw-headline" id="Custom_Function"><span class="mw-headline" id="Custom_Function"><span class="mw-headline" id="Custom_Function"><span class="mw-headline" id="Custom_Function"><span class="mw-headline" id="Custom_Function"><span class="mw-headline" id="Custom_Function"><span class="mw-headline" id="Custom_Function"><span class="mw-headline" id="Custom_Function"><span class="mw-headline" id="Custom_Function"><span class="mw-headline" id="Custom_Function"><span class="mw-headline" id="Custom_Function"><span class="mw-headline" id="Custom_Function"><span class="mw-headline" id="Custom_Function">Custom Function</span></span></span></span></span></span></span></span></span></span></span></span></span></span></span></span></span></span></span></span></span></span></span></span></span></span> ==== | ||
| + | |||
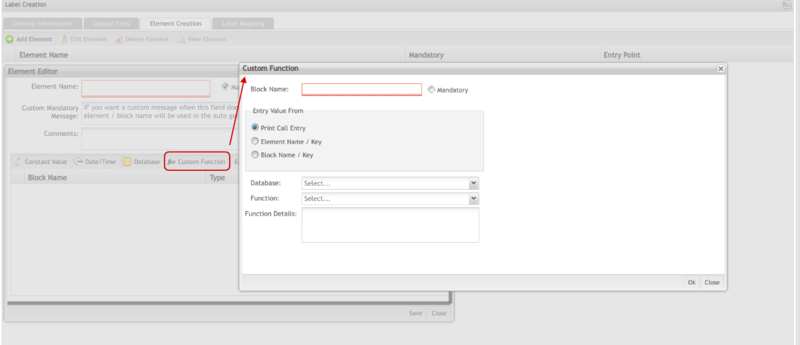
| + | <span class="mw-headline" id="The_Custom_Function_allows_fetching_database_information_through_a_customized_function.">The '''Custom Function '''allows fetching database information through a customized function.''' ''' </span> | ||
| + | |||
| + | | ||
| + | |||
| + | '''Figure 23: Custom Function''' | ||
| + | |||
| + | '''[[File:CustomFunction.png|800px|CustomFunction.png]]''' | ||
| + | |||
| + | | ||
| + | |||
| + | '''Entry Value From: '''This form informs where the input for the element comes from. The common value is '''Print Call Entry.''' | ||
| + | |||
| + | To provide a more meaningful message (for the audit and the user response) LE allows the user to provide a '''custom mandatory message '''that will be used instead. When a '''Mandatory '''checkbox is selected, an optional field, '''Custom Mandatory Message '''becomes available and this is where the label designer can provide the message to be used if a mandatory violation occurs. | ||
| + | |||
| + | *'''Print Call Entry: '''comes from the value used to print the label; | ||
| + | *'''Element Name/Key: '''comes from the element; | ||
| + | *'''Block Name/Key: '''comes from the block. | ||
| + | |||
| + | | ||
| + | |||
| + | '''Database: '''after the database is selected, the functions are displayed in the list and the user can select them and inform the '''Function Details.'''<br/> <br/> | ||
| + | |||
| + | ==== <span class="mw-headline" id="Entry_Value_Block"><span class="mw-headline" id="Entry_Value_Block"><span class="mw-headline" id="Entry_Value_Block"><span class="mw-headline" id="Entry_Value_Block"><span class="mw-headline" id="Entry_Value_Block"><span class="mw-headline" id="Entry_Value_Block"><span class="mw-headline" id="Entry_Value_Block"><span class="mw-headline" id="Entry_Value_Block"><span class="mw-headline" id="Entry_Value_Block"><span class="mw-headline" id="Entry_Value_Block"><span class="mw-headline" id="Entry_Value_Block"><span class="mw-headline" id="Entry_Value_Block"><span class="mw-headline" id="Entry_Value_Block"><span class="mw-headline" id="Entry_Value_Block"><span class="mw-headline" id="Entry_Value_Block"><span class="mw-headline" id="Entry_Value_Block"><span class="mw-headline" id="Entry_Value_Block"><span class="mw-headline" id="Entry_Value_Block"><span class="mw-headline" id="Entry_Value_Block"><span class="mw-headline" id="Entry_Value_Block"><span class="mw-headline" id="Entry_Value_Block"><span class="mw-headline" id="Entry_Value_Block"><span class="mw-headline" id="Entry_Value_Block"><span class="mw-headline" id="Entry_Value_Block"><span class="mw-headline" id="Entry_Value_Block"><span class="mw-headline" id="Entry_Value_Block"><span class="mw-headline" id="Entry_Value_Block"><span class="mw-headline" id="Entry_Value_Block">Entry Value Block</span></span></span></span></span></span></span></span></span></span></span></span></span></span></span></span></span></span></span></span></span></span></span></span></span></span></span></span> ==== | ||
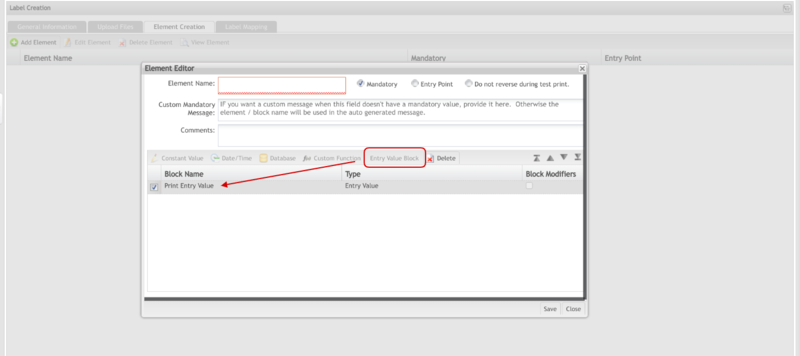
This functionality gets the entry information used to print the label (generally, the Serial Number). | This functionality gets the entry information used to print the label (generally, the Serial Number). | ||
| − | '''Figure | + | ''' ''' |
| + | |||
| + | '''Figure 24: Entry Value Block''' | ||
| + | |||
| + | '''[[File:EntryValueBlock.png|800px|EntryValueBlock.png]]''' | ||
| + | |||
| + | <br/> Click on '''Save '''to finish. | ||
| + | |||
| + | | ||
| + | |||
| + | | ||
| − | + | ==== <span class="mw-headline" id="Delete_Entry_Value"><span class="mw-headline" id="Delete_Entry_Value"><span class="mw-headline" id="DeleteEntry_Value."><span class="mw-headline" id="Delete_Entry_Value."><span class="mw-headline" id="Delete_Entry_Value."><span class="mw-headline" id="Delete_Entry_Value."><span class="mw-headline" id="Delete_Entry_Value."><span class="mw-headline" id="Delete_Entry_Value"><span class="mw-headline" id="Delete_Entry_Value"><span class="mw-headline" id="Delete_Entry_Value"><span class="mw-headline" id="Delete_Entry_Value"><span class="mw-headline" id="Delete_Entry_Value"><span class="mw-headline" id="Delete_Entry_Value"><span class="mw-headline" id="Delete_Entry_Value"><span class="mw-headline" id="Delete_Entry_Value"><span class="mw-headline" id="Delete_Entry_Value"><span class="mw-headline" id="Delete_Entry_Value"><span class="mw-headline" id="Delete_Entry_Value"><span class="mw-headline" id="Delete_Entry_Value"><span class="mw-headline" id="Delete_Entry_Value"><span class="mw-headline" id="Delete_Entry_Value"><span class="mw-headline" id="Delete_Entry_Value"><span class="mw-headline" id="Delete_Entry_Value"><span class="mw-headline" id="Delete_Entry_Value"><span class="mw-headline" id="Delete_Entry_Value"><span class="mw-headline" id="Delete_Entry_Value"><span class="mw-headline" id="Delete_Entry_Value"><span class="mw-headline" id="Delete_Entry_Value">Delete Entry Value</span></span></span></span></span></span></span></span></span></span></span></span></span></span></span></span></span></span></span></span></span></span></span></span></span></span></span></span> ==== | |
| − | + | | |
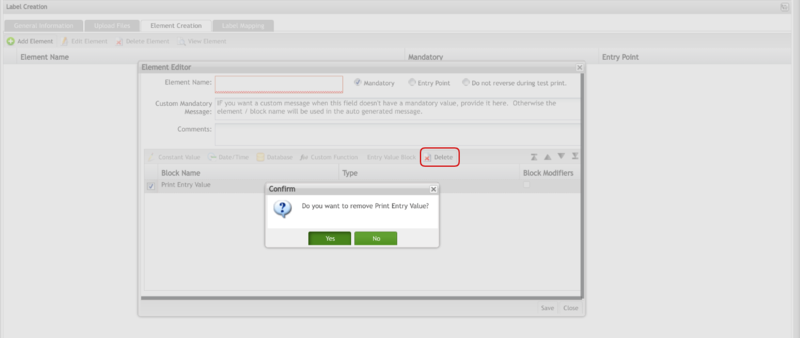
| − | + | '''Figure 25: Delete Entry Value''' | |
| − | '''Figure | ||
| − | [[ | + | '''[[File:DeleteEntryValue.png|800px|DeleteEntryValue.png]]''' |
| − | + | | |
| − | + | To delete, just select the '''Entry Value Block '''in the list and select '''Delete. '''A confirmation message is displayed, select '''Yes '''to delete or '''No '''to abort. | |
| − | + | | |
| − | + | === <span class="mw-headline" id="Edit_Element"><span class="mw-headline" id="Edit_Element"><span class="mw-headline" id="Edit_Element"><span class="mw-headline" id="Edit_Element"><span class="mw-headline" id="Edit_Element"><span class="mw-headline" id="Edit_Element"><span class="mw-headline" id="Edit_Element"><span class="mw-headline" id="Edit_Element"><span class="mw-headline" id="Edit_Element"><span class="mw-headline" id="Edit_Element"><span class="mw-headline" id="Edit_Element"><span class="mw-headline" id="Edit_Element"><span class="mw-headline" id="Edit_Element"><span class="mw-headline" id="Edit_Element"><span class="mw-headline" id="Edit_Element"><span class="mw-headline" id="Edit_Element"><span class="mw-headline" id="Edit_Element"><span class="mw-headline" id="Edit_Element"><span class="mw-headline" id="Edit_Element"><span class="mw-headline" id="Edit_Element"><span class="mw-headline" id="Edit_Element"><span class="mw-headline" id="Edit_Element"><span class="mw-headline" id="Edit_Element">Edit Element</span></span></span></span></span></span></span></span></span></span></span></span></span></span></span></span></span></span></span></span></span></span></span> === | |
| − | Editing elements work pretty | + | Editing elements work pretty similarly to '''Add Element. '''Refer to '''Add Element '''topic for further information. |
| − | + | | |
| − | '''Figure 26: | + | '''Figure 26: Edit Element''' |
| − | [[ | + | '''[[File:EditElement.png|800px|EditElement.png]]''' |
| − | + | | |
| − | + | Editing elements work pretty similar to '''Add Elements. '''Refer to '''Add Element '''topic for further information. | |
| − | ''' | ||
| − | + | | |
| + | |||
| + | === <span class="mw-headline" id="Delete_Element"><span class="mw-headline" id="Delete_Element"><span class="mw-headline" id="Delete_Element"><span class="mw-headline" id="Delete_Element"><span class="mw-headline" id="Delete_Element"><span class="mw-headline" id="Delete_Element"><span class="mw-headline" id="Delete_Element"><span class="mw-headline" id="Delete_Element"><span class="mw-headline" id="Delete_Element"><span class="mw-headline" id="Delete_Element"><span class="mw-headline" id="Delete_Element"><span class="mw-headline" id="Delete_Element"><span class="mw-headline" id="Delete_Element"><span class="mw-headline" id="Delete_Element"><span class="mw-headline" id="Delete_Element"><span class="mw-headline" id="Delete_Element"><span class="mw-headline" id="Delete_Element"><span class="mw-headline" id="Delete_Element"><span class="mw-headline" id="Delete_Element"><span class="mw-headline" id="Delete_Element"><span class="mw-headline" id="Delete_Element"><span class="mw-headline" id="Delete_Element"><span class="mw-headline" id="Delete_Element">Delete Element</span></span></span></span></span></span></span></span></span></span></span></span></span></span></span></span></span></span></span></span></span></span></span> === | ||
| + | |||
| + | To delete, just select the Element Name in the list and select Delete. | ||
| + | |||
| + | | ||
| + | |||
| + | '''Figure 27: Delete Element''' | ||
| + | |||
| + | '''[[File:DeleteElement.png|800px|DeleteElement.png]]''' | ||
| + | |||
| + | | ||
| + | |||
| + | A confirmation message is displayed, selec'''t Yes''' to delete or '''No '''to abort. | ||
| + | |||
| + | | ||
| + | |||
| + | === <span class="mw-headline" id="View_Element"><span class="mw-headline" id="View_Element"><span class="mw-headline" id="View_Element"><span class="mw-headline" id="View_Element"><span class="mw-headline" id="View_Element"><span class="mw-headline" id="View_Element"><span class="mw-headline" id="View_Element"><span class="mw-headline" id="View_Element"><span class="mw-headline" id="View_Element"><span class="mw-headline" id="View_Element"><span class="mw-headline" id="View_Element"><span class="mw-headline" id="View_Element"><span class="mw-headline" id="View_Element"><span class="mw-headline" id="View_Element"><span class="mw-headline" id="View_Element"><span class="mw-headline" id="View_Element"><span class="mw-headline" id="View_Element"><span class="mw-headline" id="View_Element"><span class="mw-headline" id="View_Element"><span class="mw-headline" id="View_Element"><span class="mw-headline" id="View_Element"><span class="mw-headline" id="View_Element"><span class="mw-headline" id="View_Element">View Element</span></span></span></span></span></span></span></span></span></span></span></span></span></span></span></span></span></span></span></span></span></span></span> === | ||
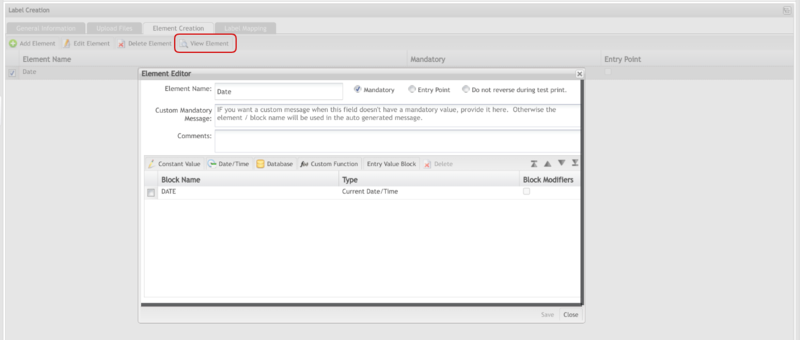
This functionality allows the user to view how the element was created. | This functionality allows the user to view how the element was created. | ||
| − | ===Label Printing== | + | It is not allowed to do any updates on this page. |
| − | One of the major features provided by '''Label Engine''' is printing labels. | + | |
| + | | ||
| + | |||
| + | '''Figure 28: View Elements''' | ||
| + | |||
| + | '''[[File:ViewElements.png|800px|ViewElements.png]]''' | ||
| + | |||
| + | | ||
| + | |||
| + | == <span class="mw-headline" id="Label_Printing"><span class="mw-headline" id="Label_Printing"><span class="mw-headline" id="Label_Printing"><span class="mw-headline" id="Label_Printing"><span class="mw-headline" id="Label_Printing"><span class="mw-headline" id="Label_Printing"><span class="mw-headline" id="Label_Printing"><span class="mw-headline" id="Label_Printing"><span class="mw-headline" id="Label_Printing"><span class="mw-headline" id="Label_Printing"><span class="mw-headline" id="Label_Printing"><span class="mw-headline" id="Label_Printing"><span class="mw-headline" id="Label_Printing"><span class="mw-headline" id="Label_Printing"><span class="mw-headline" id="Label_Printing"><span class="mw-headline" id="Label_Printing"><span class="mw-headline" id="Label_Printing"><span class="mw-headline" id="Label_Printing"><span class="mw-headline" id="Label_Printing"><span class="mw-headline" id="Label_Printing"><span class="mw-headline" id="Label_Printing"><span class="mw-headline" id="Label_Printing"><span class="mw-headline" id="Label_Printing"><span class="mw-headline" id="Label_Printing">Label Printing</span></span></span></span></span></span></span></span></span></span></span></span></span></span></span></span></span></span></span></span></span></span></span></span> == | ||
| + | |||
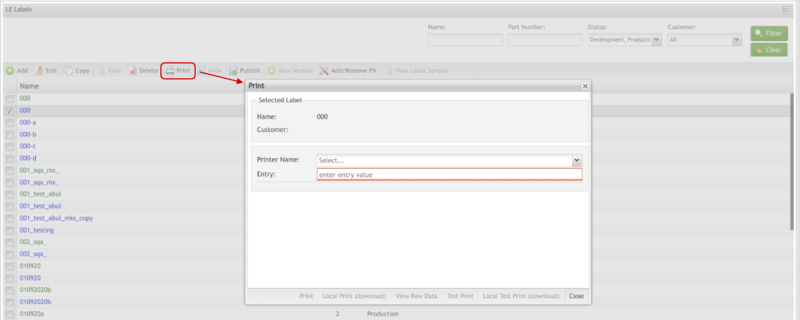
| + | One of the major features provided by '''Label Engine '''is printing labels. Users can print labels to any available printer. | ||
| + | |||
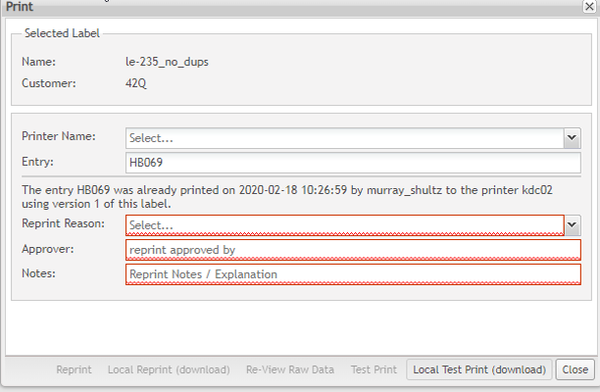
| + | This page changes based on the settings for duplicate prevention if the entry has been printed before. | ||
| + | |||
| + | | ||
| − | '''Figure | + | '''Figure 29: Print Label''' |
| − | [[ | + | '''[[File:PrintLabel.png|800px|PrintLabel.png]]''' |
| − | + | | |
| − | + | '''Figure 30: Print Label Options''' | |
| − | + | '''[[File:PrintLabelOptions.png|600px|PrintLabelOptions.png]]''' | |
| − | + | | |
| − | + | '''To print a label:''' | |
| − | + | #Select the box to the left of the '''Label Name '''on the main '''Label Engine '''page'''.''' | |
| + | #Select the printer icon on the far right of the screen. | ||
| + | #Choose a '''Printer'''. | ||
| + | #Enter the information used to print the label into the '''Entry '''field and select '''Print.''' | ||
| − | + | | |
| − | | + | '''View Raw Data: '''The user can get the raw content that will be sent to the printer. |
| − | + | '''Local Print (download): '''This option allows the user to download the print result locally as a PDF or ZPL. | |
| − | + | '''Test Print: '''Duplicate prevention and Test printing. If the label (and the plant configuration) has duplicate prevention turned on after the Entry field loses focus, the print history is checked. If the label-entry combination has been printed, viewed, or downloaded before it can't be printed again. It can only be reprinted (as many times as needed). In order to perform a reprint (if the user has permission to reprint) the three fields (Reprint Reason, Approver, and Notes) need to be filled before the reprint options become available. | |
| − | + | '''Local Test Print (Download): '''Test Print / Local Test Print are always allowed. This feature still requires a valid entry, however, the print activity does not use up the one label entry allowed. It is still recorded and viewable from the audit, but it is recorded as a test print. Also, all of the elements have their value reversed before being injected into the template so, in fact, the generated label is significantly different from a regular print. | |
| − | + | '''<u>Note</u>: '''This section also discusses web service printing. The new LE web service is documented with Swagger (which allows the user to describe the structure of your APIs so that machines can read them. | |
| − | + | In addition, '''Label Engine '''has web services that expose printing functionality to other applications. For example, it is possible to print labels created in the '''Label Engine '''by using the SFDC Commands (!! Commands): ''' ''' | |
| − | + | !!1LABENG.<labelname>.<print queue> | |
| − | + | where | |
| − | + | <labelname> is the exact name of the label in Label Engine, and <print queue> is the exact name of the print queue defined in Label Engine. | |
| − | + | | |
| − | === | + | == <span class="mw-headline" id="New_Version"><span class="mw-headline" id="New_Version"><span class="mw-headline" id="New_Version"><span class="mw-headline" id="New_Version"><span class="mw-headline" id="New_Version"><span class="mw-headline" id="New_Version"><span class="mw-headline" id="New_Version"><span class="mw-headline" id="New_Version"><span class="mw-headline" id="New_Version"><span class="mw-headline" id="New_Version"><span class="mw-headline" id="New_Version"><span class="mw-headline" id="New_Version"><span class="mw-headline" id="New_Version"><span class="mw-headline" id="New_Version"><span class="mw-headline" id="New_Version"><span class="mw-headline" id="New_Version"><span class="mw-headline" id="New_Version"><span class="mw-headline" id="New_Version"><span class="mw-headline" id="New_Version"><span class="mw-headline" id="New_Version"><span class="mw-headline" id="New_Version"><span class="mw-headline" id="New_Version">New Version</span></span></span></span></span></span></span></span></span></span></span></span></span></span></span></span></span></span></span></span></span></span> == |
| − | + | To create a new version of a label, select the box to the left of a Production, Hidden or Deprecated label then select '''New Version.''' | |
| − | + | | |
| − | ''' | + | '''<u>Note</u>: '''Labels in Development cannot have New Versions created. |
| − | + | | |
| − | + | '''Figure 31: New Version''' | |
| − | + | '''[[File:NewVersion.png|800px|NewVersion.png]]''' | |
| − | + | | |
| + | <ol start="2"> | ||
| + | <li>The '''General Information '''form will be displayed. All fields are available to edit to create a New Version of the label.</li> | ||
| + | <li>Select '''Save.'''</li> | ||
| + | </ol> | ||
| − | + | | |
| − | + | == <span class="mw-headline" id="Edit_Label"><span class="mw-headline" id="Edit_Label"><span class="mw-headline" id="Edit_Label"><span class="mw-headline" id="Edit_Label"><span class="mw-headline" id="Edit_Label"><span class="mw-headline" id="Edit_Label"><span class="mw-headline" id="Edit_Label"><span class="mw-headline" id="Edit_Label"><span class="mw-headline" id="Edit_Label"><span class="mw-headline" id="Edit_Label"><span class="mw-headline" id="Edit_Label"><span class="mw-headline" id="Edit_Label"><span class="mw-headline" id="Edit_Label"><span class="mw-headline" id="Edit_Label"><span class="mw-headline" id="Edit_Label"><span class="mw-headline" id="Edit_Label"><span class="mw-headline" id="Edit_Label"><span class="mw-headline" id="Edit_Label"><span class="mw-headline" id="Edit_Label"><span class="mw-headline" id="Edit_Label"><span class="mw-headline" id="Edit_Label">Edit Label</span></span></span></span></span></span></span></span></span></span></span></span></span></span></span></span></span></span></span></span></span> == | |
| − | + | To edit a label, select the box to the left of a label in Development. | |
| − | + | | |
| − | ''' | + | '''<u>Note</u>: '''Only labels in Development are available to edit. |
| − | + | <br/> '''Figure 32: Edit Label''' | |
| − | + | '''[[File:EditLabel.png|800px|EditLabel.png]]''' | |
| − | + | | |
| + | <ol start="2"> | ||
| + | <li>The General Information form will be displayed. All fields are available to edit.</li> | ||
| + | <li>The '''Upload Files, Element Creation, '''and '''Label Mapping '''tabs are also available to edit.</li> | ||
| + | <li>Select '''Save '''to confirm changes.</li> | ||
| + | </ol> | ||
| − | + | | |
| − | + | == <span class="mw-headline" id="View_Label"><span class="mw-headline" id="View_Label"><span class="mw-headline" id="View_Label"><span class="mw-headline" id="View_Label"><span class="mw-headline" id="View_Label"><span class="mw-headline" id="View_Label"><span class="mw-headline" id="View_Label"><span class="mw-headline" id="View_Label"><span class="mw-headline" id="View_Label"><span class="mw-headline" id="View_Label"><span class="mw-headline" id="View_Label"><span class="mw-headline" id="View_Label"><span class="mw-headline" id="View_Label"><span class="mw-headline" id="View_Label"><span class="mw-headline" id="View_Label"><span class="mw-headline" id="View_Label"><span class="mw-headline" id="View_Label"><span class="mw-headline" id="View_Label"><span class="mw-headline" id="View_Label"><span class="mw-headline" id="View_Label"><span class="mw-headline" id="View_Label">View Label </span></span></span></span></span></span></span></span></span></span></span></span></span></span></span></span></span></span></span></span></span> == | |
| − | + | '''View '''functionality is very convenient to view how the label was created in case the user does not have permission to edit. | |
| − | ''' | + | #To view a label, select the box to the left of a label in production. |
| + | #Select '''View.''' | ||
| − | + | <br/> '''Figure 33: View Label''' | |
| − | ''' | + | '''[[File:ViewLabel.png|800px|ViewLabel.png]]''' |
| − | + | | |
| + | <ol start="3"> | ||
| + | <li>All tabs will be displayed.</li> | ||
| + | <li>The label information is available to view only.</li> | ||
| + | </ol> | ||
| − | + | | |
| − | + | == <span class="mw-headline" id="Add.2FRemove_PN"><span class="mw-headline" id="Add.2FRemove_PN"><span class="mw-headline" id="Add.2FRemove_PN"><span class="mw-headline" id="Add.2FRemove_PN"><span class="mw-headline" id="Add.2FRemove_PN"><span class="mw-headline" id="Add.2FRemove_PN"><span class="mw-headline" id="Add.2FRemove_PN"><span class="mw-headline" id="Add.2FRemove_PN"><span class="mw-headline" id="Add.2FRemove_PN"><span class="mw-headline" id="Add.2FRemove_PN"><span class="mw-headline" id="Add.2FRemove_PN"><span class="mw-headline" id="Add.2FRemove_PN"><span class="mw-headline" id="Add.2FRemove_PN"><span class="mw-headline" id="Add.2FRemove_PN"><span class="mw-headline" id="Add.2FRemove_PN"><span class="mw-headline" id="Add.2FRemove_PN"><span class="mw-headline" id="Add.2FRemove_PN"><span class="mw-headline" id="Add.2FRemove_PN"><span class="mw-headline" id="Add.2FRemove_PN"><span class="mw-headline" id="Add.2FRemove_PN"><span class="mw-headline" id="Add.2FRemove_PN"><span class="mw-headline" id="Add.2FRemove_PN"><span class="mw-headline" id="Add.2FRemove_PN"><span class="mw-headline" id="Add.2FRemove_PN">Add/Remove PN</span></span></span></span></span></span></span></span></span></span></span></span></span></span></span></span></span></span></span></span></span></span></span></span> == | |
| − | + | This functionality allows the users to add or remove Part Numbers associated with the label. | |
| − | + | #To add or delete a Part Number from a label, select the box to the left of a label. | |
| − | + | | |
| − | + | '''Figure 34: Add/Remove Part Number''' | |
| − | + | '''[[File:AddandRemovePN.png|800px|AddandRemovePN.png]]''' | |
| − | + | | |
| − | + | | |
| − | + | '''Figure 35: Part Number Mapping''' | |
| − | + | '''[[File:PNMapping.png|800px|PNMapping.png]]''' | |
| − | = | + | |
| + | <ol start="2"> | ||
| + | <li>Enter the part number and select '''Add.'''</li> | ||
| + | <li>Select '''Add''' to confirm or '''Close''' to cancel.</li> | ||
| + | </ol> | ||
| − | + | | |
| − | + | '''Figure 36: Delete Part Number''' | |
| − | + | '''[[File:DeletePN.png|800px|DeletePN.png]]''' | |
| − | + | | |
| − | + | #To delete a part number, select the box to the left of the part number and select '''Delete.''' | |
| + | #A'''Confirm '''screen will display. Select '''Yes''' to confirm deletion or '''No''' to cancel. | ||
| − | + | | |
| − | === | + | == <span class="mw-headline" id="Copy_Label"><span class="mw-headline" id="Copy_Label"><span class="mw-headline" id="Copy_Label"><span class="mw-headline" id="Copy_Label"><span class="mw-headline" id="Copy_Label"><span class="mw-headline" id="Copy_Label"><span class="mw-headline" id="Copy_Label"><span class="mw-headline" id="Copy_Label"><span class="mw-headline" id="Copy_Label"><span class="mw-headline" id="Copy_Label"><span class="mw-headline" id="Copy_Label"><span class="mw-headline" id="Copy_Label"><span class="mw-headline" id="Copy_Label"><span class="mw-headline" id="Copy_Label"><span class="mw-headline" id="Copy_Label"><span class="mw-headline" id="Copy_Label"><span class="mw-headline" id="Copy_Label"><span class="mw-headline" id="Copy_Label"><span class="mw-headline" id="Copy_Label"><span class="mw-headline" id="Copy_Label"><span class="mw-headline" id="Copy_Label">Copy Label</span></span></span></span></span></span></span></span></span></span></span></span></span></span></span></span></span></span></span></span></span> == |
| − | + | To copy a label, select any label from the Labels list and then select '''Copy.''' | |
| − | + | | |
| − | + | '''Figure 37: Copy Label''' | |
| − | ''' | + | '''[[File:CopyLabel.png|800px|CopyLabel.png]]''' |
| − | + | | |
| + | <ol start="2"> | ||
| + | <li>All tabs forms will be displayed. Apply the necessary changes and then, select '''Save '''at the bottom right of the screen to save the changes.</li> | ||
| + | </ol> | ||
| − | <u> | + | |
| + | |||
| + | == <span class="mw-headline" id="Delete_Label"><span class="mw-headline" id="Delete_Label"><span class="mw-headline" id="Delete_Label"><span class="mw-headline" id="Delete_Label"><span class="mw-headline" id="Delete_Label"><span class="mw-headline" id="Delete_Label"><span class="mw-headline" id="Delete_Label"><span class="mw-headline" id="Delete_Label"><span class="mw-headline" id="Delete_Label"><span class="mw-headline" id="Delete_Label"><span class="mw-headline" id="Delete_Label"><span class="mw-headline" id="Delete_Label"><span class="mw-headline" id="Delete_Label"><span class="mw-headline" id="Delete_Label"><span class="mw-headline" id="Delete_Label"><span class="mw-headline" id="Delete_Label"><span class="mw-headline" id="Delete_Label"><span class="mw-headline" id="Delete_Label"><span class="mw-headline" id="Delete_Label"><span class="mw-headline" id="Delete_Label"><span class="mw-headline" id="Delete_Label">Delete Label</span></span></span></span></span></span></span></span></span></span></span></span></span></span></span></span></span></span></span></span></span> == | ||
| + | |||
| + | To delete a label, select the box to the left of a label in development. | ||
| + | |||
| + | | ||
| + | |||
| + | '''<u>Note</u>:''' Only labels in development status can be deleted. | ||
| + | |||
| + | | ||
| + | <ol start="2"> | ||
| + | <li>Select '''Delete.'''</li> | ||
| + | </ol> | ||
| + | |||
| + | | ||
| + | |||
| + | '''Figure 38: Delete Label''' | ||
| + | |||
| + | '''[[File:DeleteLabel1.png|800px|DeleteLabel1.png]]''' | ||
| + | |||
| + | | ||
| + | <ol start="3"> | ||
| + | <li>A confirmation message will be displayed. Select '''Yes to '''confirm deletion or '''No '''to cancel.</li> | ||
| + | </ol> | ||
| + | |||
| + | | ||
| + | |||
| + | == <span class="mw-headline" id="Hide.2FUnhide_Label"><span class="mw-headline" id="Hide.2FUnhide_Label"><span class="mw-headline" id="Hide.2FUnhide_Label"><span class="mw-headline" id="Hide.2FUnhide_Label"><span class="mw-headline" id="Hide.2FUnhide_Label"><span class="mw-headline" id="Hide.2FUnhide_Label"><span class="mw-headline" id="Hide.2FUnhide_Label"><span class="mw-headline" id="Hide.2FUnhide_Label"><span class="mw-headline" id="Hide.2FUnhide_Label"><span class="mw-headline" id="Hide.2FUnhide_Label"><span class="mw-headline" id="Hide.2FUnhide_Label"><span class="mw-headline" id="Hide.2FUnhide_Label"><span class="mw-headline" id="Hide.2FUnhide_Label"><span class="mw-headline" id="Hide.2FUnhide_Label"><span class="mw-headline" id="Hide.2FUnhide_Label"><span class="mw-headline" id="Hide.2FUnhide_Label"><span class="mw-headline" id="Hide.2FUnhide_Label"><span class="mw-headline" id="Hide.2FUnhide_Label"><span class="mw-headline" id="Hide.2FUnhide_Label"><span class="mw-headline" id="Hide.2FUnhide_Label"><span class="mw-headline" id="Hide.2FUnhide_Label">Hide/Unhide Label</span></span></span></span></span></span></span></span></span></span></span></span></span></span></span></span></span></span></span></span></span> == | ||
| + | |||
| + | Certain labels can be hidden from the list of available labels using the hide function. Labels that are currently hidden can be revealed using the unhide function. | ||
| + | |||
| + | Hide a production label, prevents the label to be printed by using SFDC Commands or any other print action from an external application, such as Shop Order Print module, SIT, and others. | ||
| + | |||
| + | | ||
| + | |||
| + | #To hide a label, select the box to the left of a label in production and select '''Hide.''' | ||
| + | |||
| + | | ||
| + | |||
| + | '''Figure 39: Hide Label''' | ||
| + | |||
| + | '''[[File:HideLabel.png|800px|HideLabel.png]]''' | ||
| + | |||
| + | | ||
| + | |||
| + | '''<u>Note</u>: '''Only labels in production can be hidden.<br/> | ||
Unhide the label restores a previously hidden production label and it can be printed using SFDC Commands or other external applications. | Unhide the label restores a previously hidden production label and it can be printed using SFDC Commands or other external applications. | ||
| − | 2 | + | |
| + | <ol start="2"> | ||
| + | <li>To unhide a hidden label, select the box to the left of a hidden label and select '''Unhide.'''</li> | ||
| + | </ol> | ||
| − | + | | |
| − | + | '''Figure 40: Unhide Label''' | |
| − | + | '''[[File:UnHideLabel.png|800px|UnHideLabel.png]]''' | |
| − | + | | |
| − | + | == <span class="mw-headline" id="Publish_Label"><span class="mw-headline" id="Publish_Label"><span class="mw-headline" id="Publish_Label"><span class="mw-headline" id="Publish_Label"><span class="mw-headline" id="Publish_Label"><span class="mw-headline" id="Publish_Label"><span class="mw-headline" id="Publish_Label"><span class="mw-headline" id="Publish_Label"><span class="mw-headline" id="Publish_Label"><span class="mw-headline" id="Publish_Label"><span class="mw-headline" id="Publish_Label"><span class="mw-headline" id="Publish_Label"><span class="mw-headline" id="Publish_Label"><span class="mw-headline" id="Publish_Label"><span class="mw-headline" id="Publish_Label"><span class="mw-headline" id="Publish_Label"><span class="mw-headline" id="Publish_Label"><span class="mw-headline" id="Publish_Label"><span class="mw-headline" id="Publish_Label"><span class="mw-headline" id="Publish_Label"><span class="mw-headline" id="Publish_Label">Publish Label</span></span></span></span></span></span></span></span></span></span></span></span></span></span></span></span></span></span></span></span></span> == | |
| − | + | Publishing a development Label locks the label and makes it available for printing from other applications. | |
| − | + | | |
| − | + | #To publish a label, select the box to the left of a label in development status, then select '''Publish.''' | |
| − | + | | |
| − | + | '''<u>Note</u>: '''Only labels in development can be published. | |
| − | |||
| − | + | | |
| − | + | '''Figure 41: Publish Label''' | |
| − | ''' | + | '''[[File:PublishLabel.png|800px|PublishLabel.png]]''' |
| − | + | | |
| + | <ol start="2"> | ||
| + | <li>A confirmation message will be displayed. Select '''Yes to '''confirm or '''No '''to cancel.</li> | ||
| + | </ol> | ||
| − | + | | |
| − | + | == <span class="mw-headline" id="View_Label_Sample_2"><span class="mw-headline" id="View_Label_Sample_2"><span class="mw-headline" id="View_Label_Sample_2"><span class="mw-headline" id="View_Label_Sample_2"><span class="mw-headline" id="View_Label_Sample_2"><span class="mw-headline" id="View_Label_Sample_2"><span class="mw-headline" id="View_Label_Sample_2"><span class="mw-headline" id="View_Label_Sample_2"><span class="mw-headline" id="View_Label_Sample_2"><span class="mw-headline" id="View_Label_Sample_2"><span class="mw-headline" id="View_Label_Sample_2"><span class="mw-headline" id="View_Label_Sample_2"><span class="mw-headline" id="View_Label_Sample_2"><span class="mw-headline" id="View_Label_Sample_2"><span class="mw-headline" id="View_Label_Sample_2"><span class="mw-headline" id="View_Label_Sample_2"><span class="mw-headline" id="View_Label_Sample_2"><span class="mw-headline" id="View_Label_Sample_2"><span class="mw-headline" id="View_Label_Sample_2"><span class="mw-headline" id="View_Label_Sample_2"><span class="mw-headline" id="View_Label_Sample_2">View Label Sample </span></span></span></span></span></span></span></span></span></span></span></span></span></span></span></span></span></span></span></span></span> == | |
| − | + | The user can preview a sample of certain labels using the View Label Sample function. | |
| − | |||
| − | |||
| − | + | | |
| − | + | #To preview a sample of a label, select the box to the left of a label in Production/Development. | |
| − | + | | |
| − | + | '''<u>Note</u>: '''Only certain labels have previews attached to them. The only way to know which labels have previews is by selecting each one and looking for the Label Sample Preview functionality to become available. | |
| − | ''' | ||
| − | + | <br/> '''Figure 42: Label Sample Preview''' | |
| − | + | '''[[File:LabelSamplePreview.png|800px|LabelSamplePreview.png]]''' | |
| − | + | | |
| − | + | = <span class="mw-headline" id="LE_Reports"><span class="mw-headline" id="LE_Reports"><span class="mw-headline" id="LE_Reports"><span class="mw-headline" id="LE_Reports"><span class="mw-headline" id="LE_Reports"><span class="mw-headline" id="LE_Reports"><span class="mw-headline" id="LE_Reports"><span class="mw-headline" id="LE_Reports"><span class="mw-headline" id="LE_Reports"><span class="mw-headline" id="LE_Reports"><span class="mw-headline" id="LE_Reports"><span class="mw-headline" id="LE_Reports"><span class="mw-headline" id="LE_Reports"><span class="mw-headline" id="LE_Reports"><span class="mw-headline" id="LE_Reports"><span class="mw-headline" id="LE_Reports"><span class="mw-headline" id="LE_Reports">LE Reports</span></span></span></span></span></span></span></span></span></span></span></span></span></span></span></span></span> = | |
| − | + | <br/> The available reports allow the user to mine the logs to extract usage data. There are three report options: | |
| − | + | * | |
| − | |||
| − | + | LE Version History | |
| − | + | * | |
| − | + | LE Print History | |
| − | + | *LE Statistics | |
| − | |||
| − | + | | |
| − | + | #Select LE Version History, LE Print History, or LE Statistics. | |
| − | + | | |
| − | |||
| − | |||
| − | |||
| − | |||
| − | + | == <span class="mw-headline" id="LE_Version_History"><span class="mw-headline" id="LE_Version_History"><span class="mw-headline" id="LE_Version_History"><span class="mw-headline" id="LE_Version_History"><span class="mw-headline" id="LE_Version_History"><span class="mw-headline" id="LE_Version_History"><span class="mw-headline" id="LE_Version_History"><span class="mw-headline" id="LE_Version_History"><span class="mw-headline" id="LE_Version_History"><span class="mw-headline" id="LE_Version_History"><span class="mw-headline" id="LE_Version_History"><span class="mw-headline" id="LE_Version_History"><span class="mw-headline" id="LE_Version_History"><span class="mw-headline" id="LE_Version_History"><span class="mw-headline" id="LE_Version_History"><span class="mw-headline" id="LE_Version_History"><span class="mw-headline" id="LE_Version_History_https:.2F.2Flh6.googleusercontent.com.2FdzJ4fqviRUcJpF7Ix41pAHtPi1AsV9UWBO8HkgD3od0WpKWKDE_j5Wt-4x0Bsput536_qntbdWwgNkkvu2R3ZpKr3isOoJwPCjDBBtWkD9AOwoqLmIU1fdMMr5IrBbtet9vdMtmxE0Cfoicq8gRALlJehuAHnGTxnypJdqqmGjA-MKlSpT-I3trfEw"><span class="mw-headline" id="LE_Version_History_https:.2F.2Flh6.googleusercontent.com.2FdzJ4fqviRUcJpF7Ix41pAHtPi1AsV9UWBO8HkgD3od0WpKWKDE_j5Wt-4x0Bsput536_qntbdWwgNkkvu2R3ZpKr3isOoJwPCjDBBtWkD9AOwoqLmIU1fdMMr5IrBbtet9vdMtmxE0Cfoicq8gRALlJehuAHnGTxnypJdqqmGjA-MKlSpT-I3trfEw">LE Version History [[File:LE prod VH Icon.png]]</span></span></span></span></span></span></span></span></span></span></span></span></span></span></span></span></span></span> == | |
| − | + | <br/> To access the '''LE Version History, '''select the '''LE Version History '''from the '''Label Engine View '''menu. | |
| − | + | <br/> '''Figure 43: LE Version History Page''' | |
| − | + | '''[[File:LEVersionHistoryPage.png|800px|LEVersionHistoryPage.png]]''' | |
| − | + | | |
| − | + | #Set the filters as needed. | |
| + | #Select '''Filter''' to extract the data. | ||
| + | #The results of the query will be displayed in the List. | ||
| − | + | <br/> This report displays the history of the label: who created it, when, its version, and its status. | |
| − | + | ''' ''' | |
| − | |||
| − | + | == <span class="mw-headline" id="LE_Print_History"><span class="mw-headline" id="LE_Print_History"><span class="mw-headline" id="LE_Print_History"><span class="mw-headline" id="LE_Print_History"><span class="mw-headline" id="LE_Print_History"><span class="mw-headline" id="LE_Print_History"><span class="mw-headline" id="LE_Print_History"><span class="mw-headline" id="LE_Print_History"><span class="mw-headline" id="LE_Print_History"><span class="mw-headline" id="LE_Print_History"><span class="mw-headline" id="LE_Print_History"><span class="mw-headline" id="LE_Print_History"><span class="mw-headline" id="LE_Print_History"><span class="mw-headline" id="LE_Print_History"><span class="mw-headline" id="LE_Print_History"><span class="mw-headline" id="LE_Print_History"><span class="mw-headline" id="LE_Print_History_https:.2F.2Flh3.googleusercontent.com.2Fs8oqml7NY3s27LtMTMAMxEncJToCDSnjK_QYsqTNjEd5UCm3H8wKPu6YWyAmNzyZwe96kzsXyd_ZLaXTSfj8q79JRu64NdfLlW9E1VCAEKBe5_WI0-SeRDPEa4XVpQTXrxgyrcG6VQk814BU8WSTAhhoXBJWHGKtWpCRzO67SffoCu1AP8J0dXDjIw"><span class="mw-headline" id="LE_Print_History_https:.2F.2Flh3.googleusercontent.com.2Fs8oqml7NY3s27LtMTMAMxEncJToCDSnjK_QYsqTNjEd5UCm3H8wKPu6YWyAmNzyZwe96kzsXyd_ZLaXTSfj8q79JRu64NdfLlW9E1VCAEKBe5_WI0-SeRDPEa4XVpQTXrxgyrcG6VQk814BU8WSTAhhoXBJWHGKtWpCRzO67SffoCu1AP8J0dXDjIw">LE Print History [[File:LE prod PH Icon.png]]</span></span></span></span></span></span></span></span></span></span></span></span></span></span></span></span></span></span> == | |
| − | + | <br/> To access the LE Print History, select the LE Print History from the Label Engine View menu. | |
| − | |||
| − | |||
| − | |||
| − | |||
| − | + | <br/> '''Figure 44: LE Print History Page''' | |
| − | |||
| − | |||
| − | |||
| − | |||
| − | |||
| − | ''' | + | '''[[File:LEPrintHistoryPage.png|800px|LEPrintHistoryPage.png]]''' |
| − | + | | |
| − | + | This report displays when the labels were printed, which system or Web Service method invokes the print action, which entry value (e.g. Serial Number) was used to print the label, and other information related to the print action. <br/> | |
| − | |||
| − | + | == <span class="mw-headline" id="LE_Statistics"><span class="mw-headline" id="LE_Statistics"><span class="mw-headline" id="LE_Statistics"><span class="mw-headline" id="LE_Statistics"><span class="mw-headline" id="LE_Statistics"><span class="mw-headline" id="LE_Statistics"><span class="mw-headline" id="LE_Statistics"><span class="mw-headline" id="LE_Statistics"><span class="mw-headline" id="LE_Statistics"><span class="mw-headline" id="LE_Statistics"><span class="mw-headline" id="LE_Statistics"><span class="mw-headline" id="LE_Statistics"><span class="mw-headline" id="LE_Statistics"><span class="mw-headline" id="LE_Statistics"><span class="mw-headline" id="LE_Statistics"><span class="mw-headline" id="LE_Statistics"><span class="mw-headline" id="LE_Statistics_https:.2F.2Flh5.googleusercontent.com.2Feee_YRC6eG6tRoUhZ8WS7j3dZ8BSE3NcFxq0gmz-Qu3vu8HktSAdyC2vgbp4sSIVbZ0tv0gtSrS3fFGuj9cs5qi2XHWL2uIEIRIz23S-ftr4AltN4DSDM5MaEQkD-yrKNVsdWKM6wIhNj3wOlX5o2bQUOvvtgIJlNz4uWaNJpT48kW4kc7TF-MXtTw"><span class="mw-headline" id="LE_Statistics_https:.2F.2Flh5.googleusercontent.com.2Feee_YRC6eG6tRoUhZ8WS7j3dZ8BSE3NcFxq0gmz-Qu3vu8HktSAdyC2vgbp4sSIVbZ0tv0gtSrS3fFGuj9cs5qi2XHWL2uIEIRIz23S-ftr4AltN4DSDM5MaEQkD-yrKNVsdWKM6wIhNj3wOlX5o2bQUOvvtgIJlNz4uWaNJpT48kW4kc7TF-MXtTw">LE Statistics [[File:LE prod Statistic Icon.png]]</span></span></span></span></span></span></span></span></span></span></span></span></span></span></span></span></span></span> == | |
| − | + | <br/> To access '''LE Statistics, '''select it from the '''Label Engine View '''menu. | |
| − | + | | |
| − | + | '''Figure 45: LE Statistics Page''' | |
| − | + | '''[[File:LEStatPage.png|800px|LEStatPage.png]]''' | |
| − | |||
| − | |||
| − | |||
| − | |||
| − | |||
| − | |||
| − | + | | |
| − | ''' | + | #To extract statistical information, select '''LE Statistics.''' |
| + | #Select the begin and end dates using the date selectors to define the time range for the statistics that will be generated and the Statistic Type: | ||
| − | + | *'''Print Activities''' | |
| + | *'''Created Revisions ''' | ||
| + | *'''Created Labels''' | ||
| + | <ol start="3"> | ||
| + | <li>Select '''Filter.'''</li> | ||
| + | <li>The results will be displayed in the '''Name '''column.</li> | ||
| + | </ol> | ||
| − | ''' | + | <br/> The user is able to save the report locally by clicking '''Export.''' |
| − | + | <br/> | |
| − | + | = <span class="mw-headline" id="Appendix_A_.E2.80.93_Key_Terms"><span class="mw-headline" id="Appendix_A_.E2.80.93_Key_Terms"><span class="mw-headline" id="Appendix_A_.E2.80.93_Key_Terms"><span class="mw-headline" id="Appendix_A_.E2.80.93_Key_Terms"><span class="mw-headline" id="Appendix_A_.E2.80.93_Key_Terms"><span class="mw-headline" id="Appendix_A_.E2.80.93_Key_Terms"><span class="mw-headline" id="Appendix_A_.E2.80.93_Key_Terms"><span class="mw-headline" id="Appendix_A_.E2.80.93_Key_Terms"><span class="mw-headline" id="Appendix_A_.E2.80.93_Key_Terms"><span class="mw-headline" id="Appendix_A_.E2.80.93_Key_Terms"><span class="mw-headline" id="Appendix_A_.E2.80.93_Key_Terms"><span class="mw-headline" id="Appendix_A_.E2.80.93_Key_Terms"><span class="mw-headline" id="Appendix_A_.E2.80.93_Key_Terms"><span class="mw-headline" id="Appendix_A_.E2.80.93_Key_Terms"><span class="mw-headline" id="Appendix_A_.E2.80.93_Key_Terms"><span class="mw-headline" id="Appendix_A_.E2.80.93_Key_Terms"><span class="mw-headline" id="Appendix_A_.E2.80.93_Key_Terms">Appendix A – Key Terms</span></span></span></span></span></span></span></span></span></span></span></span></span></span></span></span></span> = | |
| − | + | <br/> '''C''' | |
| − | |||
| − | '''C''' | ||
'''Column''' | '''Column''' | ||
| − | The columns are parameters present | + | The columns are parameters present in tables. A column has a type and can represent a data type like an integer, date, or string or can be a link to another table being used on relationships. Columns are often referred to as database fields. |
'''Customer''' | '''Customer''' | ||
| − | A customer of | + | '''A customer of 42Q will be related with a label.''' |
'''D''' | '''D''' | ||
| Line 653: | Line 912: | ||
'''Database''' | '''Database''' | ||
| − | Database that the label engine can be connected to retrieve data. The main parameters are described below. | + | Database that the label engine can be connected to retrieve data. The main parameters are described below. |
| − | * '''Name''' | + | *'''Name: '''The name of the database, this is the name to be used on the connection. |
| − | * '''Type''' | + | *'''Type:''' The type of the database: PostgreSQL, ERP, MySQL, SQLServer or Progress. |
| − | * '''Address''' | + | *'''Address: '''The address of the server where the database is running. |
| − | * '''Port''' | + | *'''Port: '''The port on the database server that is accepting connections. |
| − | * '''Schema''' | + | *'''Schema: '''The schema is a namespace into the database that stores data in separated logical structures into the same database. PostgreSQL and ERP can use this kind of feature. |
'''F''' | '''F''' | ||
| Line 665: | Line 924: | ||
'''Field Number''' | '''Field Number''' | ||
| − | Field numbers are all fields that can be replaced or used with the result of a query or | + | Field numbers are all fields that can be replaced or used with the result of a query or input data. Each field number must be related with a format file. |
'''Format File''' | '''Format File''' | ||
| − | Format files are the templates where the field numbers are associated. | + | Format files are the templates where the field numbers are associated. |
'''L''' | '''L''' | ||
| Line 675: | Line 934: | ||
'''Label''' | '''Label''' | ||
| − | Labels are the representation of all files, data and rules that are used to build a structure for printing a label. | + | Labels are the representation of all files, data and rules that are used to build a structure for printing a label. |
'''P''' | '''P''' | ||
| Line 681: | Line 940: | ||
'''Plant''' | '''Plant''' | ||
| − | Plants are each local | + | Plants are each local 42Q factory. |
'''Printer''' | '''Printer''' | ||
| − | The printer present on a plant. These printers are installed on a print queue of the server that is running the label engine application. | + | The printer is present on a plant. These printers are installed on a print queue of the server that is running the label engine application. |
| − | |||
| − | |||
| − | |||
| − | |||
| − | + | #'''Print Queue name of the installed print queue of the server''' | |
| + | #'''Address the IP or name address of the server that is running the label engine''' | ||
| + | #'''Port the port that the label engine is running on the server''' | ||
'''Project''' | '''Project''' | ||
| − | The projects are structures related | + | The projects are structures related to Progress databases. In this sense, each project must have one database associated with it. A project identifies what MDS will be used on the connection with the database to retrieve data. |
'''Q''' | '''Q''' | ||
| Line 701: | Line 958: | ||
'''Query''' | '''Query''' | ||
| − | Query is the entity used to represent how data can be retrieved from a database. A query can return values of one or more columns based on the relationships among a set of tables that can be configured by the user. | + | Query is the entity used to represent how data can be retrieved from a database. A query can return values of one or more columns based on the relationships among a set of tables that can be configured by the user. |
'''T''' | '''T''' | ||
| Line 707: | Line 964: | ||
'''Table''' | '''Table''' | ||
| − | The tables are the data structure present | + | The tables are the data structure present in databases. This table contains a set of columns and can be used to create queries. |
'''U''' | '''U''' | ||
| Line 713: | Line 970: | ||
'''User''' | '''User''' | ||
| − | The users of the Label Engine. | + | The users of the Label Engine. |
'''V''' | '''V''' | ||
| Line 719: | Line 976: | ||
'''Variable''' | '''Variable''' | ||
| − | Variables are used as parameters of the business rules and are similar to field numbers they have a query associated with them, so the result of the query will be the data inserted on the parameters. | + | Variables are used as parameters of the business rules and are similar to field numbers; they have a query associated with them, so the result of the query will be the data inserted on the parameters. |
| + | |||
| + | | ||
| − | ==Appendix B – File Types | + | |
| + | |||
| + | = <span class="mw-headline" id="Appendix_B_.E2.80.93_File_Types"><span class="mw-headline" id="Appendix_B_.E2.80.93_File_Types"><span class="mw-headline" id="Appendix_B_.E2.80.93_File_Types"><span class="mw-headline" id="Appendix_B_.E2.80.93_File_Types"><span class="mw-headline" id="Appendix_B_.E2.80.93_File_Types"><span class="mw-headline" id="Appendix_B_.E2.80.93_File_Types"><span class="mw-headline" id="Appendix_B_.E2.80.93_File_Types"><span class="mw-headline" id="Appendix_B_.E2.80.93_File_Types"><span class="mw-headline" id="Appendix_B_.E2.80.93_File_Types"><span class="mw-headline" id="Appendix_B_.E2.80.93_File_Types"><span class="mw-headline" id="Appendix_B_.E2.80.93_File_Types"><span class="mw-headline" id="Appendix_B_.E2.80.93_File_Types"><span class="mw-headline" id="Appendix_B_.E2.80.93_File_Types"><span class="mw-headline" id="Appendix_B_.E2.80.93_File_Types"><span class="mw-headline" id="Appendix_B_.E2.80.93_File_Types"><span class="mw-headline" id="Appendix_B_.E2.80.93_File_Types"><span class="mw-headline" id="Appendix_B_.E2.80.93_File_Types"><span class="mw-headline" id="Appendix_B_.E2.80.93_File_Types">Appendix B – File Types</span></span></span></span></span></span></span></span></span></span></span></span></span></span></span></span></span></span> = | ||
'''Format File''' | '''Format File''' | ||
| − | A format file keeps all the structure information to print | + | A format file keeps all the structure information to print an entire label or part of it. A label is composed of one or more format files. The system contains two types of format files: |
| − | * '''User Format File''' | + | *'''User Format File: '''A file that doesn't contain an identifier. This file is represented by the icon User format file icon in the upload file tab. |
| − | * '''Printer Format File''' | + | *'''Printer Format File: '''A file that contains an identifier. This file is represented by the iconPrinter format file icon in the upload file tab. |
'''Image''' | '''Image''' | ||
| − | A file that | + | A file that represents an image that will be sent to the printer. |
This file is represented by the icon Image in the upload file tab. | This file is represented by the icon Image in the upload file tab. | ||
| Line 738: | Line 999: | ||
'''Font''' | '''Font''' | ||
| − | A file that | + | A file that represents a font style that will be used in a label. This file will be sent to the printer. It is represented by the Font icon in the upload file tab. |
| − | |||
| − | |||
| − | |||
| − | |||
| − | + | | |
| − | + | | |
| − | + | = <span class="mw-headline" id="Appendix_C_.E2.80.93_Business_Rules"><span class="mw-headline" id="Appendix_C_.E2.80.93_Business_Rules"><span class="mw-headline" id="Appendix_C_.E2.80.93_Business_Rules"><span class="mw-headline" id="Appendix_C_.E2.80.93_Business_Rules"><span class="mw-headline" id="Appendix_C_.E2.80.93_Business_Rules"><span class="mw-headline" id="Appendix_C_.E2.80.93_Business_Rules"><span class="mw-headline" id="Appendix_C_.E2.80.93_Business_Rules"><span class="mw-headline" id="Appendix_C_.E2.80.93_Business_Rules"><span class="mw-headline" id="Appendix_C_.E2.80.93_Business_Rules"><span class="mw-headline" id="Appendix_C_.E2.80.93_Business_Rules"><span class="mw-headline" id="Appendix_C_.E2.80.93_Business_Rules"><span class="mw-headline" id="Appendix_C_.E2.80.93_Business_Rules"><span class="mw-headline" id="Appendix_C_.E2.80.93_Business_Rules"><span class="mw-headline" id="Appendix_C_.E2.80.93_Business_Rules"><span class="mw-headline" id="Appendix_C_.E2.80.93_Business_Rules"><span class="mw-headline" id="Appendix_C_.E2.80.93_Business_Rules"><span class="mw-headline" id="Appendix_C_.E2.80.93_Business_Rules"><span class="mw-headline" id="Appendix_C_.E2.80.93_Business_Rules">Appendix C – Business Rules</span></span></span></span></span></span></span></span></span></span></span></span></span></span></span></span></span></span> = | |
| − | ''' | + | '''Parameters''' |
| − | + | #'''Initial index: '''the beginning index, inclusive. | |
| + | #'''Final index:''' the ending index, exclusive. | ||
| − | '''Parameters''' | + | '''Parameters''' |
| − | + | *'''Search for value: '''Text | |
| − | + | *'''String position:''' Text | |
| − | |||
| − | |||
| − | |||
| − | |||
| − | |||
| − | |||
| − | |||
| − | * '''Search for value''' | ||
| − | * '''String position''' | ||
'''Insert''' | '''Insert''' | ||
| − | Insert a string in the position informed. | + | Insert a string in the position informed. |
'''Parameters''' | '''Parameters''' | ||
| − | * '''String to be inserted''' | + | *'''String to be inserted: '''the string to be inserted. |
| − | * '''Position of insertion''' | + | *'''Position of insertion: '''the position where the String to be inserted parameter should be inserted. |
'''Data Format''' | '''Data Format''' | ||
| − | Return the date in the specified format. | + | Return the date in the specified format. |
'''Parameter''' | '''Parameter''' | ||
| − | + | #Data format: the pattern describing the date and time format. | |
'''Ends With''' | '''Ends With''' | ||
| − | If the field number value ends with the specified Ending with parameter, the field number value is replaced by the string in the Change for parameter. | + | If the field number value ends with the specified Ending with parameter, the field number value is replaced by the string in the Change for parameter. |
'''Parameters''' | '''Parameters''' | ||
| − | + | <ol start="2"> | |
| − | + | <li>Ending with: the pattern to be matched.</li> | |
| − | + | <li>Change for: the value to be exchanged if the Ending with parameter is matched.</li> | |
| − | + | </ol> | |
'''Replace''' | '''Replace''' | ||
| − | Returns a new string resulting from replacing all occurrences of Pattern to be matched parameter in the field number value with Pattern to be used parameter. | + | Returns a new string resulting from replacing all occurrences of Pattern to be matched parameter in the field number value with Pattern to be used parameter. |
'''Parameters''' | '''Parameters''' | ||
| − | + | #'''Pattern to be matched: '''the string to be found in the field number returned. | |
| − | + | #'''Pattern to be used: '''the string to be replaced by the pattern found in the field number. | |
| − | |||
'''Between''' | '''Between''' | ||
| − | Returns a substring that is in between the Initial character parameter and the End character. | + | Returns a substring that is in between the Initial character parameter and the End character. |
'''Parameters''' | '''Parameters''' | ||
| − | * '''Initial character''' | + | *'''Initial character: '''the initial character to be matched. |
| − | * '''End character''' | + | *'''End character: '''the end character to be matched. |
'''No Ends With''' | '''No Ends With''' | ||
| − | If the field number value does not end with the specified No ending with parameter, the field number value is exchanged by the string in the Change for parameter. | + | If the field number value does not end with the specified No ending with a parameter, the field number value is exchanged by the string in the Change for the parameter. |
'''Parameters''' | '''Parameters''' | ||
| − | * '''No ending with''' | + | *'''No ending with: '''the pattern to be matched. |
| − | * '''Change for''' | + | *'''Change for:''' the value to be replaced if the Ending with parameter is matched. |
'''Equals''' | '''Equals''' | ||
| − | If the field number matches the specified If equals parameter, the field number value is replaced by the string in the Change for parameter. | + | If the field number matches the specified If equals parameter, the field number value is replaced by the string in the Change for the parameter. |
'''Parameters''' | '''Parameters''' | ||
| − | + | #'''If equals: '''the pattern to be matched. | |
| + | #'''Change for: '''the value to be replaced if the If equals parameter is matched. | ||
| + | |||
| + | | ||
| + | |||
| + | | ||
| + | |||
| + | = <span class="mw-headline" id="Examples"><span class="mw-headline" id="Appendix_D_.E2.80.93_Examples"><span class="mw-headline" id="Appendix_D_.E2.80.93_Examples"><span class="mw-headline" id="Appendix_D_.E2.80.93_Examples"><span class="mw-headline" id="Appendix_D_.E2.80.93_Examples"><span class="mw-headline" id="Appendix_D_.E2.80.93_Examples"><span class="mw-headline" id="Appendix_D_.E2.80.93_Examples"><span class="mw-headline" id="Appendix_D_.E2.80.93_Examples"><span class="mw-headline" id="Appendix_D_.E2.80.93_Examples"><span class="mw-headline" id="Appendix_D_.E2.80.93_Examples"><span class="mw-headline" id="Appendix_D_.E2.80.93_Examples"><span class="mw-headline" id="Appendix_D_.E2.80.93_Examples"><span class="mw-headline" id="Appendix_D_.E2.80.93_Examples"><span class="mw-headline" id="Appendix_D_.E2.80.93_Examples"><span class="mw-headline" id="Appendix_D_.E2.80.93_Examples"><span class="mw-headline" id="Appendix_D_.E2.80.93_Examples"><span class="mw-headline" id="Appendix_D_.E2.80.93_Examples"><span class="mw-headline" id="Appendix_D_.E2.80.93_Examples"><span class="mw-headline" id="Appendix_D_.E2.80.93_Examples">Examples</span></span></span></span></span></span></span></span></span></span></span></span></span></span></span></span></span></span></span> = | ||
| + | |||
| + | | ||
| + | |||
| + | == <span class="mw-headline" id="How_to_create_a_block.2Felement_for_containers"><span class="mw-headline" id="How_to_create_a_block.2Felement_for_containers"><span class="mw-headline" id="How_to_create_a_block.2Felement_for_containers"><span class="mw-headline" id="How_to_create_a_block.2Felement_for_containers"><span class="mw-headline" id="How_to_create_a_block.2Felement_for_containers"><span class="mw-headline" id="How_to_create_a_block.2Felement_for_containers"><span class="mw-headline" id="How_to_create_a_block.2Felement_for_containers"><span class="mw-headline" id="How_to_create_a_block.2Felement_for_containers"><span class="mw-headline" id="How_to_create_a_block.2Felement_for_containers"><span class="mw-headline" id="How_to_create_a_block.2Felement_for_containers"><span class="mw-headline" id="How_to_create_a_block.2Felement_for_containers"><span class="mw-headline" id="How_to_create_a_block.2Felement_for_containers"><span class="mw-headline" id="How_to_create_a_block.2Felement_for_containers"><span class="mw-headline" id="How_to_create_a_block.2Felement_for_containers"><span class="mw-headline" id="How_to_create_a_block.2Felement_for_containers"><span class="mw-headline" id="How_to_create_a_block.2Felement_for_containers"><span class="mw-headline" id="How_to_create_a_block.2Felement_for_containers"><span class="mw-headline" id="How_to_create_a_block.2Felement_for_containers"><span class="mw-headline" id="How_to_create_a_block.2Felement_for_containers"><span class="mw-headline" id="How_to_create_a_block.2Felement_for_containers"><span class="mw-headline" id="How_to_create_a_block.2Felement_for_containers">How to create a block/element for containers</span></span></span></span></span></span></span></span></span></span></span></span></span></span></span></span></span></span></span></span></span> == | ||
| + | |||
| + | See a full example using an existing label on how to create a block/element for a Container: | ||
| + | |||
| + | | ||
| + | |||
| + | '''Figure 46: Container Sample Label''' | ||
| − | + | '''[[File:ContainerSampleLabel.png|600px|ContainerSampleLabel.png]]''' | |
| − | + | <br/> '''Figure 47: Container Sample Element''' | |
| − | + | '''[[File:ContainerSampleElement.png|600px|ContainerSampleElement.png]]''' | |
| − | |||
| − | | | ||
| − | |||
| − | |||
| − | |||
| − | + | <br/> <br/> '''Figure 48: Container Sample Label Mapping''' | |
| − | |||
| − | |||
| − | |||
| − | |||
| − | |||
| − | | | + | '''[[File:ContainerSampleLabelMapping.png|600px|ContainerSampleLabelMapping.png]]''' |
| − | |||
| − | |||
| − | |||
| − | | | ||
| − | |||
| − | | | + | |
| + | |||
| + | == <span class="mw-headline" id="Parallel_Containers_-_Values_Other_than_Just_Serial_Numbers"><span class="mw-headline" id="Parallel_Containers_-_Values_Other_than_Just_Serial_Numbers"><span class="mw-headline" id="Parallel_Containers_-_Values_Other_than_Just_Serial_Numbers"><span class="mw-headline" id="Parallel_Containers_-_Values_Other_than_Just_Serial_Numbers"><span class="mw-headline" id="Parallel_Containers_-_Values_Other_than_Just_Serial_Numbers"><span class="mw-headline" id="Parallel_Containers_-_Values_Other_than_Just_Serial_Numbers"><span class="mw-headline" id="Parallel_Containers_-_Values_Other_than_Just_Serial_Numbers"><span class="mw-headline" id="Parallel_Containers_-_Values_Other_than_Just_Serial_Numbers"><span class="mw-headline" id="Parallel_Containers_-_Values_Other_than_Just_Serial_Numbers"><span class="mw-headline" id="Parallel_Containers_-_Values_Other_than_Just_Serial_Numbers"><span class="mw-headline" id="Parallel_Containers_-_Values_Other_than_Just_Serial_Numbers"><span class="mw-headline" id="Parallel_Containers_-_Values_Other_than_Just_Serial_Numbers"><span class="mw-headline" id="Parallel_Containers_-_Values_Other_than_Just_Serial_Numbers"><span class="mw-headline" id="Parallel_Containers_-_Values_Other_than_Just_Serial_Numbers"><span class="mw-headline" id="Parallel_Containers_-_Values_Other_than_Just_Serial_Numbers"><span class="mw-headline" id="Parallel_Containers_-_Values_Other_than_Just_Serial_Numbers"><span class="mw-headline" id="Parallel_Containers_-_Values_Other_than_Just_Serial_Numbers"><span class="mw-headline" id="Parallel_Containers_-_Values_Other_than_Just_Serial_Numbers"><span class="mw-headline" id="Parallel_Containers_-_Values_Other_than_Just_Serial_Numbers"><span class="mw-headline" id="Parallel_Containers_-_Values_Other_than_Just_Serial_Numbers">Parallel Containers - Values Other than Just Serial Numbers</span></span></span></span></span></span></span></span></span></span></span></span></span></span></span></span></span></span></span></span> == | ||
| + | |||
| + | <br/> Often users will need a container label that contains the list of enclosed units / serial numbers as well as some other attribute(s) associated with each unit. For lack of a better name, Parallel Containers.<br/> <br/> The below explanation will help ensure the container label extracts the correct data and prints it in the correct order. | ||
| + | |||
| + | | ||
| + | |||
| + | | ||
| + | |||
| + | === <span class="mw-headline" id="Naming_Template_Fields"><span class="mw-headline" id="Naming_Template_Fields"><span class="mw-headline" id="Naming_Template_Fields"><span class="mw-headline" id="Naming_Template_Fields"><span class="mw-headline" id="Naming_Template_Fields"><span class="mw-headline" id="Naming_Template_Fields"><span class="mw-headline" id="Naming_Template_Fields"><span class="mw-headline" id="Naming_Template_Fields"><span class="mw-headline" id="Naming_Template_Fields"><span class="mw-headline" id="Naming_Template_Fields"><span class="mw-headline" id="Naming_Template_Fields"><span class="mw-headline" id="Naming_Template_Fields"><span class="mw-headline" id="Naming_Template_Fields"><span class="mw-headline" id="Naming_Template_Fields"><span class="mw-headline" id="Naming_Template_Fields"><span class="mw-headline" id="Naming_Template_Fields"><span class="mw-headline" id="Naming_Template_Fields"><span class="mw-headline" id="Naming_Template_Fields"><span class="mw-headline" id="Naming_Template_Fields"><span class="mw-headline" id="Naming_Template_Fields"><span class="mw-headline" id="Naming_Template_Fields"><span class="mw-headline" id="Naming_Template_Fields">Naming Template Fields</span></span></span></span></span></span></span></span></span></span></span></span></span></span></span></span></span></span></span></span></span></span> === | ||
| + | |||
| + | When users work with Parallel Containers, it is very important to correctly name the template fields so that multiple containers are populated in the same order on the label. | ||
| + | |||
| + | Below, you will see examples of good naming strategies: | ||
| + | |||
| + | '''sn_01, sn_02, sn_03, …sn_##''' | ||
| + | |||
| + | '''mac_01, mac_02, mac_03, ...mac_## ''' | ||
| + | |||
| + | '''comp_01, comp_02, comp_03, ...comp_##''' | ||
| + | |||
| + | | ||
| + | |||
| + | '''<u>Note</u>:''' In case there are more than 100 units listed on a single page of a container label, use three digits instead of two digits.<br/> <br/> | ||
| + | |||
| + | '''Figure 49: Sample Label with Good Naming Strategy''' | ||
| + | |||
| + | '''[[File:SampleLabelwGNS.png|500px|SampleLabelwGNS.png]]''' | ||
| + | |||
| + | == <span class="mw-headline" id="Container_Element_.26_Block_Formulation"><span class="mw-headline" id="Container_Element_.26_Block_Formulation"><span class="mw-headline" id="Container_Element_.26_Block_Formulation"><span class="mw-headline" id="Container_Element_.26_Block_Formulation"><span class="mw-headline" id="Container_Element_.26_Block_Formulation"><span class="mw-headline" id="Container_Element_.26_Block_Formulation"><span class="mw-headline" id="Container_Element_.26_Block_Formulation"><span class="mw-headline" id="Container_Element_.26_Block_Formulation"><span class="mw-headline" id="Container_Element_.26_Block_Formulation"><span class="mw-headline" id="Container_Element_.26_Block_Formulation"><span class="mw-headline" id="Container_Element_.26_Block_Formulation"><span class="mw-headline" id="Container_Element_.26_Block_Formulation"><span class="mw-headline" id="Container_Element_.26_Block_Formulation"><span class="mw-headline" id="Container_Element_.26_Block_Formulation"><span class="mw-headline" id="Container_Element_.26_Block_Formulation"><span class="mw-headline" id="Container_Element_.26_Block_Formulation"><span class="mw-headline" id="Container_Element_.26_Block_Formulation"><span class="mw-headline" id="Container_Element_.26_Block_Formulation"><span class="mw-headline" id="Container_Element_.26_Block_Formulation"><span class="mw-headline" id="Container_Element_.26_Block_Formulation"><span class="mw-headline" id="Container_Element_.26_Block_Formulation"><span class="mw-headline" id="Container_Element_.26_Block_Formulation">Container Element & Block Formulation</span></span></span></span></span></span></span></span></span></span></span></span></span></span></span></span></span></span></span></span></span></span> == | ||
| + | |||
| + | When working with container labels, selecting the checkbox '''Values Will Be Assigned To Multiple Different Fields (Container) '''changes the scope of the data that is being extracted. Instead of the scope being the "container serial", the scope becomes the serial of each item in the container. The entry value will be the container serial number, but the value extracted will be the value for each item in the container. <br/> <br/> '''Figure 54 '''demonstrates how to extract the child serial numbers, the entry is the container serial number and the output would be serial.serial_number.<br/> ''' ''' | ||
| + | |||
| + | '''Figure 50: Extracting Child Serial Numbers''' | ||
| + | |||
| + | '''[[File:ExtractingChildSN.png|600px|ExtractingChildSN.png]]''' | ||
| + | |||
| + | | ||
| + | |||
| + | '''Figure 51 '''demonstrates the extraction of the mac addresses that were captured as components, using a reference designator of '''MAC_Address.'''<br/> <br/> | ||
| + | |||
| + | '''Figure 51: Extraction of the Mac Addresses''' | ||
| + | |||
| + | '''[[File:ExtractionMacAddresses.png|600px|ExtractionMacAddresses.png]]''' | ||
| + | |||
| + | | ||
| + | |||
| + | == <span class="mw-headline" id="Container_Element_Mapping"><span class="mw-headline" id="Container_Element_Mapping"><span class="mw-headline" id="Container_Element_Mapping"><span class="mw-headline" id="Container_Element_Mapping"><span class="mw-headline" id="Container_Element_Mapping"><span class="mw-headline" id="Container_Element_Mapping"><span class="mw-headline" id="Container_Element_Mapping"><span class="mw-headline" id="Container_Element_Mapping"><span class="mw-headline" id="Container_Element_Mapping"><span class="mw-headline" id="Container_Element_Mapping"><span class="mw-headline" id="Container_Element_Mapping"><span class="mw-headline" id="Container_Element_Mapping"><span class="mw-headline" id="Container_Element_Mapping"><span class="mw-headline" id="Container_Element_Mapping"><span class="mw-headline" id="Container_Element_Mapping"><span class="mw-headline" id="Container_Element_Mapping"><span class="mw-headline" id="Container_Element_Mapping"><span class="mw-headline" id="Container_Element_Mapping"><span class="mw-headline" id="Container_Element_Mapping"><span class="mw-headline" id="Container_Element_Mapping">Container Element Mapping</span></span></span></span></span></span></span></span></span></span></span></span></span></span></span></span></span></span></span></span> == | ||
| + | |||
| + | Container mappings will be many template fields to a single '''Container Element. '''Multi-select the placeholder names (left side) and select the container element (right side) and click the '''Map''' button as in '''Figure 56.'''<br/> | ||
| + | |||
| + | '''Figure 52: Label Mapping''' | ||
| + | |||
| + | '''[[File:LabelEngineMapping.png|800px|LabelEngineMapping.png]]''' | ||
| + | |||
| + | | ||
| + | |||
| + | When users follow the previous steps and print labels, they will see labels similar to the image '''Figure 57.''' | ||
| + | |||
| + | | ||
| + | |||
| + | '''Figure 53: Resulting Label''' | ||
| + | |||
| + | '''[[File:ResultingLabel.png|500px|ResultingLabel.png]]''' | ||
| + | |||
| + | <br/> | ||
| + | |||
| + | ---- | ||
| − | + | | |
Latest revision as of 14:51, 15 October 2024
42Q Home > Production > Label Engine Labels
Contents
- 1 Introduction
- 2 LE Reports
- 3 Appendix A – Key Terms
- 4 Appendix B – File Types
- 5 Appendix C – Business Rules
- 6 Examples
Introduction
Label Engine Labels is a web application that gives plants the ability to create, update, and print labels without the need for IT resources. It enables plants to easily define and access various different data sources like MES, and MESR, along with a variety of other database types. It allows users to map label fields to these data sources in order to create dynamic labels. It also enables plants to extract statistical information about the labels that are managed in Label Engine, as well as monitor the audit information.
Users can create a label template or layout in the design tool (i.e.: For ZPL use BarOne or CodeSoft, and for RTF use Microsoft Office or another tool that provides RTF format.) of their choice. Using the design tool, they export the completed template as ZPL (Zebra Printer Language) or RTF (Rich Text Format). The template is uploaded to Label Engine and the fields in the template are mapped to data sources. At print time, Label Engine combines the template with the appropriate data to produce finished labels.
The Label Engine Labels portlet allows the user to create, edit, copy, delete, and print labels. LE Admin History, LE Version History, and LE Print History reports can be viewed and/or printed from this page. LE Statistics Excel spreadsheets can also be created from the LE Labels page.
To access the LE Labels application, navigate to Production > Label Engine Labels.
Figure 1: Accessing Label Engine Labels
Within the main screen of Label Engine View, the user will be able to see four different modules:
LE Labels, LE Version History, LE Print History, and LE Statistics.
LE Labels 
To access the LE Labels, select the LE Labels from the Label Engine View menu.
Figure 2: Label Engine Labels Main Page
The main screen of the LE Labels page contains all previously created labels. The labels are sorted by name and are color-coded according to their status. The following are the colors and their statuses:
- Green=Production
- Blue=Development
- Red=Hidden
- Brown=Deprecated
Label Template File
The first step of creating a label is done outside of the Label Engine. A label layout and design tool are used to create the label template such that the finished label meets the customer's specifications. Typically the label specifications will cover such things as label media type, size, fonts, barcodes, tolerances, etc. Many different design tools exist and the choice of design tools is outside the boundaries of Label Engine.
A suitable design tool MUST be able to produce or export ZPL code (Zebra Programming Language) for use on Zebra Printers, or RTF (rich text format) for use on sheet / LaserJet printers.
As such, printing labels through Label Engine are limited to supporting printers that support ZPL (i.e. Zebra printers) or RTF (i.e. LaserJet printers).
Label Engine’s main purpose is to provide a means of populating placeholder fields in labels. Label Engine keys in on values surrounded by $ (for example $partno$) to determine which label elements are mappable within the Label Engine. At print time, these placeholders are replaced with real data by Label Engine before sending the label to the printer. Not all design software or barcode formats will allow the use of the $ character, and in such cases manually editing/cleaning the ZPL might be necessary.
The ZPL or RTF file(s) are uploaded to Label Engine as part of the label creation process.
Add New Label
To create a new label, select Add from the LE Labels main page.
Figure 3: Add New Label
Enter the label name and customer and save the Label. Label names can only contain lower case characters, digits, and - (dash) and _ (underscores) all other characters and disallowed. Label names can not be changed after the first publishing of a label and label names MUST be unique so choose your name wisely.
Figure 4: Save Label
A General Information screen will display. There are three tabs located to the right of the General Information form (Upload Files, Element Creation, andLabel Mapping).
General Information Tab
The general information tab contains the same parameters that were on the initial creation screen so that these values can be updated. It also contains additional information in the database selection panel, and it contains additional controls to allow Parts to be associated with Labels.
Figure 5: General Information
The user will need to enter the following information in the General Information form:
- Name - the unique name for the label. Each label must have a unique name. Label names can only contain lowercase letters, numbers, and underscore, and the name is limited to 30 characters. Spaces are not permitted. The name is the key to printing labels using external web services.
- Version - Defines the current label version.
- Size - Enter the size of the label.
- Resolution - choose resolution based on the printer that will be used.
- Customer - select a customer for the label from the drop-down list.
- Kind of Material - Choose the material that the label will be printed: Kapton, paper, or polyester.
- Comments - label comments for any additional information.
- Duplicate Prevention - Use this to specify if the label should prevent printing this label more than once for any given "entry". This may be disabled due to administrative settings that are explained in the LE Admin SOP {put the link and proper name}
Default Database Mapping
By filling out the Default Database section it will allow the user to use the option Part Must be Mapped in the case the selected database is an MDS Database. Moreover, it will provide the user with an autocomplete part of the creation of an element. Once a database is selected, the Table and Column lists will become available. Using these drop-down lists, define which database element will be provided at print time. This is also referred to as the default "entry" value.
Figure 6: Database Mapping
Part Number Mapping
Part number mapping allows the label to be associated with some Part Numbers. By having the Part Number informed in the Label Engine Print screen, it is very easy to find the label(s) that need to be printed by a Part Number. Depending on the Administrative configuration, Part Number mappings may be optional. Toggle the "Part Must Be Mapped" selection if the label should enforce part mapping at print time. If enabled and if the print time entry corresponds to a part that is NOT mapped to the label, the printing will be prevented.
Note: This may be disabled due to administrative settings that are explained in the LE Admin SOP {put the link and proper name}.
Enter the Part Number in the Part field and select Add 'to add the part in the Part Number list. To delete parts, select it, and select Delete.
Figure 7: Part Number Mapping
Once you have provided all of the information on the General Information tab, select Save to commit your changes to the system, and then select Next. The user can also select the Upload Files tab.
Note: Clear functionality will remove any data provided so you can start fresh.
Upload Files Tab
The Upload Files tab allows the user to manage the files and links for the label. To be usable, a label must have a template file as this contains the layout and definition of the label. A label engine label can only contain a single template file.
Label Engine's primary purpose is to collect, or generate, data and inject this data into the appropriate places within the template file and print the resulting complete label. Any "variable" data in a label template needs to be identified as a template field. Template fields are delimited by $ (dollar sign) characters. Label Engine identifies the template fields as the text between the $$, for example, $sn$ or $serial number$ or $serial_number$ would all be good template field identifiers as they are easy to understand what data is required.
When a template file is added to a label, Label Engine searches through the template and identifies a distinct list of template fields. Label Engine allows the label designer to "map" data to the template fields.
As there are different printer types, LE supports different template types. LE has support for the following template files:
- ZPL (*.txt or *.zpl) are for use with printers supporting the Zebra Printing Language
- RTF (*.rtf) are rich text format files, for use on sheet printers.
- DPL (*.txt or *.dpl) are for use with printers supporting the Datamax Printing Language
- EPL (*.txt or *.epl) are for use with printers supporting the Eltron Printing Language
- Other Template Types (*.txt) is a catch-all that will allow you to upload any text-based printing language command file that the destination printer will support. Some examples would be J-Script (Brady Printers), IPL (Intermec), etc.
Many different label design tools exist and the creation of the printer-specific template file is outside the scope of Label Engine. LE simply requires a text file containing identifiable template fields. Template files are typically printer-specific command files. The exception to this is RTF. RTF files are converted to PDF files which can be printed on most sheet/laser printers.
Tip: It is possible to put multiple labels within a single template file.
The other supported "files" that can be uploaded are:
- Label Image Sample (*.jpg, *.jpeg, *.gif, *.png) are to include a static image of a sample label. A label will only allow you to include one image sample.
- Font (*.fnt) are fonts that are required on your label. Fonts only apply to ZPL labels. The list of existing fonts will be displayed from which you can reference the one(s) your label needs. If you need a font that has not yet been uploaded, you will be able to upload a new one. You can upload or link as many Font files as are needed for your label.
- URLs are not actually uploaded and they don't have any content within LE. URL is so you can reference information about the specs of the label, or anything else you feel warrants adding a reference to. Basically, this is to allow LE to be the place you manage your label.
Figure 8: Upload Files
Most files will be uploaded from the user’s local computer. However, if the font was already uploaded to the server for use in a different label it will be possible to reference the existing font instead of uploading it again.
Add File
To add a file to the label from your local computer, select Add from the Upload Files tab.
Figure 9: Add File
- Select Browse to browse and select the file to add to the label.
- Add a description of the file.
- Select Save to confirm the addition, Reset to clear the fields, orCancel to cancel.
Edit File
For labels with files attached, the files can be edited as long as the label has not yet been published.
- To edit a file, select the checkbox to the left of the file and then select Edit.
Figure 10: Edit File
- Once the Edit button is selected, the Edit Files Uploaded pop-up displays to edit.
- Only the Description portion of the file is available to edit.
- Change the description and then select OK to save changes or Cancel to exit.
Delete File
To delete a file attached to a label, select the checkbox to the left of the file name and select Delete.
Figure 11: Delete File
A confirm box will display. Select Yes to confirm or No to exit.
Download File
Under the Upload files tab, the user can download the files attached to a label to retain the information from the label.
- To download the file, select the checkbox to the left of the file name and select Download.
Figure 12: Download File
The download will be started automatically.
View Label Sample
The user can view a sample of the file that is attached to the label from the Upload Label tab.
- To preview a sample of the file, select the checkbox to the left of the file name, and select View Label Sample.
Figure 13: View Label Sample
- A sample of the file is displayed on a new screen.
Element Creation Tab
The element creation tab is where users will create the "elements" of data that will be injected into the template at the print time via label mapping.
Figure 14: Element Creation Tab
On this tab, the user can create the elements. Elements are built up of 'blocks' of data, and elements are what is ultimately injected into the template file at a print time replacing the $place_holder$ fields.
The application provides five functionalities (Constant Value, Date/Time, Database, Custom function, and Entry Value Block), from which the user is able to customize the elements.
Add Element
To add an element, in the Element Creation tab, select the Add Element button.
Figure 15: Element Editor
The Element Editor is displayed and the user can input the necessary information to the new element.
Fill in the available fields:
Element Name: the name of the element;
Comments: any necessary information that the user wants;
Mandatory is a flag indicating that a non blank/non null value is required at print time. If the element value is empty at print time, the printing of the label is aborted and a message about the failure is recorded in the audit log and is reported back to the user. The default message contains a reference back to the element name. The element name is not always something that has meaning to an operator. To provide a more meaningful message (for the audit and the user response) LE allows the user to provide a mandatory custom message that will be used instead. When Mandatory is selected, an optional field, Custom Mandatory Message becomes available and this is where the label designer can provide the message to be used if a mandatory violation occurs.
Note: This Mandatory flag will be available at some of the functionalities and will be used for the same purpose.
Figure 16: Element Editor - Selecting Mandatory
Checking the Entry Point checkbox, it will be allowed to search values from two databases. It is used to set the database priority.
The available functionalities are described below:
Constant Value
Figure 17: Constant Value
This functionality allows the user to create a constant value (fixed value) used for printing the value in the label.
Block Name: this is the block title to be created;
Value: Value to be printed in the label (any value type). Click on OK to finish.
Date/Time
This functionality will print the date and the time in the label.
Figure 18: Date/Time
Block Name: Name of the block to be created;
Date/Time format: Select the format (from the available list) that will be printed in the label.
Figure 19: Date/Time Format
Block Modification Rules: It allows the user to set the rules to the selected field (date/time)
Figure 20: Add Rule
The rules can be used to set or modify previously assigned label fields. Dynamic data, such as system date or time, can be formatted and assigned to a label field. Rules allow for data to be combined or transformed based on runtime conditions.
It displays the details of the business rules assigned to the selected label field in the Rules list.
Multiple business rules can be applied to any field. To add business rules to a field, follow these steps:
To add a rule, select an existing rule from the list and click on the Add button. The new rule will be added to the list.
The order in which business rules are applied can be changed using the arrows in the lower section of the details section. As well, business rules can be deleted or updated using the appropriate action icons.
Database
This function loads the database information that will be printed on the label.
Figure 21: Database
Entry Value From: This form informs where the input for the element comes from. The common value isPrint Call Entry.
- Print Call Entry: comes from the value used to print the label;
- Element Name/Key: comes from the element;
- Block Name/Key: comes from the block.
The Entry Point Definition form displays the predefined values in the General Information.
Value To Extract: The user needs to select the Table and the Column to get the information to be printed on the label.
To provide a more meaningful message (for the audit and the user response) LE allows the user to provide a custom mandatory message that will be used instead. When the Mandatory checkbox is selected, an optional field, Custom Mandatory Message becomes available and this is where the label designer can provide the message to be used if a mandatory violation occurs.
Note: If the label is a Container Label, the user needs to select the Values Will Be Assigned To Different Fields option.
Figure 22: Container Label Option
The Block Modification Rule was already explained in the Date/Time topic.
See Appendix D - Examples for more information.
Custom Function
The Custom Function allows fetching database information through a customized function.
Figure 23: Custom Function
Entry Value From: This form informs where the input for the element comes from. The common value is Print Call Entry.
To provide a more meaningful message (for the audit and the user response) LE allows the user to provide a custom mandatory message that will be used instead. When a Mandatory checkbox is selected, an optional field, Custom Mandatory Message becomes available and this is where the label designer can provide the message to be used if a mandatory violation occurs.
- Print Call Entry: comes from the value used to print the label;
- Element Name/Key: comes from the element;
- Block Name/Key: comes from the block.
Database: after the database is selected, the functions are displayed in the list and the user can select them and inform the Function Details.
Entry Value Block
This functionality gets the entry information used to print the label (generally, the Serial Number).
Figure 24: Entry Value Block
Click on Save to finish.
Delete Entry Value
Figure 25: Delete Entry Value
To delete, just select the Entry Value Block in the list and select Delete. A confirmation message is displayed, select Yes to delete or No to abort.
Edit Element
Editing elements work pretty similarly to Add Element. Refer to Add Element topic for further information.
Figure 26: Edit Element
Editing elements work pretty similar to Add Elements. Refer to Add Element topic for further information.
Delete Element
To delete, just select the Element Name in the list and select Delete.
Figure 27: Delete Element
A confirmation message is displayed, select Yes to delete or No to abort.
View Element
This functionality allows the user to view how the element was created.
It is not allowed to do any updates on this page.
Figure 28: View Elements
Label Printing
One of the major features provided by Label Engine is printing labels. Users can print labels to any available printer.
This page changes based on the settings for duplicate prevention if the entry has been printed before.
Figure 29: Print Label
Figure 30: Print Label Options
To print a label:
- Select the box to the left of the Label Name on the main Label Engine page.
- Select the printer icon on the far right of the screen.
- Choose a Printer.
- Enter the information used to print the label into the Entry field and select Print.
View Raw Data: The user can get the raw content that will be sent to the printer.
Local Print (download): This option allows the user to download the print result locally as a PDF or ZPL.
Test Print: Duplicate prevention and Test printing. If the label (and the plant configuration) has duplicate prevention turned on after the Entry field loses focus, the print history is checked. If the label-entry combination has been printed, viewed, or downloaded before it can't be printed again. It can only be reprinted (as many times as needed). In order to perform a reprint (if the user has permission to reprint) the three fields (Reprint Reason, Approver, and Notes) need to be filled before the reprint options become available.
Local Test Print (Download): Test Print / Local Test Print are always allowed. This feature still requires a valid entry, however, the print activity does not use up the one label entry allowed. It is still recorded and viewable from the audit, but it is recorded as a test print. Also, all of the elements have their value reversed before being injected into the template so, in fact, the generated label is significantly different from a regular print.
Note: This section also discusses web service printing. The new LE web service is documented with Swagger (which allows the user to describe the structure of your APIs so that machines can read them.
In addition, Label Engine has web services that expose printing functionality to other applications. For example, it is possible to print labels created in the Label Engine by using the SFDC Commands (!! Commands):
!!1LABENG.<labelname>.<print queue>
where
<labelname> is the exact name of the label in Label Engine, and <print queue> is the exact name of the print queue defined in Label Engine.
New Version
To create a new version of a label, select the box to the left of a Production, Hidden or Deprecated label then select New Version.
Note: Labels in Development cannot have New Versions created.
Figure 31: New Version
- The General Information form will be displayed. All fields are available to edit to create a New Version of the label.
- Select Save.
Edit Label
To edit a label, select the box to the left of a label in Development.
Note: Only labels in Development are available to edit.
Figure 32: Edit Label
- The General Information form will be displayed. All fields are available to edit.
- The Upload Files, Element Creation, and Label Mapping tabs are also available to edit.
- Select Save to confirm changes.
View Label
View functionality is very convenient to view how the label was created in case the user does not have permission to edit.
- To view a label, select the box to the left of a label in production.
- Select View.
Figure 33: View Label
- All tabs will be displayed.
- The label information is available to view only.
Add/Remove PN
This functionality allows the users to add or remove Part Numbers associated with the label.
- To add or delete a Part Number from a label, select the box to the left of a label.
Figure 34: Add/Remove Part Number
Figure 35: Part Number Mapping
- Enter the part number and select Add.
- Select Add to confirm or Close to cancel.
Figure 36: Delete Part Number
- To delete a part number, select the box to the left of the part number and select Delete.
- AConfirm screen will display. Select Yes to confirm deletion or No to cancel.
Copy Label
To copy a label, select any label from the Labels list and then select Copy.
Figure 37: Copy Label
- All tabs forms will be displayed. Apply the necessary changes and then, select Save at the bottom right of the screen to save the changes.
Delete Label
To delete a label, select the box to the left of a label in development.
Note: Only labels in development status can be deleted.
- Select Delete.
Figure 38: Delete Label
- A confirmation message will be displayed. Select Yes to confirm deletion or No to cancel.
Hide/Unhide Label
Certain labels can be hidden from the list of available labels using the hide function. Labels that are currently hidden can be revealed using the unhide function.
Hide a production label, prevents the label to be printed by using SFDC Commands or any other print action from an external application, such as Shop Order Print module, SIT, and others.
- To hide a label, select the box to the left of a label in production and select Hide.
Figure 39: Hide Label
Note: Only labels in production can be hidden.
Unhide the label restores a previously hidden production label and it can be printed using SFDC Commands or other external applications.
- To unhide a hidden label, select the box to the left of a hidden label and select Unhide.
Figure 40: Unhide Label
Publish Label
Publishing a development Label locks the label and makes it available for printing from other applications.
- To publish a label, select the box to the left of a label in development status, then select Publish.
Note: Only labels in development can be published.
Figure 41: Publish Label
- A confirmation message will be displayed. Select Yes to confirm or No to cancel.
View Label Sample
The user can preview a sample of certain labels using the View Label Sample function.
- To preview a sample of a label, select the box to the left of a label in Production/Development.
Note: Only certain labels have previews attached to them. The only way to know which labels have previews is by selecting each one and looking for the Label Sample Preview functionality to become available.
Figure 42: Label Sample Preview
LE Reports
The available reports allow the user to mine the logs to extract usage data. There are three report options:
LE Version History
LE Print History
- LE Statistics
- Select LE Version History, LE Print History, or LE Statistics.
LE Version History 
To access the LE Version History, select the LE Version History from the Label Engine View menu.
Figure 43: LE Version History Page
- Set the filters as needed.
- Select Filter to extract the data.
- The results of the query will be displayed in the List.
This report displays the history of the label: who created it, when, its version, and its status.
LE Print History 
To access the LE Print History, select the LE Print History from the Label Engine View menu.
Figure 44: LE Print History Page
This report displays when the labels were printed, which system or Web Service method invokes the print action, which entry value (e.g. Serial Number) was used to print the label, and other information related to the print action.
LE Statistics 
To access LE Statistics, select it from the Label Engine View menu.
Figure 45: LE Statistics Page
- To extract statistical information, select LE Statistics.
- Select the begin and end dates using the date selectors to define the time range for the statistics that will be generated and the Statistic Type:
- Print Activities
- Created Revisions
- Created Labels
- Select Filter.
- The results will be displayed in the Name column.
The user is able to save the report locally by clicking Export.
Appendix A – Key Terms
C
Column
The columns are parameters present in tables. A column has a type and can represent a data type like an integer, date, or string or can be a link to another table being used on relationships. Columns are often referred to as database fields.
Customer
A customer of 42Q will be related with a label.
D
Database
Database that the label engine can be connected to retrieve data. The main parameters are described below.
- Name: The name of the database, this is the name to be used on the connection.
- Type: The type of the database: PostgreSQL, ERP, MySQL, SQLServer or Progress.
- Address: The address of the server where the database is running.
- Port: The port on the database server that is accepting connections.
- Schema: The schema is a namespace into the database that stores data in separated logical structures into the same database. PostgreSQL and ERP can use this kind of feature.
F
Field Number
Field numbers are all fields that can be replaced or used with the result of a query or input data. Each field number must be related with a format file.
Format File
Format files are the templates where the field numbers are associated.
L
Label
Labels are the representation of all files, data and rules that are used to build a structure for printing a label.
P
Plant
Plants are each local 42Q factory.
Printer
The printer is present on a plant. These printers are installed on a print queue of the server that is running the label engine application.
- Print Queue name of the installed print queue of the server
- Address the IP or name address of the server that is running the label engine
- Port the port that the label engine is running on the server
Project
The projects are structures related to Progress databases. In this sense, each project must have one database associated with it. A project identifies what MDS will be used on the connection with the database to retrieve data.
Q
Query
Query is the entity used to represent how data can be retrieved from a database. A query can return values of one or more columns based on the relationships among a set of tables that can be configured by the user.
T
Table
The tables are the data structure present in databases. This table contains a set of columns and can be used to create queries.
U
User
The users of the Label Engine.
V
Variable
Variables are used as parameters of the business rules and are similar to field numbers; they have a query associated with them, so the result of the query will be the data inserted on the parameters.
Appendix B – File Types
Format File
A format file keeps all the structure information to print an entire label or part of it. A label is composed of one or more format files. The system contains two types of format files:
- User Format File: A file that doesn't contain an identifier. This file is represented by the icon User format file icon in the upload file tab.
- Printer Format File: A file that contains an identifier. This file is represented by the iconPrinter format file icon in the upload file tab.
Image
A file that represents an image that will be sent to the printer.
This file is represented by the icon Image in the upload file tab.
Font
A file that represents a font style that will be used in a label. This file will be sent to the printer. It is represented by the Font icon in the upload file tab.
Appendix C – Business Rules
Parameters
- Initial index: the beginning index, inclusive.
- Final index: the ending index, exclusive.
Parameters
- Search for value: Text
- String position: Text
Insert
Insert a string in the position informed.
Parameters
- String to be inserted: the string to be inserted.
- Position of insertion: the position where the String to be inserted parameter should be inserted.
Data Format
Return the date in the specified format.
Parameter
- Data format: the pattern describing the date and time format.
Ends With
If the field number value ends with the specified Ending with parameter, the field number value is replaced by the string in the Change for parameter.
Parameters
- Ending with: the pattern to be matched.
- Change for: the value to be exchanged if the Ending with parameter is matched.
Replace
Returns a new string resulting from replacing all occurrences of Pattern to be matched parameter in the field number value with Pattern to be used parameter.
Parameters
- Pattern to be matched: the string to be found in the field number returned.
- Pattern to be used: the string to be replaced by the pattern found in the field number.
Between
Returns a substring that is in between the Initial character parameter and the End character.
Parameters
- Initial character: the initial character to be matched.
- End character: the end character to be matched.
No Ends With
If the field number value does not end with the specified No ending with a parameter, the field number value is exchanged by the string in the Change for the parameter.
Parameters
- No ending with: the pattern to be matched.
- Change for: the value to be replaced if the Ending with parameter is matched.
Equals
If the field number matches the specified If equals parameter, the field number value is replaced by the string in the Change for the parameter.
Parameters
- If equals: the pattern to be matched.
- Change for: the value to be replaced if the If equals parameter is matched.
Examples
How to create a block/element for containers
See a full example using an existing label on how to create a block/element for a Container:
Figure 46: Container Sample Label
Figure 47: Container Sample Element
Figure 48: Container Sample Label Mapping
Parallel Containers - Values Other than Just Serial Numbers
Often users will need a container label that contains the list of enclosed units / serial numbers as well as some other attribute(s) associated with each unit. For lack of a better name, Parallel Containers.
The below explanation will help ensure the container label extracts the correct data and prints it in the correct order.
Naming Template Fields
When users work with Parallel Containers, it is very important to correctly name the template fields so that multiple containers are populated in the same order on the label.
Below, you will see examples of good naming strategies:
sn_01, sn_02, sn_03, …sn_##
mac_01, mac_02, mac_03, ...mac_##
comp_01, comp_02, comp_03, ...comp_##
Note: In case there are more than 100 units listed on a single page of a container label, use three digits instead of two digits.
Figure 49: Sample Label with Good Naming Strategy
Container Element & Block Formulation
When working with container labels, selecting the checkbox Values Will Be Assigned To Multiple Different Fields (Container) changes the scope of the data that is being extracted. Instead of the scope being the "container serial", the scope becomes the serial of each item in the container. The entry value will be the container serial number, but the value extracted will be the value for each item in the container.
Figure 54 demonstrates how to extract the child serial numbers, the entry is the container serial number and the output would be serial.serial_number.
Figure 50: Extracting Child Serial Numbers
Figure 51 demonstrates the extraction of the mac addresses that were captured as components, using a reference designator of MAC_Address.
Figure 51: Extraction of the Mac Addresses
Container Element Mapping
Container mappings will be many template fields to a single Container Element. Multi-select the placeholder names (left side) and select the container element (right side) and click the Map button as in Figure 56.
Figure 52: Label Mapping
When users follow the previous steps and print labels, they will see labels similar to the image Figure 57.
Figure 53: Resulting Label
