Difference between revisions of "SOP-42Q-MES0037 Traceability Administrator"
Dane parker (talk | contribs) |
Helena wang (talk | contribs) |
||
| (191 intermediate revisions by 10 users not shown) | |||
| Line 1: | Line 1: | ||
| − | |||
| − | |||
| − | < | + | <small>[[42Q_Cloud-Based_MES/MOMS|42Q Home]] > [[Administration|Administration]] > Traceability Administrator</small> |
| − | |||
| − | |||
| − | |||
| − | |||
| + | | ||
| + | | ||
| − | + | | |
| + | <center>'''Administration'''</center> <center>'''Traceability Administrator'''</center> <center>'''Version MES 15.80'''</center> <center>'''Revision J1'''</center> <center> </center> | ||
| + | | ||
| − | + | | |
| − | + | | |
| − | + | = <span class="mw-headline" id="Administration"><span class="mw-headline" id="Administration"><span class="mw-headline" id="Administration"><span class="mw-headline" id="Administration"><span class="mw-headline" id="Administration"><span class="mw-headline" id="Administration"><span class="mw-headline" id="Administration"><span class="mw-headline" id="Administration"><span class="mw-headline" id="Administration"><span class="mw-headline" id="Administration"><span class="mw-headline" id="Administration"><span class="mw-headline" id="Administration"><span class="mw-headline" id="Administration"><span class="mw-headline" id="Administration"><span class="mw-headline" id="Administration"><span class="mw-headline" id="Administration"><span class="mw-headline" id="Administration"><span class="mw-headline" id="Administration"><span class="mw-headline" id="Administration"><span class="mw-headline" id="Administration"><span class="mw-headline" id="Administration">Administration</span></span></span></span></span></span></span></span></span></span></span></span></span></span></span></span></span></span></span></span></span> = | |
| − | + | Administrative privileges in '''42Q''' are located in the '''Administration''' menu heading. | |
| − | + | With the portal, Administrators are able to access privileges from one convenient location. | |
| − | + | Privileges include: | |
| − | + | *User Maintenance | |
| + | *Plant Maintenance | ||
| + | *Site Maintenance | ||
| + | *Profile Maintenance | ||
| + | *Generic Attribute Maintenance | ||
| − | <br> | + | Also located in the Administration menu heading are '''Shop Floor Control Administrator, Document Control, Traceability Administrator, Notification & Escalation, Meas Instance Admin, and Label Engine Admin.'''<br/> To access any of the Administration Portlets, the user must sign into '''42Q '''and then select the Administration expandable heading located in the menu on the left of the screen. |
| − | + | | |
| − | + | | |
| − | + | | |
| − | < | + | = <span class="mw-headline" id="Traceability_Administration"><span class="mw-headline" id="Traceability_Administration"><span class="mw-headline" id="Traceability_Administration"><span class="mw-headline" id="Traceability_Administration"><span class="mw-headline" id="Traceability_Administration"><span class="mw-headline" id="Traceability_Administration"><span class="mw-headline" id="Traceability_Administration"><span class="mw-headline" id="Traceability_Administration"><span class="mw-headline" id="Traceability_Administration"><span class="mw-headline" id="Traceability_Administration"><span class="mw-headline" id="Traceability_Administration"><span class="mw-headline" id="Traceability_Administration"><span class="mw-headline" id="Traceability_Administration"><span class="mw-headline" id="Traceability_Administration"><span class="mw-headline" id="Traceability_Administration"><span class="mw-headline" id="Traceability_Administration"><span class="mw-headline" id="Traceability_Administration"><span class="mw-headline" id="Traceability_Administration"><span class="mw-headline" id="Traceability_Administration"><span class="mw-headline" id="Traceability_Administration"><span class="mw-headline" id="Traceability_Administration"><span class="mw-headline" id="Traceability_Administration"><span class="mw-headline" id="Traceability_Administration">Traceability Administration</span></span></span></span></span></span></span></span></span></span></span></span></span></span></span></span></span></span></span></span></span></span></span> = |
| − | + | This Work Instruction is a basic navigation-training guide and is not meant to teach the process flow for individual department functionality. Individual 42Q sites may have minor or specific process changes that will be documented at the site level. Work Instruction alteration suggestions must be reviewed and approved by the site Documentation Manager prior to sending an alteration request to 42Q Corporate. This Work Instruction is a basic administration guide to support local Traceability WEB plant only. Please contact a Traceability Regional Technologist for the Traceability database and server administration. | |
| − | + | | |
| − | |||
| − | |||
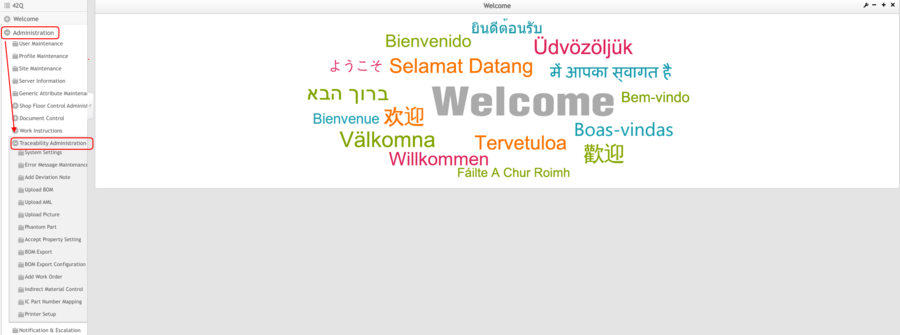
| − | + | To access the Traceability Administrator page, navigate to '''Administration'''>'''Traceability Administrator'''. | |
| − | + | <br/> '''Figure 1: Traceability Administrator''' | |
| − | + | [[File:TA TraceabilityAdministratorMainMenu.png|border|900px|TA TraceabilityAdministratorMainMenu.png]] | |
| − | + | | |
| − | + | | |
| − | === System Settings | + | = <span class="mw-headline" id="System_Settings"><span class="mw-headline" id="System_Settings"><span class="mw-headline" id="System_Settings"><span class="mw-headline" id="System_Settings"><span class="mw-headline" id="System_Settings"><span class="mw-headline" id="System_Settings"><span class="mw-headline" id="System_Settings"><span class="mw-headline" id="System_Settings"><span class="mw-headline" id="System_Settings"><span class="mw-headline" id="System_Settings"><span class="mw-headline" id="System_Settings"><span class="mw-headline" id="System_Settings"><span class="mw-headline" id="System_Settings"><span class="mw-headline" id="System_Settings"><span class="mw-headline" id="System_Settings"><span class="mw-headline" id="System_Settings"><span class="mw-headline" id="System_Settings"><span class="mw-headline" id="System_Settings"><span class="mw-headline" id="System_Settings"><span class="mw-headline" id="System_Settings"><span class="mw-headline" id="System_Settings"><span class="mw-headline" id="System_Settings"><span class="mw-headline" id="System_Settings">System Settings</span></span></span></span></span></span></span></span></span></span></span></span></span></span></span></span></span></span></span></span></span></span></span> = |
| − | This function is used to configure system parameters. Based on plant requirements, systems can be customized by changing system parameters. When | + | This function is used to configure system parameters. Based on plant requirements, systems can be customized by changing system parameters. When Traceability needs to be set up or upgraded, the administrator should make sure the parameters are configured correctly. Once changes are submitted, they are effective immediately, so the administrator should take caution when changing system settings. |
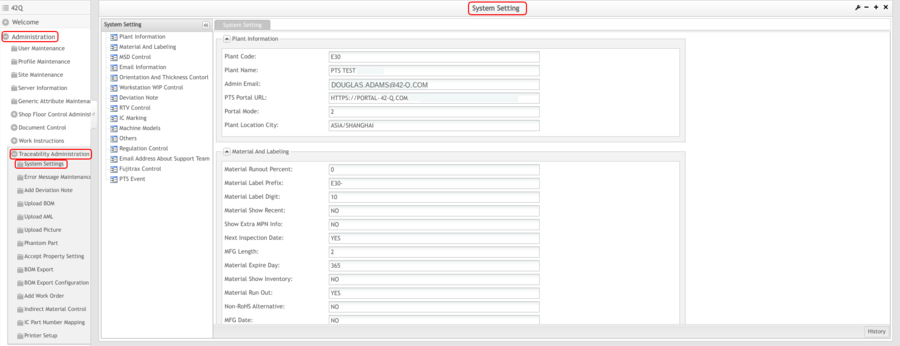
| − | + | To access the System Settings page, navigate to '''Administration'''>'''Traceability Administrator'''>'''System Settings'''. | |
| − | <br> '''Figure | + | <br/> '''Figure 2: System Settings''' |
| − | [[ | + | [[File:TA SystemSettings.png|border|900px|TA SystemSettings.png]] |
| − | + | | |
| − | + | | |
| − | + | | |
| − | |||
| − | |||
| − | |||
| − | < | + | == <span class="mw-headline" id="Plant_Information"><span class="mw-headline" id="Plant_Information"><span class="mw-headline" id="Plant_Information"><span class="mw-headline" id="Plant_Information"><span class="mw-headline" id="Plant_Information"><span class="mw-headline" id="Plant_Information"><span class="mw-headline" id="Plant_Information"><span class="mw-headline" id="Plant_Information"><span class="mw-headline" id="Plant_Information"><span class="mw-headline" id="Plant_Information"><span class="mw-headline" id="Plant_Information"><span class="mw-headline" id="Plant_Information"><span class="mw-headline" id="Plant_Information"><span class="mw-headline" id="Plant_Information"><span class="mw-headline" id="Plant_Information"><span class="mw-headline" id="Plant_Information"><span class="mw-headline" id="Plant_Information"><span class="mw-headline" id="Plant_Information"><span class="mw-headline" id="Plant_Information"><span class="mw-headline" id="Plant_Information"><span class="mw-headline" id="Plant_Information"><span class="mw-headline" id="Plant_Information"><span class="mw-headline" id="Plant_Information"><span class="mw-headline" id="Plant_Information"><span class="mw-headline" id="Plant_Information"><span class="mw-headline" id="Plant_Information"><span class="mw-headline" id="Plant_Information">Plant Information</span></span></span></span></span></span></span></span></span></span></span></span></span></span></span></span></span></span></span></span></span></span></span></span></span></span></span> == |
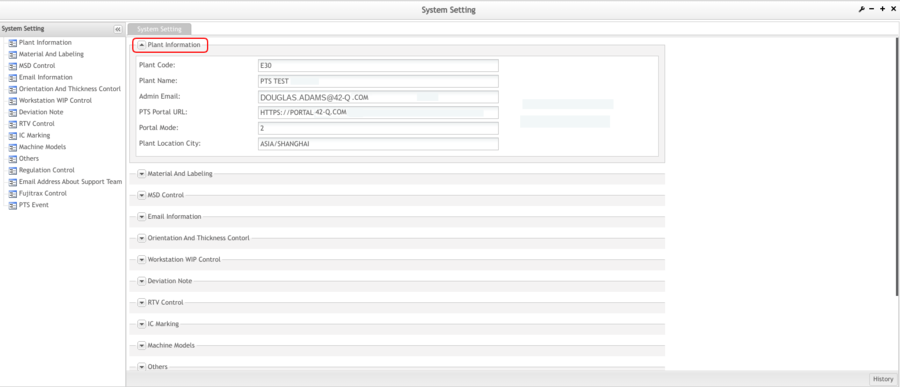
| − | *'''Material Runout Percent:''' | + | These options are used to define the information of the plant. |
| − | *'''Material Label Prefix:''' prefix for material barcode generated by the system. | + | |
| + | *'''Plant Code: '''The code of the plant. | ||
| + | *'''Plant Name: '''The name of the plant. | ||
| + | *'''Admin Email:''' The email address of the plant administrator. | ||
| + | *'''PTS''' '''Portal URL''': sets Traceability login address. This field is optional. | ||
| + | *'''Plant Location City''': The city where the plant is located. | ||
| + | |||
| + | | ||
| + | |||
| + | '''Figure 3: Plant Information''' | ||
| + | |||
| + | [[File:TA PlantInformation.png|border|900px|TA PlantInformation.png]] | ||
| + | |||
| + | | ||
| + | |||
| + | | ||
| + | |||
| + | | ||
| + | |||
| + | == <span class="mw-headline" id="Material_and_Labeling"><span class="mw-headline" id="Material_and_Labeling"><span class="mw-headline" id="Material_and_Labeling"><span class="mw-headline" id="Material_and_Labeling"><span class="mw-headline" id="Material_and_Labeling"><span class="mw-headline" id="Material_and_Labeling"><span class="mw-headline" id="Material_and_Labeling"><span class="mw-headline" id="Material_and_Labeling"><span class="mw-headline" id="Material_and_Labeling"><span class="mw-headline" id="Material_and_Labeling"><span class="mw-headline" id="Material_and_Labeling"><span class="mw-headline" id="Material_and_Labeling"><span class="mw-headline" id="Material_and_Labeling"><span class="mw-headline" id="Material_and_Labeling"><span class="mw-headline" id="Material_and_Labeling"><span class="mw-headline" id="Material_and_Labeling"><span class="mw-headline" id="Material_and_Labeling"><span class="mw-headline" id="Material_and_Labeling"><span class="mw-headline" id="Material_and_Labeling"><span class="mw-headline" id="Material_and_Labeling"><span class="mw-headline" id="Material_and_Labeling"><span class="mw-headline" id="Material_and_Labeling"><span class="mw-headline" id="Material_and_Labeling"><span class="mw-headline" id="Material_and_Labeling"><span class="mw-headline" id="Material_and_Labeling">Material and Labeling</span></span></span></span></span></span></span></span></span></span></span></span></span></span></span></span></span></span></span></span></span></span></span></span></span> == | ||
| + | |||
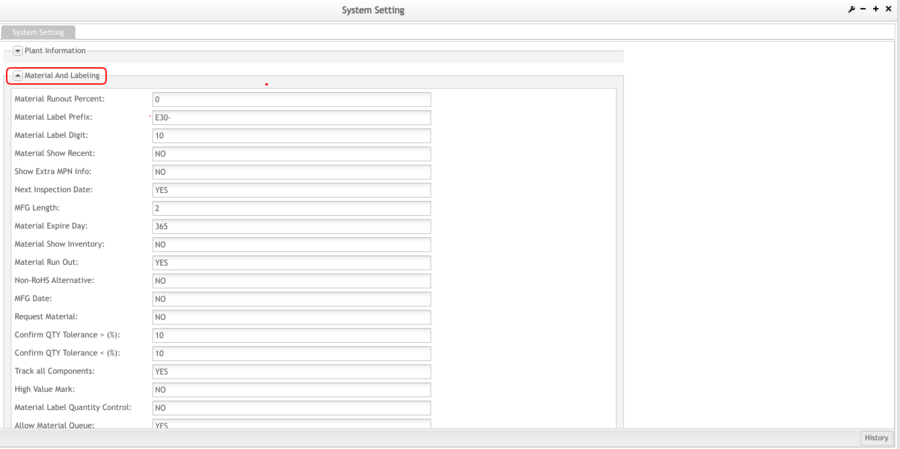
| + | These options are used to define the controls or rules of the material and labeling. | ||
| + | |||
| + | '''Figure 4: Material and Labeling ''' | ||
| + | |||
| + | [[File:TA MaterialLabeling .png|border|900px|TA MaterialLabeling .png]] | ||
| + | |||
| + | *'''Material Runout Percent:''' shows material in warning color according to remaining board quantity. | ||
| + | *'''Material Label Prefix:''' prefix for material barcode generated by the system. | ||
*'''Material Label Digit:''' the digit after the label prefix. | *'''Material Label Digit:''' the digit after the label prefix. | ||
| − | *'''Material Show Recent:''' | + | *'''Material Show Recent:''' To show the material report that was printed inside the ‘Material Labeling’ page. |
| − | *'''Show Extra MPN Info:''' at | + | |
| − | *''' | + | [Yes]: shows recent printing report at Traceability Web – Material Labeling page. |
| + | |||
| + | [No]: does not show the recent printing report on the Traceability Web – Material Labeling page. | ||
| + | |||
| + | *'''Show Extra MPN Info:''' at the ‘Material Labeling’ page whether show the information which is already defined in the ‘Manufacture Information’ module. (Such as package/orientation, etc). | ||
| + | |||
| + | [Yes]: needs to show the information on the Material Labeling page. | ||
| + | |||
| + | [No]: does not need to show the information on the Material Labeling page. | ||
| + | |||
| + | *'''Next Inspection Date:''' Allow the user to define whether or not to display the Next Inspection Date option on the Material Labeling page. | ||
| + | |||
| + | [Yes]: displays the option on the Material Labeling page. | ||
| + | |||
| + | [No]: does not need to display on the Material Labeling page. | ||
| + | |||
| + | <u>'''Note'''</u><u>:</u>''' '''If "Next Inspection Date =Yes", the date that the user set on the Material Labeling page must be greater than "Receiving day + Material Expire Day". Otherwise, the date in which the user set will be useless. | ||
| + | |||
| + | *'''MFG Length:''' used to define how many letters of manufacture P/N can be displayed on the material label (e.g., for manufacturing P/N "SIM-012STT87F": if the setting is '3', it will only show 'SIM' SIMthe first three letters of manufacture P/N on the material label). | ||
| + | |||
| + | *'''Material Expire Day''' defines when the material will expire. | ||
| + | |||
| + | '''<u>Note:</u>'''''<b> </b>''This parameter only works on 'Material Due Date' and must be set to '''Yes'''. | ||
| + | |||
| + | *'''Material Show Inventory:''' select to show inventory and locator information on the 'Material Labeling' page. | ||
| + | |||
| + | [Yes]: shows inventory and locator information at the 'Material Labeling' page. | ||
| + | |||
| + | [No]: does not show inventory and locator at the 'Material Labeling' page. | ||
| + | |||
| + | *'''Material Run Out:''' to control whether to allow loading material, preparing material, or scanning board while material quantity is zero. (It's a master switch.) | ||
| + | |||
| + | [Yes]: all workstations are not allowed to load material, prepare material, or scan board while material quantity is zero. | ||
| + | |||
| + | [No]: do not control when material quantity is zero. | ||
| + | |||
| + | *'''Non-RoHS Alternative:''' if the part number is the same whether to use 'WL' material to replace normal material when normal material is short of. | ||
| + | |||
| + | [Yes]: allows using 'WL' to replace normal material. | ||
| + | |||
| + | [No]: does not allow using 'WL' to replace normal material. | ||
| + | |||
| + | <u>'''[[File:Cautionicon.png|50px|Cautionicon.png]]Caution:'''</u> | ||
| + | |||
| + | 1) This function is only available for normal material. | ||
| + | |||
| + | 2) This function is only available for those plants already implementing the RoHS prefix standard. | ||
| + | |||
| + | 3) Before activating this function, a plant must make sure all material PN didn't start with WL or LF for normal material. | ||
| + | |||
| + | 4) RoHS material could not be replaced with other materials. | ||
| + | |||
| + | *'''MFG Date:''' used to control whether to show MFG date on the label. | ||
| + | |||
| + | [Yes]: shows MFG date on the label. | ||
| + | |||
| + | [No]: does not show MFG date on the label. | ||
| + | |||
| + | *'''Request Material:''' send the request material information to IRMS. | ||
| + | |||
| + | [Yes]: shows Request Material option at Load Material page. | ||
| + | |||
| + | [No]:(default value) does not show the Request Material option. | ||
| + | |||
| + | *The following two values are used by the plant administrator to pre-define the tolerance range for confirmation material qty in order to prevent inputting the wrong qty. They will influence on Pocket PC and Traceability Web – Confirm High-Value Qty module and Load Material module. | ||
| + | |||
| + | » '''High-Value Tolerance ''' >'''(%)''': remaining qty minus input qty < remaining qty multiplied by (%). The lower limit for the high value remaining qty.<br/> » '''High-Value Tolerance'''>'''(%):''' input qty minus remaining qty < remaining qty multiplied by (%). The upper limitation for the high value remaining qty. | ||
| + | |||
| + | *'''Track all Components:''' whether to track all components. | ||
| + | |||
| + | [Yes]:(default value) tracks all components. | ||
| + | |||
| + | [No]: tracks selected components as user set in the PN Extra Info module. | ||
| + | |||
| + | *'''Material Label Quantity Control:''' controls the quantity of printed labels.<br/> This parameter will affect Material Labeling, Print Sub-Label, and Reprint Material Label module. | ||
| + | |||
| + | [Yes]:(default value) the label is not printed over the defined quantity. | ||
| + | |||
| + | [No]: the system does not limit printed quantity. | ||
| + | |||
| + | *'''Lead-Free Transfer Control:''' used to define whether can transfer lead-free material to leaded material at Split /Transfer Material module. | ||
| + | |||
| + | [Yes]:(default value) system does not allow transferring. | ||
| + | |||
| + | [No]: lead-free material can transfer to leaded material. | ||
| + | |||
| + | *'''Show Vendor Code''': used to control the display of "Vendor Code" in Traceability material label printing modules: | ||
| + | |||
| + | [Yes]: displays Vendor Code in the material label printing module. [No]:(default value) system does not display Vendor Code in the material label printing module. | ||
| + | |||
| + | *'''Material Extra Option: '''used to set the values (drop-down list ) for the field '''ACCEPT PROPERTY '''at the page Material labeling. The default value is ""ACCEPT PROPERTY:", "ACCEPTED", "REJECTED", "UAI", "STS"". | ||
| + | *'''Allow Material Queue:''' allows material queue when the material is running out or is empty. This parameter will affect SMT and AI workstations when loading material. (For additional information, please review the Load Material page.) | ||
| + | |||
| + | [Yes]:(default value) allows material queue for SMT and AI workstations. The two options '''Material Queue Max Reels '''and '''Material Queue Max '''will work only when '''Allow Material Queue '''is '''Yes.''' | ||
| + | |||
| + | [No]: does not allow to Material queue function | ||
| + | |||
| + | *'''Material Queue Max Reels:''' Sets the max reels (material lists) that can be joined for the material queue function. | ||
| + | *'''Material Queue Max Boards:''' Sets the max boards that can be scanned using the jointed material (material lists) for the material queue function. | ||
| + | *'''Show Bin Code:''' Show Bin Code on the materials label or not. | ||
| + | *This parameter will affect whether the material label has a Bin code or not when printing/reprinting/splitting/sub-material. | ||
| + | *[Yes]: Allow material label to show Bin Code. | ||
| + | *[No]: it’s the default value, do not show Bin Code on the Material label. | ||
| + | *'''Oracle Obsoleted AML Control:''' This parameter is the switch to control the oracle obsoleted AML or not. | ||
| + | |||
| + | Use Case: | ||
| + | |||
| + | If the AML is obsoleted, the AML status will change release to Obsoleted, and the Part Number of the AML will change, too(For Example prefix with OBS). | ||
| + | |||
| + | The Traceability system will pop up the AML alarm at the production line because the customer's AML status changed from the release to OBS state, which means it is not allowed to buy the customer’s materials anymore, but the inventory customer material in the factory is allowed to use it. In this way, we will modify the AML of the agile system to Prefix OBS, Such as LFNK4210250 original AML: PSMN015-100B.118, now modified to OBS-PSMN015-100B.118, but in fact, it has already been labeled on the material tray in the factory. The information on the label is PSMN015-100B.118, but the information on the system is OBS-PSMN015-100B.118, which causes the actual materials in the system not to match, thus the Traceability system will pop up the AML alarm. | ||
| + | |||
| + | ['''Yes''']: To control the oracle obsoleted AML.The system will general/add a new AML MPN: AML MPN Prefix + original AML MPN. If one of the new AML MPNs and the original AML MPNs matched, the system would not pop up the AML alarm. | ||
| + | |||
| + | ['''No''']: Do not control the oracle obsoleted AML. The system will only check the original AML MPN. If the original AML MPN is not matched, the system would pop up the AML alarm. | ||
| + | |||
| + | *'''Obsoleted AML MPN Prefix''': This parameter defines the prefix of the original AML MPN, obsoleted AML MPN Prefix + Original AML MPN is the obsolete AML MPN. | ||
| + | |||
| + | | ||
| + | |||
| + | | ||
| + | |||
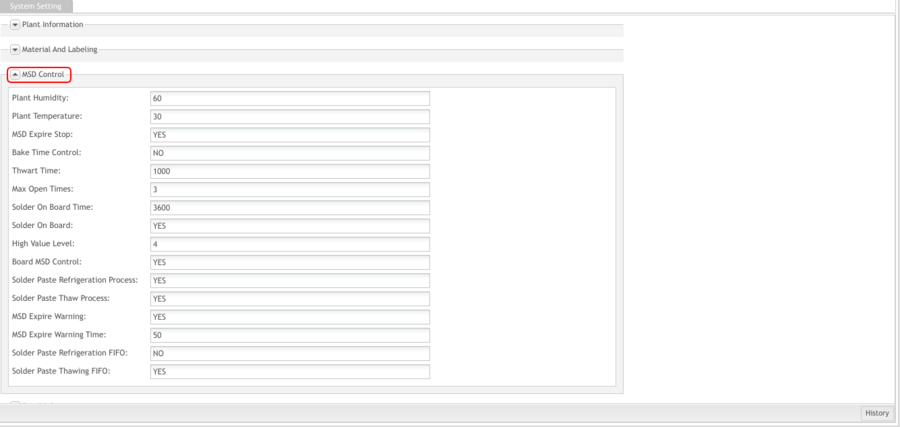
| + | == <span class="mw-headline" id="MSD_Control"><span class="mw-headline" id="MSD_Control"><span class="mw-headline" id="MSD_Control"><span class="mw-headline" id="MSD_Control"><span class="mw-headline" id="MSD_Control"><span class="mw-headline" id="MSD_Control"><span class="mw-headline" id="MSD_Control"><span class="mw-headline" id="MSD_Control"><span class="mw-headline" id="MSD_Control"><span class="mw-headline" id="MSD_Control"><span class="mw-headline" id="MSD_Control"><span class="mw-headline" id="MSD_Control"><span class="mw-headline" id="MSD_Control"><span class="mw-headline" id="MSD_Control"><span class="mw-headline" id="MSD_Control"><span class="mw-headline" id="MSD_Control"><span class="mw-headline" id="MSD_Control"><span class="mw-headline" id="MSD_Control"><span class="mw-headline" id="MSD_Control"><span class="mw-headline" id="MSD_Control"><span class="mw-headline" id="MSD_Control"><span class="mw-headline" id="MSD_Control"><span class="mw-headline" id="MSD_Control"><span class="mw-headline" id="MSD_Control">MSD Control</span></span></span></span></span></span></span></span></span></span></span></span></span></span></span></span></span></span></span></span></span></span></span></span> == | ||
| + | |||
| + | These options are used to define the controls or rules of the MSD materials. | ||
| + | |||
| + | '''Figure 5: MSD Control''' | ||
| + | |||
| + | <span class="mw-headline"><span class="mw-headline"><span class="mw-headline"><span class="mw-headline"><span class="mw-headline"><span class="mw-headline"><span class="mw-headline"><span class="mw-headline"><span class="mw-headline"><span class="mw-headline"><span class="mw-headline"><span class="mw-headline"><span class="mw-headline"><span class="mw-headline"><span class="mw-headline"><span class="mw-headline"><span class="mw-headline"><span class="mw-headline"><span class="mw-headline"><span class="mw-headline">[[File:TA MSDControl.png|border|900px|TA MSDControl.png]]</span></span></span></span></span></span></span></span></span></span></span></span></span></span></span></span></span></span></span></span> | ||
| − | ''' | + | *'''Plant Humidity:''' calculates the MSD material floor life. Can define the humidity default value for the Customize Bake Time module. |
| + | *'''Plant Temperature:''' calculates the MSD material floor life. Can define the temperature default value for the Customize Bake Time module. | ||
| + | *'''MSD Expire Stop:''' select to prepare/load material or scan board for expired MSD material. | ||
| − | + | [Yes]: will not prepare/load material or scan board when MSD material has expired. | |
| − | + | [No]: prepare/load material or scan board normally. | |
| − | |||
| − | ''' | + | *'''Bake Time Control''' selects to load material when the material is in baking. |
| − | + | [Yes]: loads material after baking time ends. | |
| − | + | [No]: loads material within baking time. | |
| − | |||
| − | |||
| − | ''' | + | *'''Thaw Time:''' defines solder paste thaw time. |
| + | *'''Max Open Times''' defines solder paste max open times. | ||
| + | *'''Solder On Board Time:''' define solder paste onboard time. (Unit is second.) | ||
| + | *'''Solder On Board:''' selects to control solder paste onboard time. | ||
| − | + | [Yes]: controls solder paste onboard time. [No]: does not control solder paste onboard time. | |
| − | + | *'''High-Value Level:''' used to customize whether MSD is high-value material (e.g., if inputting "4" in this field, MSD material will be regarded as high-value material when MSD material level is or greater than 4). | |
| − | + | <u>'''Notes:'''</u> | |
| − | |||
| − | |||
| − | |||
| − | |||
| − | |||
| − | |||
| − | + | *1) High-value material can be defined on the System Setting page or manually set at ezPicklist. | |
| + | *2) System - Defines MSD level at the system setting page, the system will automatically recognize that MSD level or higher as high-value material. | ||
| + | *3) Manual - manually defines high-value material in the Picklist whether the material is MSD or not. | ||
| − | + | | |
| − | |||
| − | |||
| − | |||
| − | + | | |
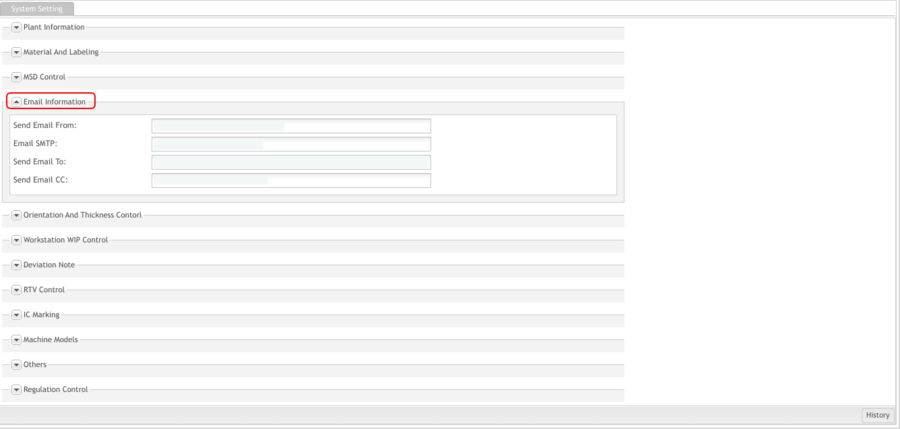
| − | + | == <span class="mw-headline" id="Email_information"><span class="mw-headline" id="Email_information"><span class="mw-headline" id="Email_information"><span class="mw-headline" id="Email_information"><span class="mw-headline" id="Email_information"><span class="mw-headline" id="Email_information"><span class="mw-headline" id="Email_information"><span class="mw-headline" id="Email_information"><span class="mw-headline" id="Email_information"><span class="mw-headline" id="Email_information"><span class="mw-headline" id="Email_information"><span class="mw-headline" id="Email_information"><span class="mw-headline" id="Email_information"><span class="mw-headline" id="Email_information"><span class="mw-headline" id="Email_information"><span class="mw-headline" id="Email_information"><span class="mw-headline" id="Email_information"><span class="mw-headline" id="Email_information"><span class="mw-headline" id="Email_information"><span class="mw-headline" id="Email_information"><span class="mw-headline" id="Email_information"><span class="mw-headline" id="Email_information"><span class="mw-headline" id="Email_information"><span class="mw-headline" id="Email_information">Email information</span></span></span></span></span></span></span></span></span></span></span></span></span></span></span></span></span></span></span></span></span></span></span></span> == | |
| − | |||
| − | |||
| − | |||
| − | |||
| − | |||
| − | |||
| − | |||
| − | |||
| − | + | These options are used to define the controls or rules of the Email information. | |
| − | + | '''Figure 6: Email Information''' | |
| − | |||
| − | |||
| − | + | '''[[File:TA EmailInformation.png|border|900px|TA EmailInformation.png]]''' | |
| − | *'''Send Email From:''' | + | |
| + | |||
| + | *'''Send Email From:''' sender's email address. | ||
*'''Email SMTP: '''email server, every plant has its own email server | *'''Email SMTP: '''email server, every plant has its own email server | ||
| − | *'''Send Email To:''' send e-mail to | + | *'''Send Email To:''' send an e-mail to a primary recipient. |
| − | *'''Send Email CC:''' send e-mail to | + | *'''Send Email CC:''' send e-mail to a secondary recipient. |
| + | |||
| + | <u>'''Note:'''</u> These email settings only have an effect on load material errors. Max 200 characters per field. | ||
| + | |||
| + | | ||
| + | |||
| + | | ||
| + | |||
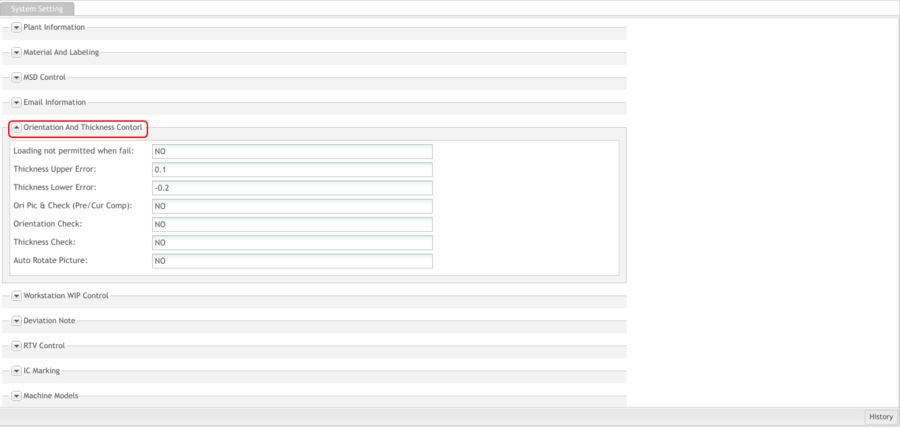
| + | == <span class="mw-headline" id="Orientation_and_Thickness_Control"><span class="mw-headline" id="Orientation_and_Thickness_Control"><span class="mw-headline" id="Orientation_and_Thickness_Control"><span class="mw-headline" id="Orientation_and_Thickness_Control"><span class="mw-headline" id="Orientation_and_Thickness_Control"><span class="mw-headline" id="Orientation_and_Thickness_Control"><span class="mw-headline" id="Orientation_and_Thickness_Control"><span class="mw-headline" id="Orientation_and_Thickness_Control"><span class="mw-headline" id="Orientation_and_Thickness_Control"><span class="mw-headline" id="Orientation_and_Thickness_Control"><span class="mw-headline" id="Orientation_and_Thickness_Control"><span class="mw-headline" id="Orientation_and_Thickness_Control"><span class="mw-headline" id="Orientation_and_Thickness_Control"><span class="mw-headline" id="Orientation_and_Thickness_Control"><span class="mw-headline" id="Orientation_and_Thickness_Control"><span class="mw-headline" id="Orientation_and_Thickness_Control"><span class="mw-headline" id="Orientation_and_Thickness_Control"><span class="mw-headline" id="Orientation_and_Thickness_Control"><span class="mw-headline" id="Orientation_and_Thickness_Control"><span class="mw-headline" id="Orientation_and_Thickness_Control"><span class="mw-headline" id="Orientation_and_Thickness_Control"><span class="mw-headline" id="Orientation_and_Thickness_Control"><span class="mw-headline" id="Orientation_and_Thickness_Control"><span class="mw-headline" id="Orientation_and_Thickness_Control">Orientation and Thickness Control</span></span></span></span></span></span></span></span></span></span></span></span></span></span></span></span></span></span></span></span></span></span></span></span> == | ||
| + | |||
| + | These options are used to define the controls of orientation and thickness for some materials. | ||
| + | |||
| + | '''Figure 7: Orientation and Thickness Control''' | ||
| + | |||
| + | [[File:TA OrientationThicknessControl.png|border|900px|TA OrientationThicknessControl.png]] | ||
| + | |||
| + | *'''Loading not permitted when fail:''' select to control material loading when orientation and thickness are unmatched. | ||
| + | |||
| + | [Yes]: does not allow loading material. | ||
| + | |||
| + | [No]: allows loading material. | ||
| + | |||
| + | *'''Thickness Upper Error:''' maximum acceptable limit if the thickness value of the target material is larger than the one in ezPicklist. | ||
| + | *'''Thickness Lower Error:''' maximum acceptable limit if the thickness value of the target material is smaller than the one in ezPicklist. | ||
| + | *'''Ori Pic & Check (Pre/Cur Comp):''' select to show the orientation picture for the required material when loading material. | ||
| + | |||
| + | [No]:(default value) does not show the orientation pictures. | ||
| + | |||
| + | [Yes]: shows the orientation picture if the picture is already been saved into a specified folder. | ||
| + | |||
| + | *'''Orientation Check''' selects to check the component’s orientation with that in ezPicklist. | ||
| + | |||
| + | [Yes]: needs to verify orientation. | ||
| + | |||
| + | [No]: does not need to verify orientation. | ||
| + | |||
| + | *'''Thickness Check:''' whether to check the component's thickness with that in ezPicklist. | ||
| + | |||
| + | [Yes]: needs to verify thickness. | ||
| + | |||
| + | [No]: does not need to verify thickness. | ||
| + | |||
| + | *'''Auto Rotate Picture:''' allows to rotate pictures with component's Orientation in Manufacture information. | ||
| + | |||
| + | [Yes]: allows auto-rotation of the picture to the orientation defined in Manufacture information. | ||
| + | |||
| + | [No]: does not allow auto-rotation of the picture. | ||
| + | |||
| + | <u>'''Note:'''</u> The default orientation of the uploaded picture is 0. | ||
| + | |||
| + | | ||
| + | |||
| + | | ||
| + | |||
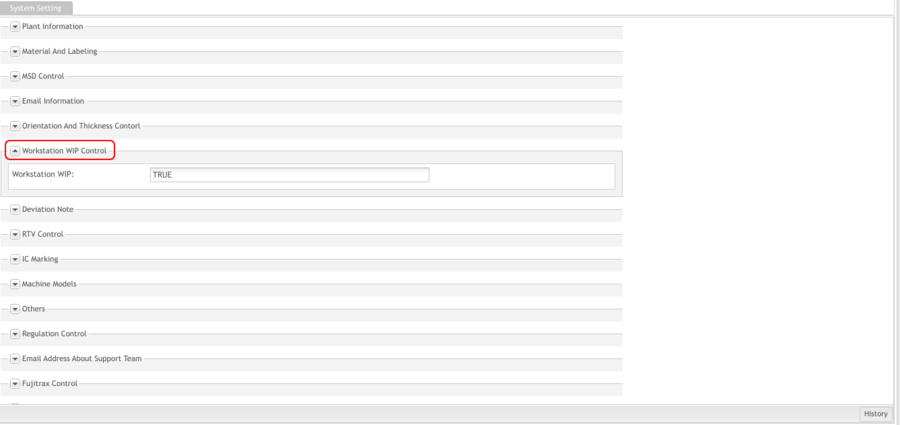
| + | == <span class="mw-headline" id="Workstation_WIP_Control"><span class="mw-headline" id="Workstation_WIP_Control"><span class="mw-headline" id="Workstation_WIP_Control"><span class="mw-headline" id="Workstation_WIP_Control"><span class="mw-headline" id="Workstation_WIP_Control"><span class="mw-headline" id="Workstation_WIP_Control"><span class="mw-headline" id="Workstation_WIP_Control"><span class="mw-headline" id="Workstation_WIP_Control"><span class="mw-headline" id="Workstation_WIP_Control"><span class="mw-headline" id="Workstation_WIP_Control"><span class="mw-headline" id="Workstation_WIP_Control"><span class="mw-headline" id="Workstation_WIP_Control"><span class="mw-headline" id="Workstation_WIP_Control"><span class="mw-headline" id="Workstation_WIP_Control"><span class="mw-headline" id="Workstation_WIP_Control"><span class="mw-headline" id="Workstation_WIP_Control"><span class="mw-headline" id="Workstation_WIP_Control"><span class="mw-headline" id="Workstation_WIP_Control"><span class="mw-headline" id="Workstation_WIP_Control"><span class="mw-headline" id="Workstation_WIP_Control"><span class="mw-headline" id="Workstation_WIP_Control"><span class="mw-headline" id="Workstation_WIP_Control"><span class="mw-headline" id="Workstation_WIP_Control"><span class="mw-headline" id="Workstation_WIP_Control">Workstation WIP Control</span></span></span></span></span></span></span></span></span></span></span></span></span></span></span></span></span></span></span></span></span></span></span></span> == | ||
| + | |||
| + | '''Figure 8: Workstation WIP Control''' | ||
| + | |||
| + | [[File:TA WorkstationWIPControl.png|border|900px|TA WorkstationWIPControl.png]] | ||
| + | |||
| + | *'''Workstation WIP:''' select to calculate all loading materials' quantity by scanning board. | ||
| + | |||
| + | [True]: calculates the remaining quantity of loading material. | ||
| + | |||
| + | [False]: does not calculate the remaining quantity of loading material. | ||
| + | |||
| + | | ||
| + | |||
| + | | ||
| + | |||
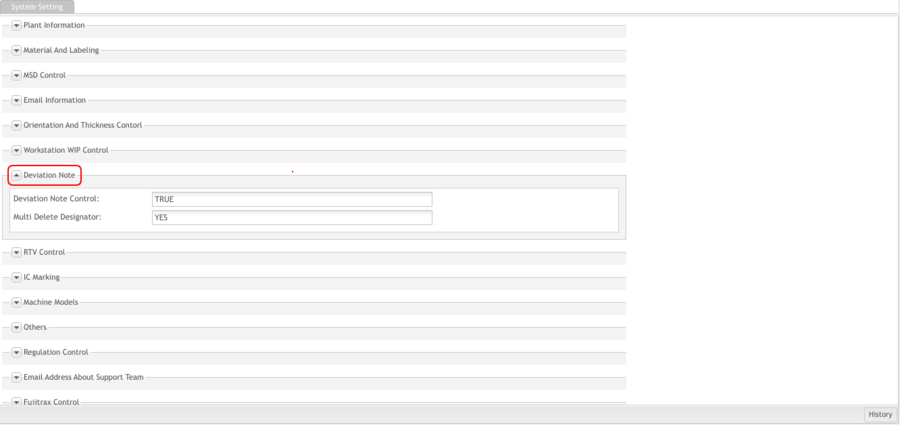
| + | == <span class="mw-headline" id="Deviation_Note"><span class="mw-headline" id="Deviation_Note"><span class="mw-headline" id="Deviation_Note"><span class="mw-headline" id="Deviation_Note"><span class="mw-headline" id="Deviation_Note"><span class="mw-headline" id="Deviation_Note"><span class="mw-headline" id="Deviation_Note"><span class="mw-headline" id="Deviation_Note"><span class="mw-headline" id="Deviation_Note"><span class="mw-headline" id="Deviation_Note"><span class="mw-headline" id="Deviation_Note"><span class="mw-headline" id="Deviation_Note"><span class="mw-headline" id="Deviation_Note"><span class="mw-headline" id="Deviation_Note"><span class="mw-headline" id="Deviation_Note"><span class="mw-headline" id="Deviation_Note"><span class="mw-headline" id="Deviation_Note"><span class="mw-headline" id="Deviation_Note"><span class="mw-headline" id="Deviation_Note"><span class="mw-headline" id="Deviation_Note"><span class="mw-headline" id="Deviation_Note"><span class="mw-headline" id="Deviation_Note"><span class="mw-headline" id="Deviation_Note"><span class="mw-headline" id="Deviation_Note"><span class="mw-headline" id="Deviation_Note"><span class="mw-headline" id="Deviation_Note">Deviation Note</span></span></span></span></span></span></span></span></span></span></span></span></span></span></span></span></span></span></span></span></span></span></span></span></span></span> == | ||
| + | |||
| + | These options are used to define the controls of deviatin notes. | ||
| + | |||
| + | '''Figure 9: Deviation Note ''' | ||
| + | |||
| + | [[File:TA DeviationNote .png|border|900px|TA DeviationNote .png]] | ||
| + | |||
| + | *'''Deviation Note Control:''' select to allow modifying DN in online status. | ||
| − | + | [True]: does not allow DN modification while the production line has online status. | |
| − | + | [False]: allows modifying DN while the production line has online status. | |
| − | + | *'''Multi Delete Designator:''' | |
| − | + | [True]: allow to delete more than one designators at the modify DN while the production line is in online status<br/> [False]: do not allow to delete more than one designators when modifying DN while the production line is in online status. | |
| − | |||
| − | |||
| − | |||
| − | |||
| − | |||
| − | |||
| − | + | | |
| − | + | | |
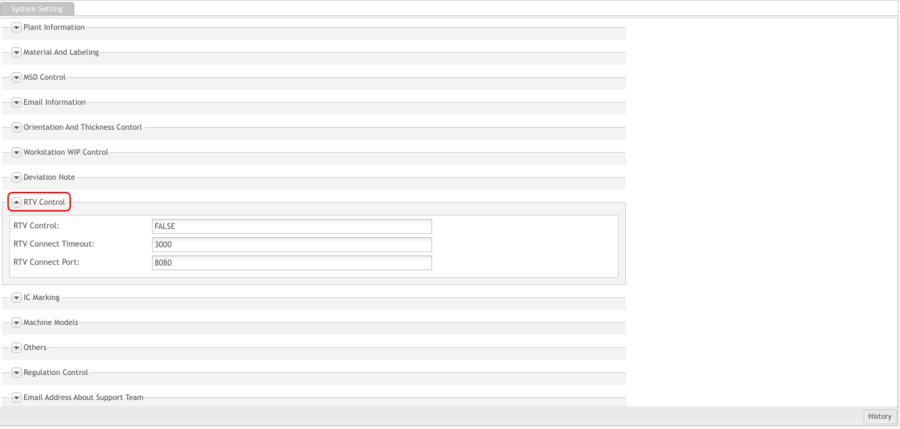
| − | < | + | == <span class="mw-headline" id="RTV_Control"><span class="mw-headline" id="RTV_Control"><span class="mw-headline" id="RTV_Control"><span class="mw-headline" id="RTV_Control"><span class="mw-headline" id="RTV_Control"><span class="mw-headline" id="RTV_Control"><span class="mw-headline" id="RTV_Control"><span class="mw-headline" id="RTV_Control"><span class="mw-headline" id="RTV_Control"><span class="mw-headline" id="RTV_Control"><span class="mw-headline" id="RTV_Control"><span class="mw-headline" id="RTV_Control"><span class="mw-headline" id="RTV_Control"><span class="mw-headline" id="RTV_Control"><span class="mw-headline" id="RTV_Control"><span class="mw-headline" id="RTV_Control"><span class="mw-headline" id="RTV_Control"><span class="mw-headline" id="RTV_Control"><span class="mw-headline" id="RTV_Control"><span class="mw-headline" id="RTV_Control"><span class="mw-headline" id="RTV_Control"><span class="mw-headline" id="RTV_Control"><span class="mw-headline" id="RTV_Control"><span class="mw-headline" id="RTV_Control">RTV Control</span></span></span></span></span></span></span></span></span></span></span></span></span></span></span></span></span></span></span></span></span></span></span></span> == |
| − | + | '''Figure 10: RTV Control ''' | |
| − | + | [[File:TA RTVControl .png|border|900px|TA RTVControl .png]] | |
| − | *''' | + | *'''RTV Control:''' select to start RTV control. |
| − | + | [True]: RTV.connects | |
| + | |||
| + | [False]: no need to control. | ||
| − | |||
*'''RTV Connect Timeout:''' timeout for RTV connecting RTV service. | *'''RTV Connect Timeout:''' timeout for RTV connecting RTV service. | ||
| − | *'''RTV Connect Port:''' RTV service port. | + | *'''RTV Connect Port:''' RTV service port. |
| + | |||
| + | | ||
| + | |||
| + | | ||
| + | |||
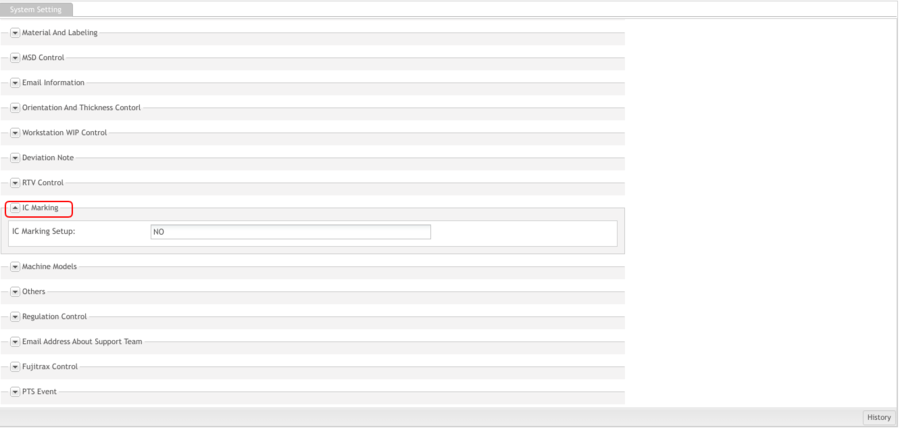
| + | == <span class="mw-headline" id="IC_Marking"><span class="mw-headline" id="IC_Marking"><span class="mw-headline" id="IC_Marking"><span class="mw-headline" id="IC_Marking"><span class="mw-headline" id="IC_Marking"><span class="mw-headline" id="IC_Marking"><span class="mw-headline" id="IC_Marking"><span class="mw-headline" id="IC_Marking"><span class="mw-headline" id="IC_Marking"><span class="mw-headline" id="IC_Marking"><span class="mw-headline" id="IC_Marking"><span class="mw-headline" id="IC_Marking"><span class="mw-headline" id="IC_Marking"><span class="mw-headline" id="IC_Marking"><span class="mw-headline" id="IC_Marking"><span class="mw-headline" id="IC_Marking"><span class="mw-headline" id="IC_Marking"><span class="mw-headline" id="IC_Marking"><span class="mw-headline" id="IC_Marking"><span class="mw-headline" id="IC_Marking"><span class="mw-headline" id="IC_Marking"><span class="mw-headline" id="IC_Marking"><span class="mw-headline" id="IC_Marking"><span class="mw-headline" id="IC_Marking">IC Marking</span></span></span></span></span></span></span></span></span></span></span></span></span></span></span></span></span></span></span></span></span></span></span></span> == | ||
| + | |||
| + | '''Figure 11: IC Making''' | ||
| + | |||
| + | [[File:TA ICMaking.png|border|900px|TA ICMaking.png]] | ||
| + | |||
| + | *'''IC Marking Setup:''' select to load material when IC Marking is unmatched. This parameter will influence on Pocket PC and Traceability Web – Prepare or Load Material module | ||
| + | |||
| + | [Yes]: IC Marking must be right when loading material. | ||
| + | |||
| + | [No]: IC Marking will not be verified when loading material. | ||
| + | |||
| + | | ||
| + | |||
| + | | ||
| + | |||
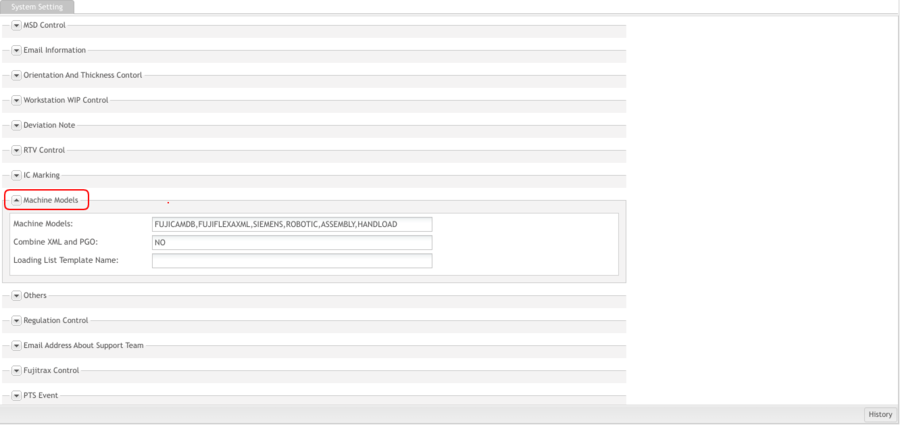
| + | == <span class="mw-headline" id="Machine_Models"><span class="mw-headline" id="Machine_Models"><span class="mw-headline" id="Machine_Models"><span class="mw-headline" id="Machine_Models"><span class="mw-headline" id="Machine_Models"><span class="mw-headline" id="Machine_Models"><span class="mw-headline" id="Machine_Models"><span class="mw-headline" id="Machine_Models"><span class="mw-headline" id="Machine_Models"><span class="mw-headline" id="Machine_Models"><span class="mw-headline" id="Machine_Models"><span class="mw-headline" id="Machine_Models"><span class="mw-headline" id="Machine_Models"><span class="mw-headline" id="Machine_Models"><span class="mw-headline" id="Machine_Models"><span class="mw-headline" id="Machine_Models"><span class="mw-headline" id="Machine_Models"><span class="mw-headline" id="Machine_Models"><span class="mw-headline" id="Machine_Models"><span class="mw-headline" id="Machine_Models"><span class="mw-headline" id="Machine_Models"><span class="mw-headline" id="Machine_Models"><span class="mw-headline" id="Machine_Models"><span class="mw-headline" id="Machine_Models">Machine Models</span></span></span></span></span></span></span></span></span></span></span></span></span></span></span></span></span></span></span></span></span></span></span></span> == | ||
| + | |||
| + | '''Figure 12: Machine Models''' | ||
| + | |||
| + | '''[[File:TA MachineModels.png|border|900px|TA MachineModels.png]]''' | ||
| + | |||
| + | *'''Machine Models:''' defines the machine types in the SMT Machine module supported by ezPicklist. | ||
| + | *'''Combine XML and PGO:''' select to get data from XML and PGO files. | ||
| + | |||
| + | [Yes]: acquires data from XML and PGO files to compose ezPicklist | ||
| + | |||
| + | [No]: does not use this function. | ||
| + | |||
| + | <u>'''Note:'''</u> The plant should have XML and PGO file formats. | ||
| + | |||
| + | | ||
| + | |||
| + | | ||
| + | |||
| + | |||
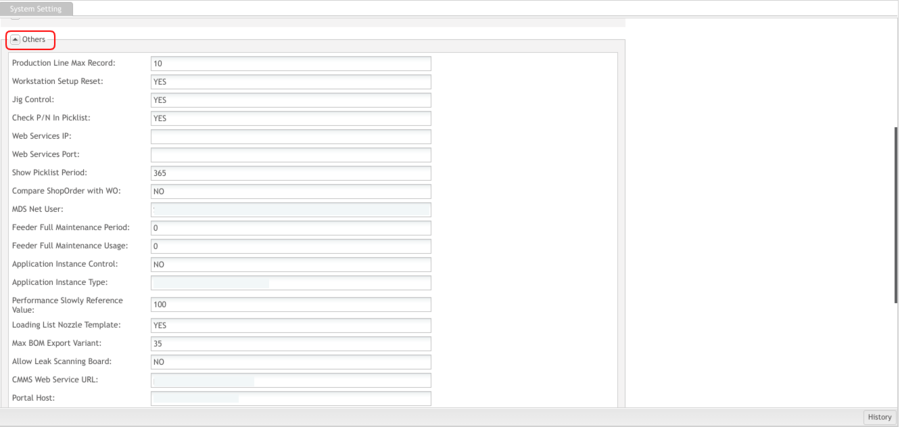
| + | == <span class="mw-headline" id="Others"><span class="mw-headline" id="Others"><span class="mw-headline" id="Others"><span class="mw-headline" id="Others"><span class="mw-headline" id="Others"><span class="mw-headline" id="Others"><span class="mw-headline" id="Others"><span class="mw-headline" id="Others"><span class="mw-headline" id="Others"><span class="mw-headline" id="Others"><span class="mw-headline" id="Others"><span class="mw-headline" id="Others"><span class="mw-headline" id="Others"><span class="mw-headline" id="Others"><span class="mw-headline" id="Others"><span class="mw-headline" id="Others"><span class="mw-headline" id="Others"><span class="mw-headline" id="Others"><span class="mw-headline" id="Others"><span class="mw-headline" id="Others"><span class="mw-headline" id="Others"><span class="mw-headline" id="Others"><span class="mw-headline" id="Others"><span class="mw-headline" id="Others"><span class="mw-headline" id="Others"><span class="mw-headline" id="Others"><span class="mw-headline" id="Others"><span class="mw-headline" id="Others">Others</span></span></span></span></span></span></span></span></span></span></span></span></span></span></span></span></span></span></span></span></span></span></span></span></span></span></span></span> == | ||
| + | |||
| + | '''Figure 13: Others''' | ||
| + | |||
| + | '''[[File:TA Others.png|border|900px|TA Others.png]]''' | ||
| + | |||
| + | *'''Workstation Setup Reset:''' select to reset "Check P/N in Picklist" value to '''Yes''' for all workstations when the production line turns off. | ||
| + | |||
| + | [Yes]: resets the value to yes when the production line turns off. | ||
| + | |||
| + | [No]: does not make any change. | ||
| + | |||
| + | *'''Jig Control:''' select the Jig Barcode system verification for the required workstation/product. | ||
| + | |||
| + | [No]: (default option) Jig Barcode will not be verified when the system scans the board. | ||
| − | + | [Yes]: required workstations will be verified by the Jig Barcode when the system scans the board. This parameter will affect the Scan Board Barcode module. | |
| − | *''' | + | *'''Check P/N In Picklist:''' used to check P/N consistency between Picklist and BOM for all workstations when the system compares Picklist with BOM. |
| − | + | [Yes]:(default value) checks consistency between Picklist P/N and BOM P/N. | |
| − | + | [No]: no need to check Picklist P/N and BOM P/N consistency. | |
| − | |||
| − | ''' | + | *'''Show Picklist Period''': used to define how many picklists are displayed under Production Setup --- |
| − | + | Defines the Picklist page as per time duration (in days). The default value is 30 days, which means the system will only display picklists of the last 30 days. This ensures that the end-users are always presented with the latest picklists and reduces the potential of using outdated picklists. | |
| − | + | *'''Compare Shop Order with WO:''' Compares the SFDC Shop Order with the Traceability Work Order for the SFDC-Traceability integration scanning. | |
| − | + | [Yes]: compares the Shop Order with the WO. | |
| − | |||
| − | |||
| − | |||
| − | |||
| − | + | [No]: does not compare the Shop Order with the WO. | |
| − | *''' | + | *'''MES Shop Floor: '''sets the MES Shop Floor that will use the function '''location mapping''' for workstation setup. |
| − | *''' | + | *'''FUJI VERIFY CONNECTION STRING: '''defines the connection string for FUJI Verify application. |
| − | *''' | + | *'''FUJI TRAX CONNECTION STRING:''' defines the connection string for FUJI TRAX application. |
| − | *''' | + | *'''FUJI PROFILER CONNECTION STRING:''' defines the connection string for FUJI Profiler application. |
| − | *'''Feeder Full Maintenance Period: ''' | + | *'''Feeder Full Maintenance Period: '''defines the period to rework/maintain all feeders. |
| + | *'''Allow Leak Scanning Board''': This option allows users whether to leak the scan board or not at the production scanning process. | ||
| − | + | [Yes]: Allows users to leak the scan board. | |
| − | + | [No]: Do not allow users to leak the scan board. | |
| − | + | Please see [[How_to_Leak_Scan_Board|how to Leak scan board]] for detailed information. | |
| − | + | *'''Loading List Nozzle Template''': define the EZpicklist Loading list template file with Nozzle or not. | |
| − | + | [Yes]: EZpicklist Loading list template file with Nozzle<br/> [No]: EZpicklist Loading list template file doesn’t with Nozzle | |
| − | |||
| − | |||
| + | *'''Lead Free PN Prefix''': define the Prefix of the part number, that the EZpicklist application will auto check the materials be Lead-Free. | ||
| + | For example, if users change its value to ‘LF, PF’ then those part numbers starting with 'LF' or ‘PF’ will be identified as ‘Lead-Free’ at the EZplicklist function automatically, so users don’t need to check, and add manually. | ||
| − | + | *'''WO BOM PPN:''' The default value will be empty, meaning the MES-Interface will sync all the MESR WO BOM to the PTS database. If users add a specific product PN at the WO BOM PPN field, then the MES-Interface will only sync those predefined WO BOM PRODUCT PN data to the PTS. Users will be able to set more than one product PN at the WO BOM PPN field. | |
| + | *'''WO BOM PPN Prefix:''' Users have to configure the Product PN Prefix for the specific customer, and sync those customers' WO BOM from Oracle to the PTS database. | ||
| − | + | <u>'''Note:'''</u> If the users do not enter any data in the WO BOM PPN or WO BOM PPN Prefix, the system will sync all the MESR WO BOM data to the PTS database.<br/> <u>'''Note:'''</u> WO BOM PPN: Work Order Bill of Materials Product Part Number. | |
| − | + | *'''Max BOM Export Variant''': This option defines the max BOM variant for the BOM Export function. It allows numbers. | |
| + | *'''Generate Phantom WO''': Define to generate the phantom work order by MES-Interface or not. Once the phantom Work Order is generated , the PTS system will show the phantom WO when setting the production line on-line. The default value is NO. | ||
| − | + | [Yes]: Allows generating the Phantom WO. | |
| − | [ | + | [No]: Do not allow generating the Phantom WO. |
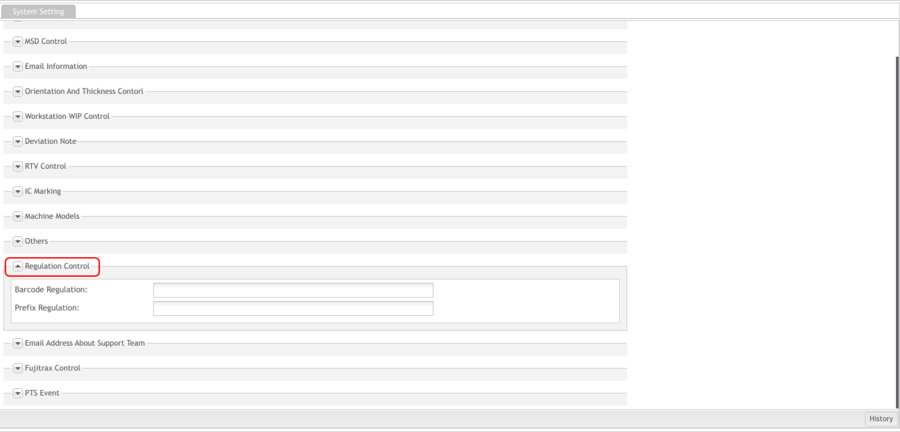
| − | < | + | == <span class="mw-headline" id="Regulation_Control"><span class="mw-headline" id="Regulation_Control"><span class="mw-headline" id="Regulation_Control"><span class="mw-headline" id="Regulation_Control"><span class="mw-headline" id="Regulation_Control"><span class="mw-headline" id="Regulation_Control"><span class="mw-headline" id="Regulation_Control"><span class="mw-headline" id="Regulation_Control"><span class="mw-headline" id="Regulation_Control"><span class="mw-headline" id="Regulation_Control"><span class="mw-headline" id="Regulation_Control"><span class="mw-headline" id="Regulation_Control"><span class="mw-headline" id="Regulation_Control"><span class="mw-headline" id="Regulation_Control"><span class="mw-headline" id="Regulation_Control"><span class="mw-headline" id="Regulation_Control"><span class="mw-headline" id="Regulation_Control"><span class="mw-headline" id="Regulation_Control"><span class="mw-headline" id="Regulation_Control"><span class="mw-headline" id="Regulation_Control"><span class="mw-headline" id="Regulation_Control"><span class="mw-headline" id="Regulation_Control"><span class="mw-headline" id="Regulation_Control"><span class="mw-headline" id="Regulation_Control"><span class="mw-headline" id="Regulation_Control"><span class="mw-headline" id="Regulation_Control">Regulation Control</span></span></span></span></span></span></span></span></span></span></span></span></span></span></span></span></span></span></span></span></span></span></span></span></span></span> == |
| − | + | '''Figure 14: Regulation Control''' | |
| − | + | '''[[File:TA RegulationControl.png|border|900px|TA RegulationControl.png]]''' | |
| − | + | *'''Material Barcode Regulation:''' defines a regular expression for load material. | |
| − | + | <u>'''Note:'''</u> regulation must be right when the user loads material if the user defines the material regulation. | |
| − | + | *'''Prefix Regulation''': Define the prefix regulation of the material barcode. | |
| + | | ||
| + | | ||
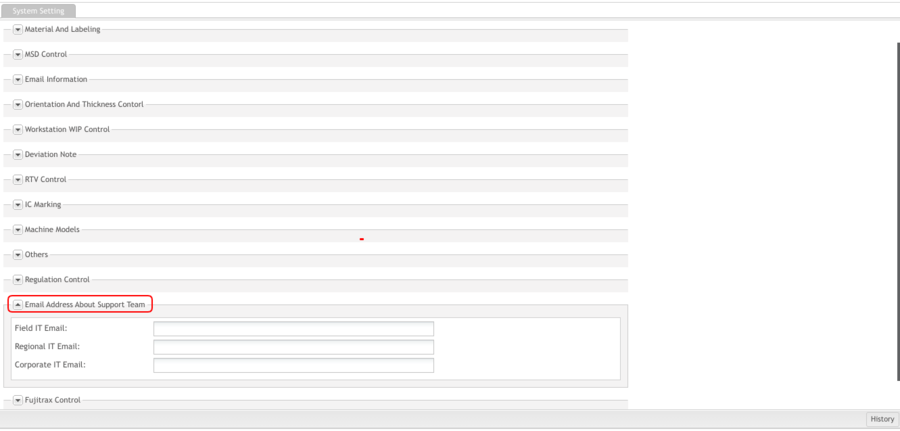
| − | ==== | + | == <span class="mw-headline" id="Email_Address_about_Support_Team"><span class="mw-headline" id="Email_Address_about_Support_Team"><span class="mw-headline" id="Email_Address_about_Support_Team"><span class="mw-headline" id="Email_Address_about_Support_Team"><span class="mw-headline" id="Email_Address_about_Support_Team"><span class="mw-headline" id="Email_Address_about_Support_Team"><span class="mw-headline" id="Email_Address_about_Support_Team"><span class="mw-headline" id="Email_Address_about_Support_Team"><span class="mw-headline" id="Email_Address_about_Support_Team"><span class="mw-headline" id="Email_Address_about_Support_Team"><span class="mw-headline" id="Email_Address_about_Support_Team"><span class="mw-headline" id="Email_Address_about_Support_Team"><span class="mw-headline" id="Email_Address_about_Support_Team"><span class="mw-headline" id="Email_Address_about_Support_Team"><span class="mw-headline" id="Email_Address_about_Support_Team"><span class="mw-headline" id="Email_Address_about_Support_Team"><span class="mw-headline" id="Email_Address_about_Support_Team"><span class="mw-headline" id="Email_Address_about_Support_Team"><span class="mw-headline" id="Email_Address_about_Support_Team"><span class="mw-headline" id="Email_Address_about_Support_Team"><span class="mw-headline" id="Email_Address_about_Support_Team"><span class="mw-headline" id="Email_Address_about_Support_Team"><span class="mw-headline" id="Email_Address_about_Support_Team"><span class="mw-headline" id="Email_Address_about_Support_Team">Email Address about Support Team</span></span></span></span></span></span></span></span></span></span></span></span></span></span></span></span></span></span></span></span></span></span></span></span> == |
| − | + | | |
| − | + | '''Figure 15: Email Address about Support Team''' | |
| − | + | '''[[File:TA EmailAddressaboutSupportTeam.png|border|900px|TA EmailAddressaboutSupportTeam.png]]''' | |
| − | + | This is to configure the email addresses of the support team so they are well informed of Traceability exceptions to perform immediate recovery. | |
| − | + | *'''Field IT Email''': input the email address of the person in the field IT team who is responsible for Traceability. | |
| + | *'''Regional IT Email''': input the email address of the person in the regional IT team who is responsible for Traceability. | ||
| + | *'''Corporate IT Email''': input the email address of the person in the corporate IT team who is responsible for Traceability. | ||
| − | + | | |
| − | + | | |
| − | + | | |
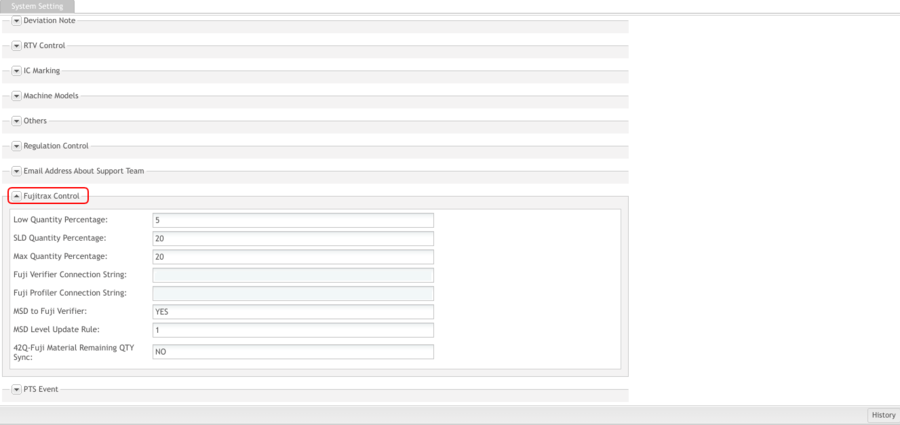
| − | < | + | == <span class="mw-headline" id="Fujitral_Control"><span class="mw-headline" id="Fujitral_Control"><span class="mw-headline" id="Fujitral_Control"><span class="mw-headline" id="Fujitral_Control"><span class="mw-headline" id="Fujitral_Control"><span class="mw-headline" id="Fujitral_Control"><span class="mw-headline" id="Fujitral_Control"><span class="mw-headline" id="Fujitral_Control"><span class="mw-headline" id="Fujitral_Control"><span class="mw-headline" id="Fujitral_Control"><span class="mw-headline" id="Fujitral_Control"><span class="mw-headline" id="Fujitral_Control"><span class="mw-headline" id="Fujitral_Control"><span class="mw-headline" id="Fujitral_Control"><span class="mw-headline" id="Fujitral_Control"><span class="mw-headline" id="Fujitral_Control"><span class="mw-headline" id="Fujitral_Control"><span class="mw-headline" id="Fujitral_Control"><span class="mw-headline" id="Fujitral_Control"><span class="mw-headline" id="Fujitral_Control"><span class="mw-headline" id="Fujitral_Control"><span class="mw-headline" id="Fujitral_Control"><span class="mw-headline" id="Fujitral_Control"><span class="mw-headline" id="Fujitral_Control"><span class="mw-headline" id="Fujitral_Control"><span class="mw-headline" id="Fujitral_Control">Fujitral Control</span></span></span></span></span></span></span></span></span></span></span></span></span></span></span></span></span></span></span></span></span></span></span></span></span></span> == |
| − | + | '''Figure 16: Fujitrax Control''' | |
| + | '''[[File:TA FujitraxControl.png|border|900px|TA FujitraxControl.png]]''' | ||
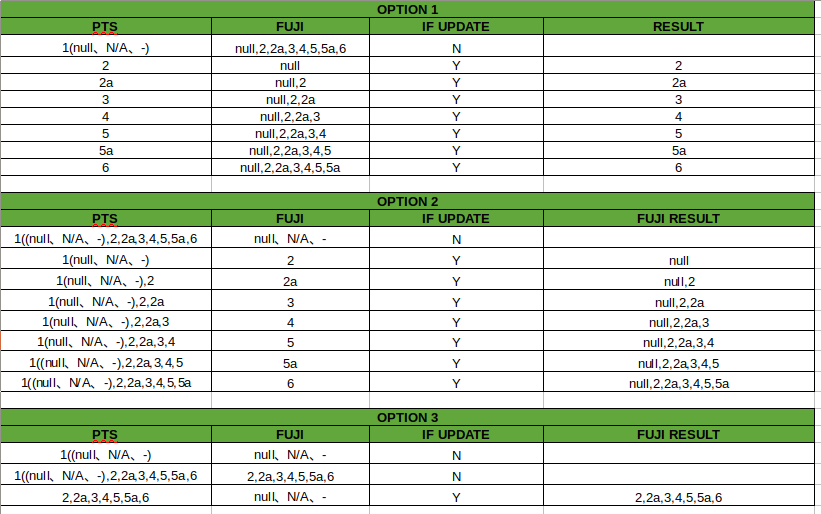
| − | ''' | + | *'''MSD to Fuji Verifier''': To define whether to verify the MSD material or not at the Fuji site. |
| − | + | *'''MSD Level Update Rule''': This option defines the rule on how to set the MSD level of the materials when syn Traceability material information into Fuji Database. Users can input 1,2 or 3 for this field, default by 1. | |
| − | + | ''' “MSD Level Update Rule”''', with options 1,2,3 | |
| − | + | #High overwrite Low | |
| + | #Low overwrite High | ||
| + | #Only Update NA MSD Level | ||
| − | + | '''Option 1''': | |
| − | + | If the Traceability real MSD level is higher than the Fuji PN MSD level, then overwrite the Fuji PN MSL value. | |
| − | + | If the Traceability real MSD level is lower than the Fuji PN MSD level, then do not overwrite the Fuji PN MSL value. | |
| − | + | '''Option 2''': | |
| − | + | If the Traceability reel MSD level is higher than the Fuji PN MSD Level, then do not overwrite the Fuji PN MSL value. | |
| − | + | If the Traceability reel MSD Level is lower than the Fuji PN MSD Level, then overwrite the Fuji PN MSL value. | |
| − | + | '''Option 3''': | |
| − | + | If the Fuji PN MSL value is none, then insert the Traceability reel MSL value into the Fuji PN MSL field. | |
| − | + | If the Fuji PN MSL value is none, then do not overwrite the Fuji PN MSL value. | |
| − | + | <u>'''Note'''</u>: When the option is changed, only affect the sync data next time. The data in processing will use the previous option. If the option is wrong, but some data has already been updated, we can't revert the database. If the plant doesn't want to use option 1 as default, needs to add a record in the Traceability database first and change the option before deploying the new version. | |
| − | + | | |
| − | + | [[File:MSD.png|border|RTENOTITLE]] | |
| − | + | *'''42Q-Fuji Material Remaining QTY Sync''': To define whether to sync the material remaining QTY to the PTS system for the different SMT machines, such as Siemens, Panasonic etc. The default option is set as '''No'''. The users could change the option to Yes. If it is set to '''YES''', the system will sync the Fuji material unloading the remaining qty into the PTS system, if it is set to '''No''', then it won’t need to sync the Fuji material unloading the remaining qty into the PTS system. | |
| − | + | | |
| − | + | | |
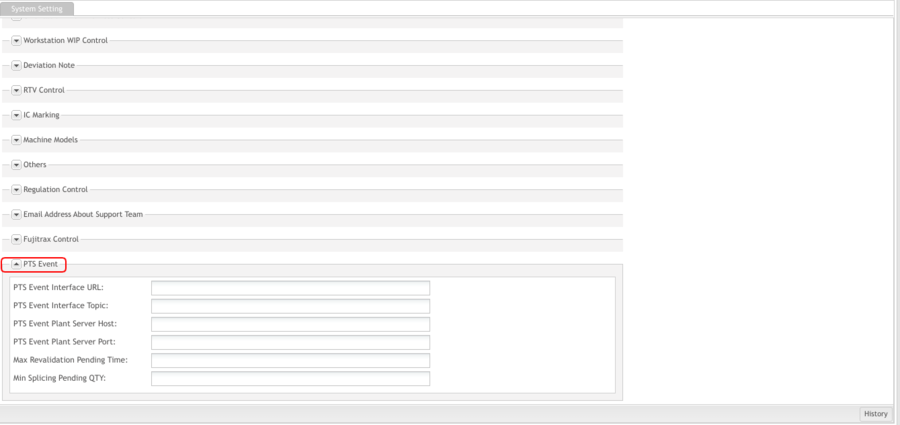
| − | ==== | + | == <span class="mw-headline" id="PTS_Event"><span class="mw-headline" id="PTS_Event"><span class="mw-headline" id="PTS_Event"><span class="mw-headline" id="PTS_Event"><span class="mw-headline" id="PTS_Event"><span class="mw-headline" id="PTS_Event">PTS Event</span></span></span></span></span></span> == |
| − | + | The options in the PTS Event page are used to define the third-interface server address and the plant address between which to transfer the material information, such as the material run-out or the material expired, then the third-interface will do the process accordingly. | |
| − | + | '''Figure 17: PTS Event''' | |
| − | + | [[File:TA PTSEvent.png|border|900px|TA PTSEvent.png]] | |
| − | + | | |
| − | + | *'''PTS Event Interface URL:'''The third-interface server URL. | |
| + | *'''PTS Event Interface Topic:'''The topic or directory for the third-interface. | ||
| + | *'''PTS Event Plant Server Host: '''The plant server host for that used the PTS Event. | ||
| + | *'''PTS Event Plant Server Port: '''The plant server port for that used the PTS Event. | ||
| + | *'''Max Revalidation Pending Time:'''The max minutes for revalidation the pending function. A warning information will occur after the time. | ||
| + | *'''Min Splicing Pending QTY: '''The min quantity for splicing. | ||
| + | | ||
| − | === Error message Maintenance | + | = <span class="mw-headline" id="Error_message_Maintenance"><span class="mw-headline" id="Error_message_Maintenance">Error message Maintenance</span></span> = |
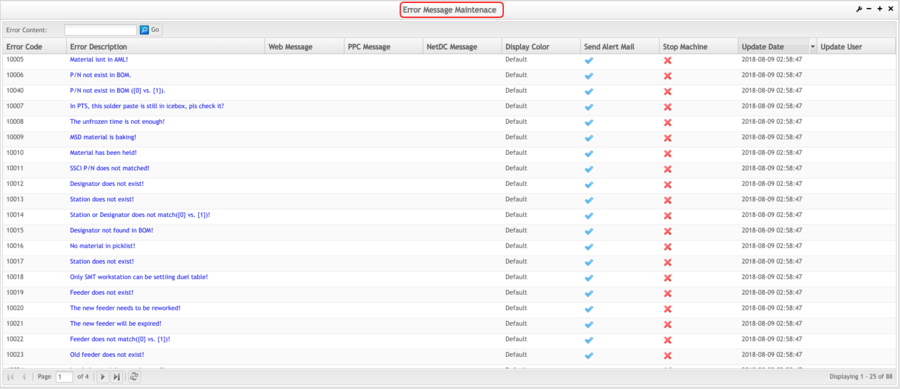
| − | Error Message Maintenance is a module under | + | Error Message Maintenance is a module under the Traceability web where users can customize the error content for different platforms, display color, and define whether or not an alert email should be triggered when such an error occurs. |
| − | 1. To access the Error Message Maintenance page, navigate to '''Administration | + | 1. To access the Error Message Maintenance page, navigate to '''Administration'''>'''Traceability Administrator'''>'''Error Message Maintenance'''. |
| − | <br> '''Figure | + | <br/> '''Figure 18: Error Message Maintenance''' |
| − | [[ | + | [[File:TA ErrorMessageMaintenance.png|900px|TA ErrorMessageMaintenance.png]] |
| − | + | | |
| − | A list of all | + | A list of all Traceability error messages will display. The user can scroll down to view or input keywords in the '''Error Content '''textbox to search for error messages. Select one error message and click on the'''Error Description''' column. |
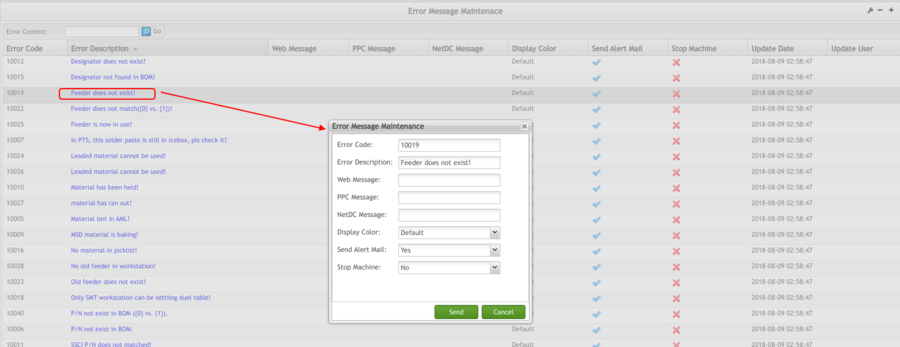
| − | The following screen will display: | + | The following screen will display: |
| − | <br> '''Figure | + | <br/> '''Figure 19: Update Error Message Detail''' |
| − | [[ | + | [[File:TA UpdateErrorMessageDetail.png|900px|TA UpdateErrorMessageDetail.png]] |
| − | *'''Error Code''': The code of selected error. Display only. | + | *'''Error Code''': The code of the selected error. Display only. |
| − | *'''Error Description''': The default error Description of selected error. Display only. | + | *'''Error Description''': The default error Description of the selected error. Display only. |
| − | *'''Web Message''': The error description to be displayed on | + | *'''Web Message''': The error description is to be displayed on the Traceability Web when the selected error occurs as per whatever user input in this textbox. |
| − | *'''PPC Message''': The error description to be displayed in PPC when the selected error occurs as per whatever user input in this textbox. | + | *'''PPC Message''': The error description is to be displayed in PPC when the selected error occurs as per whatever user input in this textbox. |
| − | *'''NetDC Message''': The error description to be displayed on NetDC when the selected error occurs as per whatever user input in this textbox. | + | *'''NetDC Message''': The error description is to be displayed on NetDC when the selected error occurs as per whatever user input in this textbox. |
| − | *'''Display Color''': Allow user to define the font color of the error message displayed when the error occurs. Select from the drop-down list. | + | *'''Display Color''': Allow the user to define the font color of the error message displayed when the error occurs. Select from the drop-down list. The default is red. |
*'''Send Alert Mail''': Defines whether or not for the system to send alert emails when the selected error occurs. Select '''Yes''' or '''No'''. | *'''Send Alert Mail''': Defines whether or not for the system to send alert emails when the selected error occurs. Select '''Yes''' or '''No'''. | ||
*'''Stop Machine''': Defines whether or not for the machine to stop when the selected error occurs. Select '''Yes''' or '''No'''. | *'''Stop Machine''': Defines whether or not for the machine to stop when the selected error occurs. Select '''Yes''' or '''No'''. | ||
*'''Send''': Saves the configuration. | *'''Send''': Saves the configuration. | ||
| − | *'''Cancel''': Goes back to previous window without saving the configuration. | + | *'''Cancel''': Goes back to the previous window without saving the configuration. |
| + | |||
| + | | ||
| + | |||
| + | <u>'''Note:'''</u> The error message can be customized to both English and Chinese. | ||
| + | |||
| + | | ||
| + | |||
| + | | ||
| + | |||
| + | = <span class="mw-headline" id="Add_Deviation_Note"><span class="mw-headline" id="Add_Deviation_Note"><span class="mw-headline" id="Add_Deviation_Note"><span class="mw-headline" id="Add_Deviation_Note"><span class="mw-headline" id="Add_Deviation_Note"><span class="mw-headline" id="Add_Deviation_Note"><span class="mw-headline" id="Add_Deviation_Note"><span class="mw-headline" id="Add_Deviation_Note"><span class="mw-headline" id="Add_Deviation_Note"><span class="mw-headline" id="Add_Deviation_Note"><span class="mw-headline" id="Add_Deviation_Note"><span class="mw-headline" id="Add_Deviation_Note"><span class="mw-headline" id="Add_Deviation_Note"><span class="mw-headline" id="Add_Deviation_Note"><span class="mw-headline" id="Add_Deviation_Note"><span class="mw-headline" id="Add_Deviation_Note"><span class="mw-headline" id="Add_Deviation_Note"><span class="mw-headline" id="Add_Deviation_Note"><span class="mw-headline" id="Add_Deviation_Note"><span class="mw-headline" id="Add_Deviation_Note"><span class="mw-headline" id="Add_Deviation_Note"><span class="mw-headline" id="Add_Deviation_Note"><span class="mw-headline" id="Add_Deviation_Note"><span class="mw-headline" id="Add_Deviation_Note"><span class="mw-headline" id="Add_Deviation_Note"><span class="mw-headline" id="Add_Deviation_Note"><span class="mw-headline" id="Add_Deviation_Note"><span class="mw-headline" id="Add_Deviation_Note"><span class="mw-headline" id="Add_Deviation_Note"><span class="mw-headline" id="Add_Deviation_Note"><span class="mw-headline" id="Add_Deviation_Note">Add Deviation Note</span></span></span></span></span></span></span></span></span></span></span></span></span></span></span></span></span></span></span></span></span></span></span></span></span></span></span></span></span></span></span> = | ||
| + | |||
| + | This module is designed to change/update BOM material in case an alternative part is needed. To distinguish the original BOM from the updated one, thus a deviation note is added. | ||
| + | |||
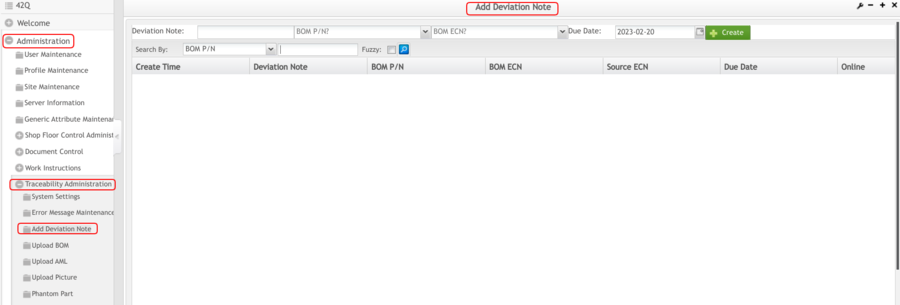
| + | To access the Add Deviation Note page, navigate to '''Administration '''> '''Traceability Administrator '''> '''Add Deviation Note'''. | ||
| + | |||
| + | <br/> '''Figure 20: Add Deviation Note''' | ||
| + | |||
| + | [[File:TA AddDeviationNote.png|border|900px|TA AddDeviationNote.png]] | ||
| + | |||
| + | | ||
| + | |||
| + | #Under '''Add Deviation Note''': Enter a reference number to identify such deviation. Example: (Modify/Temporally) Customer Change Notification (CCN) number or Engineering Change Notification (ECN). Please discuss with your Plant Quality Manager to confirm what deviation note format to be used if required. | ||
| + | #Under '''BOM P/N''': Enter the BOM Part Number, which requires updating the material part number and/or reference designator. | ||
| + | #Under '''BOM ECN''': Enter the existing BOM ECN in Traceability for this deviation change. When entering '''BOM P/N''', the '''BOM ECN''' will show automatically. If there is no BOM ECN, an alert message will display | ||
| + | #Under '''Due Date''': Select the expiry date of this deviation BOM ECN | ||
| + | #Select '''Create''' after finishing all the above steps. | ||
| + | |||
| + | | ||
| + | |||
| + | == <span class="mw-headline" id="Search_Deviation_Note"><span class="mw-headline" id="Search_Deviation_Note"><span class="mw-headline" id="Search_Deviation_Note"><span class="mw-headline" id="Search_Deviation_Note"><span class="mw-headline" id="Search_Deviation_Note"><span class="mw-headline" id="Search_Deviation_Note"><span class="mw-headline" id="Search_Deviation_Note"><span class="mw-headline" id="Search_Deviation_Note"><span class="mw-headline" id="Search_Deviation_Note"><span class="mw-headline" id="Search_Deviation_Note"><span class="mw-headline" id="Search_Deviation_Note"><span class="mw-headline" id="Search_Deviation_Note"><span class="mw-headline" id="Search_Deviation_Note"><span class="mw-headline" id="Search_Deviation_Note"><span class="mw-headline" id="Search_Deviation_Note"><span class="mw-headline" id="Search_Deviation_Note"><span class="mw-headline" id="Search_Deviation_Note"><span class="mw-headline" id="Search_Deviation_Note"><span class="mw-headline" id="Search_Deviation_Note"><span class="mw-headline" id="Search_Deviation_Note"><span class="mw-headline" id="Search_Deviation_Note"><span class="mw-headline" id="Search_Deviation_Note"><span class="mw-headline" id="Search_Deviation_Note"><span class="mw-headline" id="Search_Deviation_Note"><span class="mw-headline" id="Search_Deviation_Note"><span class="mw-headline" id="Search_Deviation_Note"><span class="mw-headline" id="Search_Deviation_Note"><span class="mw-headline" id="Search_Deviation_Note"><span class="mw-headline" id="Search_Deviation_Note"><span class="mw-headline" id="Search_Deviation_Note"><span class="mw-headline" id="Search_Deviation_Note">Search Deviation Note</span></span></span></span></span></span></span></span></span></span></span></span></span></span></span></span></span></span></span></span></span></span></span></span></span></span></span></span></span></span></span> == | ||
| + | |||
| + | '''Figure 21: Search Deviation Note''' | ||
| + | |||
| + | [[File:Figure 21- Search Deviation Note.png|border|900px|04 Admin DN search.png]] | ||
| + | |||
| + | | ||
| + | |||
| + | #Select '''Search By: BOM P/N '''or '''Deviation Note, '''input the P/N, then click '''Search'''. The result is displayed. | ||
| + | #At the report list, if the BOM ECN is online, only it displays. Otherwise, the font will be blue and it cannot be edited. | ||
| + | #Click on the '''Bom''' '''Part Number (not online, in blue font)''' which is required to change the alternative 42Q Part Number material part number and/or associated reference designator. Open the sub-page. | ||
| + | |||
| + | <br/> '''Figure 22: Show BOM Item''' | ||
| + | |||
| + | [[File:Figure 22- Show BOM Item.png|900px|05 Admin DN update sub-page.png]] | ||
| + | |||
| + | | ||
| + | |||
| + | == <span class="mw-headline" id="Add_P.2FN"><span class="mw-headline" id="Add_P.2FN"><span class="mw-headline" id="Add_P.2FN"><span class="mw-headline" id="Add_P.2FN"><span class="mw-headline" id="Add_P.2FN"><span class="mw-headline" id="Add_P.2FN"><span class="mw-headline" id="Add_P.2FN"><span class="mw-headline" id="Add_P.2FN"><span class="mw-headline" id="Add_P.2FN"><span class="mw-headline" id="Add_P.2FN"><span class="mw-headline" id="Add_P.2FN"><span class="mw-headline" id="Add_P.2FN"><span class="mw-headline" id="Add_P.2FN"><span class="mw-headline" id="Add_P.2FN"><span class="mw-headline" id="Add_P.2FN"><span class="mw-headline" id="Add_P.2FN"><span class="mw-headline" id="Add_P.2FN"><span class="mw-headline" id="Add_P.2FN"><span class="mw-headline" id="Add_P.2FN"><span class="mw-headline" id="Add_P.2FN"><span class="mw-headline" id="Add_P.2FN"><span class="mw-headline" id="Add_P.2FN"><span class="mw-headline" id="Add_P.2FN"><span class="mw-headline" id="Add_P.2FN"><span class="mw-headline" id="Add_P.2FN"><span class="mw-headline" id="Add_P.2FN"><span class="mw-headline" id="Add_P.2FN"><span class="mw-headline" id="Add_P.2FN"><span class="mw-headline" id="Add_P.2FN"><span class="mw-headline" id="Add_P.2FN"><span class="mw-headline" id="Add_P.2FN">Add P/N</span></span></span></span></span></span></span></span></span></span></span></span></span></span></span></span></span></span></span></span></span></span></span></span></span></span></span></span></span></span></span> == | ||
| + | |||
| + | '''Figure 23: Add BOM Item''' | ||
| + | |||
| + | [[File:Figure 23- Add BOM Item.png|550px|06 Admin DN-add bom item.png]] | ||
| + | |||
| + | | ||
| + | |||
| + | #Select '''Add P/N '''button to open the Add BOM Item page. | ||
| + | #Input the '''Usage''', '''Level''', '''Sequence''', '''Part''' '''Number''', and '''Designator;''' then select '''Add'''. | ||
| + | |||
| + | | ||
| + | |||
| + | == <span class="mw-headline" id="Substitute_P.2FN"><span class="mw-headline" id="Substitute_P.2FN"><span class="mw-headline" id="Substitute_P.2FN"><span class="mw-headline" id="Substitute_P.2FN"><span class="mw-headline" id="Substitute_P.2FN"><span class="mw-headline" id="Substitute_P.2FN"><span class="mw-headline" id="Substitute_P.2FN"><span class="mw-headline" id="Substitute_P.2FN"><span class="mw-headline" id="Substitute_P.2FN"><span class="mw-headline" id="Substitute_P.2FN"><span class="mw-headline" id="Substitute_P.2FN"><span class="mw-headline" id="Substitute_P.2FN"><span class="mw-headline" id="Substitute_P.2FN"><span class="mw-headline" id="Substitute_P.2FN"><span class="mw-headline" id="Substitute_P.2FN"><span class="mw-headline" id="Substitute_P.2FN"><span class="mw-headline" id="Substitute_P.2FN"><span class="mw-headline" id="Substitute_P.2FN"><span class="mw-headline" id="Substitute_P.2FN"><span class="mw-headline" id="Substitute_P.2FN"><span class="mw-headline" id="Substitute_P.2FN"><span class="mw-headline" id="Substitute_P.2FN"><span class="mw-headline" id="Substitute_P.2FN"><span class="mw-headline" id="Substitute_P.2FN"><span class="mw-headline" id="Substitute_P.2FN"><span class="mw-headline" id="Substitute_P.2FN"><span class="mw-headline" id="Substitute_P.2FN"><span class="mw-headline" id="Substitute_P.2FN"><span class="mw-headline" id="Substitute_P.2FN"><span class="mw-headline" id="Substitute_P.2FN"><span class="mw-headline" id="Substitute_P.2FN">Substitute P/N</span></span></span></span></span></span></span></span></span></span></span></span></span></span></span></span></span></span></span></span></span></span></span></span></span></span></span></span></span></span></span> == | ||
| + | |||
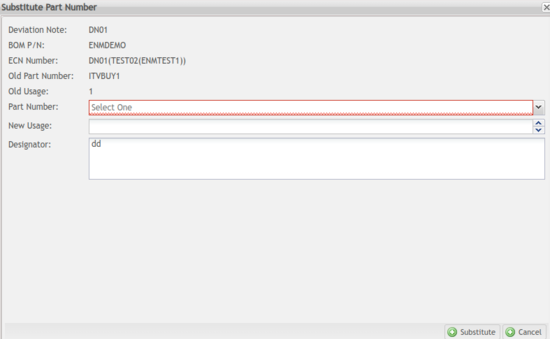
| + | #Select the left checkbox at the show BOM item page, and then select '''Substitute P/N'''. | ||
| + | #Select '''Substitute P/N '''to open the Substitute Part Number page. | ||
| + | #Input the '''Part Number''', and '''New Usage''', and select '''Substitute.''' | ||
| + | |||
| + | <br/> '''Figure 24: Substitute P/N''' | ||
| + | |||
| + | [[File:Figure 24- Substitute PN.png|550px|07 Admin DN-substitute pn.png]] | ||
| + | |||
| + | | ||
| + | |||
| + | | ||
| + | |||
| + | == <span class="mw-headline" id="Delete_Designator"><span class="mw-headline" id="Delete_Designator"><span class="mw-headline" id="Delete_Designator"><span class="mw-headline" id="Delete_Designator"><span class="mw-headline" id="Delete_Designator"><span class="mw-headline" id="Delete_Designator"><span class="mw-headline" id="Delete_Designator"><span class="mw-headline" id="Delete_Designator"><span class="mw-headline" id="Delete_Designator"><span class="mw-headline" id="Delete_Designator"><span class="mw-headline" id="Delete_Designator"><span class="mw-headline" id="Delete_Designator"><span class="mw-headline" id="Delete_Designator"><span class="mw-headline" id="Delete_Designator"><span class="mw-headline" id="Delete_Designator"><span class="mw-headline" id="Delete_Designator"><span class="mw-headline" id="Delete_Designator"><span class="mw-headline" id="Delete_Designator"><span class="mw-headline" id="Delete_Designator"><span class="mw-headline" id="Delete_Designator"><span class="mw-headline" id="Delete_Designator"><span class="mw-headline" id="Delete_Designator"><span class="mw-headline" id="Delete_Designator"><span class="mw-headline" id="Delete_Designator"><span class="mw-headline" id="Delete_Designator"><span class="mw-headline" id="Delete_Designator"><span class="mw-headline" id="Delete_Designator"><span class="mw-headline" id="Delete_Designator"><span class="mw-headline" id="Delete_Designator"><span class="mw-headline" id="Delete_Designator"><span class="mw-headline" id="Delete_Designator"><span class="mw-headline" id="Delete_Designator">Delete Designator</span></span></span></span></span></span></span></span></span></span></span></span></span></span></span></span></span></span></span></span></span></span></span></span></span></span></span></span></span></span></span></span> == | ||
| + | |||
| + | 1. Select the left checkbox at the show BOM item page, and then select '''Del Designator.''' | ||
| + | |||
| + | 2. Select '''Del Designator '''to open the Delete BOM Item page. | ||
| + | |||
| + | 3. Select the checkbox, then click the button '''Del Designator '''to delete a designator'''.''' | ||
| + | |||
| + | <br/> '''Figure 25: Delete Designator''' | ||
| + | |||
| + | [[File:Figure 25- Delete Designator.png|550px|08 Admin DN-delete bom item.png]] | ||
| + | |||
| + | | ||
| + | |||
| + | == <span class="mw-headline" id="Remove_Deviation_Note"><span class="mw-headline" id="Remove_Deviation_Note"><span class="mw-headline" id="Remove_Deviation_Note"><span class="mw-headline" id="Remove_Deviation_Note"><span class="mw-headline" id="Remove_Deviation_Note"><span class="mw-headline" id="Remove_Deviation_Note"><span class="mw-headline" id="Remove_Deviation_Note"><span class="mw-headline" id="Remove_Deviation_Note"><span class="mw-headline" id="Remove_Deviation_Note"><span class="mw-headline" id="Remove_Deviation_Note"><span class="mw-headline" id="Remove_Deviation_Note"><span class="mw-headline" id="Remove_Deviation_Note"><span class="mw-headline" id="Remove_Deviation_Note"><span class="mw-headline" id="Remove_Deviation_Note"><span class="mw-headline" id="Remove_Deviation_Note"><span class="mw-headline" id="Remove_Deviation_Note"><span class="mw-headline" id="Remove_Deviation_Note"><span class="mw-headline" id="Remove_Deviation_Note"><span class="mw-headline" id="Remove_Deviation_Note"><span class="mw-headline" id="Remove_Deviation_Note"><span class="mw-headline" id="Remove_Deviation_Note"><span class="mw-headline" id="Remove_Deviation_Note"><span class="mw-headline" id="Remove_Deviation_Note"><span class="mw-headline" id="Remove_Deviation_Note"><span class="mw-headline" id="Remove_Deviation_Note"><span class="mw-headline" id="Remove_Deviation_Note"><span class="mw-headline" id="Remove_Deviation_Note"><span class="mw-headline" id="Remove_Deviation_Note"><span class="mw-headline" id="Remove_Deviation_Note"><span class="mw-headline" id="Remove_Deviation_Note"><span class="mw-headline" id="Remove_Deviation_Note">Remove Deviation Note</span></span></span></span></span></span></span></span></span></span></span></span></span></span></span></span></span></span></span></span></span></span></span></span></span></span></span></span></span></span></span> == | ||
| + | |||
| + | '''Figure 26: Remove Deviation Note''' | ||
| + | |||
| + | [[File:Figure 26- Remove Deviation Note.png|550px|09 Admin DN-remove DN.png]] | ||
| + | |||
| + | | ||
| + | |||
| + | 1. Select the desired '''Deviation Note ('''Not online, in blue font''') to be deleted. Open the sub-page.''' | ||
| + | |||
| + | 2. Confirm the deletion by selecting '''Delete.''' | ||
| + | |||
| + | | ||
| + | |||
| + | | ||
| + | |||
| + | | ||
| + | |||
| + | | ||
| − | < | + | = <span class="mw-headline" id="Upload_BOM"><span class="mw-headline" id="Upload_BOM"><span class="mw-headline" id="Upload_BOM"><span class="mw-headline" id="Upload_BOM"><span class="mw-headline" id="Upload_BOM"><span class="mw-headline" id="Upload_BOM"><span class="mw-headline" id="Upload_BOM"><span class="mw-headline" id="Upload_BOM"><span class="mw-headline" id="Upload_BOM"><span class="mw-headline" id="Upload_BOM"><span class="mw-headline" id="Upload_BOM"><span class="mw-headline" id="Upload_BOM"><span class="mw-headline" id="Upload_BOM"><span class="mw-headline" id="Upload_BOM"><span class="mw-headline" id="Upload_BOM"><span class="mw-headline" id="Upload_BOM"><span class="mw-headline" id="Upload_BOM"><span class="mw-headline" id="Upload_BOM"><span class="mw-headline" id="Upload_BOM"><span class="mw-headline" id="Upload_BOM"><span class="mw-headline" id="Upload_BOM"><span class="mw-headline" id="Upload_BOM"><span class="mw-headline" id="Upload_BOM"><span class="mw-headline" id="Upload_BOM"><span class="mw-headline" id="Upload_BOM"><span class="mw-headline" id="Upload_BOM"><span class="mw-headline" id="Upload_BOM">Upload BOM</span></span></span></span></span></span></span></span></span></span></span></span></span></span></span></span></span></span></span></span></span></span></span></span></span></span></span> = |
| − | + | This function is used to upload BOM into the system. The user can download the template file and edit the BOM file with the template file'''. '''Before uploading the BOM, the system reads the BOM information from the BOM file(.csv) and shows the detailed BOM items on the list. After the check, the items will be uploaded along with the BOM into the system. | |
| − | + | To access the Upload Bom, navigate to '''Administration > Traceability Administrator > Upload BOM'''. | |
| − | + | | |
| − | Upload | + | '''Figure 27: Upload BOM''' |
| − | + | [[File:TA UploadBOM.png|border|900px|TA UploadBOM.png]] | |
| − | + | Click the '''Download''' button, and save the BOM template file locally. | |
| − | ''' | + | Users are able to '''Edit''' the template file '''with the production BOM data.''' |
| − | + | #Click the … ICON to select and open the Bom file, the file name will show in the text field. | |
| + | #Click the '''Import''' button to show the detailed BOM items on the list. | ||
| + | #Click the '''Upload''' button to save the BOM to the system. | ||
| + | #The BOM was uploaded successfully. | ||
| + | #Or the error message will show if the PN does not exist in the database. | ||
| − | <br> | + | |
| + | |||
| + | '''Figure 28: BOM Upload''' | ||
| + | |||
| + | [[File:TA BOMUpload.png|border|900px|TA BOMUpload.png]] | ||
| + | |||
| + | | ||
| + | |||
| + | Users can check the uploaded BOM from the '''Show BOM '''module. | ||
| + | |||
| + | | ||
| + | |||
| + | '''Figure 29: Show BOM''' | ||
| + | |||
| + | [[File:TA ShowBOM.png|border|900px|TA ShowBOM.png]] | ||
| + | |||
| + | | ||
| + | |||
| + | '''<span style="text-decoration:underline;">Note</span>''': Only the .csv file format is supported. Cannot upload the BOM when it is in use. | ||
| + | |||
| + | | ||
| + | |||
| + | | ||
| + | |||
| + | = <span class="mw-headline" id="Upload_AML"><span class="mw-headline" id="Upload_AML"><span class="mw-headline" id="Upload_AML"><span class="mw-headline" id="Upload_AML"><span class="mw-headline" id="Upload_AML"><span class="mw-headline" id="Upload_AML"><span class="mw-headline" id="Upload_AML"><span class="mw-headline" id="Upload_AML"><span class="mw-headline" id="Upload_AML"><span class="mw-headline" id="Upload_AML"><span class="mw-headline" id="Upload_AML"><span class="mw-headline" id="Upload_AML"><span class="mw-headline" id="Upload_AML"><span class="mw-headline" id="Upload_AML"><span class="mw-headline" id="Upload_AML"><span class="mw-headline" id="Upload_AML"><span class="mw-headline" id="Upload_AML"><span class="mw-headline" id="Upload_AML"><span class="mw-headline" id="Upload_AML"><span class="mw-headline" id="Upload_AML"><span class="mw-headline" id="Upload_AML"><span class="mw-headline" id="Upload_AML">Upload AML</span></span></span></span></span></span></span></span></span></span></span></span></span></span></span></span></span></span></span></span></span></span> = | ||
| + | |||
| + | The upload AML module allows users to upload the AML information from the CSV file, and also provides the template download function to let users download the CSV file template. | ||
| + | |||
| + | Navigate to '''Administrator > Traceability Administrator > Upload AML.''' | ||
| + | |||
| + | | ||
| + | |||
| + | '''Figure 30: Upload AML main page''' | ||
| + | |||
| + | [[File:TA UploadAML.png|border|900px|TA UploadAML.png]] | ||
| + | |||
| + | | ||
| + | |||
| + | | ||
| + | |||
| + | == <span class="mw-headline" id="_Download_the_AML_template_file"><span class="mw-headline" id="_Download_the_AML_template_file"><span class="mw-headline" id="_Download_the_AML_template_file"><span class="mw-headline" id="_Download_the_AML_template_file"><span class="mw-headline" id="_Download_the_AML_template_file"><span class="mw-headline" id="_Download_the_AML_template_file"><span class="mw-headline" id="_Download_the_AML_template_file"><span class="mw-headline" id="_Download_the_AML_template_file"><span class="mw-headline" id="_Download_the_AML_template_file"><span class="mw-headline" id="_Download_the_AML_template_file"><span class="mw-headline" id="_Download_the_AML_template_file"><span class="mw-headline" id="_Download_the_AML_template_file"><span class="mw-headline" id="_Download_the_AML_template_file"><span class="mw-headline" id="_Download_the_AML_template_file"><span class="mw-headline" id="_Download_the_AML_template_file"><span class="mw-headline" id="_Download_the_AML_template_file"><span class="mw-headline" id="_Download_the_AML_template_file"><span class="mw-headline" id="_Download_the_AML_template_file"><span class="mw-headline" id="_Download_the_AML_template_file"><span class="mw-headline" id="_Download_the_AML_template_file"><span class="mw-headline" id="_Download_the_AML_template_file"><span class="mw-headline" id="_Download_the_AML_template_file"><span class="mw-headline" id="_Download_the_AML_template_file"> Download the AML template file</span></span></span></span></span></span></span></span></span></span></span></span></span></span></span></span></span></span></span></span></span></span></span> == | ||
| + | |||
| + | #Select '''Download '''at the top menu''', '''to '''open the AML Template.csv file.''' | ||
| + | |||
| + | '''Figure 31: Download the AML template CSV file''' | ||
| + | |||
| + | [[File:TA DownloadAMLtemp.png|border|900px|TA DownloadAMLtemp.png]] | ||
| + | |||
| + | The detailed description of the columns for the AML template file is as follows: | ||
| + | |||
| + | *'''Part Number''': This is the Part Number of material to identify the material. This column is mandatory. | ||
| + | *'''Item Description''': The description of the Part Number to make clear to the user. This column is mandatory. | ||
| + | *'''Manufacture Name''': This is the name of the Manufacturer. This column is mandatory. | ||
| + | *'''Manufacturer PN''': The Part Number of the manufacturer. This column is mandatory. | ||
| + | *'''Receipt Traveler''': The receipt traveler number for the received materials provided by the warehouse staff. This column is mandatory. | ||
| + | *'''Qty''': The quantity of received material. | ||
| + | *'''Expiry Days''': The days of how soon the manufacture will expire. If the user leaves this column empty, it will be treated as this manufacturer and will never expire. | ||
| + | *'''Locator''': The address of the material's manufacturer. | ||
| + | *'''Status''': This column is used to verify the status of the manufacturer, the value is '''Active/Inactive'''. if the user leaves the status column empty, it will be treated as Active by default. | ||
| + | *'''Supplier Name''': The supplier name of the material. This column is optional. | ||
| + | <ol start="2"> | ||
| + | <li>Click '''Download''' to download the AML template CSV file to the local disk, or click '''Share''' to save as a google sheet.</li> | ||
| + | </ol> | ||
| + | |||
| + | | ||
| + | |||
| + | == <br/> <span class="mw-headline" id="Upload_AML_2"><span class="mw-headline" id="Upload_AML_2"><span class="mw-headline" id="Upload_AML_2"><span class="mw-headline" id="Upload_AML"><span class="mw-headline" id="Upload_AML"><span class="mw-headline" id="Upload_AML_2"><span class="mw-headline" id="Upload_AML_2"><span class="mw-headline" id="Upload_AML_2"><span class="mw-headline" id="Upload_AML_2"><span class="mw-headline" id="Upload_AML_2"><span class="mw-headline" id="Upload_AML_2"><span class="mw-headline" id="Upload_AML_2"><span class="mw-headline" id="Upload_AML_2"><span class="mw-headline" id="Upload_AML_2"><span class="mw-headline" id="Upload_AML_2"><span class="mw-headline" id="Upload_AML_2"><span class="mw-headline" id="Upload_AML_2"><span class="mw-headline" id="Upload_AML_2"><span class="mw-headline" id="Upload_AML_2"><span class="mw-headline" id="Upload_AML_2"><span class="mw-headline" id="Upload_AML_2"><span class="mw-headline" id="Upload_AML_2"><span class="mw-headline" id="Upload_AML_2"><span class="mw-headline" id="Upload_AML_2">Upload AML</span></span></span></span></span></span></span></span></span></span></span></span></span></span></span></span></span></span></span></span></span></span></span></span> == | ||
| + | |||
| + | #<span style="font-size: 13px;">Select the</span>''…''' '''''<span style="font-size: 13px;">button on the man page to open the prepared AML information CSV file.</span> | ||
| + | |||
| + | | ||
| + | |||
| + | '''Figure 32: Select the AML file''' | ||
| + | |||
| + | [[File:TA SelectAMLfile.png|border|900px|TA SelectAMLfile.png]] | ||
| + | <ol start="2"> | ||
| + | <li>Click the '''Upload''' button, and all the AML information will upload into the Traceability portal DB successfully.</li> | ||
| + | </ol> | ||
| + | |||
| + | '''<span style="text-decoration:underline;">Note</span>: '''If the AML already exists, the system will overwrite the old data with the new AML information in the CSV file. | ||
| + | <ol start="3"> | ||
| + | <li>Users can check the upload results at the '''Approved Manufacturer list '''module(This step is optional).</li> | ||
| + | </ol> | ||
| + | |||
| + | = <span class="mw-headline" id="Upload_Picture"><span class="mw-headline" id="Upload_Picture"><span class="mw-headline" id="Upload_Picture">Upload Picture</span></span></span> = | ||
| + | |||
| + | Upload Picture is a module that allows the user to upload pictures about the orientation named by the Part Number. The images must be in JPG format. | ||
| + | |||
| + | Following is the sample to show/control the Orientation picture in production: | ||
| + | |||
| + | *User needs to configure the Orientation setting ('''Orientation And Thickness Control''') at the '''Traceability System Setting'''. | ||
| + | *Upload the component image via the '''Upload Picture''' GUI. | ||
| + | *The system will display the pre-defined component picture at the load material or PPC GUI during the load material process so that the operator will refer to the pre-defined component picture to place the component at the SMT with the proper direction. | ||
| + | |||
| + | '''Important Note''': The picture must be named in this format: XXX.jpg (XXX=Part Number, which matched with the Part Number in the production picklist). | ||
| + | |||
| + | 1. To access the Upload Picture page, navigate to '''Administration'''>'''Traceability Administration'''>'''Upload Picture'''. | ||
| + | |||
| + | | ||
| + | |||
| + | '''Figure 33: Upload Image''' | ||
| + | |||
| + | [[File:Figure 33- Upload Image.png|border|800px|13 Upload Image.png]] | ||
| + | |||
| + | | ||
*Select '''Upload''' to open the upload sub-page. | *Select '''Upload''' to open the upload sub-page. | ||
*Click the '''Select''' button to open the resource folder to select the picture file, and then click the '''Upload '''button'''.''' | *Click the '''Select''' button to open the resource folder to select the picture file, and then click the '''Upload '''button'''.''' | ||
| − | *Select '''Delete '''to delete the picture. | + | *Select '''Delete '''to delete the picture. |
| − | + | <u>'''Note'''</u>: | |
*The uploaded picture file name cannot contain Chinese. | *The uploaded picture file name cannot contain Chinese. | ||
| − | *The picture file size cannot be over 3M. | + | *The picture file size cannot be over 3M. |
| + | |||
| + | | ||
| + | |||
| + | | ||
| + | |||
| + | = <span class="mw-headline" id="Phantom_Part"><span class="mw-headline" id="Phantom_Part"><span class="mw-headline" id="Phantom_Part">Phantom Part</span></span></span> = | ||
| + | |||
| + | Phantom Part module allows users to Add or Delete the Phantom Part. | ||
| + | |||
| + | '''Figure 34: Phantom Part''' | ||
| + | |||
| + | [[File:Figure 34- Phantom Part.png|border|900px|Figure 34- Phantom Part.png]]<br/> | ||
| + | |||
| + | #Select Add to open the add phantom part sub-page. | ||
| + | |||
| + | '''Figure 34a: Add Phantom Part''' | ||
| + | |||
| + | [[File:Figure 34a- Add Phantom Part.png|Figure 34a- Add Phantom Part.png]] | ||
| + | |||
| + | | ||
| + | <ol start="2"> | ||
| + | <li>Enter the Top Level WO, Top Level P/N, Phantom P/N, Usage*Qty, Gen Sub Key.</li> | ||
| + | <li>Select Save to save the phantom part and close the add phantom part sub-page,.or select Save & More to save the phantom part information and with the add phantom part sub-page opened.</li> | ||
| + | <li>Or select Delete to delete one phantom part from the system.</li> | ||
| + | </ol> | ||
| + | |||
| + | | ||
| + | |||
| + | = <span class="mw-headline" id="Accept_Prompt_Settings"><span class="mw-headline" id="Accept_Prompt_Settings"><span class="mw-headline" id="Accept_Prompt_Settings"><span class="mw-headline" id="Accept_Prompt_Settings"><span class="mw-headline" id="Accept_Prompt_Settings"><span class="mw-headline" id="Accept_Prompt_Settings"><span class="mw-headline" id="Accept_Prompt_Settings"><span class="mw-headline" id="Accept_Prompt_Settings"><span class="mw-headline" id="Accept_Prompt_Settings"><span class="mw-headline" id="Accept_Prompt_Settings"><span class="mw-headline" id="Accept_Prompt_Settings"><span class="mw-headline" id="Accept_Prompt_Settings"><span class="mw-headline" id="Accept_Prompt_Settings"><span class="mw-headline" id="Accept_Prompt_Settings"><span class="mw-headline" id="Accept_Prompt_Settings"><span class="mw-headline" id="Accept_Prompt_Settings"><span class="mw-headline" id="Accept_Prompt_Settings"><span class="mw-headline" id="Accept_Prompt_Settings"><span class="mw-headline" id="Accept_Prompt_Settings"><span class="mw-headline" id="Accept_Prompt_Settings"><span class="mw-headline" id="Accept_Prompt_Settings"><span class="mw-headline" id="Accept_Prompt_Settings"><span class="mw-headline" id="Accept_Prompt_Settings"><span class="mw-headline" id="Accept_Prompt_Settings"><span class="mw-headline" id="Accept_Prompt_Settings"><span class="mw-headline" id="Accept_Prompt_Settings"><span class="mw-headline" id="Accept_Prompt_Settings"><span class="mw-headline" id="Accept_Prompt_Settings">Accept Prompt Settings</span></span></span></span></span></span></span></span></span></span></span></span></span></span></span></span></span></span></span></span></span></span></span></span></span></span></span></span> = | ||
| + | |||
| + | Users can set the Accept Prompt Settings (for example Reject, Accepted) for the material. | ||
| + | |||
| + | This Setting is used at the'''Shop Floor Control '''> '''Production Control''' > '''Incoming Traceability > Material labeling''' module for '''Accept Property''' drop-down list (see figure below). | ||
| + | |||
| + | '''Figure 35: Accept Property Drop-down list''' | ||
| + | |||
| + | [[File:Figure 35- Accept Property Drop-Down list.png|border|700px|Accept Property.png]] | ||
| + | |||
| + | | ||
| + | |||
| + | #Navigator to '''Administrator > Traceability Administrator > Accept Prompt Settings'''. | ||
| + | |||
| + | '''Figure 36: Accept Prompt Setting Main page''' | ||
| + | |||
| + | [[File:Figure 36- Accept Prompt Setting Main page.png|border|700px|Accept Property Setting main page.png]] | ||
| + | <ol start="2"> | ||
| + | <li>Select '''Add'''</li> | ||
| + | </ol> | ||
| + | |||
| + | '''Figure 37: Add a new Accept Property Setting''' | ||
| + | |||
| + | [[File:Figure 37- Add a new Accept Property Setting.png|border|700px|Add new Accept Propert setting.png]] | ||
| + | <ol start="3"> | ||
| + | <li>Enter the '''Accept Property Name,''' '''Allow Load Component''', '''Status'''</li> | ||
| + | </ol> | ||
| + | |||
| + | *'''Accept Property Name:''' The name of the accepted property, this name will show at the Accept Property drop-down list for material labeling page. | ||
| + | *'''Allow Load Component: '''To define the system allows to load the material or not at the load material module if the material is set this Accept property. | ||
| + | |||
| + | '''Yes''': Allow loading this material. | ||
| + | |||
| + | '''No''': Not allowed to load this material. | ||
| + | |||
| + | For example, some plants set the '''Accept property name''' to '''Rejected, '''set the '''Allow Load Component '''to '''Yes, '''print one label: E76-M001 selecting the Accept Property drop-down list to '''Rejected, '''material barcode: E76-M001 can be loaded at the load material module. | ||
| + | |||
| + | For some reason, One plant set the Accept property Rejected(Name), Allow Load Component to No, then print another label: E76-M002. '''material barcode: E76-M002 can not be loaded at the load material module.''' | ||
| + | |||
| + | | ||
| + | <ul style="margin-left: 40px;"> | ||
| + | <li>'''Status: '''To set the status('''Enabled/disabled''') of the Accept property setting. If this setting is enabled, it will show at the Accept Property drop-down list, if is disabled, will not show at the Accept Property drop-down list.</li> | ||
| + | </ul> | ||
| + | <ol start="4"> | ||
| + | <li>Select '''Save''' to create a new Accept Property for the material.</li> | ||
| + | <li>Or double click on the selected Accept Property name, change the fields, select Save to edit the Accept Property setting.</li> | ||
| + | </ol> | ||
| + | |||
| + | | ||
| + | |||
| + | | ||
| + | |||
| + | = <span class="mw-headline" id="BOM_Export"><span class="mw-headline" id="BOM_Export"><span class="mw-headline" id="BOM_Export"><span class="mw-headline" id="BOM_Export"><span class="mw-headline" id="BOM_Export"><span class="mw-headline" id="BOM_Export"><span class="mw-headline" id="BOM_Export"><span class="mw-headline" id="BOM_Export"><span class="mw-headline" id="BOM_Export"><span class="mw-headline" id="BOM_Export"><span class="mw-headline" id="BOM_Export"><span class="mw-headline" id="BOM_Export"><span class="mw-headline" id="BOM_Export"><span class="mw-headline" id="BOM_Export"><span class="mw-headline" id="BOM_Export"><span class="mw-headline" id="BOM_Export"><span class="mw-headline" id="BOM_Export"><span class="mw-headline" id="BOM_Export"><span class="mw-headline" id="BOM_Export"><span class="mw-headline" id="BOM_Export"><span class="mw-headline" id="BOM_Export"><span class="mw-headline" id="BOM_Export"><span class="mw-headline" id="BOM_Export"><span class="mw-headline" id="BOM_Export">BOM Export</span></span></span></span></span></span></span></span></span></span></span></span></span></span></span></span></span></span></span></span></span></span></span></span> = | ||
| + | |||
| + | Users can export a special BOM to target PC and folder with this function BOM Export. | ||
| + | |||
| + | On the main page, users select the '''Target''', '''BOM P/N''', '''Revision''', '''Variant''', and '''levels;''' click '''Sent''' to export the BOM to the target. | ||
| + | |||
| + | | ||
| + | |||
| + | '''Figure 38: BOM Export Main Page''' | ||
| + | |||
| + | [[File:Bom Export main page.png|border|Bom Export main page.png]]<br/> | ||
| + | |||
| + | '''Target''': Select the target where to export the BOM. Target is defined at the BOM Export Configuration function. | ||
| + | |||
| + | '''BOM P/N''': Input the BOM P/N. The P/N at the BOM. | ||
| + | |||
| + | '''Revision''': Select the revision of the BOM, when users input the BOM P/N, the revision will display automatically. | ||
| + | |||
| + | '''Variant''': The range of the variant is defined at the '''system setting'''. | ||
| + | |||
| + | '''Levels''': Input the levels of the BOM P/N. | ||
| + | |||
| + | | ||
| + | |||
| + | '''Figure 39: Preview BOM Export''' | ||
| + | |||
| + | [[File:Figure 39- Preview BOM Export.png|border|BOM export preview.png]] | ||
| + | |||
| + | Click '''Preview/Save''', users can preview the exported BOM, see Figure below. | ||
| + | |||
| + | | ||
| + | |||
| + | '''Figure 40: BOM Export Preview File''' | ||
| + | |||
| + | [[File:Bom export preview file.png|border|RTENOTITLE]] | ||
| + | |||
| + | Click '''Send''' to export the BOM file to the target( IP: port/folder). | ||
| + | |||
| + | | ||
| + | |||
| + | | ||
| + | |||
| + | = <span class="mw-headline" id="BOM_Export_Configuration"><span class="mw-headline" id="BOM_Export_Configuration"><span class="mw-headline" id="BOM_Export_Configuration"><span class="mw-headline" id="BOM_Export_Configuration"><span class="mw-headline" id="BOM_Export_Configuration"><span class="mw-headline" id="BOM_Export_Configuration"><span class="mw-headline" id="BOM_Export_Configuration"><span class="mw-headline" id="BOM_Export_Configuration"><span class="mw-headline" id="BOM_Export_Configuration"><span class="mw-headline" id="BOM_Export_Configuration"><span class="mw-headline" id="BOM_Export_Configuration"><span class="mw-headline" id="BOM_Export_Configuration"><span class="mw-headline" id="BOM_Export_Configuration"><span class="mw-headline" id="BOM_Export_Configuration"><span class="mw-headline" id="BOM_Export_Configuration"><span class="mw-headline" id="BOM_Export_Configuration"><span class="mw-headline" id="BOM_Export_Configuration"><span class="mw-headline" id="BOM_Export_Configuration"><span class="mw-headline" id="BOM_Export_Configuration"><span class="mw-headline" id="BOM_Export_Configuration"><span class="mw-headline" id="BOM_Export_Configuration"><span class="mw-headline" id="BOM_Export_Configuration"><span class="mw-headline" id="BOM_Export_Configuration">BOM Export Configuration</span></span></span></span></span></span></span></span></span></span></span></span></span></span></span></span></span></span></span></span></span></span></span> = | ||
| + | |||
| + | Users can set the configurations for BOM exporting at the '''BOM Export Configuration''' function. | ||
| + | |||
| + | | ||
| + | |||
| + | '''Figure 41: BOM Export Configuration Main page''' | ||
| + | |||
| + | [[File:Bom Export config main page.png|border|900px|Bom Export config main page.png]] | ||
| + | |||
| + | == <span class="mw-headline" id="Create_Target"><span class="mw-headline" id="Create_Target"><span class="mw-headline" id="Create_Target">Create Target </span></span></span> == | ||
| + | |||
| + | Click '''Create''', input the data at the text fields accordingly, then click '''Save''' to create a new target list. | ||
| + | |||
| + | *'''Default Filter P/N: '''The Default Part Number that will be filtered. | ||
| + | *'''Default Level:'''The level of the Part number that will be exported. | ||
| + | *'''Target Name: '''The name of the list, it should be the only name. | ||
| + | *'''IP:'''The IP address of the target server. | ||
| + | *'''Port:'''The Port of the target server. | ||
| + | *''' Folder:'''The folder name of the target server. | ||
| + | *''' Login Name:'''The user/login name to log in to the target server. | ||
| + | *'''Password:'''The password to log in to the target server. | ||
| + | |||
| + | | ||
| + | |||
| + | == <span class="mw-headline" id="Copy_Target"><span class="mw-headline" id="Copy_Target"><span class="mw-headline" id="Copy_Target"><span class="mw-headline" id="Copy_Target"><span class="mw-headline" id="Copy_Target"><span class="mw-headline" id="Copy_Target"><span class="mw-headline" id="Copy_Target"><span class="mw-headline" id="Copy_Target"><span class="mw-headline" id="Copy_Target"><span class="mw-headline" id="Copy_Target"><span class="mw-headline" id="Copy_Target"><span class="mw-headline" id="Copy_Target"><span class="mw-headline" id="Copy_Target"><span class="mw-headline" id="Copy_Target"><span class="mw-headline" id="Copy_Target"><span class="mw-headline" id="Copy_Target"><span class="mw-headline" id="Copy_Target"><span class="mw-headline" id="Copy_Target"><span class="mw-headline" id="Copy_Target"><span class="mw-headline" id="Copy_Target"><span class="mw-headline" id="Copy_Target"><span class="mw-headline" id="Copy_Target"><span class="mw-headline" id="Copy_Target">Copy Target </span></span></span></span></span></span></span></span></span></span></span></span></span></span></span></span></span></span></span></span></span></span></span> == | ||
| + | |||
| + | Users can create a new target fast with the '''copy''' target function. | ||
| + | |||
| + | Select one existing target, then click '''Copy''', one copied target will appear on the list. Change some fields accordingly, click '''Save'''. One new target was created successfully. | ||
| + | |||
| + | | ||
| + | |||
| + | == <span class="mw-headline" id="Delete_Target"><span class="mw-headline" id="Delete_Target"><span class="mw-headline" id="Delete_Target"><span class="mw-headline" id="Delete_Target"><span class="mw-headline" id="Delete_Target"><span class="mw-headline" id="Delete_Target"><span class="mw-headline" id="Delete_Target"><span class="mw-headline" id="Delete_Target"><span class="mw-headline" id="Delete_Target"><span class="mw-headline" id="Delete_Target"><span class="mw-headline" id="Delete_Target"><span class="mw-headline" id="Delete_Target"><span class="mw-headline" id="Delete_Target"><span class="mw-headline" id="Delete_Target"><span class="mw-headline" id="Delete_Target"><span class="mw-headline" id="Delete_Target"><span class="mw-headline" id="Delete_Target"><span class="mw-headline" id="Delete_Target"><span class="mw-headline" id="Delete_Target"><span class="mw-headline" id="Delete_Target"><span class="mw-headline" id="Delete_Target"><span class="mw-headline" id="Delete_Target"><span class="mw-headline" id="Delete_Target">Delete Target </span></span></span></span></span></span></span></span></span></span></span></span></span></span></span></span></span></span></span></span></span></span></span> == | ||
| + | |||
| + | Users can delete a target list. | ||
| + | |||
| + | Select one target from the list, click '''Delete''', select '''Yes''' at the pop-up message box to delete the target. | ||
| + | |||
| + | | ||
| + | |||
| + | '''Figure 42: Delete Target List''' | ||
| + | |||
| + | [[File:Figure 42- Delete Target List.png|RTENOTITLE]] | ||
| + | |||
| + | | ||
| + | |||
| + | | ||
| + | |||
| + | = <span class="mw-headline" id="Add_Work_Order"><span class="mw-headline" id="Add_Work_Order"><span class="mw-headline" id="Add_Work_Order">Add Work Order</span></span></span> = | ||
| + | |||
| + | The Add Work Order module allows users to add work orders manually. | ||
| + | |||
| + | Navigate to: '''Traceability''' '''Administration''' > '''Add Work Order'''. | ||
| + | |||
| + | '''Figure 43: Add Work Order''' | ||
| + | |||
| + | [[File:Figure 43- Add Work Order.png|border|800px|Figure 43- Add Work Order.png]] | ||
| + | |||
| + | #Enter the '''Work order ''', '''Part Number''', '''Quantity''', '''Due Date'''. | ||
| + | #Select '''Send''' to save the work order. | ||
| + | |||
| + | = <span class="mw-headline" id="Indirect_Material_Control"><span class="mw-headline" id="Indirect_Material_Control"><span class="mw-headline" id="Indirect_Material_Control"><span class="mw-headline" id="Indirect_Material_Control"><span class="mw-headline" id="Indirect_Material_Control"><span class="mw-headline" id="Indirect_Material_Control"><span class="mw-headline" id="Indirect_Material_Control"><span class="mw-headline" id="Indirect_Material_Control"><span class="mw-headline" id="Indirect_Material_Control"><span class="mw-headline" id="Indirect_Material_Control"><span class="mw-headline" id="Indirect_Material_Control"><span class="mw-headline" id="Indirect_Material_Control"><span class="mw-headline" id="Indirect_Material_Control"><span class="mw-headline" id="Indirect_Material_Control"><span class="mw-headline" id="Indirect_Material_Control"><span class="mw-headline" id="Indirect_Material_Control"><span class="mw-headline" id="Indirect_Material_Control"><span class="mw-headline" id="Indirect_Material_Control"><span class="mw-headline" id="Indirect_Material_Control"><span class="mw-headline" id="Indirect_Material_Control"><span class="mw-headline" id="Indirect_Material_Control"><span class="mw-headline" id="Indirect_Material_Control"><span class="mw-headline" id="Indirect_Material_Control"><span class="mw-headline" id="Indirect_Material_Control">Indirect Material Control</span></span></span></span></span></span></span></span></span></span></span></span></span></span></span></span></span></span></span></span></span></span></span></span> = | ||
| + | |||
| + | == <span class="mw-headline" id="Background"><span class="mw-headline" id="Background"><span class="mw-headline" id="Background"><span class="mw-headline" id="Background"><span class="mw-headline" id="Background"><span class="mw-headline" id="Background"><span class="mw-headline" id="Background"><span class="mw-headline" id="Background"><span class="mw-headline" id="Background"><span class="mw-headline" id="Background"><span class="mw-headline" id="Background"><span class="mw-headline" id="Background"><span class="mw-headline" id="Background"><span class="mw-headline" id="Background"><span class="mw-headline" id="Background"><span class="mw-headline" id="Background"><span class="mw-headline" id="Background"><span class="mw-headline" id="Background"><span class="mw-headline" id="Background"><span class="mw-headline" id="Background"><span class="mw-headline" id="Background"><span class="mw-headline" id="Background"><span class="mw-headline" id="Background">Background</span></span></span></span></span></span></span></span></span></span></span></span></span></span></span></span></span></span></span></span></span></span></span> == | ||
| + | |||
| + | | ||
| + | |||
| + | In certain plants, indirect material is not managed in Oracle BOM. In order to track indirect material, engineers must add those indirect materials into the BOM through Deviation Note in the Traceability. This procedure is repeated after publishing each new version of BOM ECN. The plants believe this process is not convenient and too time-consuming. | ||
| + | |||
| + | | ||
| + | |||
| + | == <span class="mw-headline" id="Design_Proposal"><span class="mw-headline" id="Design_Proposal"><span class="mw-headline" id="Design_Proposal"><span class="mw-headline" id="Design_Proposal"><span class="mw-headline" id="Design_Proposal"><span class="mw-headline" id="Design_Proposal"><span class="mw-headline" id="Design_Proposal"><span class="mw-headline" id="Design_Proposal"><span class="mw-headline" id="Design_Proposal"><span class="mw-headline" id="Design_Proposal"><span class="mw-headline" id="Design_Proposal"><span class="mw-headline" id="Design_Proposal"><span class="mw-headline" id="Design_Proposal"><span class="mw-headline" id="Design_Proposal"><span class="mw-headline" id="Design_Proposal"><span class="mw-headline" id="Design_Proposal"><span class="mw-headline" id="Design_Proposal"><span class="mw-headline" id="Design_Proposal"><span class="mw-headline" id="Design_Proposal"><span class="mw-headline" id="Design_Proposal"><span class="mw-headline" id="Design_Proposal"><span class="mw-headline" id="Design_Proposal"><span class="mw-headline" id="Design_Proposal">Design Proposal</span></span></span></span></span></span></span></span></span></span></span></span></span></span></span></span></span></span></span></span></span></span></span> == | ||
| + | |||
| + | | ||
| + | |||
| + | Indirect material config modules allow users to add/delete the indirect material information with an effective date and expiration date. The system will check if the indirect material is active or not, then add or remove the indirect material information into/from the BOM automatically, eliminating the need to create one BOM ECN. After the indirect materials are added into Traceability BOM, they can be tracked by the Traceability system as direct materials. | ||
| + | |||
| + | | ||
| + | |||
| + | '''Figure 35: Solution for Indirect material''' | ||
| + | |||
| + | [[File:Solution for Indirect material.png|border|800px|Solution for Indirect material.png]] | ||
| + | |||
| + | | ||
| + | |||
| + | | ||
| + | |||
| + | | ||
| + | |||
| + | == <span class="mw-headline" id="_Indirect_Material_Control"><span class="mw-headline" id="_Indirect_Material_Control"><span class="mw-headline" id="_Indirect_Material_Control"><span class="mw-headline" id="_Indirect_Material_Control"><span class="mw-headline" id="_Indirect_Material_Control"><span class="mw-headline" id="_Indirect_Material_Control"><span class="mw-headline" id="_Indirect_Material_Control"><span class="mw-headline" id="_Indirect_Material_Control"><span class="mw-headline" id="_Indirect_Material_Control"><span class="mw-headline" id="_Indirect_Material_Control"><span class="mw-headline" id="_Indirect_Material_Control"><span class="mw-headline" id="_Indirect_Material_Control"><span class="mw-headline" id="_Indirect_Material_Control"><span class="mw-headline" id="_Indirect_Material_Control"><span class="mw-headline" id="_Indirect_Material_Control"><span class="mw-headline" id="_Indirect_Material_Control"><span class="mw-headline" id="_Indirect_Material_Control"><span class="mw-headline" id="_Indirect_Material_Control"><span class="mw-headline" id="_Indirect_Material_Control"><span class="mw-headline" id="_Indirect_Material_Control"><span class="mw-headline" id="_Indirect_Material_Control"><span class="mw-headline" id="_Indirect_Material_Control"><span class="mw-headline" id="_Indirect_Material_Control"><span class="mw-headline" id="_Indirect_Material_Control"><span class="mw-headline" id="_Indirect_Material_Control"><span class="mw-headline" id="_Indirect_Material_Control"> Indirect Material Control</span></span></span></span></span></span></span></span></span></span></span></span></span></span></span></span></span></span></span></span></span></span></span></span></span></span> == | ||
| + | |||
| + | | ||
| + | |||
| + | #Go to: Traceability Administration > Indirect Material Configuration. | ||
| + | |||
| + | | ||
| + | |||
| + | '''Figure 45: Indirect Material Config list main page''' | ||
| + | |||
| + | [[File:Figure 45- Indirect Material Config list main page.png|border|800px|36 Indirect Material Config list main page.png]] | ||
| + | |||
| + | | ||
| + | |||
| + | In Indirect Material Config portlet , users may create a new indirect material config and delete an existing indirect material config. | ||
| + | |||
| + | | ||
| + | <ol start="2"> | ||
| + | <li>Select '''Create''' to open the Create Indirect Material Config page.</li> | ||
| + | </ol> | ||
| + | |||
| + | | ||
| + | |||
| + | '''Figure 46: Create Indirect Material Config.''' | ||
| + | |||
| + | [[File:Create Indirect Material Config.png|border|800px|Create Indirect Material Config.png]] | ||
| + | |||
| + | | ||
| + | |||
| + | *'''Model P/N''': Production Part Number. The Model P/N cannot be blank and must be preconfigured in the Traceability System. | ||
| + | *'''Designator''': Define the Designator/station where the indirect material will be loaded. | ||
| + | *'''Material P/N''': The material Part Number for the indirect material. | ||
| + | *'''Quantity''': The quantity of the received indirect material, the default value is 1. | ||
| + | *'''Effective Date''': The effective date that to Syn this indirect material to Traceability BOM, Default is the current date. | ||
| + | *'''Expire Date''': The expiration date of the indirect material. If the expiration date is earlier than the Date that PrintQ to Syn Bom into Traceability process, the indirect material cannot be added to the BOM. | ||
| + | |||
| + | #'''Reset''': To clear the fields to blank. | ||
| + | #'''Save''': Fill in all the requested values, Click the Save button to submit the indirect material information to the Traceability system. The Create Indirect Material Config page will close. | ||
| + | #'''Save & More''': Fill in all the requested values, Click the Save button to submit the first set of indirect material information to the Traceability system. The page remains open and all fields in the page will be cleared to blank. Users may now add another indirect material config. | ||
| + | |||
| + | '''<span style="text-decoration:underline;">Note</span>''': The related field verification when submitting is similar to the previous functional interface. The default for Quantity is 1, for Effective Date the current system date, while the Expire Date may be left empty, i.e. processing is not controlled by Expire Date. | ||
| + | |||
| + | The Indirect material config can’t be duplicated. | ||
| + | |||
| + | | ||
| + | |||
| + | '''Figure 47 : Indirect Material Config can’t be duplicated''' | ||
| + | |||
| + | '''[[File:38 Indirect Material Config can’t be duplicated.png|border|700px|38 Indirect Material Config can’t be duplicated.png]]''' | ||
| + | |||
| + | Following is the rules to verify if indirect material is active or inactive. | ||
| + | |||
| + | *BOM without related Indirect Material Config, it shouldn't add any Indirect Material P/N to it; | ||
| + | *BOM time < Indirect Material Config Effective time, it shouldn't add the Indirect Material P/N; | ||
| + | *BOM time > Indirect Material Config Expire time, it shouldn't add the Indirect Material P/N; | ||
| + | *BOM time >= Indirect Material Config Effective time & Expire Date is null, it should add the Indirect Material P/N to the Traceability BOM; | ||
| + | *Indirect Material Config Effective time <= BOM time < Expire Date, it should add the Indirect Material P/N to Traceability BOM; | ||
| + | |||
| + | '''<span style="text-decoration:underline;">Note</span>''': BOM time= The time that PrintQ interfaces to Syn the Bom information from ERP to Traceability database. | ||
| + | |||
| + | For example, The following indirect material information is already configured and active. Once approved, the information will be automatically added into BOM by Traceability system . | ||
| + | |||
| + | Users can then track the indirect material normally at the load material process. | ||
| + | |||
| + | | ||
| + | |||
| + | '''Figure 48: Indirect Material Example''' | ||
| + | |||
| + | [[File:Figure 48- Indirect Material Example.png|border|800px|Indirect Material Example1.png]] | ||
| + | |||
| + | | ||
| + | |||
| + | '''Figure 49: Show BOM''' | ||
| + | |||
| + | [[File:Figure 49- Show BOM.png|border|800px|40 Show BOM.png]] | ||
| + | |||
| + | | ||
| + | |||
| + | | ||
| + | |||
| + | | ||
| + | |||
| + | == <span class="mw-headline" id="Delete_Indirect_Material_Config"><span class="mw-headline" id="Delete_Indirect_Material_Config"><span class="mw-headline" id="Delete_Indirect_Material_Config"><span class="mw-headline" id="Delete_Indirect_Material_Config"><span class="mw-headline" id="Delete_Indirect_Material_Config"><span class="mw-headline" id="Delete_Indirect_Material_Config"><span class="mw-headline" id="Delete_Indirect_Material_Config"><span class="mw-headline" id="Delete_Indirect_Material_Config"><span class="mw-headline" id="Delete_Indirect_Material_Config"><span class="mw-headline" id="Delete_Indirect_Material_Config"><span class="mw-headline" id="Delete_Indirect_Material_Config"><span class="mw-headline" id="Delete_Indirect_Material_Config"><span class="mw-headline" id="Delete_Indirect_Material_Config"><span class="mw-headline" id="Delete_Indirect_Material_Config"><span class="mw-headline" id="Delete_Indirect_Material_Config"><span class="mw-headline" id="Delete_Indirect_Material_Config"><span class="mw-headline" id="Delete_Indirect_Material_Config"><span class="mw-headline" id="Delete_Indirect_Material_Config"><span class="mw-headline" id="Delete_Indirect_Material_Config"><span class="mw-headline" id="Delete_Indirect_Material_Config"><span class="mw-headline" id="Delete_Indirect_Material_Config"><span class="mw-headline" id="Delete_Indirect_Material_Config"><span class="mw-headline" id="Delete_Indirect_Material_Config"><span class="mw-headline" id="Delete_Indirect_Material_Config"><span class="mw-headline" id="Delete_Indirect_Material_Config">Delete Indirect Material Config</span></span></span></span></span></span></span></span></span></span></span></span></span></span></span></span></span></span></span></span></span></span></span></span></span> == | ||
| + | |||
| + | #Tick the indirect material config you wish to delete from the list, then select '''Delete'''. | ||
| + | #System displays a confirmation message to confirm the deletion. Click '''Yes''' to delete the indirect material config or '''No''' to cancel the operation. | ||
| + | |||
| + | | ||
| + | |||
| + | '''Figure 50: Delete Material Config''' | ||
| + | |||
| + | [[File:Delete Indirect Material Config.png|800px|Delete Indirect Material Config.png]] | ||
| + | |||
| + | | ||
| + | |||
| + | | ||
| + | |||
| + | | ||
| + | |||
| + | | ||
| + | |||
| + | | ||
| + | |||
| + | = <span class="mw-headline" id="IC_Part_Number_Mapping"><span class="mw-headline" id="IC_Part_Number_Mapping"><span class="mw-headline" id="IC_Part_Number_Mapping"><span class="mw-headline" id="IC_Part_Number_Mapping"><span class="mw-headline" id="IC_Part_Number_Mapping"><span class="mw-headline" id="IC_Part_Number_Mapping"><span class="mw-headline" id="IC_Part_Number_Mapping"><span class="mw-headline" id="IC_Part_Number_Mapping"><span class="mw-headline" id="IC_Part_Number_Mapping"><span class="mw-headline" id="IC_Part_Number_Mapping"><span class="mw-headline" id="IC_Part_Number_Mapping"><span class="mw-headline" id="IC_Part_Number_Mapping"><span class="mw-headline" id="IC_Part_Number_Mapping"><span class="mw-headline" id="IC_Part_Number_Mapping"><span class="mw-headline" id="IC_Part_Number_Mapping"><span class="mw-headline" id="IC_Part_Number_Mapping"><span class="mw-headline" id="IC_Part_Number_Mapping"><span class="mw-headline" id="IC_Part_Number_Mapping"><span class="mw-headline" id="IC_Part_Number_Mapping"><span class="mw-headline" id="IC_Part_Number_Mapping"><span class="mw-headline" id="IC_Part_Number_Mapping"><span class="mw-headline" id="IC_Part_Number_Mapping">IC Part Number Mapping</span></span></span></span></span></span></span></span></span></span></span></span></span></span></span></span></span></span></span></span></span></span> = | ||
| + | |||
| + | At some plants, a certain number of ICs require programming prior to surface mounting. For the same IC, some product models require the programming to be burned before mounting, while others require programming after mounting. The ICs have different Sanmina P/Ns before and after programming (Before programming - P/N:A, with IQC PASSED label; after programming - new P/N: B, without IQC, PASSED label as plant don't print new label after programmed the IC, the operator manually writes the new part number on the existing IQC label). This means that the same IC would exhibit two different statuses during WIP, while the IQC PASSED labels would remain the same. During SMT loading, Traceability cannot recognize whether or not the material has been programmed. In the case that the incorrect material is loaded (e.g. if unprogrammed material is loaded instead of the expected programmed material), it would cause a bulk rework. Therefore, Traceability must be equipped with setup recognition and binding functions (differing P/N pre- and post-programming), enabling Traceability to automatically report an error when a loading error occurs. | ||
| + | |||
| + | IC Part Number Mapping is used to make a connection for the Part Number between the Raw IC Part number(before programming) and the Programmed IC part number. | ||
| + | |||
| + | | ||
| + | |||
| + | #Navigator to '''Administration > Traceability Administration > IC Part Number Mapping'''. | ||
| + | |||
| + | '''Figure 51: IC Part Number Mapping Main Page''' | ||
| + | |||
| + | [[File:Figure 51- IC Part Number Mapping Main Page.png|border|800px|42 IC Part Number Mapping Main Page.png]] | ||
| + | |||
| + | | ||
| + | <ol start="2"> | ||
| + | <li>Select '''Create''' to add a new mapping.</li> | ||
| + | </ol> | ||
| + | |||
| + | '''Figure 52: Create a New IC P/N mapping''' | ||
| + | |||
| + | [[File:Create IC PN Mapping.png|RTENOTITLE]] | ||
| + | |||
| + | *'''Model P/N: '''The Production Part Number. | ||
| + | *'''Raw IC P/N''': The Raw Part number for the IC, it’s always printed by the warehouse which save into the Oracle ERP system. | ||
| + | *'''Programmed IC P/N: '''The Part Number after the programming process for the IC. | ||
| + | *'''Effective Date''': The effective date for the PrintQ to sync this Programmed IC P/N into the Traceability Database. Set the current date by default. | ||
| + | *'''Expire Date''': The expire date for the PrintQ to sync this Programmed IC P/N into the Traceability Database. | ||
| + | *Input the fields, select '''Save''' to add a new mapping. | ||
| + | *Or select '''Save & More '''to save the mapping and clear all fields to add more mappings. | ||
| + | *Select one existing mapping and click '''Delete''' to remove the mapping. | ||
| + | |||
| + | | ||
| + | |||
| + | = <span class="mw-headline" id="Printer_Setup"><span class="mw-headline" id="Printer_Setup"><span class="mw-headline" id="Printer_Setup"><span class="mw-headline" id="Printer_Setup"><span class="mw-headline" id="Printer_Setup"><span class="mw-headline" id="Printer_Setup"><span class="mw-headline" id="Printer_Setup"><span class="mw-headline" id="Printer_Setup"><span class="mw-headline" id="Printer_Setup"><span class="mw-headline" id="Printer_Setup"><span class="mw-headline" id="Printer_Setup"><span class="mw-headline" id="Printer_Setup"><span class="mw-headline" id="Printer_Setup"><span class="mw-headline" id="Printer_Setup"><span class="mw-headline" id="Printer_Setup"><span class="mw-headline" id="Printer_Setup"><span class="mw-headline" id="Printer_Setup"><span class="mw-headline" id="Printer_Setup"><span class="mw-headline" id="Printer_Setup"><span class="mw-headline" id="Printer_Setup"><span class="mw-headline" id="Printer_Setup"><span class="mw-headline" id="Printer_Setup"><span class="mw-headline" id="Printer_Setup">Printer Setup</span></span></span></span></span></span></span></span></span></span></span></span></span></span></span></span></span></span></span></span></span></span></span> = | ||
| + | |||
| + | This Module is to manage the Printer, the user can add or delete the Printer. | ||
| + | |||
| + | | ||
| − | + | #Navigator to '''Administration > Traceability Administration > Printer Setup'''. | |
| − | + | '''Finger 53: Printer Setup Main page''' | |
| − | + | [[File:Finger 53- Printer Setup Main page.png|border|800px|Printer Setup Main page.png]] | |
| − | |||
| − | |||
| − | |||
| − | |||
| − | |||
| − | |||
| − | |||
| − | |||
| − | |||
| − | |||
| − | |||
| − | |||
| − | |||
| − | |||
| − | |||
| − | |||
| − | |||
| − | |||
| − | |||
| − | |||
| − | |||
| − | |||
| − | |||
| − | |||
| − | | | ||
| − | < | + | |
| + | <ol start="2"> | ||
| + | <li>Select '''Add''' '''Printer''' to add a new printer.</li> | ||
| + | <li>Select '''Delete Printer''' to delete an existing printer.</li> | ||
| + | </ol> | ||
| − | + | ---- | |
| − | |||
| − | |||
| − | |||
| − | |||
| − | |||
| − | |||
| − | |||
| − | <br> | + | <br/> |
Latest revision as of 01:48, 26 February 2024
42Q Home > Administration > Traceability Administrator
Contents
- 1 Administration
- 2 Traceability Administration
- 3 System Settings
- 3.1 Plant Information
- 3.2 Material and Labeling
- 3.3 MSD Control
- 3.4 Email information
- 3.5 Orientation and Thickness Control
- 3.6 Workstation WIP Control
- 3.7 Deviation Note
- 3.8 RTV Control
- 3.9 IC Marking
- 3.10 Machine Models
- 3.11 Others
- 3.12 Regulation Control
- 3.13 Email Address about Support Team
- 3.14 Fujitral Control
- 3.15 PTS Event
- 4 Error message Maintenance
- 5 Add Deviation Note
- 6 Upload BOM
- 7 Upload AML
- 8 Upload Picture
- 9 Phantom Part
- 10 Accept Prompt Settings
- 11 BOM Export
- 12 BOM Export Configuration
- 13 Add Work Order
- 14 Indirect Material Control
- 15 IC Part Number Mapping
- 16 Printer Setup
Administration
Administrative privileges in 42Q are located in the Administration menu heading.
With the portal, Administrators are able to access privileges from one convenient location.
Privileges include:
- User Maintenance
- Plant Maintenance
- Site Maintenance
- Profile Maintenance
- Generic Attribute Maintenance
Also located in the Administration menu heading are Shop Floor Control Administrator, Document Control, Traceability Administrator, Notification & Escalation, Meas Instance Admin, and Label Engine Admin.
To access any of the Administration Portlets, the user must sign into 42Q and then select the Administration expandable heading located in the menu on the left of the screen.
Traceability Administration
This Work Instruction is a basic navigation-training guide and is not meant to teach the process flow for individual department functionality. Individual 42Q sites may have minor or specific process changes that will be documented at the site level. Work Instruction alteration suggestions must be reviewed and approved by the site Documentation Manager prior to sending an alteration request to 42Q Corporate. This Work Instruction is a basic administration guide to support local Traceability WEB plant only. Please contact a Traceability Regional Technologist for the Traceability database and server administration.
To access the Traceability Administrator page, navigate to Administration>Traceability Administrator.
Figure 1: Traceability Administrator
System Settings
This function is used to configure system parameters. Based on plant requirements, systems can be customized by changing system parameters. When Traceability needs to be set up or upgraded, the administrator should make sure the parameters are configured correctly. Once changes are submitted, they are effective immediately, so the administrator should take caution when changing system settings.
To access the System Settings page, navigate to Administration>Traceability Administrator>System Settings.
Figure 2: System Settings
Plant Information
These options are used to define the information of the plant.
- Plant Code: The code of the plant.
- Plant Name: The name of the plant.
- Admin Email: The email address of the plant administrator.
- PTS Portal URL: sets Traceability login address. This field is optional.
- Plant Location City: The city where the plant is located.
Figure 3: Plant Information
Material and Labeling
These options are used to define the controls or rules of the material and labeling.
Figure 4: Material and Labeling
- Material Runout Percent: shows material in warning color according to remaining board quantity.
- Material Label Prefix: prefix for material barcode generated by the system.
- Material Label Digit: the digit after the label prefix.
- Material Show Recent: To show the material report that was printed inside the ‘Material Labeling’ page.
[Yes]: shows recent printing report at Traceability Web – Material Labeling page.
[No]: does not show the recent printing report on the Traceability Web – Material Labeling page.
- Show Extra MPN Info: at the ‘Material Labeling’ page whether show the information which is already defined in the ‘Manufacture Information’ module. (Such as package/orientation, etc).
[Yes]: needs to show the information on the Material Labeling page.
[No]: does not need to show the information on the Material Labeling page.
- Next Inspection Date: Allow the user to define whether or not to display the Next Inspection Date option on the Material Labeling page.
[Yes]: displays the option on the Material Labeling page.
[No]: does not need to display on the Material Labeling page.
Note: If "Next Inspection Date =Yes", the date that the user set on the Material Labeling page must be greater than "Receiving day + Material Expire Day". Otherwise, the date in which the user set will be useless.
- MFG Length: used to define how many letters of manufacture P/N can be displayed on the material label (e.g., for manufacturing P/N "SIM-012STT87F": if the setting is '3', it will only show 'SIM' SIMthe first three letters of manufacture P/N on the material label).
- Material Expire Day defines when the material will expire.
Note: This parameter only works on 'Material Due Date' and must be set to Yes.
- Material Show Inventory: select to show inventory and locator information on the 'Material Labeling' page.
[Yes]: shows inventory and locator information at the 'Material Labeling' page.
[No]: does not show inventory and locator at the 'Material Labeling' page.
- Material Run Out: to control whether to allow loading material, preparing material, or scanning board while material quantity is zero. (It's a master switch.)
[Yes]: all workstations are not allowed to load material, prepare material, or scan board while material quantity is zero.
[No]: do not control when material quantity is zero.
- Non-RoHS Alternative: if the part number is the same whether to use 'WL' material to replace normal material when normal material is short of.
[Yes]: allows using 'WL' to replace normal material.
[No]: does not allow using 'WL' to replace normal material.
1) This function is only available for normal material.
2) This function is only available for those plants already implementing the RoHS prefix standard.
3) Before activating this function, a plant must make sure all material PN didn't start with WL or LF for normal material.
4) RoHS material could not be replaced with other materials.
- MFG Date: used to control whether to show MFG date on the label.
[Yes]: shows MFG date on the label.
[No]: does not show MFG date on the label.
- Request Material: send the request material information to IRMS.
[Yes]: shows Request Material option at Load Material page.
[No]:(default value) does not show the Request Material option.
- The following two values are used by the plant administrator to pre-define the tolerance range for confirmation material qty in order to prevent inputting the wrong qty. They will influence on Pocket PC and Traceability Web – Confirm High-Value Qty module and Load Material module.
» High-Value Tolerance >(%): remaining qty minus input qty < remaining qty multiplied by (%). The lower limit for the high value remaining qty.
» High-Value Tolerance>(%): input qty minus remaining qty < remaining qty multiplied by (%). The upper limitation for the high value remaining qty.
- Track all Components: whether to track all components.
[Yes]:(default value) tracks all components.
[No]: tracks selected components as user set in the PN Extra Info module.
- Material Label Quantity Control: controls the quantity of printed labels.
This parameter will affect Material Labeling, Print Sub-Label, and Reprint Material Label module.
[Yes]:(default value) the label is not printed over the defined quantity.
[No]: the system does not limit printed quantity.
- Lead-Free Transfer Control: used to define whether can transfer lead-free material to leaded material at Split /Transfer Material module.
[Yes]:(default value) system does not allow transferring.
[No]: lead-free material can transfer to leaded material.
- Show Vendor Code: used to control the display of "Vendor Code" in Traceability material label printing modules:
[Yes]: displays Vendor Code in the material label printing module. [No]:(default value) system does not display Vendor Code in the material label printing module.
- Material Extra Option: used to set the values (drop-down list ) for the field ACCEPT PROPERTY at the page Material labeling. The default value is ""ACCEPT PROPERTY:", "ACCEPTED", "REJECTED", "UAI", "STS"".
- Allow Material Queue: allows material queue when the material is running out or is empty. This parameter will affect SMT and AI workstations when loading material. (For additional information, please review the Load Material page.)
[Yes]:(default value) allows material queue for SMT and AI workstations. The two options Material Queue Max Reels and Material Queue Max will work only when Allow Material Queue is Yes.
[No]: does not allow to Material queue function
- Material Queue Max Reels: Sets the max reels (material lists) that can be joined for the material queue function.
- Material Queue Max Boards: Sets the max boards that can be scanned using the jointed material (material lists) for the material queue function.
- Show Bin Code: Show Bin Code on the materials label or not.
- This parameter will affect whether the material label has a Bin code or not when printing/reprinting/splitting/sub-material.
- [Yes]: Allow material label to show Bin Code.
- [No]: it’s the default value, do not show Bin Code on the Material label.
- Oracle Obsoleted AML Control: This parameter is the switch to control the oracle obsoleted AML or not.
Use Case:
If the AML is obsoleted, the AML status will change release to Obsoleted, and the Part Number of the AML will change, too(For Example prefix with OBS).
The Traceability system will pop up the AML alarm at the production line because the customer's AML status changed from the release to OBS state, which means it is not allowed to buy the customer’s materials anymore, but the inventory customer material in the factory is allowed to use it. In this way, we will modify the AML of the agile system to Prefix OBS, Such as LFNK4210250 original AML: PSMN015-100B.118, now modified to OBS-PSMN015-100B.118, but in fact, it has already been labeled on the material tray in the factory. The information on the label is PSMN015-100B.118, but the information on the system is OBS-PSMN015-100B.118, which causes the actual materials in the system not to match, thus the Traceability system will pop up the AML alarm.
[Yes]: To control the oracle obsoleted AML.The system will general/add a new AML MPN: AML MPN Prefix + original AML MPN. If one of the new AML MPNs and the original AML MPNs matched, the system would not pop up the AML alarm.
[No]: Do not control the oracle obsoleted AML. The system will only check the original AML MPN. If the original AML MPN is not matched, the system would pop up the AML alarm.
- Obsoleted AML MPN Prefix: This parameter defines the prefix of the original AML MPN, obsoleted AML MPN Prefix + Original AML MPN is the obsolete AML MPN.
MSD Control
These options are used to define the controls or rules of the MSD materials.
Figure 5: MSD Control
- Plant Humidity: calculates the MSD material floor life. Can define the humidity default value for the Customize Bake Time module.
- Plant Temperature: calculates the MSD material floor life. Can define the temperature default value for the Customize Bake Time module.
- MSD Expire Stop: select to prepare/load material or scan board for expired MSD material.
[Yes]: will not prepare/load material or scan board when MSD material has expired.
[No]: prepare/load material or scan board normally.
- Bake Time Control selects to load material when the material is in baking.
[Yes]: loads material after baking time ends.
[No]: loads material within baking time.
- Thaw Time: defines solder paste thaw time.
- Max Open Times defines solder paste max open times.
- Solder On Board Time: define solder paste onboard time. (Unit is second.)
- Solder On Board: selects to control solder paste onboard time.
[Yes]: controls solder paste onboard time. [No]: does not control solder paste onboard time.
- High-Value Level: used to customize whether MSD is high-value material (e.g., if inputting "4" in this field, MSD material will be regarded as high-value material when MSD material level is or greater than 4).
Notes:
- 1) High-value material can be defined on the System Setting page or manually set at ezPicklist.
- 2) System - Defines MSD level at the system setting page, the system will automatically recognize that MSD level or higher as high-value material.
- 3) Manual - manually defines high-value material in the Picklist whether the material is MSD or not.
Email information
These options are used to define the controls or rules of the Email information.
Figure 6: Email Information
- Send Email From: sender's email address.
- Email SMTP: email server, every plant has its own email server
- Send Email To: send an e-mail to a primary recipient.
- Send Email CC: send e-mail to a secondary recipient.
Note: These email settings only have an effect on load material errors. Max 200 characters per field.
Orientation and Thickness Control
These options are used to define the controls of orientation and thickness for some materials.
Figure 7: Orientation and Thickness Control
- Loading not permitted when fail: select to control material loading when orientation and thickness are unmatched.
[Yes]: does not allow loading material.
[No]: allows loading material.
- Thickness Upper Error: maximum acceptable limit if the thickness value of the target material is larger than the one in ezPicklist.
- Thickness Lower Error: maximum acceptable limit if the thickness value of the target material is smaller than the one in ezPicklist.
- Ori Pic & Check (Pre/Cur Comp): select to show the orientation picture for the required material when loading material.
[No]:(default value) does not show the orientation pictures.
[Yes]: shows the orientation picture if the picture is already been saved into a specified folder.
- Orientation Check selects to check the component’s orientation with that in ezPicklist.
[Yes]: needs to verify orientation.
[No]: does not need to verify orientation.
- Thickness Check: whether to check the component's thickness with that in ezPicklist.
[Yes]: needs to verify thickness.
[No]: does not need to verify thickness.
- Auto Rotate Picture: allows to rotate pictures with component's Orientation in Manufacture information.
[Yes]: allows auto-rotation of the picture to the orientation defined in Manufacture information.
[No]: does not allow auto-rotation of the picture.
Note: The default orientation of the uploaded picture is 0.
Workstation WIP Control
Figure 8: Workstation WIP Control
- Workstation WIP: select to calculate all loading materials' quantity by scanning board.
[True]: calculates the remaining quantity of loading material.
[False]: does not calculate the remaining quantity of loading material.
Deviation Note
These options are used to define the controls of deviatin notes.
Figure 9: Deviation Note
- Deviation Note Control: select to allow modifying DN in online status.
[True]: does not allow DN modification while the production line has online status.
[False]: allows modifying DN while the production line has online status.
- Multi Delete Designator:
[True]: allow to delete more than one designators at the modify DN while the production line is in online status
[False]: do not allow to delete more than one designators when modifying DN while the production line is in online status.
RTV Control
Figure 10: RTV Control
- RTV Control: select to start RTV control.
[True]: RTV.connects
[False]: no need to control.
- RTV Connect Timeout: timeout for RTV connecting RTV service.
- RTV Connect Port: RTV service port.
IC Marking
Figure 11: IC Making
- IC Marking Setup: select to load material when IC Marking is unmatched. This parameter will influence on Pocket PC and Traceability Web – Prepare or Load Material module
[Yes]: IC Marking must be right when loading material.
[No]: IC Marking will not be verified when loading material.
Machine Models
Figure 12: Machine Models
- Machine Models: defines the machine types in the SMT Machine module supported by ezPicklist.
- Combine XML and PGO: select to get data from XML and PGO files.
[Yes]: acquires data from XML and PGO files to compose ezPicklist
[No]: does not use this function.
Note: The plant should have XML and PGO file formats.
Others
Figure 13: Others
- Workstation Setup Reset: select to reset "Check P/N in Picklist" value to Yes for all workstations when the production line turns off.
[Yes]: resets the value to yes when the production line turns off.
[No]: does not make any change.
- Jig Control: select the Jig Barcode system verification for the required workstation/product.
[No]: (default option) Jig Barcode will not be verified when the system scans the board.
[Yes]: required workstations will be verified by the Jig Barcode when the system scans the board. This parameter will affect the Scan Board Barcode module.
- Check P/N In Picklist: used to check P/N consistency between Picklist and BOM for all workstations when the system compares Picklist with BOM.
[Yes]:(default value) checks consistency between Picklist P/N and BOM P/N.
[No]: no need to check Picklist P/N and BOM P/N consistency.
- Show Picklist Period: used to define how many picklists are displayed under Production Setup ---
Defines the Picklist page as per time duration (in days). The default value is 30 days, which means the system will only display picklists of the last 30 days. This ensures that the end-users are always presented with the latest picklists and reduces the potential of using outdated picklists.
- Compare Shop Order with WO: Compares the SFDC Shop Order with the Traceability Work Order for the SFDC-Traceability integration scanning.
[Yes]: compares the Shop Order with the WO.
[No]: does not compare the Shop Order with the WO.
- MES Shop Floor: sets the MES Shop Floor that will use the function location mapping for workstation setup.
- FUJI VERIFY CONNECTION STRING: defines the connection string for FUJI Verify application.
- FUJI TRAX CONNECTION STRING: defines the connection string for FUJI TRAX application.
- FUJI PROFILER CONNECTION STRING: defines the connection string for FUJI Profiler application.
- Feeder Full Maintenance Period: defines the period to rework/maintain all feeders.
- Allow Leak Scanning Board: This option allows users whether to leak the scan board or not at the production scanning process.
[Yes]: Allows users to leak the scan board.
[No]: Do not allow users to leak the scan board.
Please see how to Leak scan board for detailed information.
- Loading List Nozzle Template: define the EZpicklist Loading list template file with Nozzle or not.
[Yes]: EZpicklist Loading list template file with Nozzle
[No]: EZpicklist Loading list template file doesn’t with Nozzle
- Lead Free PN Prefix: define the Prefix of the part number, that the EZpicklist application will auto check the materials be Lead-Free.
For example, if users change its value to ‘LF, PF’ then those part numbers starting with 'LF' or ‘PF’ will be identified as ‘Lead-Free’ at the EZplicklist function automatically, so users don’t need to check, and add manually.
- WO BOM PPN: The default value will be empty, meaning the MES-Interface will sync all the MESR WO BOM to the PTS database. If users add a specific product PN at the WO BOM PPN field, then the MES-Interface will only sync those predefined WO BOM PRODUCT PN data to the PTS. Users will be able to set more than one product PN at the WO BOM PPN field.
- WO BOM PPN Prefix: Users have to configure the Product PN Prefix for the specific customer, and sync those customers' WO BOM from Oracle to the PTS database.
Note: If the users do not enter any data in the WO BOM PPN or WO BOM PPN Prefix, the system will sync all the MESR WO BOM data to the PTS database.
Note: WO BOM PPN: Work Order Bill of Materials Product Part Number.
- Max BOM Export Variant: This option defines the max BOM variant for the BOM Export function. It allows numbers.
- Generate Phantom WO: Define to generate the phantom work order by MES-Interface or not. Once the phantom Work Order is generated , the PTS system will show the phantom WO when setting the production line on-line. The default value is NO.
[Yes]: Allows generating the Phantom WO.
[No]: Do not allow generating the Phantom WO.
Regulation Control
Figure 14: Regulation Control
- Material Barcode Regulation: defines a regular expression for load material.
Note: regulation must be right when the user loads material if the user defines the material regulation.
- Prefix Regulation: Define the prefix regulation of the material barcode.
Email Address about Support Team
Figure 15: Email Address about Support Team
This is to configure the email addresses of the support team so they are well informed of Traceability exceptions to perform immediate recovery.
- Field IT Email: input the email address of the person in the field IT team who is responsible for Traceability.
- Regional IT Email: input the email address of the person in the regional IT team who is responsible for Traceability.
- Corporate IT Email: input the email address of the person in the corporate IT team who is responsible for Traceability.
Fujitral Control
Figure 16: Fujitrax Control
- MSD to Fuji Verifier: To define whether to verify the MSD material or not at the Fuji site.
- MSD Level Update Rule: This option defines the rule on how to set the MSD level of the materials when syn Traceability material information into Fuji Database. Users can input 1,2 or 3 for this field, default by 1.
“MSD Level Update Rule”, with options 1,2,3
- High overwrite Low
- Low overwrite High
- Only Update NA MSD Level
Option 1:
If the Traceability real MSD level is higher than the Fuji PN MSD level, then overwrite the Fuji PN MSL value.
If the Traceability real MSD level is lower than the Fuji PN MSD level, then do not overwrite the Fuji PN MSL value.
Option 2:
If the Traceability reel MSD level is higher than the Fuji PN MSD Level, then do not overwrite the Fuji PN MSL value.
If the Traceability reel MSD Level is lower than the Fuji PN MSD Level, then overwrite the Fuji PN MSL value.
Option 3:
If the Fuji PN MSL value is none, then insert the Traceability reel MSL value into the Fuji PN MSL field.
If the Fuji PN MSL value is none, then do not overwrite the Fuji PN MSL value.
Note: When the option is changed, only affect the sync data next time. The data in processing will use the previous option. If the option is wrong, but some data has already been updated, we can't revert the database. If the plant doesn't want to use option 1 as default, needs to add a record in the Traceability database first and change the option before deploying the new version.
- 42Q-Fuji Material Remaining QTY Sync: To define whether to sync the material remaining QTY to the PTS system for the different SMT machines, such as Siemens, Panasonic etc. The default option is set as No. The users could change the option to Yes. If it is set to YES, the system will sync the Fuji material unloading the remaining qty into the PTS system, if it is set to No, then it won’t need to sync the Fuji material unloading the remaining qty into the PTS system.
PTS Event
The options in the PTS Event page are used to define the third-interface server address and the plant address between which to transfer the material information, such as the material run-out or the material expired, then the third-interface will do the process accordingly.
Figure 17: PTS Event
- PTS Event Interface URL:The third-interface server URL.
- PTS Event Interface Topic:The topic or directory for the third-interface.
- PTS Event Plant Server Host: The plant server host for that used the PTS Event.
- PTS Event Plant Server Port: The plant server port for that used the PTS Event.
- Max Revalidation Pending Time:The max minutes for revalidation the pending function. A warning information will occur after the time.
- Min Splicing Pending QTY: The min quantity for splicing.
Error message Maintenance
Error Message Maintenance is a module under the Traceability web where users can customize the error content for different platforms, display color, and define whether or not an alert email should be triggered when such an error occurs.
1. To access the Error Message Maintenance page, navigate to Administration>Traceability Administrator>Error Message Maintenance.
Figure 18: Error Message Maintenance
A list of all Traceability error messages will display. The user can scroll down to view or input keywords in the Error Content textbox to search for error messages. Select one error message and click on theError Description column.
The following screen will display:
Figure 19: Update Error Message Detail
- Error Code: The code of the selected error. Display only.
- Error Description: The default error Description of the selected error. Display only.
- Web Message: The error description is to be displayed on the Traceability Web when the selected error occurs as per whatever user input in this textbox.
- PPC Message: The error description is to be displayed in PPC when the selected error occurs as per whatever user input in this textbox.
- NetDC Message: The error description is to be displayed on NetDC when the selected error occurs as per whatever user input in this textbox.
- Display Color: Allow the user to define the font color of the error message displayed when the error occurs. Select from the drop-down list. The default is red.
- Send Alert Mail: Defines whether or not for the system to send alert emails when the selected error occurs. Select Yes or No.
- Stop Machine: Defines whether or not for the machine to stop when the selected error occurs. Select Yes or No.
- Send: Saves the configuration.
- Cancel: Goes back to the previous window without saving the configuration.
Note: The error message can be customized to both English and Chinese.
Add Deviation Note
This module is designed to change/update BOM material in case an alternative part is needed. To distinguish the original BOM from the updated one, thus a deviation note is added.
To access the Add Deviation Note page, navigate to Administration > Traceability Administrator > Add Deviation Note.
Figure 20: Add Deviation Note
- Under Add Deviation Note: Enter a reference number to identify such deviation. Example: (Modify/Temporally) Customer Change Notification (CCN) number or Engineering Change Notification (ECN). Please discuss with your Plant Quality Manager to confirm what deviation note format to be used if required.
- Under BOM P/N: Enter the BOM Part Number, which requires updating the material part number and/or reference designator.
- Under BOM ECN: Enter the existing BOM ECN in Traceability for this deviation change. When entering BOM P/N, the BOM ECN will show automatically. If there is no BOM ECN, an alert message will display
- Under Due Date: Select the expiry date of this deviation BOM ECN
- Select Create after finishing all the above steps.
Search Deviation Note
Figure 21: Search Deviation Note
- Select Search By: BOM P/N or Deviation Note, input the P/N, then click Search. The result is displayed.
- At the report list, if the BOM ECN is online, only it displays. Otherwise, the font will be blue and it cannot be edited.
- Click on the Bom Part Number (not online, in blue font) which is required to change the alternative 42Q Part Number material part number and/or associated reference designator. Open the sub-page.
Figure 22: Show BOM Item
Add P/N
Figure 23: Add BOM Item
- Select Add P/N button to open the Add BOM Item page.
- Input the Usage, Level, Sequence, Part Number, and Designator; then select Add.
Substitute P/N
- Select the left checkbox at the show BOM item page, and then select Substitute P/N.
- Select Substitute P/N to open the Substitute Part Number page.
- Input the Part Number, and New Usage, and select Substitute.
Figure 24: Substitute P/N
Delete Designator
1. Select the left checkbox at the show BOM item page, and then select Del Designator.
2. Select Del Designator to open the Delete BOM Item page.
3. Select the checkbox, then click the button Del Designator to delete a designator.
Figure 25: Delete Designator
Remove Deviation Note
Figure 26: Remove Deviation Note
1. Select the desired Deviation Note (Not online, in blue font) to be deleted. Open the sub-page.
2. Confirm the deletion by selecting Delete.
Upload BOM
This function is used to upload BOM into the system. The user can download the template file and edit the BOM file with the template file. Before uploading the BOM, the system reads the BOM information from the BOM file(.csv) and shows the detailed BOM items on the list. After the check, the items will be uploaded along with the BOM into the system.
To access the Upload Bom, navigate to Administration > Traceability Administrator > Upload BOM.
Figure 27: Upload BOM
Click the Download button, and save the BOM template file locally.
Users are able to Edit the template file with the production BOM data.
- Click the … ICON to select and open the Bom file, the file name will show in the text field.
- Click the Import button to show the detailed BOM items on the list.
- Click the Upload button to save the BOM to the system.
- The BOM was uploaded successfully.
- Or the error message will show if the PN does not exist in the database.
Figure 28: BOM Upload
Users can check the uploaded BOM from the Show BOM module.
Figure 29: Show BOM
Note: Only the .csv file format is supported. Cannot upload the BOM when it is in use.
Upload AML
The upload AML module allows users to upload the AML information from the CSV file, and also provides the template download function to let users download the CSV file template.
Navigate to Administrator > Traceability Administrator > Upload AML.
Figure 30: Upload AML main page
Download the AML template file
- Select Download at the top menu, to open the AML Template.csv file.
Figure 31: Download the AML template CSV file
The detailed description of the columns for the AML template file is as follows:
- Part Number: This is the Part Number of material to identify the material. This column is mandatory.
- Item Description: The description of the Part Number to make clear to the user. This column is mandatory.
- Manufacture Name: This is the name of the Manufacturer. This column is mandatory.
- Manufacturer PN: The Part Number of the manufacturer. This column is mandatory.
- Receipt Traveler: The receipt traveler number for the received materials provided by the warehouse staff. This column is mandatory.
- Qty: The quantity of received material.
- Expiry Days: The days of how soon the manufacture will expire. If the user leaves this column empty, it will be treated as this manufacturer and will never expire.
- Locator: The address of the material's manufacturer.
- Status: This column is used to verify the status of the manufacturer, the value is Active/Inactive. if the user leaves the status column empty, it will be treated as Active by default.
- Supplier Name: The supplier name of the material. This column is optional.
- Click Download to download the AML template CSV file to the local disk, or click Share to save as a google sheet.
Upload AML
- Select the… button on the man page to open the prepared AML information CSV file.
Figure 32: Select the AML file
- Click the Upload button, and all the AML information will upload into the Traceability portal DB successfully.
Note: If the AML already exists, the system will overwrite the old data with the new AML information in the CSV file.
- Users can check the upload results at the Approved Manufacturer list module(This step is optional).
Upload Picture
Upload Picture is a module that allows the user to upload pictures about the orientation named by the Part Number. The images must be in JPG format.
Following is the sample to show/control the Orientation picture in production:
- User needs to configure the Orientation setting (Orientation And Thickness Control) at the Traceability System Setting.
- Upload the component image via the Upload Picture GUI.
- The system will display the pre-defined component picture at the load material or PPC GUI during the load material process so that the operator will refer to the pre-defined component picture to place the component at the SMT with the proper direction.
Important Note: The picture must be named in this format: XXX.jpg (XXX=Part Number, which matched with the Part Number in the production picklist).
1. To access the Upload Picture page, navigate to Administration>Traceability Administration>Upload Picture.
Figure 33: Upload Image
- Select Upload to open the upload sub-page.
- Click the Select button to open the resource folder to select the picture file, and then click the Upload button.
- Select Delete to delete the picture.
Note:
- The uploaded picture file name cannot contain Chinese.
- The picture file size cannot be over 3M.
Phantom Part
Phantom Part module allows users to Add or Delete the Phantom Part.
Figure 34: Phantom Part
- Select Add to open the add phantom part sub-page.
Figure 34a: Add Phantom Part
- Enter the Top Level WO, Top Level P/N, Phantom P/N, Usage*Qty, Gen Sub Key.
- Select Save to save the phantom part and close the add phantom part sub-page,.or select Save & More to save the phantom part information and with the add phantom part sub-page opened.
- Or select Delete to delete one phantom part from the system.
Accept Prompt Settings
Users can set the Accept Prompt Settings (for example Reject, Accepted) for the material.
This Setting is used at theShop Floor Control > Production Control > Incoming Traceability > Material labeling module for Accept Property drop-down list (see figure below).
Figure 35: Accept Property Drop-down list
- Navigator to Administrator > Traceability Administrator > Accept Prompt Settings.
Figure 36: Accept Prompt Setting Main page
- Select Add
Figure 37: Add a new Accept Property Setting
- Enter the Accept Property Name, Allow Load Component, Status
- Accept Property Name: The name of the accepted property, this name will show at the Accept Property drop-down list for material labeling page.
- Allow Load Component: To define the system allows to load the material or not at the load material module if the material is set this Accept property.
Yes: Allow loading this material.
No: Not allowed to load this material.
For example, some plants set the Accept property name to Rejected, set the Allow Load Component to Yes, print one label: E76-M001 selecting the Accept Property drop-down list to Rejected, material barcode: E76-M001 can be loaded at the load material module.
For some reason, One plant set the Accept property Rejected(Name), Allow Load Component to No, then print another label: E76-M002. material barcode: E76-M002 can not be loaded at the load material module.
- Status: To set the status(Enabled/disabled) of the Accept property setting. If this setting is enabled, it will show at the Accept Property drop-down list, if is disabled, will not show at the Accept Property drop-down list.
- Select Save to create a new Accept Property for the material.
- Or double click on the selected Accept Property name, change the fields, select Save to edit the Accept Property setting.
BOM Export
Users can export a special BOM to target PC and folder with this function BOM Export.
On the main page, users select the Target, BOM P/N, Revision, Variant, and levels; click Sent to export the BOM to the target.
Figure 38: BOM Export Main Page
Target: Select the target where to export the BOM. Target is defined at the BOM Export Configuration function.
BOM P/N: Input the BOM P/N. The P/N at the BOM.
Revision: Select the revision of the BOM, when users input the BOM P/N, the revision will display automatically.
Variant: The range of the variant is defined at the system setting.
Levels: Input the levels of the BOM P/N.
Figure 39: Preview BOM Export
Click Preview/Save, users can preview the exported BOM, see Figure below.
Figure 40: BOM Export Preview File
Click Send to export the BOM file to the target( IP: port/folder).
BOM Export Configuration
Users can set the configurations for BOM exporting at the BOM Export Configuration function.
Figure 41: BOM Export Configuration Main page
Create Target
Click Create, input the data at the text fields accordingly, then click Save to create a new target list.
- Default Filter P/N: The Default Part Number that will be filtered.
- Default Level:The level of the Part number that will be exported.
- Target Name: The name of the list, it should be the only name.
- IP:The IP address of the target server.
- Port:The Port of the target server.
- Folder:The folder name of the target server.
- Login Name:The user/login name to log in to the target server.
- Password:The password to log in to the target server.
Copy Target
Users can create a new target fast with the copy target function.
Select one existing target, then click Copy, one copied target will appear on the list. Change some fields accordingly, click Save. One new target was created successfully.
Delete Target
Users can delete a target list.
Select one target from the list, click Delete, select Yes at the pop-up message box to delete the target.
Figure 42: Delete Target List
Add Work Order
The Add Work Order module allows users to add work orders manually.
Navigate to: Traceability Administration > Add Work Order.
Figure 43: Add Work Order
- Enter the Work order , Part Number, Quantity, Due Date.
- Select Send to save the work order.
Indirect Material Control
Background
In certain plants, indirect material is not managed in Oracle BOM. In order to track indirect material, engineers must add those indirect materials into the BOM through Deviation Note in the Traceability. This procedure is repeated after publishing each new version of BOM ECN. The plants believe this process is not convenient and too time-consuming.
Design Proposal
Indirect material config modules allow users to add/delete the indirect material information with an effective date and expiration date. The system will check if the indirect material is active or not, then add or remove the indirect material information into/from the BOM automatically, eliminating the need to create one BOM ECN. After the indirect materials are added into Traceability BOM, they can be tracked by the Traceability system as direct materials.
Figure 35: Solution for Indirect material
Indirect Material Control
- Go to: Traceability Administration > Indirect Material Configuration.
Figure 45: Indirect Material Config list main page
In Indirect Material Config portlet , users may create a new indirect material config and delete an existing indirect material config.
- Select Create to open the Create Indirect Material Config page.
Figure 46: Create Indirect Material Config.
- Model P/N: Production Part Number. The Model P/N cannot be blank and must be preconfigured in the Traceability System.
- Designator: Define the Designator/station where the indirect material will be loaded.
- Material P/N: The material Part Number for the indirect material.
- Quantity: The quantity of the received indirect material, the default value is 1.
- Effective Date: The effective date that to Syn this indirect material to Traceability BOM, Default is the current date.
- Expire Date: The expiration date of the indirect material. If the expiration date is earlier than the Date that PrintQ to Syn Bom into Traceability process, the indirect material cannot be added to the BOM.
- Reset: To clear the fields to blank.
- Save: Fill in all the requested values, Click the Save button to submit the indirect material information to the Traceability system. The Create Indirect Material Config page will close.
- Save & More: Fill in all the requested values, Click the Save button to submit the first set of indirect material information to the Traceability system. The page remains open and all fields in the page will be cleared to blank. Users may now add another indirect material config.
Note: The related field verification when submitting is similar to the previous functional interface. The default for Quantity is 1, for Effective Date the current system date, while the Expire Date may be left empty, i.e. processing is not controlled by Expire Date.
The Indirect material config can’t be duplicated.
Figure 47 : Indirect Material Config can’t be duplicated
Following is the rules to verify if indirect material is active or inactive.
- BOM without related Indirect Material Config, it shouldn't add any Indirect Material P/N to it;
- BOM time < Indirect Material Config Effective time, it shouldn't add the Indirect Material P/N;
- BOM time > Indirect Material Config Expire time, it shouldn't add the Indirect Material P/N;
- BOM time >= Indirect Material Config Effective time & Expire Date is null, it should add the Indirect Material P/N to the Traceability BOM;
- Indirect Material Config Effective time <= BOM time < Expire Date, it should add the Indirect Material P/N to Traceability BOM;
Note: BOM time= The time that PrintQ interfaces to Syn the Bom information from ERP to Traceability database.
For example, The following indirect material information is already configured and active. Once approved, the information will be automatically added into BOM by Traceability system .
Users can then track the indirect material normally at the load material process.
Figure 48: Indirect Material Example
Figure 49: Show BOM
Delete Indirect Material Config
- Tick the indirect material config you wish to delete from the list, then select Delete.
- System displays a confirmation message to confirm the deletion. Click Yes to delete the indirect material config or No to cancel the operation.
Figure 50: Delete Material Config
IC Part Number Mapping
At some plants, a certain number of ICs require programming prior to surface mounting. For the same IC, some product models require the programming to be burned before mounting, while others require programming after mounting. The ICs have different Sanmina P/Ns before and after programming (Before programming - P/N:A, with IQC PASSED label; after programming - new P/N: B, without IQC, PASSED label as plant don't print new label after programmed the IC, the operator manually writes the new part number on the existing IQC label). This means that the same IC would exhibit two different statuses during WIP, while the IQC PASSED labels would remain the same. During SMT loading, Traceability cannot recognize whether or not the material has been programmed. In the case that the incorrect material is loaded (e.g. if unprogrammed material is loaded instead of the expected programmed material), it would cause a bulk rework. Therefore, Traceability must be equipped with setup recognition and binding functions (differing P/N pre- and post-programming), enabling Traceability to automatically report an error when a loading error occurs.
IC Part Number Mapping is used to make a connection for the Part Number between the Raw IC Part number(before programming) and the Programmed IC part number.
- Navigator to Administration > Traceability Administration > IC Part Number Mapping.
Figure 51: IC Part Number Mapping Main Page
- Select Create to add a new mapping.
Figure 52: Create a New IC P/N mapping
- Model P/N: The Production Part Number.
- Raw IC P/N: The Raw Part number for the IC, it’s always printed by the warehouse which save into the Oracle ERP system.
- Programmed IC P/N: The Part Number after the programming process for the IC.
- Effective Date: The effective date for the PrintQ to sync this Programmed IC P/N into the Traceability Database. Set the current date by default.
- Expire Date: The expire date for the PrintQ to sync this Programmed IC P/N into the Traceability Database.
- Input the fields, select Save to add a new mapping.
- Or select Save & More to save the mapping and clear all fields to add more mappings.
- Select one existing mapping and click Delete to remove the mapping.
Printer Setup
This Module is to manage the Printer, the user can add or delete the Printer.
- Navigator to Administration > Traceability Administration > Printer Setup.
Finger 53: Printer Setup Main page
- Select Add Printer to add a new printer.
- Select Delete Printer to delete an existing printer.
