Difference between revisions of "SOP-42Q-MES0005 Data Editor Maintenance"
| (48 intermediate revisions by 6 users not shown) | |||
| Line 1: | Line 1: | ||
| − | |||
| − | |||
| − | < | + | <small>[[42Q_Cloud-Based_MES/MOMS|42Q Home]] > [[Shop_Floor_Control|Shop Floor Control]] > [[Configuration|Configuration]] > Data Editor Maintenance</small><br/> |
| − | |||
| − | <br | ||
| − | |||
| − | |||
| + | | ||
| + | | ||
| + | | ||
| + | <center>'''Shop Floor Control'''</center> <center>'''Configuration'''</center> <center>'''Data Editor'''</center> <center>'''Version MES15.82'''</center> <center>'''Revision F1'''</center> <center> </center> | ||
| + | | ||
| + | <center> </center> | ||
| + | == <span class="mw-headline" id="Shop_Floor_Configuration"><span class="mw-headline" id="Shop_Floor_Configuration"><span class="mw-headline" id="Shop_Floor_Configuration"><span class="mw-headline" id="Shop_Floor_Configuration"><span class="mw-headline" id="Shop_Floor_Configuration"><span class="mw-headline" id="Shop_Floor_Configuration.5Bedit.5D"><span class="mw-headline" id="Shop_Floor_Configuration">Shop Floor Configuration</span></span></span></span></span></span></span> == | ||
| − | + | 42Q’s powerful data collection system collects critical information from a plant’s shop floor, utilizing shop floor data collector, an intuitive tool developed by 42Q’s experienced manufacturing team. The aggregate information is stored in a cloud database, and available to MESWeb, where quality reports are generated. The 42Q system uses manual and automated barcode scanning to collect data for a product line or plant. Thus, 42Q plays an important role in maintaining unit histories and directing product movement on the manufacturing floor. The current version of 42Q includes configuration capabilities, which provide access to all sub-modules pages and their functionalities (view, add, edit, print/generate output files). | |
| − | + | | |
| − | + | | |
| − | + | == <span class="mw-headline" id="Data_Editor_Maintenance"><span class="mw-headline" id="Data_Editor_Maintenance"><span class="mw-headline" id="Data_Editor_Maintenance"><span class="mw-headline" id="Data_Editor_Maintenance"><span class="mw-headline" id="Data_Editor_Maintenance"><span class="mw-headline" id="Data_Editor_Maintenance"><span class="mw-headline" id="Data_Editor_Maintenance"><span class="mw-headline" id="Data_Editor_Maintenance.5Bedit.5D"><span class="mw-headline" id="Data_Editor_Maintenance">Data Editor Maintenance</span></span></span></span></span></span></span></span></span> == | |
| − | + | Data Editor Maintenance provides access to the Shop Floor configuration file that defines (but is not limited to) PCC ports, Options Lines, Auto Commands, Macros, Serial Input Masking, Passwords, and Device Numbers. | |
| − | ''' | + | To access the Data Editor, select '''Shop Floor Control'''>'''Configuration'''>'''Shop Floor Configuration'''>'''Data Editor''' |
| − | + | | |
| − | + | '''Figure 1: Data Editor Maintenance''' | |
| − | |||
| − | '''Figure 1: | ||
| − | |||
| − | |||
| − | |||
| − | |||
| − | + | '''[[File:Data Editor Config.png|900px]]''' | |
| − | |||
| − | + | | |
| − | + | | |
| − | |||
| − | + | '''<u>Note</u>''': A user only has access to the modules assigned to his/her profile. | |
| − | + | | |
| − | + | The '''Setup Data Editor '''screen is displayed. | |
| − | + | | |
| − | + | '''Figure 2: Setup Data Editor Shop Floor ID List''' | |
| − | |||
| − | + | [[File:2 DE Setup DataEditorShopFloorIDList.jpg|900px|2 DE Setup DataEditorShopFloorIDList.jpg]] | |
| − | |||
| − | + | | |
| − | + | The user can edit, clear Data Editor, Publish History, and Print/Export the data. | |
| − | |||
| − | + | | |
| − | + | | |
| − | + | === <span class="mw-headline" id="Filter_Setup_Data_Editor_by_Shop_Floor_ID"><span class="mw-headline" id="Filter_Setup_Data_Editor_by_Shop_Floor_ID"><span class="mw-headline" id="Filter_Setup_Data_Editor_by_Shop_Floor_ID"><span class="mw-headline" id="Filter_Setup_Data_Editor_by_Shop_Floor_ID"><span class="mw-headline" id="Filter_Setup_Data_Editor_by_Shop_Floor_ID"><span class="mw-headline" id="Filter_Setup_Data_Editor_by_Shop_Floor_ID"><span class="mw-headline" id="Filter_Setup_Data_Editor_by_Shop_Floor_ID"><span class="mw-headline" id="Filter_Setup_Data_Editor_by_Shop_Floor_ID"><span class="mw-headline" id="Filter_Setup_Data_Editor_by_Shop_Floor_ID"><span class="mw-headline" id="Filter_Setup_Data_Editor_by_Shop_Floor_ID.5Bedit.5D"><span class="mw-headline" id="Filter_Setup_Data_Editor_by_Shop_Floor_ID">Filter Setup Data Editor by Shop Floor ID</span></span></span></span></span></span></span></span></span></span></span> === | |
| − | + | This module enables the user to filter by Shop Floor ID. | |
| − | ''' | + | 1. Enter the desired Shop Floor ID into the appropriate field, and then select '''Filter'''. The filtered Shop Floor ID is now displayed. |
| − | + | | |
| − | + | '''Figure 3: Shop Floor ID List - Find''' | |
| − | |||
| − | + | [[File:3 DE ShopFloorIDList-Find.jpg|900px|3 DE ShopFloorIDList-Find.jpg]] | |
| − | + | | |
| − | + | === <span class="mw-headline" id="Editing_with_the_Setup_Data_Editor"><span class="mw-headline" id="Editing_with_the_Setup_Data_Editor"><span class="mw-headline" id="Editing_with_the_Setup_Data_Editor"><span class="mw-headline" id="Editing_with_the_Setup_Data_Editor"><span class="mw-headline" id="Editing_with_the_Setup_Data_Editor"><span class="mw-headline" id="Editing_with_the_Setup_Data_Editor"><span class="mw-headline" id="Editing_with_the_Setup_Data_Editor"><span class="mw-headline" id="Editing_with_the_Setup_Data_Editor"><span class="mw-headline" id="Editing_with_the_Setup_Data_Editor"><span class="mw-headline" id="Editing_with_the_Setup_Data_Editor"><span class="mw-headline" id="Editing_with_the_Setup_Data_Editor"><span class="mw-headline" id="Editing_with_the_Setup_Data_Editor"><span class="mw-headline" id="Editing_with_the_Setup_Data_Editor.5Bedit.5D"><span class="mw-headline" id="Editing_with_the_Setup_Data_Editor">Editing with the Setup Data Editor</span></span></span></span></span></span></span></span></span></span></span></span></span></span> === | |
| − | + | This module enables the user to edit using the Setup Data Editor. | |
| − | ''' | + | 1. To edit using Setup Data Editor, select the data editor to be edited and select '''Edit'''. The Setup Data Editor Form for the selected Shop Floor ID is now displayed. |
| − | < | + | <br/> '''Figure 4: Shop Floor ID List – Edit Setup Data Editor''' |
| − | + | [[File:4 DE EditSetupDataEditor.jpg|900px|4 DE EditSetupDataEditor.jpg]] | |
| − | + | <br/> '''Figure 5: Setup Data Editor Form''' | |
| − | |||
| − | + | [[File:Figure 5 Setup Data Editor Form.jpg|900px|Figure 5 Setup Data Editor Form.jpg]] | |
| − | + | <br/> '''<u>Note:</u>''' To add a new tab, create an entry line by entering the section name. For example: # SECTION MULTIPASS | |
| − | + | 2. Enter the desired modifications to the Setup Data Editor Form. | |
| − | + | | |
| − | + | ==== <span class="mw-headline" id="Employee_Validation_Variables"><span class="mw-headline" id="Employee_Validation_Variables"><span class="mw-headline" id="Employee_Validation_Variables">Employee Validation Variables</span></span></span> ==== | |
| − | + | To turn on and off the Employee Validation functionality in the current site, the following variables are available: | |
| − | |||
| − | + | *OPTIONS EMPVAL VALIDATION=YES/NO This allows users to Turn on /off the employee validation in Production Workbench. | |
| + | *OPTIONS EMPVAL_PROD PRODUCT=@.(40)@ This allows users to configure the part number mask to be validated with Employee Validation in Production Workbench. | ||
| + | *OPTIONS EMPLMASK=@@@nn.nnnn This allows the user to configure the part number mask to do the Employee validation when scans. | ||
| + | *CONDUIT_OPTIONS CREATE_USER_ON_SCAN=YES/NO If yes then the user can be created on the fly when scanning a serial number in Production Workbench. | ||
| + | *CONDUIT_OPTIONS LEGACY_PASSWORD_AUTH=YES/NO If yes then it will require the user name and password as an authentication, if not then is only required the user name. | ||
| − | + | | |
| − | ''' | + | '''<u>Note:</u>''' If multiple users have opened the Setup Data Editor for the same SFDC PC line, only the first user to open the file has to write access. Other users are notified that the SDE is locked for editing by another user and that read-only access is allowed. |
| − | + | | |
| − | + | '''Figure 6: SDE Read-Only State''' | |
| − | + | [[File:Figure 6 SDE Read-Only State.jpg|700px|Figure 6 SDE Read-Only State.jpg]] | |
| − | + | | |
| − | + | ==== <span class="mw-headline" id="Copy_Setup_Data_Editor_from_Other_Shop_Floor_ID"><span class="mw-headline" id="Copy_Setup_Data_Editor_from_Other_Shop_Floor_ID"><span class="mw-headline" id="Copy_Setup_Data_Editor_from_Other_Shop_Floor_ID"><span class="mw-headline" id="Copy_Setup_Data_Editor_from_Other_Shop_Floor_ID"><span class="mw-headline" id="Copy_Setup_Data_Editor_from_Other_Shop_Floor_ID"><span class="mw-headline" id="Copy_Setup_Data_Editor_from_Other_Shop_Floor_ID"><span class="mw-headline" id="Copy_Setup_Data_Editor_from_Other_Shop_Floor_ID"><span class="mw-headline" id="Copy_Setup_Data_Editor_from_Other_Shop_Floor_ID"><span class="mw-headline" id="Copy_Setup_Data_Editor_from_Other_Shop_Floor_ID"><span class="mw-headline" id="Copy_Setup_Data_Editor_from_Other_Shop_Floor_ID"><span class="mw-headline" id="Copy_Setup_Data_Editor_from_Other_Shop_Floor_ID"><span class="mw-headline" id="Copy_Setup_Data_Editor_from_Other_Shop_Floor_ID"><span class="mw-headline" id="Copy_Setup_Data_Editor_from_Other_Shop_Floor_ID"><span class="mw-headline" id="Copy_Setup_Data_Editor_from_Other_Shop_Floor_ID.5Bedit.5D"><span class="mw-headline" id="Copy_Setup_Data_Editor_from_Other_Shop_Floor_ID">Copy Setup Data Editor from Other Shop Floor ID</span></span></span></span></span></span></span></span></span></span></span></span></span></span></span> ==== | |
| − | + | This module replaces the contents of the current Setup Data Editor Form with data copied from another Shop Floor ID. | |
| − | + | 1. To copy data from another Shop Floor ID, open the target Shop Floor IDs Setup Data Editor and select '''Copy Data from Other Shop Floor ID''' in the Tasks window. The Choose a Shop Floor ID window is now displayed. | |
| − | + | | |
| − | '''Figure 7: | + | '''Figure 7: Copy Data from Other Shop Floor ID''' |
| − | [[ | + | [[File:7 DE CopyDatafromOtherShopFloorID.jpg|900px|7 DE CopyDatafromOtherShopFloorID.jpg]] |
| − | + | | |
| − | + | | |
| − | + | 2. Select the Shop Floor ID to copy and select '''Save''' to install the Setup Data Editor. The Setup Data Editor is now updated with the data from the selected Shop Floor ID. | |
| + | <br/> '''Figure 8: Install'''<br/> [[File:8 DE Install.jpg|900px|8 DE Install.jpg]] | ||
| − | + | | |
| − | + | 3. Select '''Yes''' to confirm the install, or select '''No''' to cancel. | |
| − | ''' | ||
| − | + | <br/> '''<u>Note:</u>''' The application saves a backup file on the MES server every time the user installs a Setup Data Editor. | |
| − | + | | |
| − | + | ==== <span class="mw-headline" id="Publish_History"><span class="mw-headline" id="Publish_History"><span class="mw-headline" id="Publish_History"><span class="mw-headline" id="Publish_History"><span class="mw-headline" id="Publish_History"><span class="mw-headline" id="Publish_History"><span class="mw-headline" id="Publish_History"><span class="mw-headline" id="Publish_History"><span class="mw-headline" id="Publish_History"><span class="mw-headline" id="Publish_History"><span class="mw-headline" id="Publish_History"><span class="mw-headline" id="Publish_History"><span class="mw-headline" id="Publish_History"><span class="mw-headline" id="Publish_History.5Bedit.5D"><span class="mw-headline" id="Publish_History">Publish History</span></span></span></span></span></span></span></span></span></span></span></span></span></span></span> ==== | |
| − | + | The Publish History functionality is used by permitted users to show and publish the action history of a Route. To use this functionality | |
| − | ''' | + | #Select a route from the list. The Publish History function becomes available for selection. |
| + | #Select '''Publish History'''. The Publish History window pops up for the given route. This history shows the Action, Status, Time/Date, and User for each item. | ||
| + | #Select '''Publish''', to publish the history to the Conduit. Select '''Close''' to end or abort. | ||
| − | + | | |
| − | + | '''Figure 9: Publish History''' | |
| − | + | [[File:9 DE Publish History.jpg|9 DE Publish History.jpg]] | |
| − | + | | |
| − | + | | |
| − | + | ==== <span class="mw-headline" id="Print.2FExport_Current_Setup_Data_Editor"><span class="mw-headline" id="Print.2FExport_Current_Setup_Data_Editor"><span class="mw-headline" id="Print.2FExport_Current_Setup_Data_Editor"><span class="mw-headline" id="Print.2FExport_Current_Setup_Data_Editor"><span class="mw-headline" id="Print.2FExport_Current_Setup_Data_Editor"><span class="mw-headline" id="Print.2FExport_Current_Setup_Data_Editor"><span class="mw-headline" id="Print.2FExport_Current_Setup_Data_Editor"><span class="mw-headline" id="Print.2FExport_Current_Setup_Data_Editor"><span class="mw-headline" id="Print.2FExport_Current_Setup_Data_Editor"><span class="mw-headline" id="Print.2FExport_Current_Setup_Data_Editor"><span class="mw-headline" id="Print.2FExport_Current_Setup_Data_Editor"><span class="mw-headline" id="Print.2FExport_Current_Setup_Data_Editor"><span class="mw-headline" id="Print.2FExport_Current_Setup_Data_Editor"><span class="mw-headline" id="Print.2FExport_Current_Setup_Data_Editor.5Bedit.5D"><span class="mw-headline" id="Print.2FExport_Current_Setup_Data_Editor">Print/Export Current Setup Data Editor</span></span></span></span></span></span></span></span></span></span></span></span></span></span></span> ==== | |
| − | + | This module enables the user to print or export the current Setup Data Editor. | |
| − | ''' | + | 1. To print or export the current Setup Data Editor Form, select '''Print/Export'''. A report PDF will be generated that the user may save or print. |
| − | + | | |
| − | + | '''Figure 10: Print/Export Current Editor''' | |
| − | + | [[File:10 DE PrintExportCurrentEditor.jpg|900px|10 DE PrintExportCurrentEditor.jpg]] | |
| − | + | | |
| − | + | | |
| − | + | '''Figure 11: Print/Export Report''' | |
| − | + | [[File:Figure 10 Print Export Report.jpg|700px|Figure 10 Print Export Report.jpg]] | |
| − | + | | |
| − | + | | |
| − | + | | |
| − | + | ==== <span class="mw-headline" id="Show_History"><span class="mw-headline" id="Show_History"><span class="mw-headline" id="Show_History"><span class="mw-headline" id="Show_History"><span class="mw-headline" id="Show_History"><span class="mw-headline" id="Show_History"><span class="mw-headline" id="Show_History"><span class="mw-headline" id="Show_History"><span class="mw-headline" id="Show_History"><span class="mw-headline" id="Show_History"><span class="mw-headline" id="Show_History"><span class="mw-headline" id="Show_History"><span class="mw-headline" id="Show_History"><span class="mw-headline" id="Show_History.5Bedit.5D"><span class="mw-headline" id="Show_History">Show History</span></span></span></span></span></span></span></span></span></span></span></span></span></span></span> ==== | |
| − | + | This module displays the Setup Data Editor history updates. | |
| − | ''' | + | 1. To show the history, select '''Show History'''. The '''Setup Data Backup Files''' pop-up is now displayed. |
| − | + | | |
| − | '''Figure | + | '''Figure 12: Show History'''<br/> [[File:12 DE Show History.jpg|900px|12 DE Show History.jpg]] |
| − | + | | |
| − | + | | |
| − | + | 2. Select the '''Restore Setup Data''' icon to restore the data or to save it locally, then select the '''Download Setup Data''' icon. | |
| − | + | === <span class="mw-headline" id="Save.2FPublish"><span class="mw-headline" id="Save.2FPublish"><span class="mw-headline" id="Save.2FPublish"><span class="mw-headline" id="Save.2FPublish"><span class="mw-headline" id="Save.2FPublish"><span class="mw-headline" id="Save.2FPublish"><span class="mw-headline" id="Save.2FPublish"><span class="mw-headline" id="Save.2FPublish.5Bedit.5D"><span class="mw-headline" id="Save.2FPublish">Save/Publish</span></span></span></span></span></span></span></span></span> === | |
| − | + | The Save/Publish Conduit-based function at the bottom of the Attribute Step List screen is available to users with the appropriate permissions and can be used by selecting the down arrow adjacent to the Save button. Whereas Save gives the record a pending status relative to Conduit, Save/Publish saves the record and publishes it to Conduit. | |
| − | + | '''Figure 13: Save/Publish - Conduit Function''' | |
| − | + | [[File:Step List Save Publish.JPG|150px|Step List Save Publish.JPG]] | |
| − | + | | |
| − | + | | |
| − | + | == <span class="mw-headline" id="Appendix_A"><span class="mw-headline" id="Appendix_A"><span class="mw-headline" id="Appendix_A"><span class="mw-headline" id="Appendix_A"><span class="mw-headline" id="Appendix_A"><span class="mw-headline" id="Appendix_A.5Bedit.5D"><span class="mw-headline" id="Appendix_A">Appendix A</span></span></span></span></span></span></span> == | |
| − | + | <br/> <br/> '''FES'''<br/> Factory Execution Systems<br/> <br/> '''LDAP'''<br/> Lightweight Directory Access Protocol<br/> <br/> '''Mfg'''<br/> Manufacturing<br/> <br/> '''MES'''<br/> Manufacturing Execution Systems<br/> <br/> '''PRAC'''<br/> Process Access<br/> <br/> '''SFDC'''<br/> Shop Floor Data Collection<br/> <br/> '''SPC'''<br/> Statistical Process Control<br/> <br/> '''SQC'''<br/> Statistical Quality Control<br/> | |
| − | + | == <span class="mw-headline" id="Appendix_B"><span class="mw-headline" id="Appendix_B"><span class="mw-headline" id="Appendix_B"><span class="mw-headline" id="Appendix_B"><span class="mw-headline" id="Appendix_B"><span class="mw-headline" id="Appendix_B.5Bedit.5D"><span class="mw-headline" id="Appendix_B">Appendix B</span></span></span></span></span></span></span> == | |
| − | |||
| − | |||
| − | |||
| − | |||
| − | |||
| − | |||
| − | |||
| − | |||
| − | |||
| − | |||
| − | |||
| − | |||
| − | |||
| − | ==== | ||
| − | |||
| − | |||
| − | |||
| − | |||
| − | |||
| − | |||
| − | |||
| − | |||
| − | |||
| − | |||
| − | |||
| − | |||
| − | |||
| − | |||
| − | |||
| − | |||
| − | |||
| − | |||
| − | |||
| − | |||
| − | |||
| − | |||
| − | |||
| − | |||
| − | |||
| − | |||
| − | |||
| − | |||
| − | |||
| − | |||
| − | |||
| − | |||
| − | |||
| − | |||
| − | |||
| − | |||
| − | |||
| − | |||
| − | |||
| − | |||
| − | |||
| − | |||
| − | |||
| − | |||
| − | |||
| − | |||
| − | |||
| − | |||
| − | |||
| − | |||
'''Glossary''' | '''Glossary''' | ||
| Line 291: | Line 220: | ||
'''''Access Control''''' | '''''Access Control''''' | ||
| − | + | A module that will set the permissions for users and external customers of 42Q | |
| − | ''''' | + | '''''Administrator''''' |
| − | the System | + | the System Administrator has full access - all plants, all reports, all users. |
| − | ''''' | + | '''''Component''''' |
| − | A component is a specific piece of data that appears on a label, for example | + | A component is a specific piece of data that appears on a label, for example, barcode, part numbers, graphic images, line, or text. Hence, label components are broken down into several different types: text, graphic images, MES database values, or a combination of text and database values. |
| − | ''''' | + | '''''Framework''''' |
In software development, a framework is a defined support structure in which another software project can be organized and developed. A framework may include support programs, code libraries, a scripting language, or other software to help develop and glue together the different components of a software project. | In software development, a framework is a defined support structure in which another software project can be organized and developed. A framework may include support programs, code libraries, a scripting language, or other software to help develop and glue together the different components of a software project. | ||
| − | ''''' | + | '''''Shop Floor Configuration''''' |
| − | The rules used to define how | + | The rules used to define how Shop Floor collects data provides analysis, controls the processing, and maintains unit histories |
'''''Site Minder''''' | '''''Site Minder''''' | ||
| − | ''Universal login of | + | ''Universal login of 42Q'' |
| − | ''''' | + | '''''Username''''' |
| − | + | The username is the SiteMinder username (or a partial string) | |
| − | + | ---- | |
| − | |||
| − | |||
| − | |||
| − | |||
| − | |||
| − | |||
| − | |||
| − | |||
| − | |||
| − | |||
| − | |||
| − | |||
| − | |||
| − | |||
| − | |||
| − | |||
| − | |||
| − | |||
| − | |||
| − | |||
| − | |||
| − | |||
| − | |||
| − | |||
| − | |||
| − | |||
| − | |||
| − | |||
| − | |||
| − | |||
| − | + | | |
Latest revision as of 15:54, 17 October 2024
42Q Home > Shop Floor Control > Configuration > Data Editor Maintenance
Shop Floor Configuration
42Q’s powerful data collection system collects critical information from a plant’s shop floor, utilizing shop floor data collector, an intuitive tool developed by 42Q’s experienced manufacturing team. The aggregate information is stored in a cloud database, and available to MESWeb, where quality reports are generated. The 42Q system uses manual and automated barcode scanning to collect data for a product line or plant. Thus, 42Q plays an important role in maintaining unit histories and directing product movement on the manufacturing floor. The current version of 42Q includes configuration capabilities, which provide access to all sub-modules pages and their functionalities (view, add, edit, print/generate output files).
Data Editor Maintenance
Data Editor Maintenance provides access to the Shop Floor configuration file that defines (but is not limited to) PCC ports, Options Lines, Auto Commands, Macros, Serial Input Masking, Passwords, and Device Numbers.
To access the Data Editor, select Shop Floor Control>Configuration>Shop Floor Configuration>Data Editor
Figure 1: Data Editor Maintenance
Note: A user only has access to the modules assigned to his/her profile.
The Setup Data Editor screen is displayed.
Figure 2: Setup Data Editor Shop Floor ID List
The user can edit, clear Data Editor, Publish History, and Print/Export the data.
Filter Setup Data Editor by Shop Floor ID
This module enables the user to filter by Shop Floor ID.
1. Enter the desired Shop Floor ID into the appropriate field, and then select Filter. The filtered Shop Floor ID is now displayed.
Figure 3: Shop Floor ID List - Find
Editing with the Setup Data Editor
This module enables the user to edit using the Setup Data Editor.
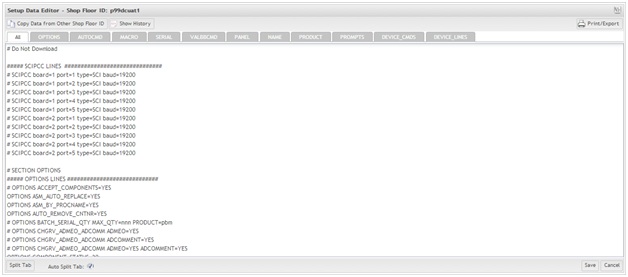
1. To edit using Setup Data Editor, select the data editor to be edited and select Edit. The Setup Data Editor Form for the selected Shop Floor ID is now displayed.
Figure 4: Shop Floor ID List – Edit Setup Data Editor
Figure 5: Setup Data Editor Form
Note: To add a new tab, create an entry line by entering the section name. For example: # SECTION MULTIPASS
2. Enter the desired modifications to the Setup Data Editor Form.
Employee Validation Variables
To turn on and off the Employee Validation functionality in the current site, the following variables are available:
- OPTIONS EMPVAL VALIDATION=YES/NO This allows users to Turn on /off the employee validation in Production Workbench.
- OPTIONS EMPVAL_PROD PRODUCT=@.(40)@ This allows users to configure the part number mask to be validated with Employee Validation in Production Workbench.
- OPTIONS EMPLMASK=@@@nn.nnnn This allows the user to configure the part number mask to do the Employee validation when scans.
- CONDUIT_OPTIONS CREATE_USER_ON_SCAN=YES/NO If yes then the user can be created on the fly when scanning a serial number in Production Workbench.
- CONDUIT_OPTIONS LEGACY_PASSWORD_AUTH=YES/NO If yes then it will require the user name and password as an authentication, if not then is only required the user name.
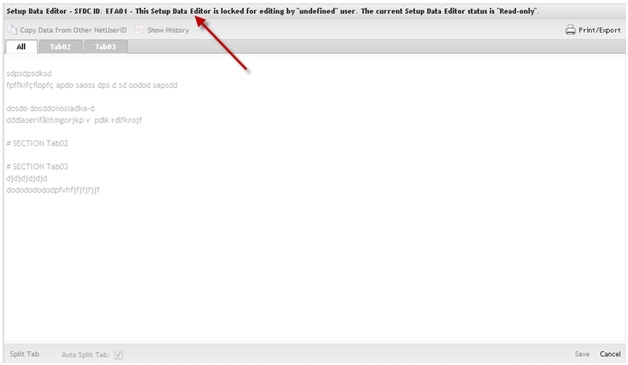
Note: If multiple users have opened the Setup Data Editor for the same SFDC PC line, only the first user to open the file has to write access. Other users are notified that the SDE is locked for editing by another user and that read-only access is allowed.
Figure 6: SDE Read-Only State
Copy Setup Data Editor from Other Shop Floor ID
This module replaces the contents of the current Setup Data Editor Form with data copied from another Shop Floor ID.
1. To copy data from another Shop Floor ID, open the target Shop Floor IDs Setup Data Editor and select Copy Data from Other Shop Floor ID in the Tasks window. The Choose a Shop Floor ID window is now displayed.
Figure 7: Copy Data from Other Shop Floor ID
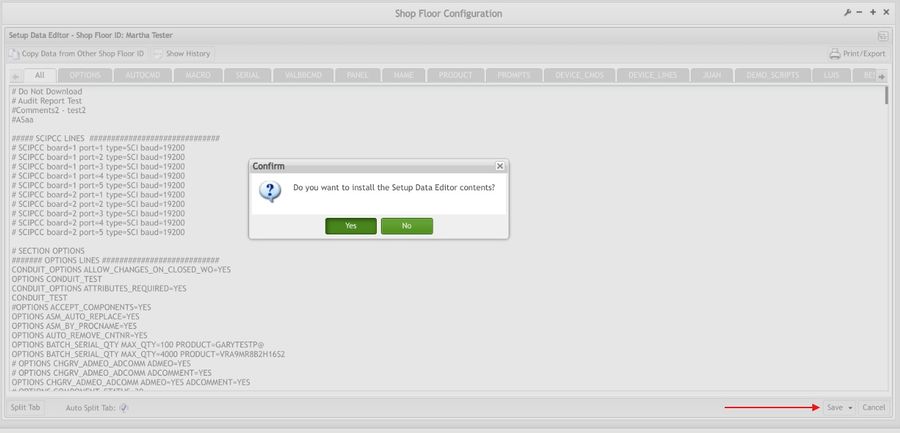
2. Select the Shop Floor ID to copy and select Save to install the Setup Data Editor. The Setup Data Editor is now updated with the data from the selected Shop Floor ID.
3. Select Yes to confirm the install, or select No to cancel.
Note: The application saves a backup file on the MES server every time the user installs a Setup Data Editor.
Publish History
The Publish History functionality is used by permitted users to show and publish the action history of a Route. To use this functionality
- Select a route from the list. The Publish History function becomes available for selection.
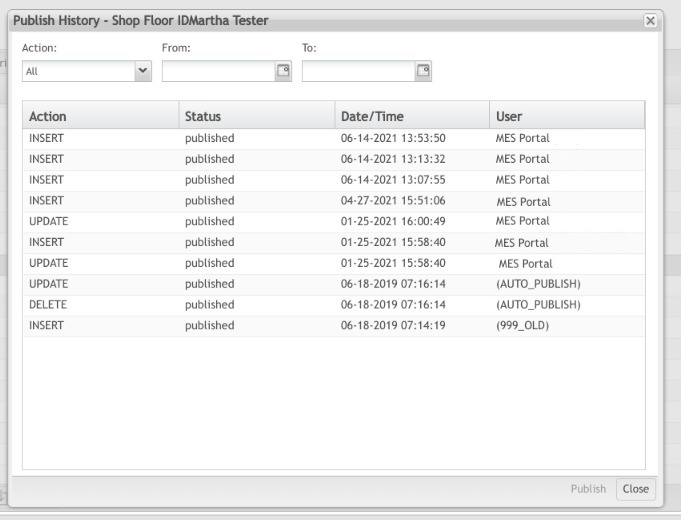
- Select Publish History. The Publish History window pops up for the given route. This history shows the Action, Status, Time/Date, and User for each item.
- Select Publish, to publish the history to the Conduit. Select Close to end or abort.
Figure 9: Publish History
Print/Export Current Setup Data Editor
This module enables the user to print or export the current Setup Data Editor.
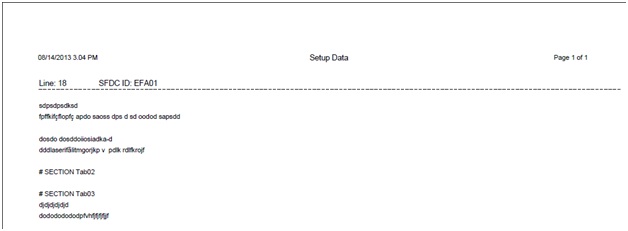
1. To print or export the current Setup Data Editor Form, select Print/Export. A report PDF will be generated that the user may save or print.
Figure 10: Print/Export Current Editor
Figure 11: Print/Export Report
Show History
This module displays the Setup Data Editor history updates.
1. To show the history, select Show History. The Setup Data Backup Files pop-up is now displayed.
2. Select the Restore Setup Data icon to restore the data or to save it locally, then select the Download Setup Data icon.
Save/Publish
The Save/Publish Conduit-based function at the bottom of the Attribute Step List screen is available to users with the appropriate permissions and can be used by selecting the down arrow adjacent to the Save button. Whereas Save gives the record a pending status relative to Conduit, Save/Publish saves the record and publishes it to Conduit.
Figure 13: Save/Publish - Conduit Function
Appendix A
FES
Factory Execution Systems
LDAP
Lightweight Directory Access Protocol
Mfg
Manufacturing
MES
Manufacturing Execution Systems
PRAC
Process Access
SFDC
Shop Floor Data Collection
SPC
Statistical Process Control
SQC
Statistical Quality Control
Appendix B
Glossary
Access Control
A module that will set the permissions for users and external customers of 42Q
Administrator
the System Administrator has full access - all plants, all reports, all users.
Component
A component is a specific piece of data that appears on a label, for example, barcode, part numbers, graphic images, line, or text. Hence, label components are broken down into several different types: text, graphic images, MES database values, or a combination of text and database values.
Framework
In software development, a framework is a defined support structure in which another software project can be organized and developed. A framework may include support programs, code libraries, a scripting language, or other software to help develop and glue together the different components of a software project.
Shop Floor Configuration
The rules used to define how Shop Floor collects data provides analysis, controls the processing, and maintains unit histories
Site Minder
Universal login of 42Q
Username
The username is the SiteMinder username (or a partial string)


