Difference between revisions of "SOP-42Q-MES0009 Mfg Line Maintenance"
| (6 intermediate revisions by one other user not shown) | |||
| Line 4: | Line 4: | ||
| | ||
| + | | ||
| + | <center>'''Shop Floor Configuration'''</center> <center>'''Configuration'''</center> <center>'''MFG Line Maintenance'''</center> <center>'''Version MES15.82'''</center> <center>'''Revision G1'''</center> <center> </center> <center> </center> | ||
| | ||
| | ||
| − | < | + | |
| − | + | == <span class="mw-headline" id="Shop_Floor_Configuration"><span class="mw-headline" id="Shop_Floor_Configuration"><span class="mw-headline" id="Shop_Floor_Configuration"><span class="mw-headline" id="Shop_Floor_Configuration"><span class="mw-headline" id="Shop_Floor_Configuration"><span class="mw-headline" id="Shop_Floor_Configuration"><span class="mw-headline" id="Shop_Floor_Configuration"><span class="mw-headline" id="Shop_Floor_Configuration"><span class="mw-headline" id="Shop_Floor_Configuration"><span class="mw-headline" id="Shop_Floor_Configuration">Shop Floor Configuration</span></span></span></span></span></span></span></span></span></span> == | |
| + | |||
| + | 42Q's powerful data collection system collects critical information from a plant’s shop floor, utilizing the shop floor data collector, an intuitive tool developed by 42Q’s experienced manufacturing team. The aggregate information is stored in a cloud database, and available to MESWeb, where quality reports are generated. The 42Q system uses manual and automated barcode scanning to collect data for a product line or plant. Thus, 42Q plays an important role in maintaining unit histories and directing product movement on the manufacturing floor. The current version of 42Q includes configuration capabilities, which provide access to all sub-module pages and their functionalities (view, add, edit, print/generate output files). | ||
| | ||
| − | + | == <span class="mw-headline" id="MFG_Line_Maintenance"><span class="mw-headline" id="MFG_Line_Maintenance"><span class="mw-headline" id="MFG_Line_Maintenance"><span class="mw-headline" id="MFG_Line_Maintenance"><span class="mw-headline" id="MFG_Line_Maintenance"><span class="mw-headline" id="MFG_Line_Maintenance"><span class="mw-headline" id="MFG_Line_Maintenance"><span class="mw-headline" id="MFG_Line_Maintenance"><span class="mw-headline" id="MFG_Line_Maintenance"><span class="mw-headline" id="MFG_Line_Maintenance">MFG Line Maintenance</span></span></span></span></span></span></span></span></span></span> == | |
| + | |||
| + | This portlet enables users to assign data collector (scanning) locations to a manufacturing line. Production data collected in the Manufacturing Line portlet is integrated with [https://42qrpt1.42-q.com/mes_wiki/index.php/42Q-MES0113-C_42Q_Live 42Q Live] where critical line status is displayed on dashboard systems according to target yields. | ||
| − | + | To access MFG Line Maintenance, navigate to: | |
| − | + | '''Shop Floor Control > Configuration > Shop Floor Configuration > MFG Line ''' | |
| | ||
| − | + | '''Figure 1: MFG Line''' | |
| − | + | '''[[File:MFG Line 15.82.png|900px]]''' | |
| − | + | | |
| − | ''' | + | <u>'''Note'''</u>: A user only has access to the modules assigned to his/her profile. |
| − | + | | |
| − | |||
| − | |||
| | ||
| − | === <span class="mw-headline" id="Add_MFG_Lines"><span class="mw-headline" id="Add_MFG_Lines"><span class="mw-headline" id="Add_MFG_Lines">Add MFG Lines</span></span></span> === | + | === <span class="mw-headline" id="Add_MFG_Lines"><span class="mw-headline" id="Add_MFG_Lines"><span class="mw-headline" id="Add_MFG_Lines"><span class="mw-headline" id="Add_MFG_Lines"><span class="mw-headline" id="Add_MFG_Lines"><span class="mw-headline" id="Add_MFG_Lines"><span class="mw-headline" id="Add_MFG_Lines"><span class="mw-headline" id="Add_MFG_Lines"><span class="mw-headline" id="Add_MFG_Lines"><span class="mw-headline" id="Add_MFG_Lines"><span class="mw-headline" id="Add_MFG_Lines"><span class="mw-headline" id="Add_MFG_Lines">Add MFG Lines</span></span></span></span></span></span></span></span></span></span></span></span> === |
This portlet enables the user to add manufacturing line configurations to the database. | This portlet enables the user to add manufacturing line configurations to the database. | ||
| Line 42: | Line 46: | ||
'''Figure 2: MFG Line Form''' | '''Figure 2: MFG Line Form''' | ||
| − | [[File: | + | [[File:MFGLine MFGLineForm.png|x400px|MFGLine MFGLineForm.png]] |
To add or edit a manufacturing line, | To add or edit a manufacturing line, | ||
| Line 58: | Line 62: | ||
| | ||
| − | <u>'''Note'''</u>: If the manufacturing line is WIP location line, the name must end with "WIP". | + | <u>'''Note'''</u>: If the manufacturing line is a WIP location line, the name must end with "WIP". |
| + | |||
| + | <u>'''Note'''</u>: The Site ID can be changed if all Site ID references were updated in the SFDC Miscellaneous Configuration sub-module. If it is a WIP location line, it is not possible to create an escalation for this manufacturing line. '''Man Power''', '''Work Hour''', and '''Min Sample Size''', fields are going to be enabled only after the user selects and enters the mandatory MFG Line Form fields. The Man Power and Work Hour parameters are defined and will reflect in the SOMS reports. The Man Power parameter can be also defined on the fly as a report parameter. | ||
| − | + | Also, the report requires all Mfg Line setups including Data Collectors and Multi-Pass Location setup – the same used to set up SOMS Global Status reports. | |
| − | + | | |
| − | < | + | === <span class="mw-headline" id="Adding_or_Removing_scanners_from_Scanners_Tab"><span class="mw-headline" id="Adding_or_Removing_scanners_from_Scanners_Tab"><span class="mw-headline" id="Adding_or_Removing_scanners_from_Scanners_Tab">Adding or Removing scanners from Scanners Tab</span></span></span> === |
| | ||
| − | + | *To add a scanner: Select it from Available Scanners in the drop-down list | |
| + | *To remove a specific scanner: Select the desired scanner, and select Remove Selected Item | ||
| + | *To remove all scanners: | ||
| + | * | ||
| + | **Select Remove All Items. | ||
| + | * | ||
| + | **Select Ok to save, or Cancel to cancel the operation. | ||
| − | + | | |
| − | + | '''Figure 3: Scanners Tab''' | |
| − | + | === <span class="mw-headline" id="Adding_or_Removing_Locations">[[File:MFGLine ScannersTab.png|MFGLine ScannersTab.png]]<br/> <br/> <br/> <br/> <span class="mw-headline" id="Adding_or_Removing_Locations"><span class="mw-headline" id="Adding_or_Removing_Locations">Adding or Removing Locations</span></span></span> === | |
| − | + | | |
| − | ''' | + | The '''Locations''' '''Tab''' allows the setup of manufacturing lines by locations, instead of scanners. |
| − | + | The assignment between the Location and Line is available on the Locations Tab.<br/> | |
| − | *To | + | *To add a location: Select it from Available Locations in the drop-down list. |
| − | *To | + | *To remove a specific location: Select the desired location, and select Remove Selected Item. |
| − | *To | + | *To remove all locations: |
| + | * | ||
| + | **Select Remove All Items. | ||
| + | * | ||
| + | **Select Ok to save, or Cancel to cancel the operation. | ||
| | ||
| − | ''' | + | '''Figure 4: Locations Tab''' |
| − | |||
| − | |||
| − | + | [[File:MFGLine LocationsTab.png|MFGLine LocationsTab.png]] | |
| − | + | <u>'''Note:'''</u> One Location can not be assigned for multi-lines. | |
| − | + | <br/> | |
| − | |||
| − | + | === <span class="mw-headline" id="Adding_Escalation_Emails"><span class="mw-headline"><span class="mw-headline">Adding Escalation Emails</span></span></span> === | |
| − | + | Add Escalation emails by | |
| − | + | #Entering an email address and selecting the '''Add''' icon. The escalation emails allow adding four levels of emails. Level 2, Level 3, and Level 4 tabs become available only when the information in the previous tab has an email address assigned to it. | |
| | ||
| − | ''' | + | '''Figure 5: Escalation''' |
| − | + | [[File:MFGLine Escalation.png|MFGLine Escalation.png]] | |
| − | + | | |
| − | + | ==== <span class="mw-headline" id="Using_the_available_filters"><span class="mw-headline" id="Using_the_available_filters"><span class="mw-headline" id="Using_the_available_filters">Using the available filters</span></span></span> ==== | |
| − | + | Scanners can be filtered by Shop Floor ID, Device Number, or Location Name using the Available Scanners field under the Associated Scanners tab: | |
| − | * | + | *To filter by location, enter the Location name |
| + | *To filter by Shop Floor ID, enter the shop floor ID | ||
| + | *To filter by Device, enter the Device number | ||
| − | | + | |
| − | + | ==== <span class="mw-headline" id="Removing_Escalation_Emails"><span class="mw-headline" id="Removing_Escalation_Emails"><span class="mw-headline" id="Removing_Escalation_Emails">Removing Escalation Emails</span></span></span> ==== | |
| − | + | *'''To remove a specific email:''' Select the desired email to be removed and select Remove Selected Item. | |
| − | + | *'''To remove all e-mails:''' | |
| − | + | * | |
| + | **Select '''Remove All Items''' | ||
| + | * | ||
| + | **Select '''Ok''' to save, or '''Cancel''' to cancel the operation | ||
| | ||
| − | ''' | + | '''Figure 6: Removing E-mail from Escalation''' |
| − | + | [[File:MFGLine RemovingmailfromEscalation.png|MFGLine RemovingmailfromEscalation.png]] | |
| | ||
| − | + | == <span class="mw-headline" id="Edit_MFG_Lines"><span class="mw-headline" id="Edit_MFG_Lines"><span class="mw-headline" id="Edit_MFG_Lines">Edit MFG Lines </span></span></span> == | |
| − | |||
| − | |||
| − | |||
| − | |||
| − | |||
| − | |||
| − | |||
| − | |||
| − | + | This portlet enables the user to edit manufacturing line configurations. The steps for editing manufacturing lines are the same as those for adding. For further information, see the'''Add MFG Line''' section above. | |
| − | |||
| − | |||
| − | |||
| − | + | To edit manufacturing lines, | |
| − | |||
| − | |||
| − | |||
| − | |||
| − | + | #Select the desired line and select Edit. | |
| | ||
| − | |||
| − | |||
| − | |||
| − | |||
| − | |||
| − | |||
| − | |||
| − | |||
'''Figure 7: MFG Line List – Edit''' | '''Figure 7: MFG Line List – Edit''' | ||
| − | [[File: | + | [[File:MFGLine ListEdit.png|x400px|MFGLine ListEdit.png]] |
| − | 2 | + | |
| + | <ol start="2"> | ||
| + | <li>Update the information in the MFG Line Form as needed. </li> | ||
| + | <li>Select '''Ok''' to confirm, or select '''No''' to cancel the update action.</li> | ||
| + | </ol> | ||
| − | + | | |
| − | + | == <span class="mw-headline" id="Delete_MFG_Lines"><span class="mw-headline" id="Delete_MFG_Lines"><span class="mw-headline" id="Delete_MFG_Lines">Delete MFG Lines </span></span></span> == | |
This portlet enables the user to delete an existing manufacturing line configuration. It is only possible to delete a manufacturing line if it does not have any Data Collector locations assigned to it. The user must first remove all assigned Data Collector locations from the manufacturing line configuration prior to deleting. | This portlet enables the user to delete an existing manufacturing line configuration. It is only possible to delete a manufacturing line if it does not have any Data Collector locations assigned to it. The user must first remove all assigned Data Collector locations from the manufacturing line configuration prior to deleting. | ||
| − | To delete a manufacturing line, | + | To delete a manufacturing line, |
| − | + | #Select the desired manufacturing line, then select '''Delete'''. A confirmation message is displayed. | |
| − | + | | |
| − | + | '''Figure 8: MFG Line List - Delete''' | |
| − | + | [[File:MFGLine ListDelete.png|x300px|MFGLine ListDelete.png]] | |
| | ||
| + | <ol start="2"> | ||
| + | <li>Select '''Yes''' to confirm, or '''No''' to cancel the action.</li> | ||
| + | </ol> | ||
| − | + | | |
| − | + | == <span class="mw-headline" id="Import_Escalation_Data"><span class="mw-headline" id="Import_Escalation_Data"><span class="mw-headline" id="Import_Escalation_Data">Import Escalation Data</span></span></span> == | |
| − | To | + | To import escalation data |
| − | + | #Select the Import Escalation Data button. | |
| − | + | | |
| − | |||
| − | |||
| − | '''Figure | + | '''Figure 9: Import Escalation Data''' |
| − | [[File: | + | [[File:MFGLine ImportEscalationData.png|x350px|MFGLine ImportEscalationData.png]] |
| | ||
| + | <ol start="2"> | ||
| + | <li>Users must choose the CSV file, or get the template</li> | ||
| + | </ol> | ||
| − | + | <br/> <br/> | |
| − | + | == <span class="mw-headline" id="Export_Escalation_Data"><span class="mw-headline" id="Export_Escalation_Data"><span class="mw-headline" id="Export_Escalation_Data">Export Escalation Data </span></span></span> == | |
| − | + | This portlet will export all escalation Data and save it in a ZIP file. | |
| − | ''' | + | #Choose the local directory and select '''Save'''. The ZIP file with the .csv file will be saved locally. |
| − | + | | |
| − | + | '''Figure 10: Export Escalation Data''' | |
| − | + | [[File:MFGLine ExportEscalationData.png|x265px|MFGLine ExportEscalationData.png]] | |
| − | + | <br/> <br/> <br/> | |
| − | + | == <span class="mw-headline" id="Print.2FExport_Filtered_MFG_Lines"><span class="mw-headline" id="Print.2FExport_Filtered_MFG_Lines"><span class="mw-headline" id="Print.2FExport_Filtered_MFG_Lines">Print/Export Filtered MFG Lines </span></span></span> == | |
| − | + | This portlet enables the user to print/export filtered manufacturing lines. To print filtered MFG Lines, | |
| − | ''' | + | #'''Select Print/Export Filtered MFG Lines'''. A report is generated and the user is able to save the file or print it. |
| | ||
| − | + | '''Figure 11: Print/Export Filtered MFG Line''' | |
| − | + | [[File:MFG Line PrintExportFiltered.png|x265px|MFG Line PrintExportFiltered.png]] | |
| − | + | | |
| − | ''' | + | <br/> The CSV file will show the available information of the MGF Line such as: '''Name, Pixel X, Pixel Y, Site ID, Man Power, Work Hour, and Min Sample Size.''' |
| − | + | | |
| − | |||
| − | |||
| − | |||
| − | |||
| − | |||
| − | |||
| − | ''' | + | '''Figure 12: Print/Export Filtered MFG Lines Result'''<br/> [[File:MFGLines PrintExportFilteredResult.png|MFGLines PrintExportFilteredResult.png]]<br/> <br/> <br/> |
| − | |||
| − | |||
| − | |||
| − | |||
| − | |||
| − | |||
| − | |||
| − | |||
| − | |||
| − | |||
| − | |||
| − | |||
| − | |||
| − | |||
| − | |||
| − | |||
| − | |||
| − | |||
| − | |||
| − | |||
| − | |||
| − | |||
| − | |||
| − | |||
| − | |||
| − | |||
| − | |||
| − | |||
| − | |||
| − | | ||
| − | == <span class="mw-headline" id="Note"><span class="mw-headline" id="Note">Note</span></span> | + | = <span class="mw-headline" id="Note"><span class="mw-headline" id="Note"><span class="mw-headline" id="Note">Note</span></span></span> = |
| − | Unit Status definitions Deprecated from Assembly Maintenance, Attribute Maintenance, MFG Hold, | + | Unit Status definitions are Deprecated from Assembly Maintenance, Attribute Maintenance, MFG Hold, MFG Line, Location Maintenance, Data Collector Maintenance they are used/assigned by the system for internal purposes. |
*'''In Container (36)''' | *'''In Container (36)''' | ||
| Line 299: | Line 266: | ||
*'''Not DB of Record (70)''' | *'''Not DB of Record (70)''' | ||
| − | For more information | + | For more information go to '''[https://42qrpt1.42-q.com/mes_wiki/index.php/42Q-MES0160-C_Unit_Status_Definition_Work_Instruction 42Q-MES0160-C Unit Status Definition Work Instruction]''' |
---- | ---- | ||
| | ||
Latest revision as of 15:42, 17 October 2024
42Q Home > Shop Floor Control > Configuration > Mfg Line Maintenance
Contents
Shop Floor Configuration
42Q's powerful data collection system collects critical information from a plant’s shop floor, utilizing the shop floor data collector, an intuitive tool developed by 42Q’s experienced manufacturing team. The aggregate information is stored in a cloud database, and available to MESWeb, where quality reports are generated. The 42Q system uses manual and automated barcode scanning to collect data for a product line or plant. Thus, 42Q plays an important role in maintaining unit histories and directing product movement on the manufacturing floor. The current version of 42Q includes configuration capabilities, which provide access to all sub-module pages and their functionalities (view, add, edit, print/generate output files).
MFG Line Maintenance
This portlet enables users to assign data collector (scanning) locations to a manufacturing line. Production data collected in the Manufacturing Line portlet is integrated with 42Q Live where critical line status is displayed on dashboard systems according to target yields.
To access MFG Line Maintenance, navigate to:
Shop Floor Control > Configuration > Shop Floor Configuration > MFG Line
Figure 1: MFG Line
Note: A user only has access to the modules assigned to his/her profile.
Add MFG Lines
This portlet enables the user to add manufacturing line configurations to the database.
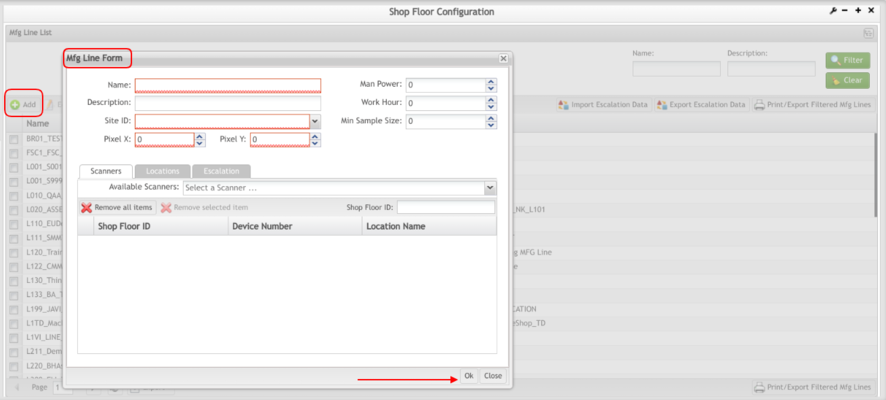
1. To add manufacturing lines, click the Add icon. The MFG Line Form is displayed.
Figure 2: MFG Line Form
To add or edit a manufacturing line,
1. Enter the Name and the Site ID in the respective fields. If it is a WIP Location Line, at least one location must be assigned. Otherwise, the Pixel X and the Pixel Y, and at least one scanner must be assigned.
The name must be created according to the following rules:
- 2 chars for Level or Modules (areas of interests) - Ex: L1; M2
- 2 chars to group Process Lines - Ex: L110; M250
- 1 char with "_" + Process Name + 1 char with "_" - Ex: L110_SMT_; M250_PTH_
- Line name - Ex: L110_SMT_Line1; M250_PTH_Line2.
- Project Name: The project name of the line, which is used here to distinguish between different projects with the same configuration. For example, if the project name is G18, the full manufacturing line name will be L110_SMT_Line1_G18; M250_PTH_Line2_G18.
Note: If the manufacturing line is a WIP location line, the name must end with "WIP".
Note: The Site ID can be changed if all Site ID references were updated in the SFDC Miscellaneous Configuration sub-module. If it is a WIP location line, it is not possible to create an escalation for this manufacturing line. Man Power, Work Hour, and Min Sample Size, fields are going to be enabled only after the user selects and enters the mandatory MFG Line Form fields. The Man Power and Work Hour parameters are defined and will reflect in the SOMS reports. The Man Power parameter can be also defined on the fly as a report parameter.
Also, the report requires all Mfg Line setups including Data Collectors and Multi-Pass Location setup – the same used to set up SOMS Global Status reports.
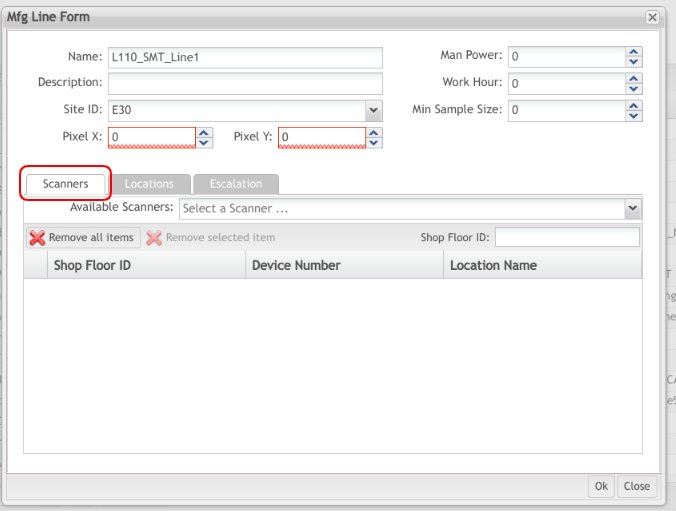
Adding or Removing scanners from Scanners Tab
- To add a scanner: Select it from Available Scanners in the drop-down list
- To remove a specific scanner: Select the desired scanner, and select Remove Selected Item
- To remove all scanners:
-
- Select Remove All Items.
-
- Select Ok to save, or Cancel to cancel the operation.
Figure 3: Scanners Tab
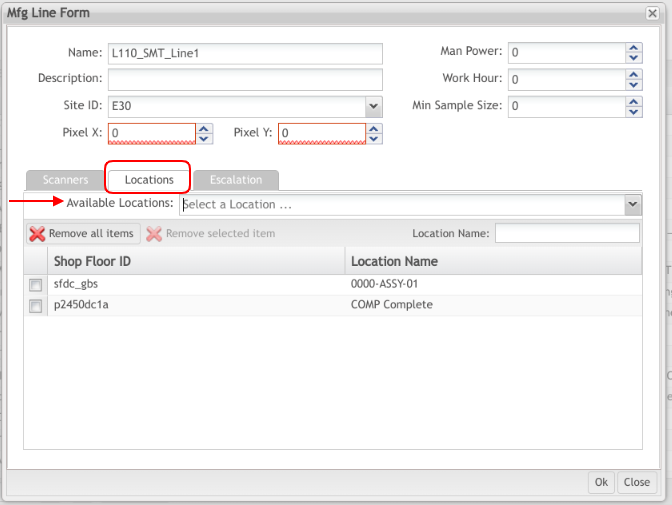
Adding or Removing Locations
The Locations Tab allows the setup of manufacturing lines by locations, instead of scanners.
The assignment between the Location and Line is available on the Locations Tab.
- To add a location: Select it from Available Locations in the drop-down list.
- To remove a specific location: Select the desired location, and select Remove Selected Item.
- To remove all locations:
-
- Select Remove All Items.
-
- Select Ok to save, or Cancel to cancel the operation.
Figure 4: Locations Tab
Note: One Location can not be assigned for multi-lines.
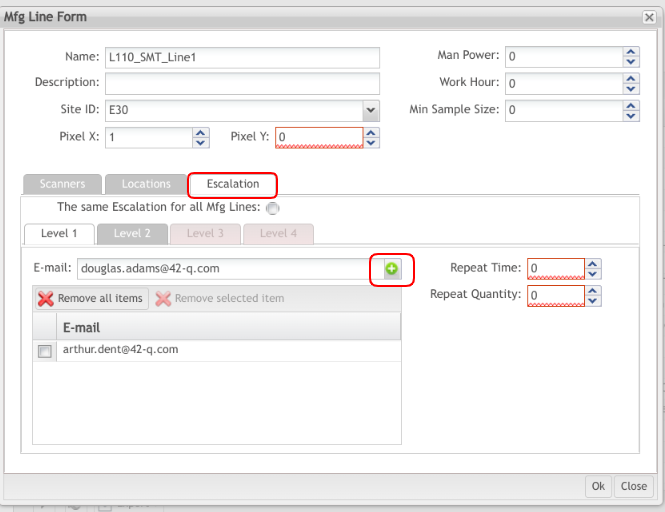
Adding Escalation Emails
Add Escalation emails by
- Entering an email address and selecting the Add icon. The escalation emails allow adding four levels of emails. Level 2, Level 3, and Level 4 tabs become available only when the information in the previous tab has an email address assigned to it.
Figure 5: Escalation
Using the available filters
Scanners can be filtered by Shop Floor ID, Device Number, or Location Name using the Available Scanners field under the Associated Scanners tab:
- To filter by location, enter the Location name
- To filter by Shop Floor ID, enter the shop floor ID
- To filter by Device, enter the Device number
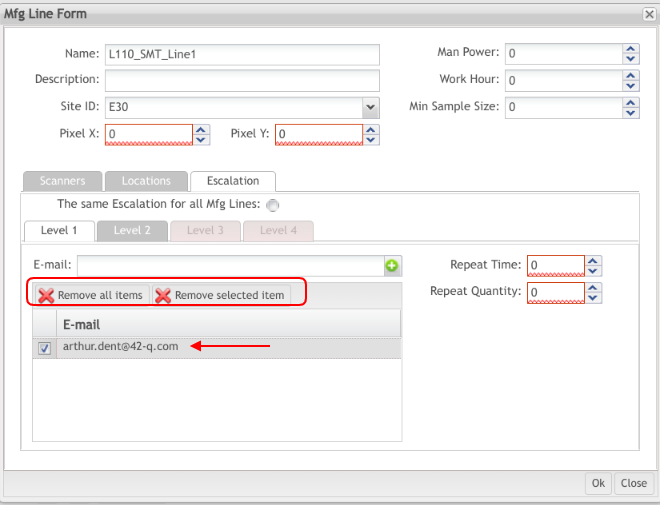
Removing Escalation Emails
- To remove a specific email: Select the desired email to be removed and select Remove Selected Item.
- To remove all e-mails:
-
- Select Remove All Items
-
- Select Ok to save, or Cancel to cancel the operation
Figure 6: Removing E-mail from Escalation
Edit MFG Lines
This portlet enables the user to edit manufacturing line configurations. The steps for editing manufacturing lines are the same as those for adding. For further information, see theAdd MFG Line section above.
To edit manufacturing lines,
- Select the desired line and select Edit.
Figure 7: MFG Line List – Edit
- Update the information in the MFG Line Form as needed.
- Select Ok to confirm, or select No to cancel the update action.
Delete MFG Lines
This portlet enables the user to delete an existing manufacturing line configuration. It is only possible to delete a manufacturing line if it does not have any Data Collector locations assigned to it. The user must first remove all assigned Data Collector locations from the manufacturing line configuration prior to deleting.
To delete a manufacturing line,
- Select the desired manufacturing line, then select Delete. A confirmation message is displayed.
Figure 8: MFG Line List - Delete
- Select Yes to confirm, or No to cancel the action.
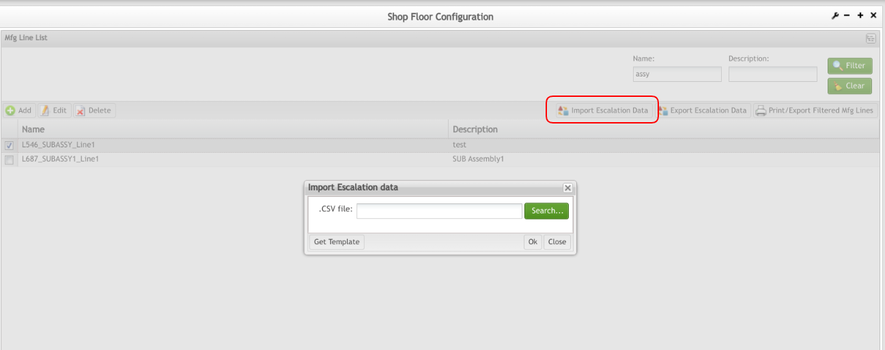
Import Escalation Data
To import escalation data
- Select the Import Escalation Data button.
Figure 9: Import Escalation Data
- Users must choose the CSV file, or get the template
Export Escalation Data
This portlet will export all escalation Data and save it in a ZIP file.
- Choose the local directory and select Save. The ZIP file with the .csv file will be saved locally.
Figure 10: Export Escalation Data
Print/Export Filtered MFG Lines
This portlet enables the user to print/export filtered manufacturing lines. To print filtered MFG Lines,
- Select Print/Export Filtered MFG Lines. A report is generated and the user is able to save the file or print it.
Figure 11: Print/Export Filtered MFG Line
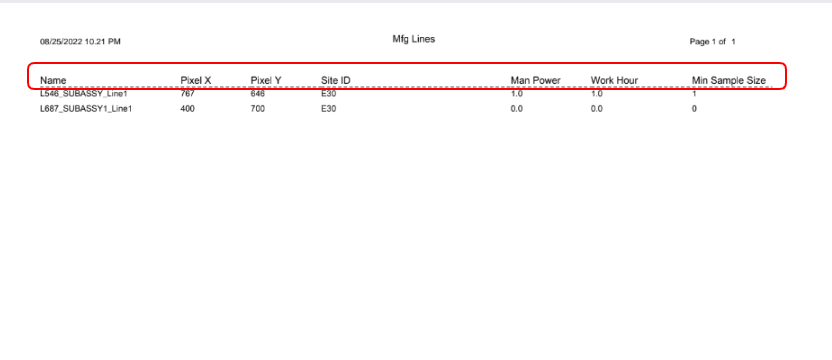
The CSV file will show the available information of the MGF Line such as: Name, Pixel X, Pixel Y, Site ID, Man Power, Work Hour, and Min Sample Size.
Figure 12: Print/Export Filtered MFG Lines Result
Note
Unit Status definitions are Deprecated from Assembly Maintenance, Attribute Maintenance, MFG Hold, MFG Line, Location Maintenance, Data Collector Maintenance they are used/assigned by the system for internal purposes.
- In Container (36)
- In Transit (37)
- Temporary Ship Status (45)
- CRM Received (46)
- CRM Released (47)
- CRM RESERVED (48)
- CRM Finished (49)
- Killed (51)
- Killed RBF (52)
- Killed (56)
- Batch Old ID (63)
- Not DB of Record (70)
For more information go to 42Q-MES0160-C Unit Status Definition Work Instruction

