Difference between revisions of "SOP-42Q-MES0079 Label Engine Admin"
| (2 intermediate revisions by the same user not shown) | |||
| Line 7: | Line 7: | ||
| | ||
| − | <center>'''Administration'''</center> <center>'''Label Engine Admin'''</center> <center>'''Version MES 15. | + | <center>'''Administration'''</center> <center>'''Label Engine Admin'''</center> <center>'''Version MES 15.82'''</center> <center> </center> <p style="text-align: center;"> </p> <p style="text-align: center;"> </p> |
| − | + | | |
| − | = <span class="mw-headline" id="Introduction">'''Introduction'''</span> = | + | = <span class="mw-headline" id="Introduction"><span class="mw-headline" id="Introduction">'''Introduction'''</span></span> = |
Labels are critical to the overall manufacturing process. 42Q understands this need and has worked to develop a system for label creation, edition, and sharing. | Labels are critical to the overall manufacturing process. 42Q understands this need and has worked to develop a system for label creation, edition, and sharing. | ||
| Line 25: | Line 25: | ||
*Application Configuration; | *Application Configuration; | ||
| − | To access the customer module, navigate to'''Administration > LE Engine Admin ''' | + | To access the customer module, navigate to '''Administration > LE Engine Admin ''' |
<br/> '''Figure 1: Label Engine''' | <br/> '''Figure 1: Label Engine''' | ||
| − | + | '''[[File:LEAV maisscreen.png|900px]]''' | |
| − | |||
| − | |||
| − | |||
| − | |||
| − | |||
| − | |||
| − | |||
| − | |||
| − | |||
| − | |||
| − | |||
| − | |||
| − | |||
| | ||
| − | |||
| − | |||
| − | |||
| − | |||
| | ||
| Line 54: | Line 37: | ||
| | ||
| − | == <span class="mw-headline" id="Customer"><span class="mw-headline" id="Customer"><span class="mw-headline" id="Customer"><span class="mw-headline" id="Customer"><span class="mw-headline" id="Customer"><span class="mw-headline" id="Customer"><span class="mw-headline" id="Customer"><span class="mw-headline" id="Customer_https:.2F.2Flh3.googleusercontent.com.2FmNYBYh88W6ODWEll2dgvAX3X5vcuhp_WoIe7w8_83IrVl5o7IT-r8zsLbSRgM95oTrpI32SXBg_c-l81mP9tQoWY-HJtwgBk2-Jqqwt_DEfvdMB49uFiravEFzQKT_6zFMD7gjIvb_JiKA2wJHdYsmgFqkWmWCzkksfHKJtPNZDffjAgo1sZ9clPeg">Customer [[File: | + | == <span class="mw-headline" id="Customer"><span class="mw-headline" id="Customer"><span class="mw-headline" id="Customer"><span class="mw-headline" id="Customer"><span class="mw-headline" id="Customer"><span class="mw-headline" id="Customer"><span class="mw-headline" id="Customer"><span class="mw-headline" id="Customer"><span class="mw-headline" id="Customer_https:.2F.2Flh3.googleusercontent.com.2FmNYBYh88W6ODWEll2dgvAX3X5vcuhp_WoIe7w8_83IrVl5o7IT-r8zsLbSRgM95oTrpI32SXBg_c-l81mP9tQoWY-HJtwgBk2-Jqqwt_DEfvdMB49uFiravEFzQKT_6zFMD7gjIvb_JiKA2wJHdYsmgFqkWmWCzkksfHKJtPNZDffjAgo1sZ9clPeg">Customer [[File:LEAV Customer icon.png]]</span></span></span></span></span></span></span></span></span> == |
<br/> The Customer sub-module is responsible for creating, editing, or deleting customers in the database. | <br/> The Customer sub-module is responsible for creating, editing, or deleting customers in the database. | ||
| Line 71: | Line 54: | ||
| | ||
| − | === <span class="mw-headline" id="Filter_Customers"><span class="mw-headline" id="Filter_Customers"><span class="mw-headline" id="Filter_Customers"><span class="mw-headline" id="Filter_Customers"><span class="mw-headline" id="Filter_Customers"><span class="mw-headline" id="Filter_Customers"><span class="mw-headline" id="Filter_Customers"><span class="mw-headline" id="Filter_Customers"><span class="mw-headline" id="Filter_Customers">Filter Customers</span></span></span></span></span></span></span></span></span> === | + | === <span class="mw-headline" id="Filter_Customers"><span class="mw-headline" id="Filter_Customers"><span class="mw-headline" id="Filter_Customers"><span class="mw-headline" id="Filter_Customers"><span class="mw-headline" id="Filter_Customers"><span class="mw-headline" id="Filter_Customers"><span class="mw-headline" id="Filter_Customers"><span class="mw-headline" id="Filter_Customers"><span class="mw-headline" id="Filter_Customers"><span class="mw-headline" id="Filter_Customers">Filter Customers</span></span></span></span></span></span></span></span></span></span> === |
The filter feature can be used to narrow the list that is displayed on the main '''Customer''' List page. This can be useful if the user wants to look at information pertaining to limited entries. Filters can be selected at the top of the Customer page. | The filter feature can be used to narrow the list that is displayed on the main '''Customer''' List page. This can be useful if the user wants to look at information pertaining to limited entries. Filters can be selected at the top of the Customer page. | ||
| − | '''Figure | + | '''Figure 2: LE Customer Name/Filter''' |
'''[[File:LEA CustomerNameFilter.png|x230px|LEA CustomerNameFilter.png]]''' | '''[[File:LEA CustomerNameFilter.png|x230px|LEA CustomerNameFilter.png]]''' | ||
| Line 83: | Line 66: | ||
| | ||
| − | === <span class="mw-headline" id="Add_Customers"><span class="mw-headline" id="Add_Customers"><span class="mw-headline" id="Add_Customers"><span class="mw-headline" id="Add_Customers"><span class="mw-headline" id="Add_Customers"><span class="mw-headline" id="Add_Customers"><span class="mw-headline" id="Add_Customers"><span class="mw-headline" id="Add_Customers"><span class="mw-headline" id="Add_Customers">Add Customers</span></span></span></span></span></span></span></span></span> === | + | === <span class="mw-headline" id="Add_Customers"><span class="mw-headline" id="Add_Customers"><span class="mw-headline" id="Add_Customers"><span class="mw-headline" id="Add_Customers"><span class="mw-headline" id="Add_Customers"><span class="mw-headline" id="Add_Customers"><span class="mw-headline" id="Add_Customers"><span class="mw-headline" id="Add_Customers"><span class="mw-headline" id="Add_Customers"><span class="mw-headline" id="Add_Customers">Add Customers</span></span></span></span></span></span></span></span></span></span> === |
The primary purpose of this feature is to add customer information. Each label is associated with a customer so, to set up a customer, the user must provide the following information: | The primary purpose of this feature is to add customer information. Each label is associated with a customer so, to set up a customer, the user must provide the following information: | ||
| Line 94: | Line 77: | ||
*'''Comments''' - any additional free form information the user wishes to associate with the customer. | *'''Comments''' - any additional free form information the user wishes to associate with the customer. | ||
| − | '''Figure | + | '''Figure 3: Add LE Customer''' |
'''[[File:LEA .AddLECustomerpng.png|x285px|LEA .AddLECustomerpng.png]]''' | '''[[File:LEA .AddLECustomerpng.png|x285px|LEA .AddLECustomerpng.png]]''' | ||
| Line 104: | Line 87: | ||
| | ||
| − | === <span class="mw-headline" id="Edit_LE_Customers_Information"><span class="mw-headline" id="Edit_LE_Customers_Information"><span class="mw-headline" id="Edit_LE_Customers_Information"><span class="mw-headline" id="Edit_LE_Customers_Information"><span class="mw-headline" id="Edit_LE_Customers_Information"><span class="mw-headline" id="Edit_LE_Customers_Information"><span class="mw-headline" id="Edit_LE_Customers_Information"><span class="mw-headline" id="Edit_LE_Customers_Information">Edit LE Customers Information</span></span></span></span></span></span></span></span> === | + | === <span class="mw-headline" id="Edit_LE_Customers_Information"><span class="mw-headline" id="Edit_LE_Customers_Information"><span class="mw-headline" id="Edit_LE_Customers_Information"><span class="mw-headline" id="Edit_LE_Customers_Information"><span class="mw-headline" id="Edit_LE_Customers_Information"><span class="mw-headline" id="Edit_LE_Customers_Information"><span class="mw-headline" id="Edit_LE_Customers_Information"><span class="mw-headline" id="Edit_LE_Customers_Information"><span class="mw-headline" id="Edit_LE_Customers_Information">Edit LE Customers Information</span></span></span></span></span></span></span></span></span> === |
To edit customer information, select a customer in the list and click on the '''Edit''' button on the main page. The '''Customer Details''' pop-up window displays: | To edit customer information, select a customer in the list and click on the '''Edit''' button on the main page. The '''Customer Details''' pop-up window displays: | ||
| Line 110: | Line 93: | ||
| | ||
| − | '''Figure | + | '''Figure 4: LE Edit Customer Information''' |
'''[[File:LEA EditCustomerInfo.png|x255px|LEA EditCustomerInfo.png]]''' | '''[[File:LEA EditCustomerInfo.png|x255px|LEA EditCustomerInfo.png]]''' | ||
| Line 120: | Line 103: | ||
| | ||
| − | === <span class="mw-headline" id="Delete_Customers"><span class="mw-headline" id="Delete_Customers"><span class="mw-headline" id="Delete_Customers"><span class="mw-headline" id="Delete_Customers"><span class="mw-headline" id="Delete_Customers"><span class="mw-headline" id="Delete_Customers"><span class="mw-headline" id="Delete_Customers"><span class="mw-headline" id="Delete_Customers"><span class="mw-headline" id="Delete_Customers"><span class="mw-headline" id="Delete_Customers">Delete Customers </span></span></span></span></span></span></span></span></span></span> === | + | === <span class="mw-headline" id="Delete_Customers"><span class="mw-headline" id="Delete_Customers"><span class="mw-headline" id="Delete_Customers"><span class="mw-headline" id="Delete_Customers"><span class="mw-headline" id="Delete_Customers"><span class="mw-headline" id="Delete_Customers"><span class="mw-headline" id="Delete_Customers"><span class="mw-headline" id="Delete_Customers"><span class="mw-headline" id="Delete_Customers"><span class="mw-headline" id="Delete_Customers"><span class="mw-headline" id="Delete_Customers">Delete Customers </span></span></span></span></span></span></span></span></span></span></span> === |
#To delete customers, select a customer in the list and click the '''Delete''' button on the main page. A confirmation message pop-up window displays: | #To delete customers, select a customer in the list and click the '''Delete''' button on the main page. A confirmation message pop-up window displays: | ||
| − | <br/> '''Figure | + | <br/> '''Figure 5: LE Delete Customer''' |
[[File:LEA LEDeleteCustomer.png|x230px|LEA LEDeleteCustomer.png]] | [[File:LEA LEDeleteCustomer.png|x230px|LEA LEDeleteCustomer.png]] | ||
| Line 132: | Line 115: | ||
<u>'''Note'''</u>: Only an unreferenced customer can be deleted. | <u>'''Note'''</u>: Only an unreferenced customer can be deleted. | ||
| + | | ||
| + | | ||
| + | == <span class="mw-headline" id="Printer"><span class="mw-headline" id="Printer"><span class="mw-headline" id="Printer"><span class="mw-headline" id="Printer"><span class="mw-headline" id="Printer"><span class="mw-headline" id="Printer"><span class="mw-headline" id="Printer"><span class="mw-headline" id="Printer"><span class="mw-headline" id="Printer"><span class="mw-headline" id="Printer"><span class="mw-headline" id="Printer"><span class="mw-headline" id="Printer"><span class="mw-headline" id="Printer"><span class="mw-headline" id="Printer"><span class="mw-headline" id="Printer_https:.2F.2Flh3.googleusercontent.com.2FzO5PICl_6uzuSxdCVvXBhPxeBmUml2IWPg_hW1S00Qead3Oi9cqMlk2HcRN2ZxbKwahKYrkcmXKJMGE5w7MlADrhNFeRvZP1DlHMyQg3MVSxgK_Zu3QqvKtb4tyx1ctFlCNWy0mCe66BDv3gC-ssbmn_IwU4Wsq31vZO2-aQUXOe7wYreSTv0yp16g">Printer [[File:LEA printerIcon.png]]</span></span></span></span></span></span></span></span></span></span></span></span></span></span></span> == | ||
| − | + | '''LE Admin Printers''' is the interface that manages the print queues for MES101 printing activities. Label Engine has a list of printers to which it can print labels. | |
| − | |||
| − | |||
| − | |||
| − | |||
| − | '''LE Admin Printers''' is the interface | ||
To access the '''Printer''' module, navigate to '''Administration''' > '''LE Administration '''> '''Printer''' | To access the '''Printer''' module, navigate to '''Administration''' > '''LE Administration '''> '''Printer''' | ||
| Line 154: | Line 135: | ||
| | ||
| − | '''Figure | + | '''Figure 6: LE Printer''' |
| − | [[File:LEA LEPrinter.png|900px]] | + | [[File:LEA LEPrinter.png|900px|LEA LEPrinter.png]] |
| | ||
| Line 164: | Line 145: | ||
| | ||
| − | + | === <span class="mw-headline" id="Filter_Printers"><span class="mw-headline" id="Filter_Printers"><span class="mw-headline" id="Filter_Printers"><span class="mw-headline" id="Filter_Printers"><span class="mw-headline" id="Filter_Printers"><span class="mw-headline" id="Filter_Printers"><span class="mw-headline" id="Filter_Printers"><span class="mw-headline" id="Filter_Printers"><span class="mw-headline" id="Filter_Printers"><span class="mw-headline" id="Filter_Printers"><span class="mw-headline" id="Filter_Printers"><span class="mw-headline" id="Filter_Printers"><span class="mw-headline" id="Filter_Printers"><span class="mw-headline" id="Filter_Printers"><span class="mw-headline" id="Filter_Printers"><span class="mw-headline" id="Filter_Printers"><span class="mw-headline" id="Filter_Printers"><span class="mw-headline" id="Filter_Printers">Filter Printers</span></span></span></span></span></span></span></span></span></span></span></span></span></span></span></span></span></span> === | |
| − | |||
| − | |||
| − | === <span class="mw-headline" id="Filter_Printers"><span class="mw-headline" id="Filter_Printers"><span class="mw-headline" id="Filter_Printers"><span class="mw-headline" id="Filter_Printers"><span class="mw-headline" id="Filter_Printers"><span class="mw-headline" id="Filter_Printers"><span class="mw-headline" id="Filter_Printers"><span class="mw-headline" id="Filter_Printers"><span class="mw-headline" id="Filter_Printers"><span class="mw-headline" id="Filter_Printers"><span class="mw-headline" id="Filter_Printers"><span class="mw-headline" id="Filter_Printers"><span class="mw-headline" id="Filter_Printers"><span class="mw-headline" id="Filter_Printers"><span class="mw-headline" id="Filter_Printers"><span class="mw-headline" id="Filter_Printers">Filter Printers</span></span></span></span></span></span></span></span></span></span></span></span></span></span></span></span> === | ||
The filter feature can be used to narrow the list that is displayed on the main '''Printer''' List page. This can be useful if the user wants to look at information pertaining to limited entries. Filters can be selected at the top of the '''Printer''' page. | The filter feature can be used to narrow the list that is displayed on the main '''Printer''' List page. This can be useful if the user wants to look at information pertaining to limited entries. Filters can be selected at the top of the '''Printer''' page. | ||
| Line 176: | Line 154: | ||
*Printer Name - the friendly name, an alias to the actual print queue name. | *Printer Name - the friendly name, an alias to the actual print queue name. | ||
| − | '''Figure | + | '''Figure 7: Filter Printer''' |
'''[[File:LEA FilterPrinter.png|x145px|LEA FilterPrinter.png]]''' | '''[[File:LEA FilterPrinter.png|x145px|LEA FilterPrinter.png]]''' | ||
| Line 184: | Line 162: | ||
| | ||
| − | === <span class="mw-headline" id="Add_Printers"><span class="mw-headline" id="Add_Printers"><span class="mw-headline" id="Add_Printers"><span class="mw-headline" id="Add_Printers"><span class="mw-headline" id="Add_Printers"><span class="mw-headline" id="Add_Printers"><span class="mw-headline" id="Add_Printers"><span class="mw-headline" id="Add_Printers"><span class="mw-headline" id="Add_Printers"><span class="mw-headline" id="Add_Printers"><span class="mw-headline" id="Add_Printers"><span class="mw-headline" id="Add_Printers"><span class="mw-headline" id="Add_Printers"><span class="mw-headline" id="Add_Printers">Add Printers</span></span></span></span></span></span></span></span></span></span></span></span></span></span> === | + | |
| + | === <span class="mw-headline" id="Add_Printers"><span class="mw-headline" id="Add_Printers"><span class="mw-headline" id="Add_Printers"><span class="mw-headline" id="Add_Printers"><span class="mw-headline" id="Add_Printers"><span class="mw-headline" id="Add_Printers"><span class="mw-headline" id="Add_Printers"><span class="mw-headline" id="Add_Printers"><span class="mw-headline" id="Add_Printers"><span class="mw-headline" id="Add_Printers"><span class="mw-headline" id="Add_Printers"><span class="mw-headline" id="Add_Printers"><span class="mw-headline" id="Add_Printers"><span class="mw-headline" id="Add_Printers"><span class="mw-headline" id="Add_Printers"><span class="mw-headline" id="Add_Printers"><span class="mw-headline" id="Add_Printers">Add Printers</span></span></span></span></span></span></span></span></span></span></span></span></span></span></span></span></span> === | ||
The main purpose of this feature is to create new print queues. | The main purpose of this feature is to create new print queues. | ||
| Line 194: | Line 173: | ||
| | ||
| − | '''Figure | + | '''Figure 8: Filter Printer Details''' |
'''[[File:LEA FilterPrinterDetails.png|x365px|LEA FilterPrinterDetails.png]]''' | '''[[File:LEA FilterPrinterDetails.png|x365px|LEA FilterPrinterDetails.png]]''' | ||
| Line 223: | Line 202: | ||
<u>'''Note'''</u>: If there are no entries, then no edge devices are set up. The user can go to the IIoT portlet to create a new edge device, with details primarily outside the scope of comparison amongst the new and old LE printer screens. | <u>'''Note'''</u>: If there are no entries, then no edge devices are set up. The user can go to the IIoT portlet to create a new edge device, with details primarily outside the scope of comparison amongst the new and old LE printer screens. | ||
| − | To navigate to the IIoT portlet, go to | + | To navigate to the IIoT portlet, go to '''Shop Floor Control >Configuration > IIoT Configuration.''' |
Users must also provide the IP address of the printer to which the prints will be directed. This IP network must be reachable from the edge device. Users will provide the port that the printer is listening on. | Users must also provide the IP address of the printer to which the prints will be directed. This IP network must be reachable from the edge device. Users will provide the port that the printer is listening on. | ||
| Line 257: | Line 236: | ||
| | ||
| − | === <span class="mw-headline" id="Edit_Printers"><span class="mw-headline" id="Edit_Printers"><span class="mw-headline" id="Edit_Printers"><span class="mw-headline" id="Edit_Printers"><span class="mw-headline" id="Edit_Printers"><span class="mw-headline" id="Edit_Printers"><span class="mw-headline" id="Edit_Printers"><span class="mw-headline" id="Edit_Printers"><span class="mw-headline" id="Edit_Printers"><span class="mw-headline" id="Edit_Printers"><span class="mw-headline" id="Edit_Printers"><span class="mw-headline" id="Edit_Printers"><span class="mw-headline" id="Edit_Printers"><span class="mw-headline" id="Edit_Printers">Edit Printers</span></span></span></span></span></span></span></span></span></span></span></span></span></span> === | + | === <span class="mw-headline" id="Edit_Printers"><span class="mw-headline" id="Edit_Printers"><span class="mw-headline" id="Edit_Printers"><span class="mw-headline" id="Edit_Printers"><span class="mw-headline" id="Edit_Printers"><span class="mw-headline" id="Edit_Printers"><span class="mw-headline" id="Edit_Printers"><span class="mw-headline" id="Edit_Printers"><span class="mw-headline" id="Edit_Printers"><span class="mw-headline" id="Edit_Printers"><span class="mw-headline" id="Edit_Printers"><span class="mw-headline" id="Edit_Printers"><span class="mw-headline" id="Edit_Printers"><span class="mw-headline" id="Edit_Printers"><span class="mw-headline" id="Edit_Printers"><span class="mw-headline" id="Edit_Printers">Edit Printers</span></span></span></span></span></span></span></span></span></span></span></span></span></span></span></span> === |
| | ||
| Line 265: | Line 244: | ||
| | ||
| − | '''Figure | + | '''Figure 9: LE Edit Printer Information''' |
'''[[File:LEA EditPrinterInfo.png|x430px|LEA EditPrinterInfo.png]]''' | '''[[File:LEA EditPrinterInfo.png|x430px|LEA EditPrinterInfo.png]]''' | ||
| Line 273: | Line 252: | ||
| | ||
| − | === <span class="mw-headline" id="Delete_Printers"><span class="mw-headline" id="Delete_Printers"><span class="mw-headline" id="Delete_Printers"><span class="mw-headline" id="Delete_Printers"><span class="mw-headline" id="Delete_Printers"><span class="mw-headline" id="Delete_Printers"><span class="mw-headline" id="Delete_Printers"><span class="mw-headline" id="Delete_Printers"><span class="mw-headline" id="Delete_Printers"><span class="mw-headline" id="Delete_Printers"><span class="mw-headline" id="Delete_Printers"><span class="mw-headline" id="Delete_Printers"><span class="mw-headline" id="Delete_Printers"><span class="mw-headline" id="Delete_Printers">Delete Printers </span></span></span></span></span></span></span></span></span></span></span></span></span></span> === | + | === <span class="mw-headline" id="Delete_Printers"><span class="mw-headline" id="Delete_Printers"><span class="mw-headline" id="Delete_Printers"><span class="mw-headline" id="Delete_Printers"><span class="mw-headline" id="Delete_Printers"><span class="mw-headline" id="Delete_Printers"><span class="mw-headline" id="Delete_Printers"><span class="mw-headline" id="Delete_Printers"><span class="mw-headline" id="Delete_Printers"><span class="mw-headline" id="Delete_Printers"><span class="mw-headline" id="Delete_Printers"><span class="mw-headline" id="Delete_Printers"><span class="mw-headline" id="Delete_Printers"><span class="mw-headline" id="Delete_Printers"><span class="mw-headline" id="Delete_Printers"><span class="mw-headline" id="Delete_Printers">Delete Printers </span></span></span></span></span></span></span></span></span></span></span></span></span></span></span></span> === |
#To delete a printer, select a printer in the list and click on the Delete button on the main page. A confirmation message pop-up window displays: | #To delete a printer, select a printer in the list and click on the Delete button on the main page. A confirmation message pop-up window displays: | ||
| Line 279: | Line 258: | ||
| | ||
| − | '''Figure | + | '''Figure 10: Delete Printer''' |
'''[[File:LEA DeleteLEPrinter.png|x250px|LEA DeleteLEPrinter.png]]''' | '''[[File:LEA DeleteLEPrinter.png|x250px|LEA DeleteLEPrinter.png]]''' | ||
| Line 289: | Line 268: | ||
| | ||
| − | == <span class="mw-headline" id="Database"><span class="mw-headline" id="Database"><span class="mw-headline" id="Database"><span class="mw-headline" id="Database"><span class="mw-headline" id="Database"><span class="mw-headline" id="Database"><span class="mw-headline" id="Database"><span class="mw-headline" id="Databasehttps:.2F.2Flh5.googleusercontent.com.2FhNX7fmM6l_DjXja8qGz6j6whfeNqsHnZvSG5bE3W6jUkJrkRkNk_DgO2KLF_RdsOKBoObaFk3HIvGX1EknbNPmfBECtEdrRHLHJcLLL4M9LzNiEvZDXcJ1_sSx-Lhgb_dbLON0geOTWfYKCwFLP17ZhPg_zq1MW0h564oLrWUrGNMdoqvcoklCYnxg">Database [[File: | + | == <span class="mw-headline" id="Database"><span class="mw-headline" id="Database"><span class="mw-headline" id="Database"><span class="mw-headline" id="Database"><span class="mw-headline" id="Database"><span class="mw-headline" id="Database"><span class="mw-headline" id="Database"><span class="mw-headline" id="Database"><span class="mw-headline" id="Databasehttps:.2F.2Flh5.googleusercontent.com.2FhNX7fmM6l_DjXja8qGz6j6whfeNqsHnZvSG5bE3W6jUkJrkRkNk_DgO2KLF_RdsOKBoObaFk3HIvGX1EknbNPmfBECtEdrRHLHJcLLL4M9LzNiEvZDXcJ1_sSx-Lhgb_dbLON0geOTWfYKCwFLP17ZhPg_zq1MW0h564oLrWUrGNMdoqvcoklCYnxg">Database [[File:LEAV DataBase icon.png]]</span></span></span></span></span></span></span></span></span> == |
Before a label can use a database, a database needs to be set up and configured within the Label Engine. | Before a label can use a database, a database needs to be set up and configured within the Label Engine. | ||
| Line 304: | Line 283: | ||
| | ||
| − | '''Figure | + | '''Figure 11: LE Database ''' |
| − | '''[[File:LEA databaseLE.png|x130px]]''' | + | '''[[File:LEA databaseLE.png|x130px|LEA databaseLE.png]]''' |
See below the details for each feature. | See below the details for each feature. | ||
| Line 312: | Line 291: | ||
| | ||
| − | === <span class="mw-headline" id="Filter_Databases"><span class="mw-headline" id="Filter_Databases"><span class="mw-headline" id="Filter_Databases"><span class="mw-headline" id="Filter_Databases"><span class="mw-headline" id="Filter_Databases"><span class="mw-headline" id="Filter_Databases"><span class="mw-headline" id="Filter_Databases"><span class="mw-headline" id="Filter_Databases">Filter Databases</span></span></span></span></span></span></span></span> === | + | === <span class="mw-headline" id="Filter_Databases"><span class="mw-headline" id="Filter_Databases"><span class="mw-headline" id="Filter_Databases"><span class="mw-headline" id="Filter_Databases"><span class="mw-headline" id="Filter_Databases"><span class="mw-headline" id="Filter_Databases"><span class="mw-headline" id="Filter_Databases"><span class="mw-headline" id="Filter_Databases"><span class="mw-headline" id="Filter_Databases">Filter Databases</span></span></span></span></span></span></span></span></span> === |
The filter feature can be used to narrow the list that is displayed on the main '''Database''' List page. This can be useful if the user wants to look at information pertaining to limited entries. Filters can be selected at the top of the '''Database''' page. | The filter feature can be used to narrow the list that is displayed on the main '''Database''' List page. This can be useful if the user wants to look at information pertaining to limited entries. Filters can be selected at the top of the '''Database''' page. | ||
| Line 318: | Line 297: | ||
To filter the '''Database''' List page listings, enter a database '''Name''' and/or Database '''Type''' fields and apply by clicking the '''Filter''' button. | To filter the '''Database''' List page listings, enter a database '''Name''' and/or Database '''Type''' fields and apply by clicking the '''Filter''' button. | ||
| − | <br/> '''Figure | + | <br/> '''Figure 12: LE Filter Database''' |
| − | [[File:LEA LEDataBasefields.png|x235px]] | + | [[File:LEA LEDataBasefields.png|x235px|LEA LEDataBasefields.png]] |
<br/> | <br/> | ||
| + | | ||
| − | === <span class="mw-headline" id="Add_Databases"><span class="mw-headline" id="Add_Databases"><span class="mw-headline" id="Add_Databases"><span class="mw-headline" id="Add_Databases"><span class="mw-headline" id="Add_Databases"><span class="mw-headline" id="Add_Databases"><span class="mw-headline" id="Add_Databases"><span class="mw-headline" id="Add_Databases"><span class="mw-headline" id="Add_Databases">Add Databases</span></span></span></span></span></span></span></span></span> === | + | === <span class="mw-headline" id="Add_Databases"><span class="mw-headline" id="Add_Databases"><span class="mw-headline" id="Add_Databases"><span class="mw-headline" id="Add_Databases"><span class="mw-headline" id="Add_Databases"><span class="mw-headline" id="Add_Databases"><span class="mw-headline" id="Add_Databases"><span class="mw-headline" id="Add_Databases"><span class="mw-headline" id="Add_Databases"><span class="mw-headline" id="Add_Databases">Add Databases</span></span></span></span></span></span></span></span></span></span> === |
Adding a database is as easy as providing the Database details: | Adding a database is as easy as providing the Database details: | ||
| − | '''Figure | + | '''Figure 13: LE Add Database''' |
| − | '''[[File:LEA Add Database.png|x376px]]''' | + | '''[[File:LEA Add Database.png|x376px|LEA Add Database.png]]''' |
*'''Name''' - the exact name of the database on the server (address); | *'''Name''' - the exact name of the database on the server (address); | ||
| Line 349: | Line 329: | ||
| | ||
| + | | ||
| − | === <span class="mw-headline" id="Edit_Databases"><span class="mw-headline" id="Edit_Databases"><span class="mw-headline" id="Edit_Databases"><span class="mw-headline" id="Edit_Databases"><span class="mw-headline" id="Edit_Databases"><span class="mw-headline" id="Edit_Databases"><span class="mw-headline" id="Edit_Databases"><span class="mw-headline" id="Edit_Databases"><span class="mw-headline" id="Edit_Databases">Edit Databases</span></span></span></span></span></span></span></span></span> === | + | === <span class="mw-headline" id="Edit_Databases"><span class="mw-headline" id="Edit_Databases"><span class="mw-headline" id="Edit_Databases"><span class="mw-headline" id="Edit_Databases"><span class="mw-headline" id="Edit_Databases"><span class="mw-headline" id="Edit_Databases"><span class="mw-headline" id="Edit_Databases"><span class="mw-headline" id="Edit_Databases"><span class="mw-headline" id="Edit_Databases"><span class="mw-headline" id="Edit_Databases">Edit Databases</span></span></span></span></span></span></span></span></span></span> === |
#To edit the database information, select a database in the list and click on the Edit button on the main page. The '''Database Details''' pop-up window displays: | #To edit the database information, select a database in the list and click on the Edit button on the main page. The '''Database Details''' pop-up window displays: | ||
| Line 356: | Line 337: | ||
| | ||
| − | '''Figure | + | '''Figure 14: LE Edit Database''' |
| − | [[File:LEA editdb.png|x370px]] | + | [[File:LEA editdb.png|x370px|LEA editdb.png]] |
Update the necessary information, select '''Test Connection''', and if the test were successful, select '''Save'''. | Update the necessary information, select '''Test Connection''', and if the test were successful, select '''Save'''. | ||
| Line 364: | Line 345: | ||
| | ||
| + | | ||
| − | === <span class="mw-headline" id="Delete_Databases"><span class="mw-headline" id="Delete_Databases"><span class="mw-headline" id="Delete_Databases"><span class="mw-headline" id="Delete_Databases"><span class="mw-headline" id="Delete_Databases"><span class="mw-headline" id="Delete_Databases"><span class="mw-headline" id="Delete_Databases"><span class="mw-headline" id="Delete_Databases"><span class="mw-headline" id="Delete_Databases">Delete Databases </span></span></span></span></span></span></span></span></span> === | + | === <span class="mw-headline" id="Delete_Databases"><span class="mw-headline" id="Delete_Databases"><span class="mw-headline" id="Delete_Databases"><span class="mw-headline" id="Delete_Databases"><span class="mw-headline" id="Delete_Databases"><span class="mw-headline" id="Delete_Databases"><span class="mw-headline" id="Delete_Databases"><span class="mw-headline" id="Delete_Databases"><span class="mw-headline" id="Delete_Databases"><span class="mw-headline" id="Delete_Databases">Delete Databases </span></span></span></span></span></span></span></span></span></span> === |
#To delete databases, select a database in the list and click on the Delete button on the main page. A confirmation message pop-up window displays: | #To delete databases, select a database in the list and click on the Delete button on the main page. A confirmation message pop-up window displays: | ||
| Line 371: | Line 353: | ||
| | ||
| − | '''Figure | + | '''Figure 15: LE Delete Database''' |
| − | [[File:LEA DeleteBD.png|x220px]] | + | [[File:LEA DeleteBD.png|x220px|LEA DeleteBD.png]] |
Select '''Yes''' to confirm deletion or '''No''' to abort. | Select '''Yes''' to confirm deletion or '''No''' to abort. | ||
| Line 379: | Line 361: | ||
| | ||
| + | | ||
| − | == <span class="mw-headline" id="Load_Database"><span class="mw-headline" id="Load_Database"><span class="mw-headline" id="Load_Database"><span class="mw-headline" id="Load_Database"><span class="mw-headline" id="Load_Database"><span class="mw-headline" id="Load_Database"><span class="mw-headline" id="Load_Database"><span class="mw-headline" id="Load_Database"><span class="mw-headline" id="Load_Database_https:.2F.2Flh5.googleusercontent.com.2FBNwKEY2yPeVR1pYWkw8b7Izjn0mdtK5EbGUXs9OWhftyUFwxo2ofeFs6fqXVMEP5hI0UOvsZ11r9klTGSVQW_iSqGSSvA7vtugJjoKPSeyxz87WqFYIlr9Y9YLeotZHtKON_-8j5gz0afapzQktbby5QBZn34podVVkdCe6KA6TxHDOlCLifzWw5Dw">Load Database [[File: | + | == <span class="mw-headline" id="Load_Database"><span class="mw-headline" id="Load_Database"><span class="mw-headline" id="Load_Database"><span class="mw-headline" id="Load_Database"><span class="mw-headline" id="Load_Database"><span class="mw-headline" id="Load_Database"><span class="mw-headline" id="Load_Database"><span class="mw-headline" id="Load_Database"><span class="mw-headline" id="Load_Database"><span class="mw-headline" id="Load_Database_https:.2F.2Flh5.googleusercontent.com.2FBNwKEY2yPeVR1pYWkw8b7Izjn0mdtK5EbGUXs9OWhftyUFwxo2ofeFs6fqXVMEP5hI0UOvsZ11r9klTGSVQW_iSqGSSvA7vtugJjoKPSeyxz87WqFYIlr9Y9YLeotZHtKON_-8j5gz0afapzQktbby5QBZn34podVVkdCe6KA6TxHDOlCLifzWw5Dw">Load Database [[File:LEAV LoadDatabase Icon.png]]</span></span></span></span></span></span></span></span></span></span> == |
| | ||
| Line 395: | Line 378: | ||
| | ||
| − | '''Figure | + | '''Figure 16: Load Database Main Page''' |
'''[[File:LEA LoadDatabaseMainPage.png|x200px|LEA LoadDatabaseMainPage.png]]''' | '''[[File:LEA LoadDatabaseMainPage.png|x200px|LEA LoadDatabaseMainPage.png]]''' | ||
| Line 410: | Line 393: | ||
| | ||
| − | === <span class="mw-headline" id="No_Action.2FEnable.2FDisable_Tables"><span class="mw-headline" id="No_Action.2FEnable.2FDisable_Tables"><span class="mw-headline" id="No_Action.2FEnable.2FDisable_Tables"><span class="mw-headline" id="No_Action.2FEnable.2FDisable_Tables"><span class="mw-headline" id="No_Action.2FEnable.2FDisable_Tables"><span class="mw-headline" id="No_Action.2FEnable.2FDisable_Tables"><span class="mw-headline" id="No_Action.2FEnable.2FDisable_Tables"><span class="mw-headline" id="No_Action.2FEnable.2FDisable_Tables"><span class="mw-headline" id="No_Action.2FEnable.2FDisable_Tables">No Action/Enable/Disable Tables</span></span></span></span></span></span></span></span></span> === | + | === <span class="mw-headline" id="No_Action.2FEnable.2FDisable_Tables"><span class="mw-headline" id="No_Action.2FEnable.2FDisable_Tables"><span class="mw-headline" id="No_Action.2FEnable.2FDisable_Tables"><span class="mw-headline" id="No_Action.2FEnable.2FDisable_Tables"><span class="mw-headline" id="No_Action.2FEnable.2FDisable_Tables"><span class="mw-headline" id="No_Action.2FEnable.2FDisable_Tables"><span class="mw-headline" id="No_Action.2FEnable.2FDisable_Tables"><span class="mw-headline" id="No_Action.2FEnable.2FDisable_Tables"><span class="mw-headline" id="No_Action.2FEnable.2FDisable_Tables"><span class="mw-headline" id="No_Action.2FEnable.2FDisable_Tables">No Action/Enable/Disable Tables</span></span></span></span></span></span></span></span></span></span> === |
The user can enable or disable tables to be used in the LE Labels. | The user can enable or disable tables to be used in the LE Labels. | ||
| Line 416: | Line 399: | ||
| | ||
| − | '''Figure | + | '''Figure 17: Load Database Enable Table''' |
'''[[File:LEA LoadDatabaseEnableTable.png|x200px|LEA LoadDatabaseEnableTable.png]]''' | '''[[File:LEA LoadDatabaseEnableTable.png|x200px|LEA LoadDatabaseEnableTable.png]]''' | ||
| Line 426: | Line 409: | ||
| | ||
| − | '''Figure | + | '''Figure 18: Load Database Disable Table''' |
'''[[File:LEA LoadDatabaseDisableTable.png|x200px|LEA LoadDatabaseDisableTable.png]]''' | '''[[File:LEA LoadDatabaseDisableTable.png|x200px|LEA LoadDatabaseDisableTable.png]]''' | ||
| Line 438: | Line 421: | ||
| | ||
| − | === <span class="mw-headline" id="Reload_Tables"><span class="mw-headline" id="Reload_Tables"><span class="mw-headline" id="Reload_Tables"><span class="mw-headline" id="Reload_Tables"><span class="mw-headline" id="Reload_Tables"><span class="mw-headline" id="Reload_Tables"><span class="mw-headline" id="Reload_Tables"><span class="mw-headline" id="Reload_Tables"><span class="mw-headline" id="Reload_Tables">Reload Tables</span></span></span></span></span></span></span></span></span> === | + | === <span class="mw-headline" id="Reload_Tables"><span class="mw-headline" id="Reload_Tables"><span class="mw-headline" id="Reload_Tables"><span class="mw-headline" id="Reload_Tables"><span class="mw-headline" id="Reload_Tables"><span class="mw-headline" id="Reload_Tables"><span class="mw-headline" id="Reload_Tables"><span class="mw-headline" id="Reload_Tables"><span class="mw-headline" id="Reload_Tables"><span class="mw-headline" id="Reload_Tables">Reload Tables</span></span></span></span></span></span></span></span></span></span> === |
This functionality will reload any updates done in the database tables to the current list. | This functionality will reload any updates done in the database tables to the current list. | ||
| Line 448: | Line 431: | ||
| | ||
| − | '''Figure | + | '''Figure 19: Load Database Reload Tables''' |
'''[[File:LEA LoadDatabaseReloadTables.png|x200px|LEA LoadDatabaseReloadTables.png]]''' | '''[[File:LEA LoadDatabaseReloadTables.png|x200px|LEA LoadDatabaseReloadTables.png]]''' | ||
| Line 456: | Line 439: | ||
| | ||
| − | === <span class="mw-headline" id="View_Columns"><span class="mw-headline" id="View_Columns"><span class="mw-headline" id="View_Columns"><span class="mw-headline" id="View_Columns"><span class="mw-headline" id="View_Columns"><span class="mw-headline" id="View_Columns"><span class="mw-headline" id="View_Columns"><span class="mw-headline" id="View_Columns"><span class="mw-headline" id="View_Columns">View Columns</span></span></span></span></span></span></span></span></span> === | + | === <span class="mw-headline" id="View_Columns"><span class="mw-headline" id="View_Columns"><span class="mw-headline" id="View_Columns"><span class="mw-headline" id="View_Columns"><span class="mw-headline" id="View_Columns"><span class="mw-headline" id="View_Columns"><span class="mw-headline" id="View_Columns"><span class="mw-headline" id="View_Columns"><span class="mw-headline" id="View_Columns"><span class="mw-headline" id="View_Columns">View Columns</span></span></span></span></span></span></span></span></span></span> === |
Click on '''View Columns''' to display the columns list that belongs to the selected table. | Click on '''View Columns''' to display the columns list that belongs to the selected table. | ||
| Line 462: | Line 445: | ||
| | ||
| − | '''Figure | + | '''Figure 20: Load Database View Columns''' |
'''[[File:LEA LoadDatabaseViewColumns.png|x355px|LEA LoadDatabaseViewColumns.png]]''' | '''[[File:LEA LoadDatabaseViewColumns.png|x355px|LEA LoadDatabaseViewColumns.png]]''' | ||
| Line 470: | Line 453: | ||
| | ||
| − | === <span class="mw-headline" id="Expose_Tables"><span class="mw-headline" id="Expose_Tables"><span class="mw-headline" id="Expose_Tables"><span class="mw-headline" id="Expose_Tables"><span class="mw-headline" id="Expose_Tables"><span class="mw-headline" id="Expose_Tables"><span class="mw-headline" id="Expose_Tables"><span class="mw-headline" id="Expose_Tables"><span class="mw-headline" id="Expose_Tables">Expose Tables </span></span></span></span></span></span></span></span></span> === | + | === <span class="mw-headline" id="Expose_Tables"><span class="mw-headline" id="Expose_Tables"><span class="mw-headline" id="Expose_Tables"><span class="mw-headline" id="Expose_Tables"><span class="mw-headline" id="Expose_Tables"><span class="mw-headline" id="Expose_Tables"><span class="mw-headline" id="Expose_Tables"><span class="mw-headline" id="Expose_Tables"><span class="mw-headline" id="Expose_Tables"><span class="mw-headline" id="Expose_Tables">Expose Tables </span></span></span></span></span></span></span></span></span></span> === |
Click on '''Expose Tables''' to display the relationships between activated tables. | Click on '''Expose Tables''' to display the relationships between activated tables. | ||
| Line 476: | Line 459: | ||
| | ||
| − | '''Figure | + | '''Figure 21: Load Database Expose Tables''' |
'''[[File:LEA LoadDatabaseExposeTables.png|x425px|LEA LoadDatabaseExposeTables.png]]''' | '''[[File:LEA LoadDatabaseExposeTables.png|x425px|LEA LoadDatabaseExposeTables.png]]''' | ||
| Line 490: | Line 473: | ||
| | ||
| − | ==== <span class="mw-headline" id="Expose_Tables_-_Enable.2FDisable_Custom_Joins"><span class="mw-headline" id="Expose_Tables_-_Enable.2FDisable_Custom_Joins"><span class="mw-headline" id="Expose_Tables_-_Enable.2FDisable_Custom_Joins"><span class="mw-headline" id="Expose_Tables_-_Enable.2FDisable_Custom_Joins"><span class="mw-headline" id="Expose_Tables_-_Enable.2FDisable_Custom_Joins"><span class="mw-headline" id="Expose_Tables_-_Enable.2FDisable_Custom_Joins"><span class="mw-headline" id="Expose_Tables_-_Enable.2FDisable_Custom_Joins"><span class="mw-headline" id="Expose_Tables_-_Enable.2FDisable_Custom_Joins"><span class="mw-headline" id="Expose_Tables_-_Enable.2FDisable_Custom_Joins"><span class="mw-headline" id="Expose_Tables_-_Enable.2FDisable_Custom_Joins">Expose Tables - Enable/Disable Custom Joins</span></span></span></span></span></span></span></span></span></span> ==== | + | ==== <span class="mw-headline" id="Expose_Tables_-_Enable.2FDisable_Custom_Joins"><span class="mw-headline" id="Expose_Tables_-_Enable.2FDisable_Custom_Joins"><span class="mw-headline" id="Expose_Tables_-_Enable.2FDisable_Custom_Joins"><span class="mw-headline" id="Expose_Tables_-_Enable.2FDisable_Custom_Joins"><span class="mw-headline" id="Expose_Tables_-_Enable.2FDisable_Custom_Joins"><span class="mw-headline" id="Expose_Tables_-_Enable.2FDisable_Custom_Joins"><span class="mw-headline" id="Expose_Tables_-_Enable.2FDisable_Custom_Joins"><span class="mw-headline" id="Expose_Tables_-_Enable.2FDisable_Custom_Joins"><span class="mw-headline" id="Expose_Tables_-_Enable.2FDisable_Custom_Joins"><span class="mw-headline" id="Expose_Tables_-_Enable.2FDisable_Custom_Joins"><span class="mw-headline" id="Expose_Tables_-_Enable.2FDisable_Custom_Joins">Expose Tables - Enable/Disable Custom Joins</span></span></span></span></span></span></span></span></span></span></span> ==== |
Select join in the list and click on '''Enable Join''' for an available join or '''Disable Join''' for an unavailable join. | Select join in the list and click on '''Enable Join''' for an available join or '''Disable Join''' for an unavailable join. | ||
| Line 496: | Line 479: | ||
| | ||
| − | '''Figure | + | '''Figure 22: Enable/Disable Joins''' |
[[File:LEA EnableDisableJoins.png|x370px|LEA EnableDisableJoins.png]] | [[File:LEA EnableDisableJoins.png|x370px|LEA EnableDisableJoins.png]] | ||
| Line 506: | Line 489: | ||
| | ||
| − | ==== <span class="mw-headline" id="Expose_Tables_-_Add_Custom_Joins"><span class="mw-headline" id="Expose_Tables_-_Add_Custom_Joins"><span class="mw-headline" id="Expose_Tables_-_Add_Custom_Joins"><span class="mw-headline" id="Expose_Tables_-_Add_Custom_Joins"><span class="mw-headline" id="Expose_Tables_-_Add_Custom_Joins"><span class="mw-headline" id="Expose_Tables_-_Add_Custom_Joins"><span class="mw-headline" id="Expose_Tables_-_Add_Custom_Joins"><span class="mw-headline" id="Expose_Tables_-_Add_Custom_Joins"><span class="mw-headline" id="Expose_Tables_-_Add_Custom_Joins"><span class="mw-headline" id="Expose_Tables_-_Add_Custom_Joins">Expose Tables - Add Custom Joins</span></span></span></span></span></span></span></span></span></span> ==== | + | ==== <span class="mw-headline" id="Expose_Tables_-_Add_Custom_Joins"><span class="mw-headline" id="Expose_Tables_-_Add_Custom_Joins"><span class="mw-headline" id="Expose_Tables_-_Add_Custom_Joins"><span class="mw-headline" id="Expose_Tables_-_Add_Custom_Joins"><span class="mw-headline" id="Expose_Tables_-_Add_Custom_Joins"><span class="mw-headline" id="Expose_Tables_-_Add_Custom_Joins"><span class="mw-headline" id="Expose_Tables_-_Add_Custom_Joins"><span class="mw-headline" id="Expose_Tables_-_Add_Custom_Joins"><span class="mw-headline" id="Expose_Tables_-_Add_Custom_Joins"><span class="mw-headline" id="Expose_Tables_-_Add_Custom_Joins"><span class="mw-headline" id="Expose_Tables_-_Add_Custom_Joins">Expose Tables - Add Custom Joins</span></span></span></span></span></span></span></span></span></span></span> ==== |
This functionality is used when tables do not have relationships and this is necessary to extract some data from the database. | This functionality is used when tables do not have relationships and this is necessary to extract some data from the database. | ||
| Line 516: | Line 499: | ||
| | ||
| − | '''Figure | + | '''Figure 23: Add Custom Joins''' |
[[File:LEA AddCustomsJoins.png|x400px|LEA AddCustomsJoins.png]] | [[File:LEA AddCustomsJoins.png|x400px|LEA AddCustomsJoins.png]] | ||
| Line 535: | Line 518: | ||
| | ||
| − | ==== <span class="mw-headline" id="Edit_Custom_Joins"><span class="mw-headline" id="Edit_Custom_Joins"><span class="mw-headline" id="Edit_Custom_Joins"><span class="mw-headline" id="Edit_Custom_Joins"><span class="mw-headline" id="Edit_Custom_Joins"><span class="mw-headline" id="Edit_Custom_Joins"><span class="mw-headline" id="Edit_Custom_Joins"><span class="mw-headline" id="Edit_Custom_Joins"><span class="mw-headline" id="Edit_Custom_Joins"><span class="mw-headline" id="Edit_Custom_Joins">Edit Custom Joins</span></span></span></span></span></span></span></span></span></span> ==== | + | ==== <span class="mw-headline" id="Edit_Custom_Joins"><span class="mw-headline" id="Edit_Custom_Joins"><span class="mw-headline" id="Edit_Custom_Joins"><span class="mw-headline" id="Edit_Custom_Joins"><span class="mw-headline" id="Edit_Custom_Joins"><span class="mw-headline" id="Edit_Custom_Joins"><span class="mw-headline" id="Edit_Custom_Joins"><span class="mw-headline" id="Edit_Custom_Joins"><span class="mw-headline" id="Edit_Custom_Joins"><span class="mw-headline" id="Edit_Custom_Joins"><span class="mw-headline" id="Edit_Custom_Joins">Edit Custom Joins</span></span></span></span></span></span></span></span></span></span></span> ==== |
#To edit the custom joins information, select a join in the list and click on the Edit button on the main page. The Custom Table Join pop-up window displays: | #To edit the custom joins information, select a join in the list and click on the Edit button on the main page. The Custom Table Join pop-up window displays: | ||
| Line 541: | Line 524: | ||
| | ||
| − | '''Figure | + | '''Figure 24: Edit Custom Joins''' |
'''[[File:LEA EditCustomJoins.png|x400px|LEA EditCustomJoins.png]]''' | '''[[File:LEA EditCustomJoins.png|x400px|LEA EditCustomJoins.png]]''' | ||
| Line 549: | Line 532: | ||
| | ||
| + | | ||
| − | ==== <span class="mw-headline" id="Delete_Custom_Joins"><span class="mw-headline" id="Delete_Custom_Joins"><span class="mw-headline" id="Delete_Custom_Joins"><span class="mw-headline" id="Delete_Custom_Joins"><span class="mw-headline" id="Delete_Custom_Joins"><span class="mw-headline" id="Delete_Custom_Joins"><span class="mw-headline" id="Delete_Custom_Joins"><span class="mw-headline" id="Delete_Custom_Joins"><span class="mw-headline" id="Delete_Custom_Joins"><span class="mw-headline" id="Delete_Custom_Joins"><span class="mw-headline" id="Delete_Custom_Joins">Delete Custom Joins</span></span></span></span></span></span></span></span></span></span></span> ==== | + | ==== <span class="mw-headline" id="Delete_Custom_Joins"><span class="mw-headline" id="Delete_Custom_Joins"><span class="mw-headline" id="Delete_Custom_Joins"><span class="mw-headline" id="Delete_Custom_Joins"><span class="mw-headline" id="Delete_Custom_Joins"><span class="mw-headline" id="Delete_Custom_Joins"><span class="mw-headline" id="Delete_Custom_Joins"><span class="mw-headline" id="Delete_Custom_Joins"><span class="mw-headline" id="Delete_Custom_Joins"><span class="mw-headline" id="Delete_Custom_Joins"><span class="mw-headline" id="Delete_Custom_Joins"><span class="mw-headline" id="Delete_Custom_Joins">Delete Custom Joins</span></span></span></span></span></span></span></span></span></span></span></span> ==== |
#To delete custom joins, select a join in the list and click on the Delete button on the main page. A confirmation message pop-up window displays: | #To delete custom joins, select a join in the list and click on the Delete button on the main page. A confirmation message pop-up window displays: | ||
| Line 556: | Line 540: | ||
| | ||
| − | '''Figure | + | '''Figure 25: Delete Custom Joins''' |
[[File:LEA DeleteCustomJoins.png|x270px|LEA DeleteCustomJoins.png]] | [[File:LEA DeleteCustomJoins.png|x270px|LEA DeleteCustomJoins.png]] | ||
| Line 563: | Line 547: | ||
| | ||
| − | |||
| − | |||
| − | |||
| | ||
| − | | + | == <span class="mw-headline" id="Token_Creation"><span class="mw-headline" id="Token_Creation"><span class="mw-headline" id="Token_Creation"><span class="mw-headline" id="Token_Creation"><span class="mw-headline" id="Token_Creation"><span class="mw-headline" id="Token_Creation"><span class="mw-headline" id="Token_Creation"><span class="mw-headline" id="Token_Creation"><span class="mw-headline" id="Token_Creation"><span class="mw-headline" id="Token_Creation_https:.2F.2Flh6.googleusercontent.com.2FsurjFDy8CRpv8XLNfF9IXCus4mZZx7CvCOWck5pl6lp9OCmrd1JnOga-J80zhPrLTwOoXxDiRUv6Bld5907MFckJ-B0E2NdeQ2tgBiNX8uVfcdkuSzfTxSC7rX9Mfj-lErYP76jm9CCxZkvecwKZrA9uS4aOGtNnbAteuW4Ch7oblBXXDYAGutwX">Token Creation [[File:LEAV Token Creation Icon.png]]</span></span></span></span></span></span></span></span></span></span> == |
The token creation was developed to check the service call integrity. <br/> To access the '''Token Creation''' functionality, navigate to '''Administration''' > '''LE Administration''' > '''Token Creation'''. | The token creation was developed to check the service call integrity. <br/> To access the '''Token Creation''' functionality, navigate to '''Administration''' > '''LE Administration''' > '''Token Creation'''. | ||
| Line 582: | Line 563: | ||
| | ||
| − | '''Figure | + | '''Figure 26: LE Token Main Page''' |
| − | [[File:LEA Tokecreation.png|900px]] | + | [[File:LEA Tokecreation.png|900px|LEA Tokecreation.png]] |
| | ||
| Line 590: | Line 571: | ||
| | ||
| − | === <span class="mw-headline" id="Filter_Tokens"><span class="mw-headline" id="Filter_Tokens"><span class="mw-headline" id="Filter_Tokens"><span class="mw-headline" id="Filter_Tokens"><span class="mw-headline" id="Filter_Tokens"><span class="mw-headline" id="Filter_Tokens"><span class="mw-headline" id="Filter_Tokens"><span class="mw-headline" id="Filter_Tokens"><span class="mw-headline" id="Filter_Tokens">Filter Tokens</span></span></span></span></span></span></span></span></span> === | + | === <span class="mw-headline" id="Filter_Tokens"><span class="mw-headline" id="Filter_Tokens"><span class="mw-headline" id="Filter_Tokens"><span class="mw-headline" id="Filter_Tokens"><span class="mw-headline" id="Filter_Tokens"><span class="mw-headline" id="Filter_Tokens"><span class="mw-headline" id="Filter_Tokens"><span class="mw-headline" id="Filter_Tokens"><span class="mw-headline" id="Filter_Tokens"><span class="mw-headline" id="Filter_Tokens">Filter Tokens</span></span></span></span></span></span></span></span></span></span> === |
The filter feature can be used to narrow the list that is displayed on the main '''Token Creation''' List page. This can be useful if the user wants to look at information pertaining to limited entries. Filters can be selected at the top of the Token Creation page. | The filter feature can be used to narrow the list that is displayed on the main '''Token Creation''' List page. This can be useful if the user wants to look at information pertaining to limited entries. Filters can be selected at the top of the Token Creation page. | ||
| − | <br/> '''Figure | + | <br/> '''Figure 27: LE Filter Token''' |
| − | [[File:LEA FilterToken.png|900px]] | + | [[File:LEA FilterToken.png|900px|LEA FilterToken.png]] |
| | ||
| Line 604: | Line 585: | ||
| | ||
| − | === <span class="mw-headline" id="Add_Tokens"><span class="mw-headline" id="Add_Tokens"><span class="mw-headline" id="Add_Tokens"><span class="mw-headline" id="Add_Tokens"><span class="mw-headline" id="Add_Tokens"><span class="mw-headline" id="Add_Tokens"><span class="mw-headline" id="Add_Tokens">'''<span class="mw-headline" id="Add_Tokens"><span class="mw-headline" id="Add_Tokens">Add Tokens</span></span>'''</span></span></span></span></span></span></span> === | + | === <span class="mw-headline" id="Add_Tokens"><span class="mw-headline" id="Add_Tokens"><span class="mw-headline" id="Add_Tokens"><span class="mw-headline" id="Add_Tokens"><span class="mw-headline" id="Add_Tokens"><span class="mw-headline" id="Add_Tokens"><span class="mw-headline" id="Add_Tokens"><span class="mw-headline" id="Add_Tokens">'''<span class="mw-headline" id="Add_Tokens"><span class="mw-headline" id="Add_Tokens">Add Tokens</span></span>'''</span></span></span></span></span></span></span></span> === |
To add tokens, provide the following information: | To add tokens, provide the following information: | ||
| − | '''Figure | + | '''Figure 28: LE Add Token''' |
| − | '''[[File:LEA AddToken.png|x228px]]''' | + | '''[[File:LEA AddToken.png|x228px|LEA AddToken.png]]''' |
*'''Token name''' - the name of the token | *'''Token name''' - the name of the token | ||
| Line 624: | Line 605: | ||
| | ||
| − | === <span class="mw-headline" id="Edit_Tokens"><span class="mw-headline" id="Edit_Tokens"><span class="mw-headline" id="Edit_Tokens"><span class="mw-headline" id="Edit_Tokens"><span class="mw-headline" id="Edit_Tokens"><span class="mw-headline" id="Edit_Tokens"><span class="mw-headline" id="Edit_Tokens"><span class="mw-headline" id="Edit_Tokens"><span class="mw-headline" id="Edit_Tokens">Edit Tokens</span></span></span></span></span></span></span></span></span> === | + | === <span class="mw-headline" id="Edit_Tokens"><span class="mw-headline" id="Edit_Tokens"><span class="mw-headline" id="Edit_Tokens"><span class="mw-headline" id="Edit_Tokens"><span class="mw-headline" id="Edit_Tokens"><span class="mw-headline" id="Edit_Tokens"><span class="mw-headline" id="Edit_Tokens"><span class="mw-headline" id="Edit_Tokens"><span class="mw-headline" id="Edit_Tokens"><span class="mw-headline" id="Edit_Tokens">Edit Tokens</span></span></span></span></span></span></span></span></span></span> === |
#To edit the token information, select a token in the list and click on the Edit button in the main page. The '''Tokens Creation '''pop-up window displays: | #To edit the token information, select a token in the list and click on the Edit button in the main page. The '''Tokens Creation '''pop-up window displays: | ||
| − | '''Figure | + | '''Figure 29: Edit Token''' |
| − | [[File:LEA EditToken.png|x270px]] | + | [[File:LEA EditToken.png|x270px|LEA EditToken.png]] |
Update the necessary information, select '''Get Token Value''', and if the test were successful select '''Save'''. | Update the necessary information, select '''Get Token Value''', and if the test were successful select '''Save'''. | ||
| Line 636: | Line 617: | ||
| | ||
| − | === <span class="mw-headline" id="Delete_Token"><span class="mw-headline" id="Delete_Token"><span class="mw-headline" id="Delete_Token"><span class="mw-headline" id="Delete_Token"><span class="mw-headline" id="Delete_Token"><span class="mw-headline" id="Delete_Token"><span class="mw-headline" id="Delete_Token"><span class="mw-headline" id="Delete_Token"><span class="mw-headline" id="Delete_Token">Delete Token</span></span></span></span></span></span></span></span></span> === | + | === <span class="mw-headline" id="Delete_Token"><span class="mw-headline" id="Delete_Token"><span class="mw-headline" id="Delete_Token"><span class="mw-headline" id="Delete_Token"><span class="mw-headline" id="Delete_Token"><span class="mw-headline" id="Delete_Token"><span class="mw-headline" id="Delete_Token"><span class="mw-headline" id="Delete_Token"><span class="mw-headline" id="Delete_Token"><span class="mw-headline" id="Delete_Token">Delete Token</span></span></span></span></span></span></span></span></span></span> === |
#To delete tokens, select a token in the list and click on the Delete button on the main page. A confirmation message pop-up window displays: | #To delete tokens, select a token in the list and click on the Delete button on the main page. A confirmation message pop-up window displays: | ||
| Line 642: | Line 623: | ||
| | ||
| − | '''Figure | + | '''Figure 30: LE Delete Token''' |
| − | [[File:LEA DeleteToken.png|x220px]] | + | [[File:LEA DeleteToken.png|x220px|LEA DeleteToken.png]] |
Select '''Yes''' to confirm deletion or '''No''' to abort. | Select '''Yes''' to confirm deletion or '''No''' to abort. | ||
| + | | ||
| − | == <span class="mw-headline" id="Application_Configuration"><span class="mw-headline" id="Application_Configuration"><span class="mw-headline" id="Application_Configuration"><span class="mw-headline" id="Application_Configuration"><span class="mw-headline" id="Application_Configuration"><span class="mw-headline" id="Application_Configuration"><span class="mw-headline" id="Application_Configuration"><span class="mw-headline" id="Application_Configuration"><span class="mw-headline" id="Application_Configuration"><span class="mw-headline" id="Application_Configuration_https:.2F.2Flh3.googleusercontent.com.2FZ2n1GunNXopn6Hxs2muBqBtAbCx8wJFLd33jxfszfURymDc-zfF4IGcH3-_hNLxlzKdN5Xnysm8BWd-KLtPDialLEj9DRHM0HTzy7L8WWOzG8Wu1R7Ni7y22aUuqRK1_yqXVcEK0GgL8QlHkbBcbT088ihD1kx_wpioGc4eRjx1ZG4u6w0l0b7wC">Application Configuration [[File: | + | == <span class="mw-headline" id="Application_Configuration"><span class="mw-headline" id="Application_Configuration"><span class="mw-headline" id="Application_Configuration"><span class="mw-headline" id="Application_Configuration"><span class="mw-headline" id="Application_Configuration"><span class="mw-headline" id="Application_Configuration"><span class="mw-headline" id="Application_Configuration"><span class="mw-headline" id="Application_Configuration"><span class="mw-headline" id="Application_Configuration"><span class="mw-headline" id="Application_Configuration"><span class="mw-headline" id="Application_Configuration_https:.2F.2Flh3.googleusercontent.com.2FZ2n1GunNXopn6Hxs2muBqBtAbCx8wJFLd33jxfszfURymDc-zfF4IGcH3-_hNLxlzKdN5Xnysm8BWd-KLtPDialLEj9DRHM0HTzy7L8WWOzG8Wu1R7Ni7y22aUuqRK1_yqXVcEK0GgL8QlHkbBcbT088ihD1kx_wpioGc4eRjx1ZG4u6w0l0b7wC">Application Configuration [[File:LEAV Application Config Icon.png]]</span></span></span></span></span></span></span></span></span></span></span> == |
This configuration page is used directly in the LE Labels. | This configuration page is used directly in the LE Labels. | ||
| Line 657: | Line 639: | ||
The '''Application Configuration''' page is displayed: | The '''Application Configuration''' page is displayed: | ||
| − | <br/> '''Figure | + | <br/> '''Figure 31: Application Configuration Main Page''' |
'''[[File:LEA ApplicationConfigurationMain.png|x360px|LEA ApplicationConfigurationMain.png]]''' | '''[[File:LEA ApplicationConfigurationMain.png|x360px|LEA ApplicationConfigurationMain.png]]''' | ||
Latest revision as of 17:09, 15 October 2024
42Q Home > Administration > Label Enginge Admin
Contents
Introduction
Labels are critical to the overall manufacturing process. 42Q understands this need and has worked to develop a system for label creation, edition, and sharing.
The Label Engine tool empowers users to control the label design and implementation process. It also provides users and their teams with a shared library of designs to further reduce the overall effort to establish a new label.
There is tremendous value in self-service functionality and in site-to-site collaboration. 42Q has made a significant step in both of these areas with the release of the Label Engine and is working on similar capabilities throughout the MES suite.
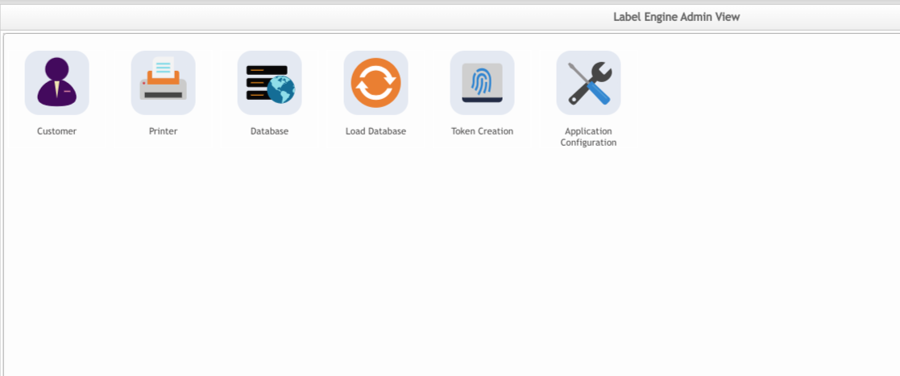
Label Engine Administration is responsible for System Configuration. In this portlet, Administrators can do the following:
- Add/Edit and Delete a Customer, Printer, or Database;
- Load a Database;
- Token Creation;
- Application Configuration;
To access the customer module, navigate to Administration > LE Engine Admin
Figure 1: Label Engine
Customer 
The Customer sub-module is responsible for creating, editing, or deleting customers in the database.
To access the customer module, navigate to Administration > LE Engine Admin >Customer.
Users can select the following features:
- Filter: Filter and search the list on the page.
- Add: Add a Customer.
- Edit: Edit a Customer from the list.
- Delete: Delete a registered Customer from the list.
See below the details for each feature.
Filter Customers
The filter feature can be used to narrow the list that is displayed on the main Customer List page. This can be useful if the user wants to look at information pertaining to limited entries. Filters can be selected at the top of the Customer page.
Figure 2: LE Customer Name/Filter
To filter the Customer List page listings, select the Name field and apply by clicking the Filter button.
Add Customers
The primary purpose of this feature is to add customer information. Each label is associated with a customer so, to set up a customer, the user must provide the following information:
- To add a new customer, click the Add button on the main page. The Customer Details pop-up window displays:
The system displays a Window allowing to fill up the following fields:
- Name - the name of the customer. (each customer name must be unique)
- Comments - any additional free form information the user wishes to associate with the customer.
Figure 3: Add LE Customer
Once this information is entered, select the Save button.
Note:Once created, a customer's details can be updated, however, only an unreferenced customer can be deleted.
Edit LE Customers Information
To edit customer information, select a customer in the list and click on the Edit button on the main page. The Customer Details pop-up window displays:
Figure 4: LE Edit Customer Information
Update any necessary information and select Save.
Delete Customers
- To delete customers, select a customer in the list and click the Delete button on the main page. A confirmation message pop-up window displays:
Figure 5: LE Delete Customer
Select Yes to confirm deletion or No to abort.
Note: Only an unreferenced customer can be deleted.
Printer 
LE Admin Printers is the interface that manages the print queues for MES101 printing activities. Label Engine has a list of printers to which it can print labels.
To access the Printer module, navigate to Administration > LE Administration > Printer
Users are able to select the following features:
- Filter: Filter and search the list on the page.
- Add: Add a Printer.
- Edit: Edit a Printer from the list.
- Delete: Delete a registered Printer from the list.
Figure 6: LE Printer
See below the details for each feature.
Filter Printers
The filter feature can be used to narrow the list that is displayed on the main Printer List page. This can be useful if the user wants to look at information pertaining to limited entries. Filters can be selected at the top of the Printer page.
To filter the Printer List page listings, enter a Printer Friendly Name and/or a Print Queue Name and/or Resolution fields and apply by clicking the Filter button.
- Queue Name - the name of the actual print queue Resolution - the resolution of the printer, e.g. 200 dpi, 300dpi, 600 dpi, etc.
- Printer Name - the friendly name, an alias to the actual print queue name.
Figure 7: Filter Printer
Add Printers
The main purpose of this feature is to create new print queues.
- To add a new printer, click on the Add button on the main page. The Printer Details pop-up window displays.
Note: Print Queue names are automatically generated.
Figure 8: Filter Printer Details
Adding a printer is as easy as providing the following details:
- Printer Name - the friendly name for the printer.
- Print Queue - the actual print queue name which is system generated. system generated
- Resolution - the resolution of the printer, e.g. 200 dpi, 300dpi, 600 dpi, etc.
- Make (optional) - Description of the brand of the printer. A non functional attribute but provided to assist the plant with printer management
- Printer Model (optional) - description of the specific printer. A non functional attribute but provided to assist the plant with printer management
- Description (optional) - a free-form description of the printer. A non functional attribute but provided to assist the plant with printer management
- Connectivity Type options:
-
- Edge Device
-
-
- Composed of hardware that performs the two essential functions of providing physical connectivity and enabling traffic between networks.
-
Note: Users can use the printer name or the printer queue name in the auto commands or macros to print Label Engine labels.
Users must first select the Edge Device (also known as green grass group for legacy) from the drop down list. The above list is based upon SQA and contains testing information, and the list provided will typically contain one entry.
Note: If there are no entries, then no edge devices are set up. The user can go to the IIoT portlet to create a new edge device, with details primarily outside the scope of comparison amongst the new and old LE printer screens.
To navigate to the IIoT portlet, go to Shop Floor Control >Configuration > IIoT Configuration.
Users must also provide the IP address of the printer to which the prints will be directed. This IP network must be reachable from the edge device. Users will provide the port that the printer is listening on.
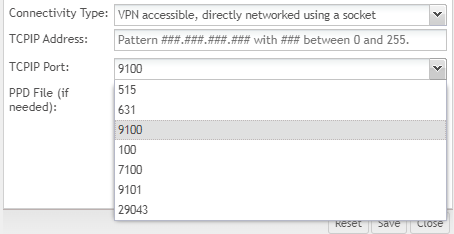
Note: For external ports, don't limit the value, however, most of the time the value will be one of 9100, 515 or 631.
- VPN
-
- Accessible Directly: using a TCPIP socket.
-
- VPN accessible printers:
The user must specify the IP address of the network reachable printer and they must select the port on which the printer is listening.
- Zebra Cloud Connect
-
- Zebra Link-OS enabled printers can print through the cloud
-
- Zebra Cloud Connect accessible printers:
- For Zebra Cloud Connect printers, the only parameter the user needs to provide is the serial number of the Zebra Printer. However, the customer must first register their zebra for use with 42-q Zebra Cloud Connect
- PDD File - if a printer requires a PPD file for extra configuration it can be
- Once the information is entered, select the Save button.
Edit Printers
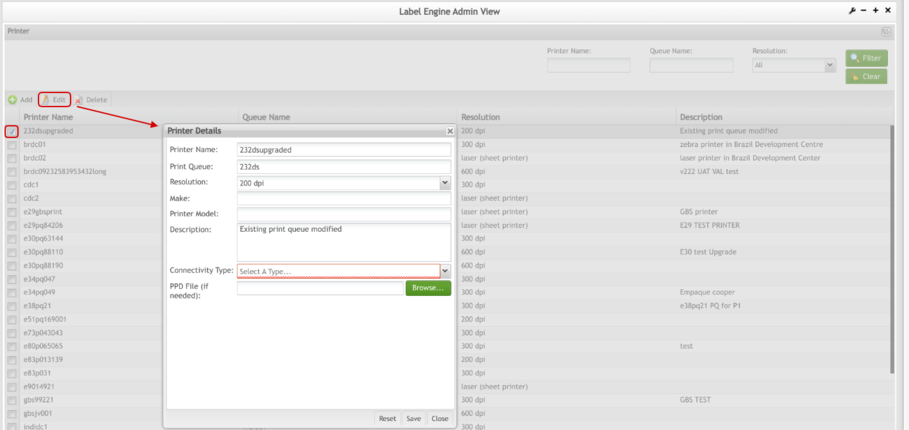
- To edit the printer information, select a printer in the list and click on the Edit button on the main page. The Printer Details pop-up window displays.
Figure 9: LE Edit Printer Information
Update any necessary information and select Save.
Delete Printers
- To delete a printer, select a printer in the list and click on the Delete button on the main page. A confirmation message pop-up window displays:
Figure 10: Delete Printer
Select Yes to confirm deletion or No to cancel.
Note: Only an unreferenced customer can be deleted.
Database 
Before a label can use a database, a database needs to be set up and configured within the Label Engine.
To access the Database module, navigate to Administration > Label Engine Admin > Database
Users are able to select the following features:
- Filter: Filter and search the list on the page.
- Add: Add a Database.
- Edit: Edit a Database from the list.
- Delete: Delete a Database from the list.
Figure 11: LE Database
See below the details for each feature.
Filter Databases
The filter feature can be used to narrow the list that is displayed on the main Database List page. This can be useful if the user wants to look at information pertaining to limited entries. Filters can be selected at the top of the Database page.
To filter the Database List page listings, enter a database Name and/or Database Type fields and apply by clicking the Filter button.
Figure 12: LE Filter Database
Add Databases
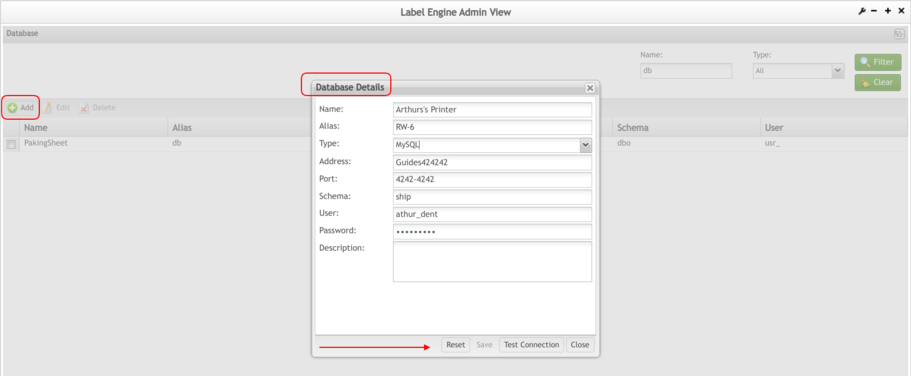
Adding a database is as easy as providing the Database details:
Figure 13: LE Add Database
- Name - the exact name of the database on the server (address);
- Type - the type of database. Currently, Label Engine can extract data from Progress, ERP, PostgreSQL, MS SQL Server, and MySQL;
- Plant - the plant associated with the database;
- Address - the TCPIP address of the database server;
- Port - the TCPIO port that the database is listening on;
- Schema - the schema/owner of the database;
- User - the user id to use when Label Engine connects to the database;
- Password - the password associated with User;
- Description - a freeform description of the database.
Once the information is entered and the Test Connection was successful, select the Save button to save the database information.
Edit Databases
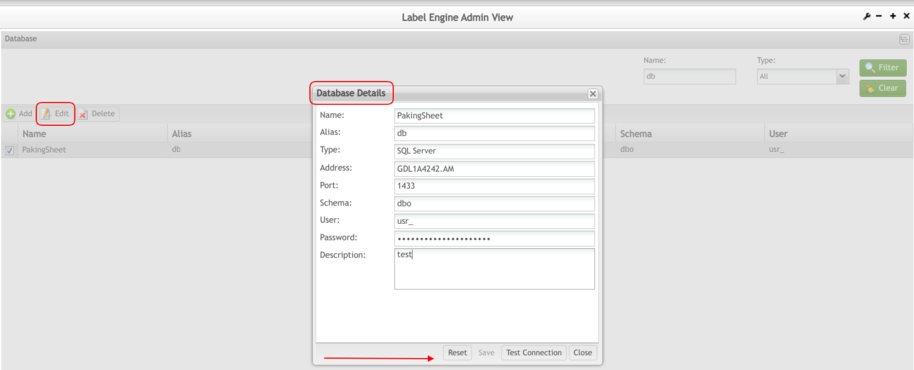
- To edit the database information, select a database in the list and click on the Edit button on the main page. The Database Details pop-up window displays:
Figure 14: LE Edit Database
Update the necessary information, select Test Connection, and if the test were successful, select Save.
Delete Databases
- To delete databases, select a database in the list and click on the Delete button on the main page. A confirmation message pop-up window displays:
Figure 15: LE Delete Database
Select Yes to confirm deletion or No to abort.
Load Database 
In order to map a label to pull data from a database, the database needs to be "loaded".
To access the Load Database functionality, navigate to Administration > Label Engine Admin > Load Database.
The Load Database page displays:
To load databases follow the steps below:
- In the resulting screen, select the database from the drop-down list and the first load will be done.
- A list of all tables will be loaded and displayed in the "Load Database" list.
Figure 16: Load Database Main Page
From this list, the user can:
- Enable\Disable Tables
- Reload
- View Columns
- Expose Tables
No Action/Enable/Disable Tables
The user can enable or disable tables to be used in the LE Labels.
Figure 17: Load Database Enable Table
Select the table to be enabled (in black) and click on Enable Tables.
The table will be enabled and will be displayed (in blue).
Figure 18: Load Database Disable Table
Select the table to be disabled (in blue) and click on Disable Tables.
The table will be disabled and will be displayed (in black).
Reload Tables
This functionality will reload any updates done in the database tables to the current list.
Click on the Reload button. A confirmation message is displayed.
Select Yes to reload or No to abort.
Figure 19: Load Database Reload Tables
View Columns
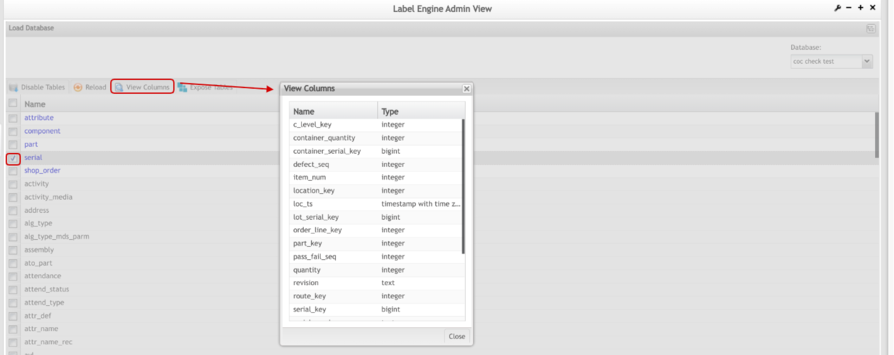
Click on View Columns to display the columns list that belongs to the selected table.
Figure 20: Load Database View Columns
Expose Tables
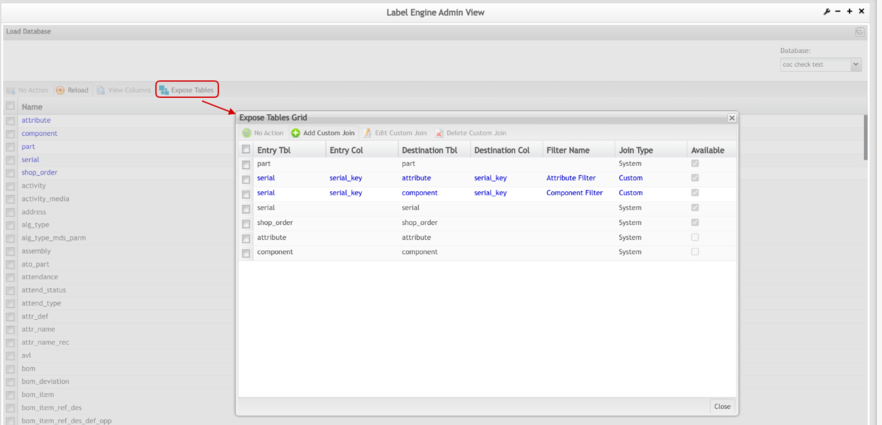
Click on Expose Tables to display the relationships between activated tables.
Figure 21: Load Database Expose Tables
From this functionality, the user is able to:
- Add Custom Join
- Edit Custom Join
- Delete Custom Join
Expose Tables - Enable/Disable Custom Joins
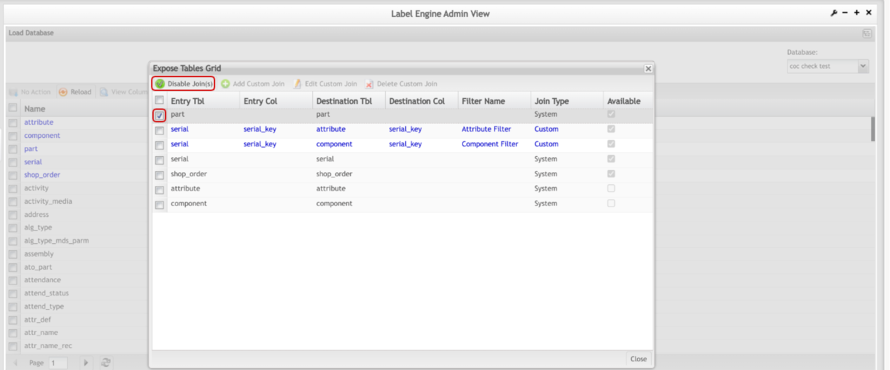
Select join in the list and click on Enable Join for an available join or Disable Join for an unavailable join.
Figure 22: Enable/Disable Joins
This functionality is used together with Enable\Disable tables. Both need to be enabled to be used on LE Labels otherwise it will not be possible to extract data from the database.
Expose Tables - Add Custom Joins
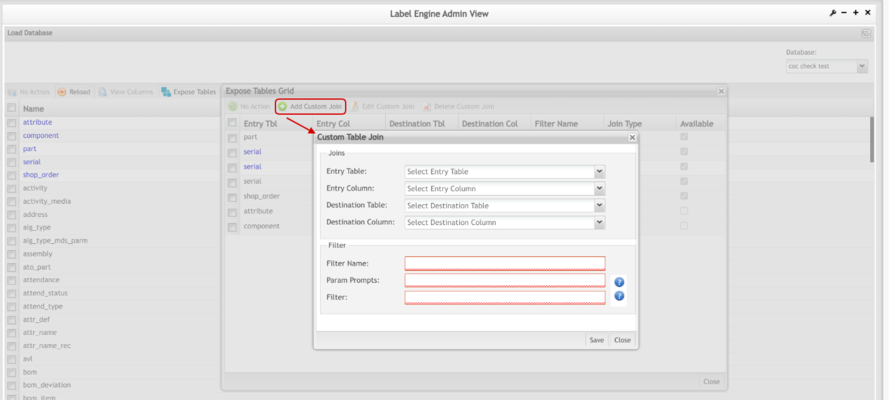
This functionality is used when tables do not have relationships and this is necessary to extract some data from the database.
To add a custom join, select Add Custom Joins button in the expose tables’ grid.
The Custom Table Join page is displayed.
Figure 23: Add Custom Joins
All fields below must be filled:
- Entry Table/Entry Column → Destination Table/Destination Column Filter
- Filter Name: it is the filter name.
- Param Prompts: it is used to define a variable name. E.g: ?p1?=Attribute Name
- Filter: it is used to define manually the joins for a destination table. E.g: serial.serial_key=attribute.serial_key AND attribute.attr_name_key = attr_name.attr_name_key AND attribute.removed = 0 and attr_name.name = ?p1?
Note: All these fields above will create the custom join the user needs to link a database field to a field number.
Edit Custom Joins
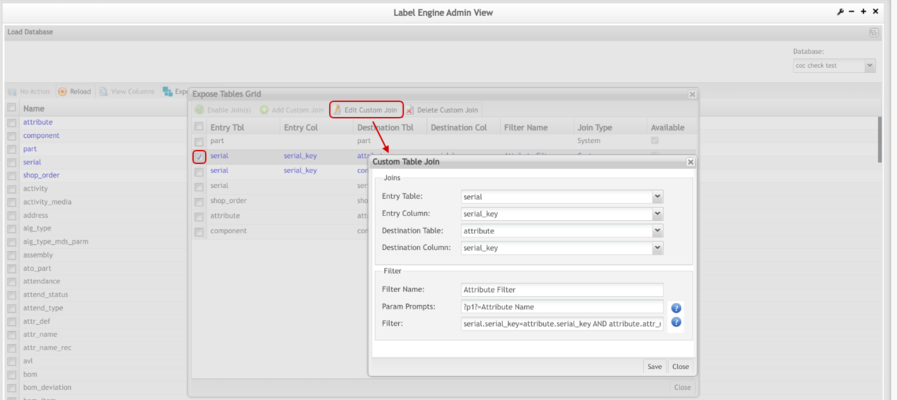
- To edit the custom joins information, select a join in the list and click on the Edit button on the main page. The Custom Table Join pop-up window displays:
Figure 24: Edit Custom Joins
Update the necessary information, and select Save.
Delete Custom Joins
- To delete custom joins, select a join in the list and click on the Delete button on the main page. A confirmation message pop-up window displays:
Figure 25: Delete Custom Joins
Select Yes to confirm deletion or No to cancel.
Token Creation 
The token creation was developed to check the service call integrity.
To access the Token Creation functionality, navigate to Administration > LE Administration > Token Creation.
Users are able to perform the following actions:
- Filter: Filter and search the list on the page.
- Add: Add Tokens.
- Edit: Edit a Token from the list.
- Delete: Delete a Token from the list.
Figure 26: LE Token Main Page
Filter Tokens
The filter feature can be used to narrow the list that is displayed on the main Token Creation List page. This can be useful if the user wants to look at information pertaining to limited entries. Filters can be selected at the top of the Token Creation page.
Figure 27: LE Filter Token
To filter the Token List page listings, enter a token Name and/or System fields and apply by clicking the Filter button.
Add Tokens
To add tokens, provide the following information:
Figure 28: LE Add Token
- Token name - the name of the token
- Token value - this is read-only and is set by the button "Get Token Value" that generates the token automatically.
- System – The system that will use the created token (MDS, PTS.SFDC, and rTO)
Once the information is entered, select the Save button. The token's details can be updated, or it can also be deleted.
Edit Tokens
- To edit the token information, select a token in the list and click on the Edit button in the main page. The Tokens Creation pop-up window displays:
Figure 29: Edit Token
Update the necessary information, select Get Token Value, and if the test were successful select Save.
Delete Token
- To delete tokens, select a token in the list and click on the Delete button on the main page. A confirmation message pop-up window displays:
Figure 30: LE Delete Token
Select Yes to confirm deletion or No to abort.
Application Configuration 
This configuration page is used directly in the LE Labels.
To access the Application Configuration functionality, navigate to Administration > Label Engine Admin > Application Configuration.
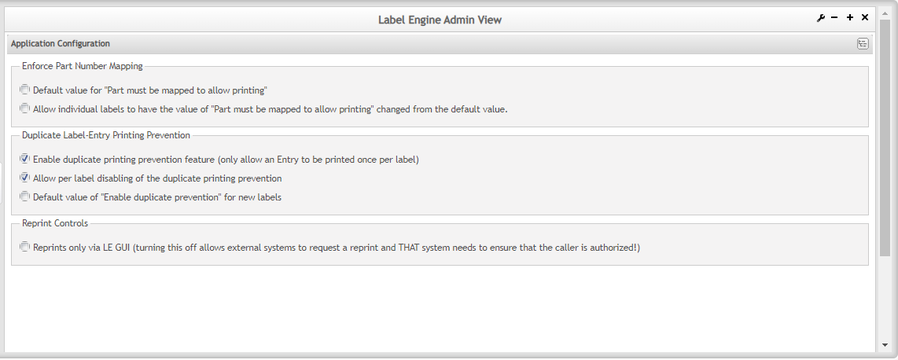
The Application Configuration page is displayed:
Figure 31: Application Configuration Main Page
The application configuration displays some options that, according to the user selection, will enable or disable functionalities in the Label Engine Labels Application. See below the options description:
1. Label Engine Admin View: ‘Enforce Part Number Mapping’ Section
- Allow Individual Labels - By selecting this option, the Part Must be Mapped option in the LE Labels can be updated according to the user's needs.
2. Label Engine Admin View: ‘Duplicate Label-Entrol Printing Prevention Controls’ Section
- Enable Duplicate Printing Prevention - The default value is checked to allow the plant the ability to print duplicate printing. It can be turned off (unchecked) and the feature “Prevent duplicate printing for the same entry value” will not be available in the Label Engine Labels application.
- Allow per Label Disabling of the Duplicate Printing Prevention - Once this is turned on (checked), along with “Duplicate Printing Prevention”, the plant will have the ability to turn on duplication prevention for some labels and off for others (Default value is checked).
- Default Value of “Enable Duplicate Prevention” for New Labels - If checked, every label's initial value will be checked, if unchecked, the initial value in every label, when starting a new label will be off, and the plant will have to turn it on. (Default value is unchecked)
- Reprint Controls - If duplicate printing is turned off, this special mechanism was created to allow the ability to reprint labels that have already been printed. This feature also gives the plant the ability to turn off web service integration with Label Engine for reprinting. (Default value is unchecked)
Note: For further details, see Label Engine Labels documentation.
