Difference between revisions of "42Q-MES0174-A OEE Workbench"
| Line 37: | Line 37: | ||
| | ||
| − | == <span class="mw-headline" id="Machine_Integration"><span class="mw-headline" id="Machine_Integration"><span class="mw-headline" id="Machine_Integration"><span class="mw-headline" id="Machine_Integration"><span class="mw-headline" id="Machine_Integration"><span class="mw-headline" id="Machine_Integration"><span class="mw-headline" id="Machine_Integration"><span class="mw-headline" id="Machine_Integration"><span class="mw-headline" id="Machine_Integration"><span class="mw-headline" id="Machine_Integration"><span class="mw-headline" id="Machine_Integration"><span class="mw-headline" id="Machine_Integration"><span class="mw-headline" id="Machine_Integration"><span class="mw-headline" id="Machine_Integration"><span class="mw-headline" id="Machine_Integration"><span class="mw-headline" id="Machine_Integration"><span class="mw-headline" id="Machine_Integration"><span class="mw-headline" id="Machine_Integration"><span class="mw-headline" id="Machine_Integration"><span class="mw-headline" id="Machine_Integration"><span class="mw-headline" id="Machine_Integration"><span class="mw-headline" id="Machine_Integration"><span class="mw-headline" id="Machine_Integration"><span class="mw-headline" id="Machine_Integration"><span class="mw-headline" id="Machine_Integration">Machine Integration</span></span></span></span></span></span></span></span></span></span></span></span></span></span></span></span></span></span></span></span></span></span></span></span></span> == | + | |
| + | == <span class="mw-headline" id="Machine_Integration"><span class="mw-headline" id="Machine_Integration"><span class="mw-headline" id="Machine_Integration"><span class="mw-headline" id="Machine_Integration"><span class="mw-headline" id="Machine_Integration"><span class="mw-headline" id="Machine_Integration"><span class="mw-headline" id="Machine_Integration"><span class="mw-headline" id="Machine_Integration"><span class="mw-headline" id="Machine_Integration"><span class="mw-headline" id="Machine_Integration"><span class="mw-headline" id="Machine_Integration"><span class="mw-headline" id="Machine_Integration"><span class="mw-headline" id="Machine_Integration"><span class="mw-headline" id="Machine_Integration"><span class="mw-headline" id="Machine_Integration"><span class="mw-headline" id="Machine_Integration"><span class="mw-headline" id="Machine_Integration"><span class="mw-headline" id="Machine_Integration"><span class="mw-headline" id="Machine_Integration"><span class="mw-headline" id="Machine_Integration"><span class="mw-headline" id="Machine_Integration"><span class="mw-headline" id="Machine_Integration"><span class="mw-headline" id="Machine_Integration"><span class="mw-headline" id="Machine_Integration"><span class="mw-headline" id="Machine_Integration"><span class="mw-headline" id="Machine_Integration">Machine Integration</span></span></span></span></span></span></span></span></span></span></span></span></span></span></span></span></span></span></span></span></span></span></span></span></span></span> == | ||
To set up the machine in CMMS Asset go to '''Shop Floor Control> Configuration> CMMS Asset> Asset'''. | To set up the machine in CMMS Asset go to '''Shop Floor Control> Configuration> CMMS Asset> Asset'''. | ||
| Line 59: | Line 60: | ||
'''Figure 4: Add Asset Information''' | '''Figure 4: Add Asset Information''' | ||
| − | '''[[File:OEEWB AddAssetInformation.png| | + | '''[[File:OEEWB AddAssetInformation.png|600px|OEEWB AddAssetInformation.png]]''' |
<u>'''Note'''</u>: The following fields are mandatory: '''Asset Id''', '''Asset Name''', and '''Asset Type'''. | <u>'''Note'''</u>: The following fields are mandatory: '''Asset Id''', '''Asset Name''', and '''Asset Type'''. | ||
| Line 103: | Line 104: | ||
'''Figure 8: Edit Asset Type''' | '''Figure 8: Edit Asset Type''' | ||
| − | [[File:OEEWB Edit asset Type.png| | + | [[File:OEEWB Edit asset Type.png|600px|OEEWB Edit asset Type.png]]<br/> |
| | ||
Revision as of 23:16, 20 February 2023
42Q Home > Production > OEE Workbench
Production
OEE Workbench
Version MES15.72
Revision B1
Contents
Introduction
Batch/Lot Process form is an interface that allows for basic data collection, including location selection, basic defect recording, attribute/assembly data if configured. TAKT time display and OEE basic data recording is available using asset integration through CMMS. All the activities are recorded in Unit History against the serial record.
Target Maintenance
To use the Batch/Lot Process Control function, the following items are required:
- A serial (batch in this case) in process status for the location to
- Setup target maintenance with setup time and cycle time for the part number
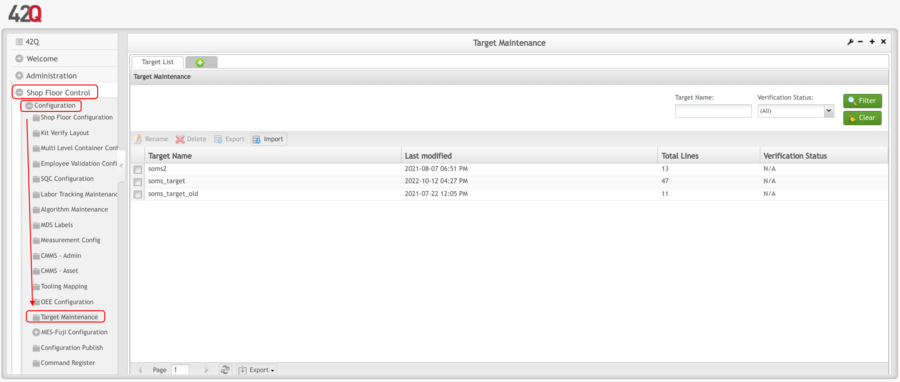
Go to Shop Floor Control> Configuration> Target maintenance> soms_target
Note: Users have to set up the Target Cycle Time and Setup Time for the part number and process they will be working on using the Create button on the top right.
For more details on target maintenance please refer to Target Maintenance.
Machine Integration
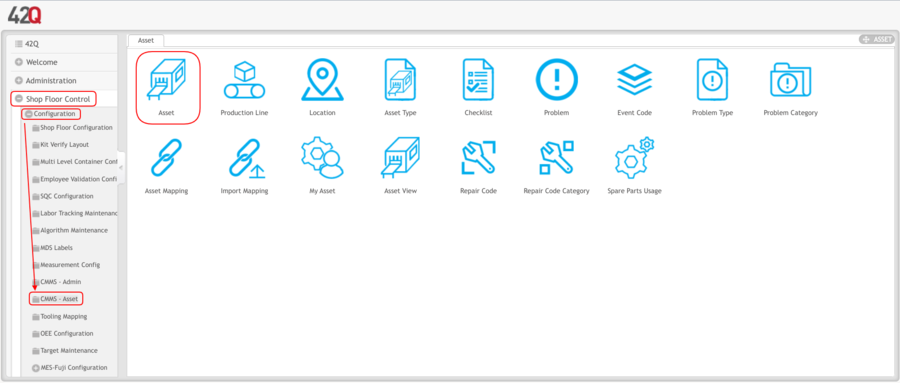
To set up the machine in CMMS Asset go to Shop Floor Control> Configuration> CMMS Asset> Asset.
Figure 2: CMMS-Asset
Select the Add button to add a new machine (asset). The Add Asset Window will be displayed to enter the required information.
Figure 3: Scan / Add Asset
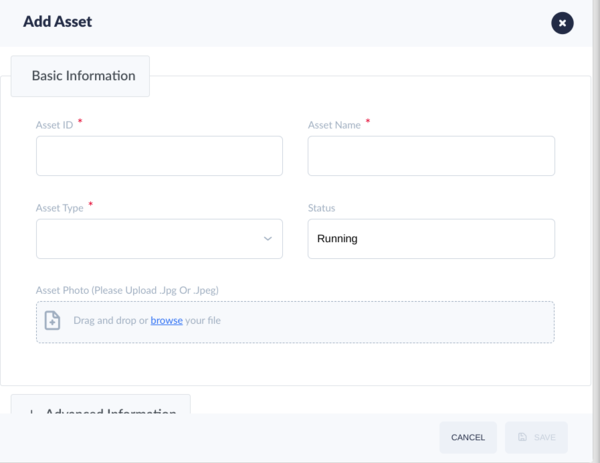
Figure 4: Add Asset Information
Note: The following fields are mandatory: Asset Id, Asset Name, and Asset Type.
Users must map the CMMS Asset to the location operator who will perform the job.
To map the machine to the respective location, go to Shop Floor Control> Configuration> CMMS Asset> Asset Mapping.
Figure 5: Asset Mapping
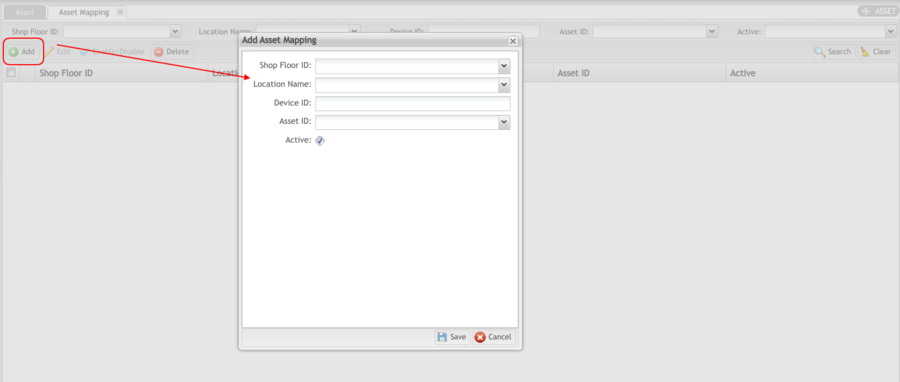
Select Add and fill the form with the Location Name and Machine for mapping as shown in the figure.
Figure 6: Add Asset Mapping
For more details on asset management refer to CMMS Asset.
Users have to set up Problems/ Reasons for the machine. To add the problems in CMMS under Problem, users must have the problem type and problem category created before the problem creation.
Assign the Problem to Asset Type for the assets.
Figure 7: Asset Type
Figure 8: Edit Asset Type
OEE Workbench
Without Asset Integration
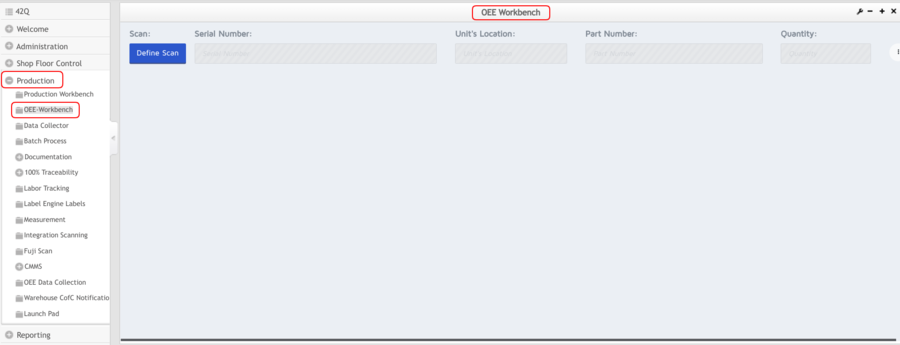
Once all the prerequisites have been set up the users have to access the Batch/Lot Process control form; to do so navigate to Production> OEE Workbench
Figure 9: OEE Workbench
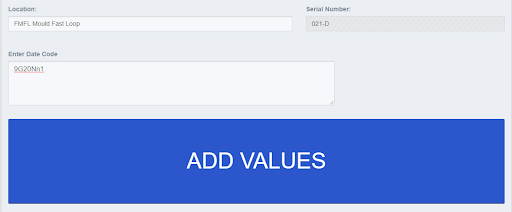
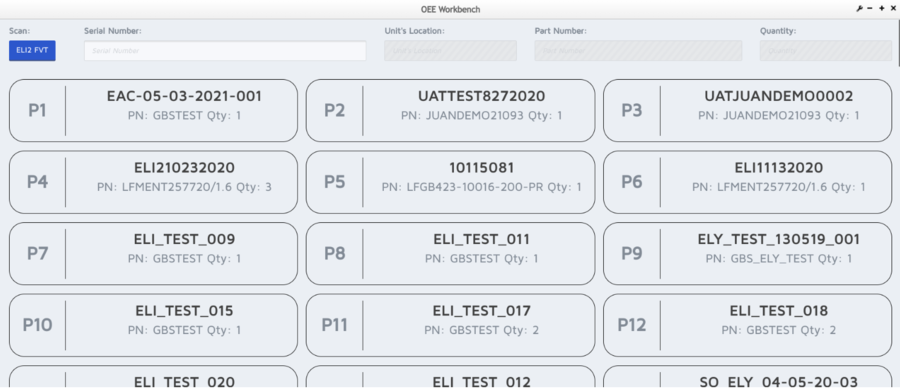
Users have to Scan the Location they want to work on to be able to see all the units that are available to that location.
Figure 10: Select Device or Location
Note: Batch can also be scanned in the serial number text box. The P1, P2 are the priority based on the shop order sequencing. If there is no sequencing/ priority defined the orders appear as the oldest order first.
Figure 9: OEE Workbench Location and Serial Numbers
Users have to select the unit to work on. It will give a summary of the unit, such as part number, unit quantity (can be updated by user), shop order quantity. As there is no machine integration the machine status is N/A.
Figure 10: Unit to Work On Screen
Note: There is a new rule that states that when a location name starts with ‘S’, the operation will not be considered as SETUP (it will not be hard-coded), instead, it will take as reference the setup done in the process_mapping to retrieve the operations. However, if the process_mapping does not contain the ‘S’, or is empty, ‘S’ will be set up by default.
Select START to begin the operation. If there are any prompts (attributes or assembly setups) they must be completed.
Figure 11: Attributes or Assembly Setups
- The clock will start ticking and users will be able to see the time under which the operation starts. This is the Remaining Time (standard time*qty + setup time), Setup Time, and Standard Time based on the SOMS table set up in target maintenance.
- Multiple operations are available for operators, such as Add Comment, Add Defect, and End of the process.
- Once all the activities have been finished, users can select the END button to move the unit to the next step based on the route. All the activities will be recorded in Unit History.
Figure 12: MESWeb Unit history
With Asset Integration
Once all the prerequisites have been set up the users have to access the Batch/Lot Process control form; to do so navigate to Production> OEE Workbench (Figure 7). Users have to Scan the Location they want to work on to see all the units that are available at that location.
Note: Batch can also be scanned in the serial number text box.
Figure 13: Scanned Location
The next step is to select a unit and quantity on which the operator will work on.
Figure 14: Selected Unit to Work On
To begin the operation, users must select START. Once done, the clock will start ticking and the user will be able to see the start time under the remaining time.
Figure 15: Running Machine Example
Note: The machine status comes from CMMS, if the machine is under maintenance in CMMS, the status of the machine will be down here.
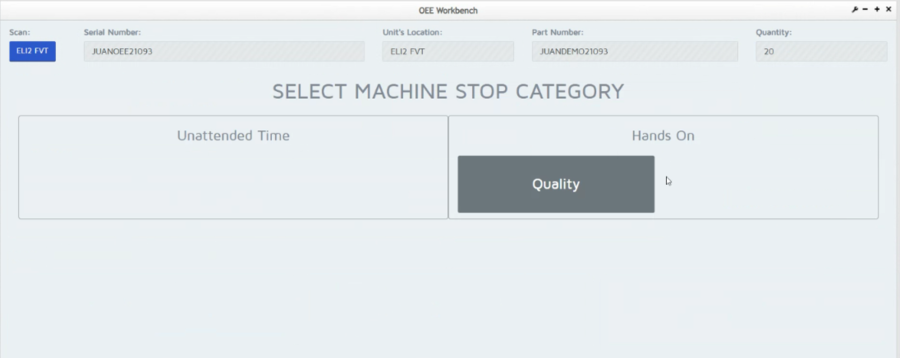
To stop the machine, users must select the STOP button and then, specify a reason for stopping the machine. The reasons are the problems that have been created in CMMS Asset.
Figure 16: Stop Category
A confirmation message will be displayed asking to proceed or cancel the action. Once confirmed, the problem will be recorded on the machine and a success message will be displayed.
Figure 17: Information Update Message
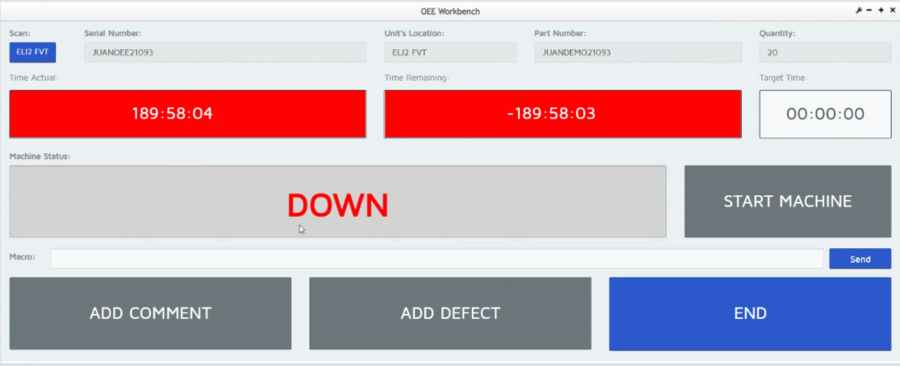
The system will advise that the machine is “DOWN”. Once the problem has been fixed, the operator can select again the Start Machine button and the Machine Status will be changed to “RUNNING”.
Figure 18: Down Machine Example
Labor Tracking - OEE Workbench
The module of OEE Workbench has also a Labor Tracking widget where users are able to realize manually (default configuration) or automatically (sections 6.1 and 6.2) different actions for Direct or Indirect labors of a shop order, in a specific location:
- Clock-in
- Clock-out
- Pause
- Resume
To execute the Labor Tracking functionalities, just select the corresponding icon ![]() located at the left bar and then clock in a Shop Order or an Indirect Labor:
located at the left bar and then clock in a Shop Order or an Indirect Labor:
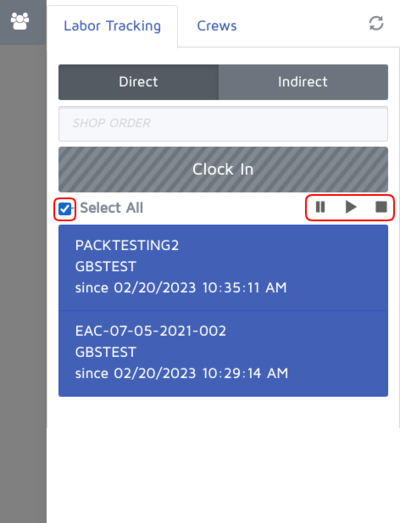
Figure 19: Labor Tracking Icon
Figure 20: Clock in a Shop Order
Users will find two tabs, one for Labor Tracking and the other for Crews. And two buttons for labor, one for Direct and the other for Indirect.
Clock-in direct labor
- To clock in time in a Shop Order, type the Shop Order in the corresponding field and then, select the Clock-In button below. (Figure 20)
- A success message will appear at the right bottom of the page, indicating that direct-shop-order labor has been started and that a new card has been created and added to the Direct Labor/Shop Order list. This also confirms that the Direct Labor is being tracked.
Figure 21: Success Message ‘Started direct shop order labor’
Clock-out direct labor
- To clock out one Shop Order, select the stop icon inside the corresponding shop order box. In case users want to stop more than one labor at a time, select the stop icon located at the top of the list.
- A confirmation message will appear. To complete the action, select Confirm or Cancel to quit.
Figure 22: Clock-out Selected Labor
Figure 23: Multiple Selection
Pause direct labor
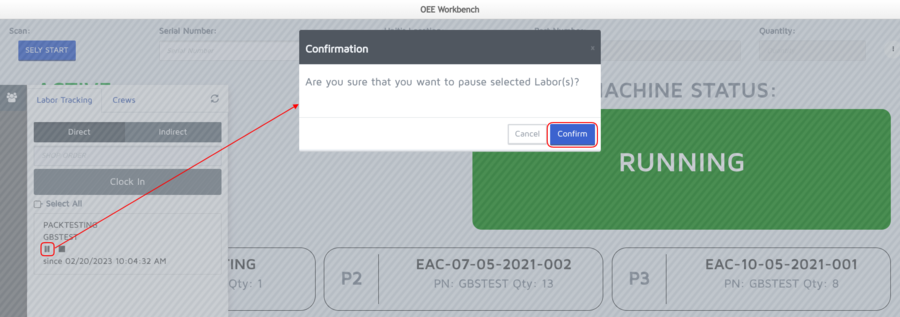
- To pause labor, select the pause icon.
- A confirmation message will be displayed. Select Confirm to complete the action, or Cancel to quit.
- Once confirmed, a success message will appear at the right bottom of the page, indicating that direct-shop-order labor has been started.
Figure 24: Pause Labor
Figure 25: Success Message ‘Paused direct shop order labor’
Resume direct labor
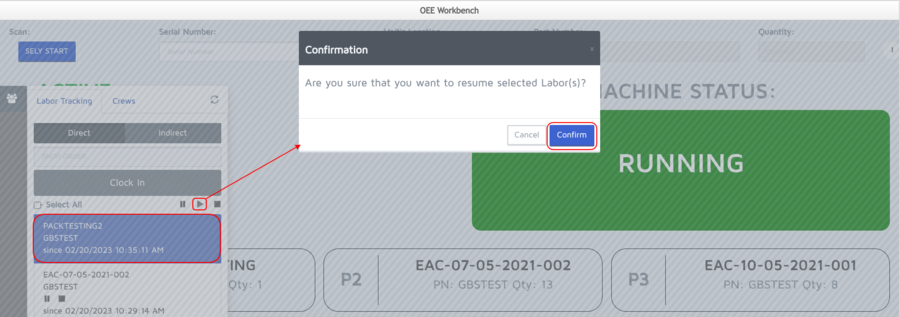
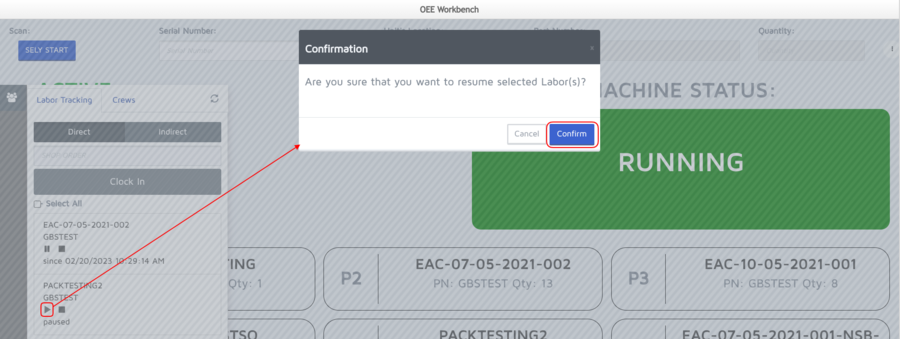
- To resume a paused labor, select the resume icon inside the shop order box or the one at the top of the list.
- A confirmation message will appear. To complete the action, select Confirm or Cancel to quit.
- Once confirmed, a successful confirmation will appear at the top right of the screen.
Figure 26: Resume Labor 1
Figure 27: Success Message “Direct Shop Order labor already started”
Figure 28: Resume Labor 2
Figure 29: Success Message ‘Started previously paused direct shop order labor’
Start indirect labor
As mentioned above, users are able to start indirect labors that will be recorded in the unit history. To do so:
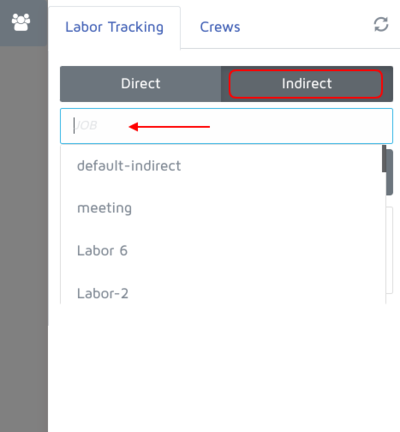
- Select the Indirect tab of the Labor Tracking widget.
- Write down an indirect labor in the corresponding field or select one from the drop-down list. The selected indirect labor will be listed below.
Figure 30: Indirect Labor Selection
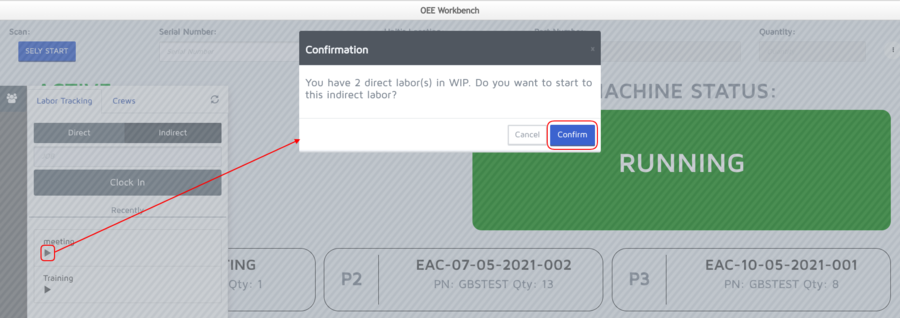
- Click the start icon to continue.
- A confirmation message will appear. Select Confirm to proceed or Cancel to quit.
- Once confirmed, a success message will appear.
Figure 31: Start indirect labor
Figure 32: Started indirect labor message
Crews
The Labor Tracking widget, in OEE Workbench, allows users to join or leave a current active crew, as is explained below.
To join a crew as a regular user
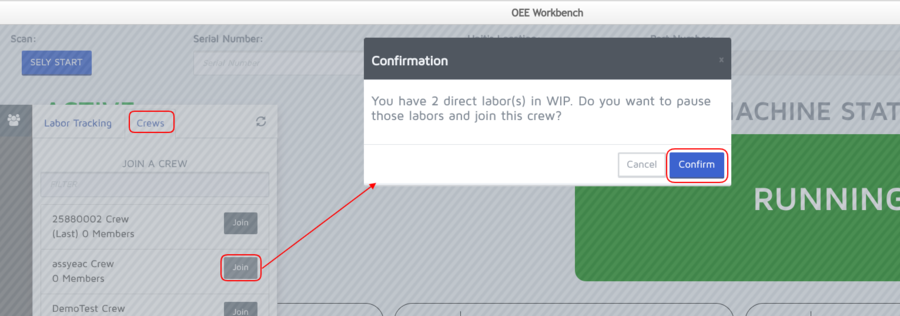
- Open the Crew tab of the Labor Tracking widget to see the current active crews.
- Select the Join button of a desired crew. A confirmation message will be displayed asking to pause labors and join the selected crew.
- Click Confirm to proceed, or Cancel to quit.
- Two pop-up messages will appear:
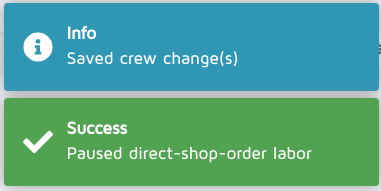
- Message 1 confirming that crew changes were saved
- Message 2 advising that the direct shop order labor was successfully paused
Figure 33: Join a crew
Figure 34: Saved crew changes pop-up messages
To leave a crew as a regular user
Users are also allowed to leave a crew by using this widget. To do so:
- Open the Crew tab of the Labor Tracking widget.
- Select the Leave button of a desired crew. A confirmation message will be displayed.
- Click Confirm to proceed, or Cancel to quit.
- A pop-up messages will appear confirming that the crew changes were saved.
Figure 35: Leave a crew
To add new members as a crew user
Users can log in to the portal as crew users. In this case, the addition of a new crew member requires users to log in with their personal credentials.
- Log in the 42Q portal as a crew user and navigate to Production > OEE Workbench.
- Select the Labor Tracking icon.
- Open the Crew tab to see the current active members of that crew.
- Select the + button located above the members’ list. A pop-up window will appear to log into the portal.
Figure 36: Add a Member as Crew User
Once logged, the system will announce that the change was done and the information of the new member will appear in the members’ list of the crew.
Figure 37: Saved Crew Change(s) Message
To leave a crew as a crew user
Users are also able to leave a crew if they logged into the portal with a crew user. The system will ask for their personal credentials, as well. To do so:
- Select the Leave button of the user that will leave.
- A new window will open asking for username and password. Write down the required information.
Once logged, a pop-up message will be displayed informing the user that the crew change was saved (Figure 37). And the member that left the crew will not appear anymore in the members list.
Figure 38: Leave a Crew as Crew User
Smart insights
The Smart Insights functionality performs semi-automatically the start/resume labor records upon a serial number is scanned, helping users to save time and avoid manual and forgettable tasks.
Once a serial number has been scanned, the system will prompt a confirmation message suggesting three options:
- Clock-in/Resume
- Dismiss
- Dismiss and don’t ask again
Figure 39: Smart insights alert message
Users must set up previously this feature that can be configured based on a generic attribute or based on a flex field for location or process.
To set values based on a generic attribute
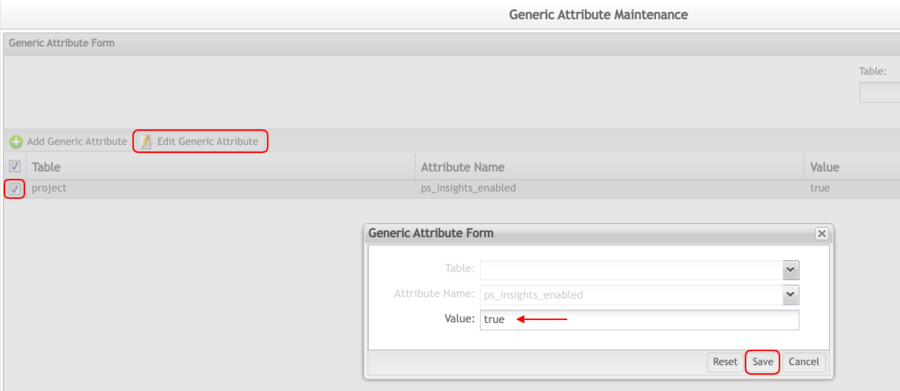
- Navigate to Administration > Generic Attribute Maintenance.
- Search the “ps_insights_enabled” generic attribute.
- Select the corresponding checkbox.
- Click the Edit Generic Attribute button located at the top of the list. The Generic Attribute Form will be displayed.
- Input the desired value:
- “True” value —> turn on the alert message
- “False” value —> turn off the alert message
- Select Save to proceed or Cancel to quit.
Figure 40: Generic attribute form
To set values based on a flex field
With a flex field configuration for process or location, using the ps_labor_tracking_option macro configuration.
Configuration by Location
- Navigate to Shop Floor Control > Configuration > Shop Floor Configuration > Location.
- Select a location.
- Click the Edit button to display the Location Form.
- Open the Flex Field Form tab.
- Search “ps_labor_tracking_option”.
- Input the desired value:
- “Insight” value to allow users clock-in/clock-out manually through an alert message (figure 28)
- “Off” value to disable the alert message
- “Auto” value to clock-out automatically
- Save the action.
Figure 41: Location Form
Configuration by Process
- Navigate to Shop Floor Control > Configuration > Shop Floor Configuration > Location.
- Select a location.
- Click the Process Maintenance button to display the Process List.
- Select a process.
- Click the Edit button to display the Process Form.
- Open the Flex Field Form tab.
- Search “ps_labor_tracking_option”.
- Input the desired value:
- “Insight” value to allow users clock-in/clock-out manually through an alert message (figure 28)
- “Off” value to disable the alert message
- “Auto” value to clock-out automatically
- Save the action.
Figure 42: Process Form
