Difference between revisions of "SOP-MES0039 MESWeb Central"
Dane parker (talk | contribs) |
|||
| (231 intermediate revisions by 10 users not shown) | |||
| Line 1: | Line 1: | ||
| − | |||
| − | <br> | + | <small>[[42Q_Cloud-Based_MES/MOMS|42Q Home]] > [[Administration|Administration]] > MESWeb Central</small><br/> |
| − | <center>'''MESWeb'''</center> <center> | + | <center><span style="font-family:arial,helvetica,sans-serif;">'''MESWeb'''</span></center> <center><span style="font-family:arial,helvetica,sans-serif;">'''MESWeb Central'''</span></center> <center><span style="font-family:arial,helvetica,sans-serif;">'''Version MES15.74'''</span></center> <center><span style="font-family:arial,helvetica,sans-serif;">'''Revision E1'''</span></center> <center> </center> |
| − | + | | |
| − | + | | |
| − | |||
| − | |||
| − | == Introduction | + | = <span class="mw-headline" id="Introduction"><span class="mw-headline" id="Introduction"><span class="mw-headline" id="Introduction"><span class="mw-headline" id="Introduction"><span class="mw-headline" id="Introduction"><span class="mw-headline" id="Introduction"><span class="mw-headline" id="Introduction"><span class="mw-headline" id="Introduction"><span class="mw-headline" id="Introduction"><span class="mw-headline" id="Introduction"><span class="mw-headline" id="Introduction"><span class="mw-headline" id="Introduction"><span class="mw-headline" id="Introduction"><span class="mw-headline" id="Introduction"><span class="mw-headline" id="Introduction"><span class="mw-headline" id="Introduction"><span style="font-family:arial,helvetica,sans-serif;"><span style="font-size:x-large;">Introduction</span></span></span></span></span></span></span></span></span></span></span></span></span></span></span></span></span></span> = |
| − | MESWeb is a powerful business intelligence application designed from the ground up to simplify reporting from manufacturing execution systems, and empower end users with a streamlined and full-featured web interface. The application includes an ad hoc report design tool that allows users to easily build their own reports and modify existing ones with little to no training. Also, create rich, customized reports from heterogeneous data sources. | + | <span style="font-family:arial,helvetica,sans-serif;">MESWeb is a powerful business intelligence application designed from the ground up to simplify reporting from manufacturing execution systems, and empower end-users with a streamlined and full-featured web interface. The application includes an ad hoc report design tool that allows users to easily build their own reports and modify existing ones with little to no training. Also, create rich, customized reports from heterogeneous data sources.</span> |
| − | Decentralized custom reports, redundant data, lack of | + | <span style="font-family:arial,helvetica,sans-serif;"><span style="color:#000000;">Decentralized custom reports, redundant data, lack of </span>pop-up<span style="color:#000000;"> security controls, and convoluted development requirements are problems faced by all 42Q s, and MESWeb has been designed to resolve these issues while maximizing usability and performance.</span></span> |
| − | The purpose of this application is to manage the permissions for every report in our MES Web application. It provides | + | <span style="font-family:arial,helvetica,sans-serif;">The purpose of this application is to manage the permissions for every report in our MES Web application. It provides 42Q s with an easy mechanism for managing users, roles, applications, services, and the relations among them.</span> |
| − | + | | |
| − | + | | |
| − | + | = <span class="mw-headline" id="Administration"><span class="mw-headline" id="Administration"><span class="mw-headline" id="Administration"><span class="mw-headline" id="Administration"><span class="mw-headline" id="Administration"><span class="mw-headline" id="Administration"><span class="mw-headline" id="Administration"><span class="mw-headline" id="Administration"><span class="mw-headline" id="Administration"><span class="mw-headline" id="Administration"><span class="mw-headline" id="Administration"><span class="mw-headline" id="Administration"><span class="mw-headline" id="Administration"><span class="mw-headline" id="Administration"><span class="mw-headline" id="Administration"><span class="mw-headline" id="Administration"><span class="mw-headline" id="Administration"><span class="mw-headline" id="Administration"><span class="mw-headline" id="Administration"><span style="font-family:arial,helvetica,sans-serif;"><span style="font-size:x-large;">Administration</span></span></span></span></span></span></span></span></span></span></span></span></span></span></span></span></span></span></span></span></span> = | |
| − | |||
| − | |||
| − | |||
| − | |||
| − | |||
| − | |||
| − | + | <span style="font-family:arial,helvetica,sans-serif;">There are 2 types of roles in MESWeb, the first type grants certain permissions to the user in the Central module and those are:*</span> | |
| − | + | *<span style="font-family:arial,helvetica,sans-serif;">'''Administrator''': user with this role has full permissions to all locations in the Central module.</span> | |
| + | *<span style="font-family:arial,helvetica,sans-serif;">'''Security Manager''': can grant access to all kinds of permissions except Administrator to other users and himself, including roles and reports.</span> | ||
| + | *<span style="font-family:arial,helvetica,sans-serif;">'''Report Manager''': this role has all permission in the Report Module but just for the specific Location assigned. (Create, edit, copy, and publish reports)</span> | ||
| + | *<span style="font-family:arial,helvetica,sans-serif;">'''Data Source Manager''': this role has all permission in the Data source module but just for the specific Location assigned. (Create, edit, delete data sources)</span> | ||
| − | + | | |
| − | + | <span style="font-family:arial,helvetica,sans-serif;">The following roles will only take effect on the report execution:*</span> | |
| − | + | *<span style="font-family:arial,helvetica,sans-serif;">'''All MESR Customers''': this role allows the user to see all customers of a specific location.</span> | |
| + | *<span style="font-family:arial,helvetica,sans-serif;">'''All data sources''': this role allows users to see all data sources of a specific location.</span> | ||
| + | *<span style="font-family:arial,helvetica,sans-serif;">'''All Reports''': this role allows the user to see and execute all reports available in a specific location.</span> | ||
| + | <div style="color:#000000;"> </div> <div style="color:#000000;"><span style="font-family:arial,helvetica,sans-serif;">This section will cover how to navigate and execute all location, data source, and custom report activities. With this portlet, the user can add, edit or delete locations, servers, data sources, and data source types. The user can also access report group maintenance to perform searches, create, edit or delete report groups and add s to report groups. Report maintenance also allows the user to create, edit, or delete reports. The user can also publish/unpublished reports.</span></div> | ||
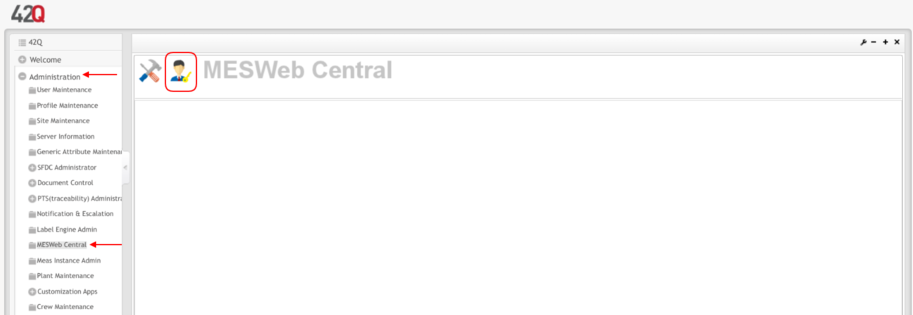
| + | '''<span style="font-family:arial,helvetica,sans-serif;">To access MESWeb</span>''' | ||
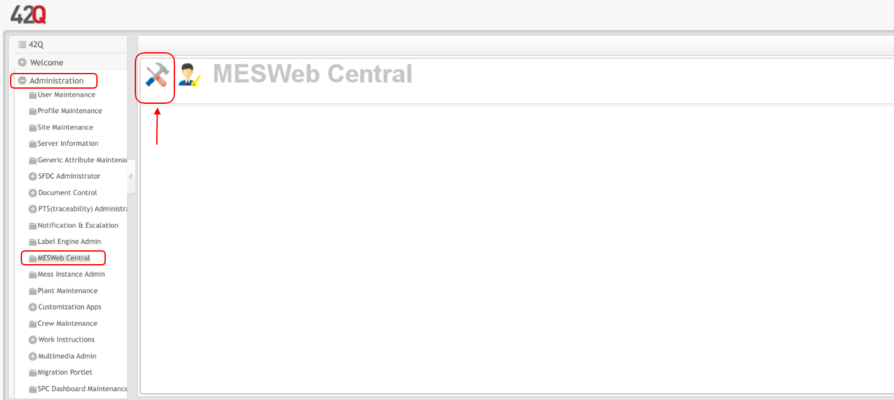
| − | + | #<span style="font-family:arial,helvetica,sans-serif;">Navigate to '''Administration > MESWeb Central'''</span> | |
| + | #<span style="font-family:arial,helvetica,sans-serif;">Select the Administration icon located on the MESWeb Central Main page.</span> | ||
| − | + | | |
| − | + | '''Figure 1: MESWeb Central Administration''' | |
| − | + | [[File:MWC Administration.png|x400px|MWC Administration.png]] | |
| + | <ol start="3"> | ||
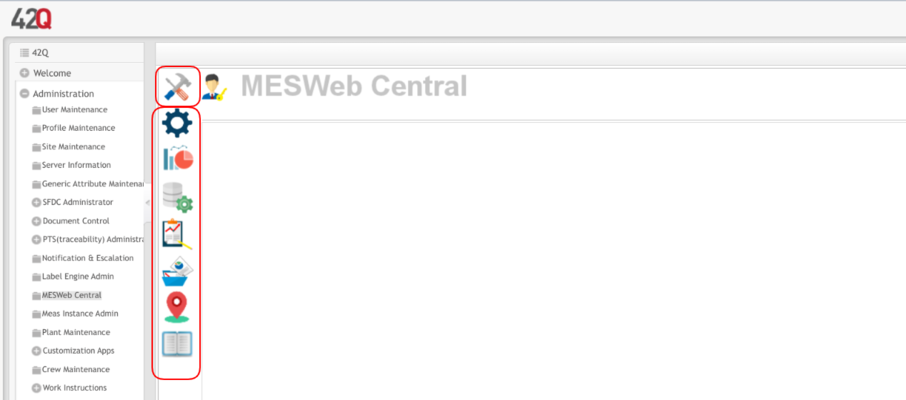
| + | <li><span style="font-family:arial,helvetica,sans-serif;">Upon selecting the '''Administration '''icon''', '''six additional icons become available:''' '''Settings, Dashboard Configuration, Data Sources, Reports, Report Groups, '''Locations, '''and '''Data Dictionary Settings'''.</span></li> | ||
| + | </ol> | ||
| − | + | | |
| − | + | '''Figure 2: Administration Functions''' | |
| − | == | + | [[File:MWC AdministrationFunctions.png|x400px|MWC AdministrationFunctions.png]] |
| + | <ol start="4"> | ||
| + | <li><span style="font-family:arial,helvetica,sans-serif;">Once an icon is selected, it is placed in a tab at the top of the '''Administration Page'''. The user can navigate between icons by placing them in tabs that can be easily accessed.</span></li> | ||
| + | </ol> | ||
| − | + | | |
| − | |||
| − | ==== | + | == <span class="mw-headline" id="Settings"><span class="mw-headline" id="Settings"><span class="mw-headline" id="Settings"><span class="mw-headline" id="Settings"><span class="mw-headline" id="Settings"><span class="mw-headline" id="Settings"><span class="mw-headline" id="Settings"><span class="mw-headline" id="Settings"><span class="mw-headline" id="Settings"><span class="mw-headline" id="Settings"><span class="mw-headline" id="Settings"><span class="mw-headline" id="Settings"><span class="mw-headline" id="Settings"><span class="mw-headline" id="Settings"><span class="mw-headline" id="Settings"><span class="mw-headline" id="Settings"><span class="mw-headline" id="Settings"><span class="mw-headline" id="Settings"><span class="mw-headline" id="Settings"><span class="mw-headline" id="Settings">Settings [[File:MWC Settings.png]]</span></span></span></span></span></span></span></span></span></span></span></span></span></span></span></span></span></span></span></span> == |
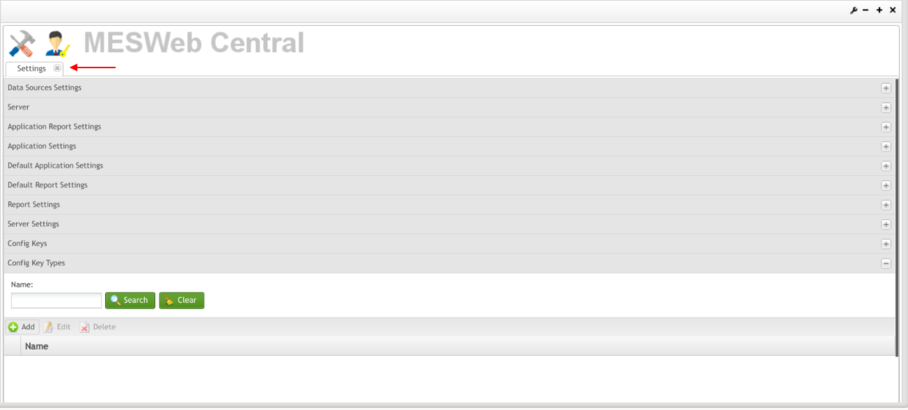
| − | The | + | The '''Settings''' section is organized as an accordion layout that allows easy access to each functionality, in this way, when the user clicks each section will be able to see the screen related to that section. |
| − | + | In this section, users can configure applications, data sources, servers, and reports. | |
| − | + | | |
| − | + | '''Figure 3: Functions in Tabs''' | |
| − | + | [[File:MWC FunctionsinTabs.png|x410px|MWC FunctionsinTabs.png]] | |
| − | + | | |
| − | ==== | + | === <span class="mw-headline" id="Data_Source_Settings"><span class="mw-headline" id="Data_Source_Settings"><span class="mw-headline" id="Data_Source_Settings"><span class="mw-headline" id="Data_Source_Settings"><span class="mw-headline" id="Data_Source_Settings"><span class="mw-headline" id="Data_Source_Settings"><span class="mw-headline" id="Data_Source_Settings"><span class="mw-headline" id="Data_Source_Settings"><span class="mw-headline" id="Data_Source_Settings"><span class="mw-headline" id="Data_Source_Settings"><span class="mw-headline" id="Data_Source_Settings"><span class="mw-headline" id="Data_Source_Settings"><span class="mw-headline" id="Data_Source_Settings"><span class="mw-headline" id="Data_Source_Settings"><span class="mw-headline" id="Data_Source_Settings"><span class="mw-headline" id="Data_Source_Settings"><span class="mw-headline" id="Data_Source_Settings"><span class="mw-headline" id="Data_Source_Settings"><span class="mw-headline" id="Data_Source_Settings"><span class="mw-headline" id="Data_Source_Settings">Data Source Settings</span></span></span></span></span></span></span></span></span></span></span></span></span></span></span></span></span></span></span></span> === |
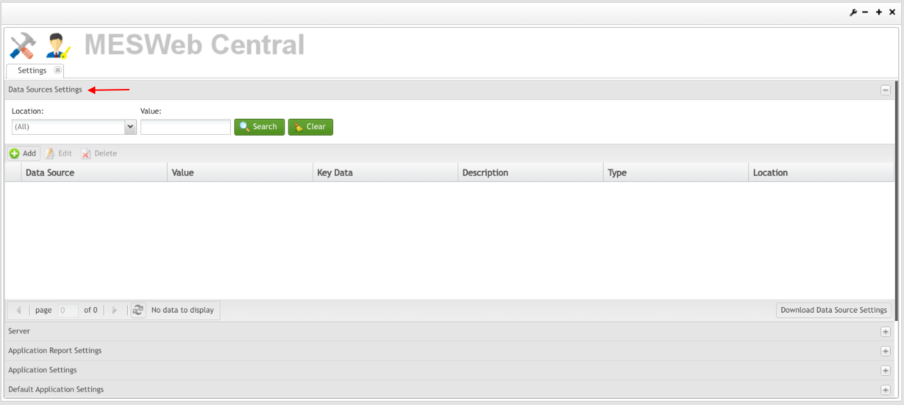
| − | + | In this section, the user can configure the data source for the Dashboard and '''42Q Live''' application. | |
| − | + | The'''Data Source '''function is located in the '''Settings''' menu and allows the administrators' users to add, edit or delete the Data Sources. | |
| − | + | To access the '''Data Source''' function, click on the '''Data Source''' menu located under the '''Settings''' menu or select '''“+”''' icon. | |
| − | + | <br/> '''Figure 4: Data Source Settings Main page''' | |
| − | + | [[File:MWC DataSourceSettingsMainpage.png|x405px|MWC DataSourceSettingsMainpage.png]] | |
| − | + | The '''Data Source List''' displays containing all previously created data sources, listed numerically and alphabetically. From this screen, the '''Administrator''' can a'''dd, edit or delete''' data sources. | |
| − | + | ==== <br/> <span class="mw-headline" id="Filter_Data_Source_Settings"><span class="mw-headline" id="Filter_Data_Source_Settings"><span class="mw-headline" id="Filter_Data_Source_Settings"><span class="mw-headline" id="Filter_Data_Source_Settings"><span class="mw-headline" id="Filter_Data_Source_Settings"><span class="mw-headline" id="Filter_Data_Source_Settings"><span class="mw-headline" id="Filter_Data_Source_Settings"><span class="mw-headline" id="Filter_Data_Source_Settings"><span class="mw-headline" id="Filter_Data_Source_Settings"><span class="mw-headline" id="Filter_Data_Source_Settings"><span class="mw-headline" id="Filter_Data_Source_Settings"><span class="mw-headline" id="Filter_Data_Source_Settings"><span class="mw-headline" id="Filter_Data_Source_Settings"><span class="mw-headline" id="Filter_Data_Source_Settings"><span class="mw-headline" id="Filter_Data_Source_Settings"><span class="mw-headline" id="Filter_Data_Source_Settings"><span class="mw-headline" id="Filter_Data_Source_Settings"><span class="mw-headline" id="Filter_Data_Source_Settings"><span class="mw-headline" id="Filter_Data_Source_Settings"><span class="mw-headline" id="Filter_Data_Source_Settings">Filter Data Source Settings</span></span></span></span></span></span></span></span></span></span></span></span></span></span></span></span></span></span></span></span> ==== | |
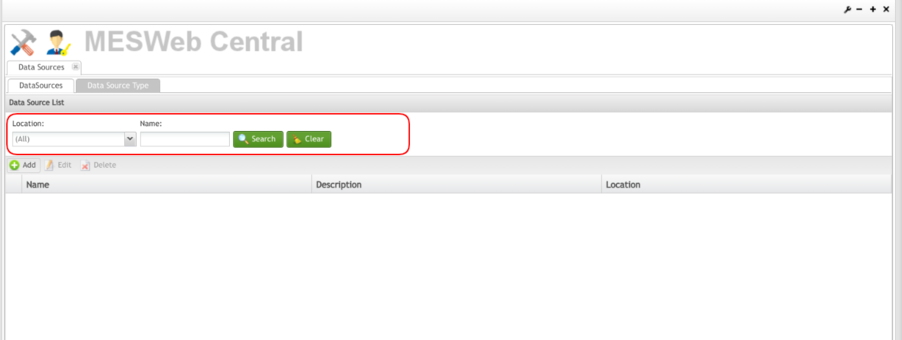
| − | + | To perform a search at the '''Data Source List''', fill at least one field and click on '''Search '''to continue. | |
| − | + | '''Figure 5: Data Source Filter''' | |
| − | + | [[File:MWC DataSourceFilter.png|x400px|MWC DataSourceFilter.png]] | |
| − | + | The List will be displayed according to the user search. | |
| − | + | | |
| − | + | ==== <span class="mw-headline" id="Add_Data_Source_Settings"><span class="mw-headline" id="Add_Data_Source_Settings"><span class="mw-headline" id="Add_Data_Source_Settings"><span class="mw-headline" id="Add_Data_Source_Settings"><span class="mw-headline" id="Add_Data_Source_Settings"><span class="mw-headline" id="Add_Data_Source_Settings"><span class="mw-headline" id="Add_Data_Source_Settings"><span class="mw-headline" id="Add_Data_Source_Settings"><span class="mw-headline" id="Add_Data_Source_Settings"><span class="mw-headline" id="Add_Data_Source_Settings"><span class="mw-headline" id="Add_Data_Source_Settings"><span class="mw-headline" id="Add_Data_Source_Settings"><span class="mw-headline" id="Add_Data_Source_Settings"><span class="mw-headline" id="Add_Data_Source_Settings"><span class="mw-headline" id="Add_Data_Source_Settings"><span class="mw-headline" id="Add_Data_Source_Settings"><span class="mw-headline" id="Add_Data_Source_Settings"><span class="mw-headline" id="Add_Data_Source_Settings"><span class="mw-headline" id="Add_Data_Source_Settings"><span class="mw-headline" id="Add_Data_Source_Settings">Add Data Source Settings</span></span></span></span></span></span></span></span></span></span></span></span></span></span></span></span></span></span></span></span> ==== | |
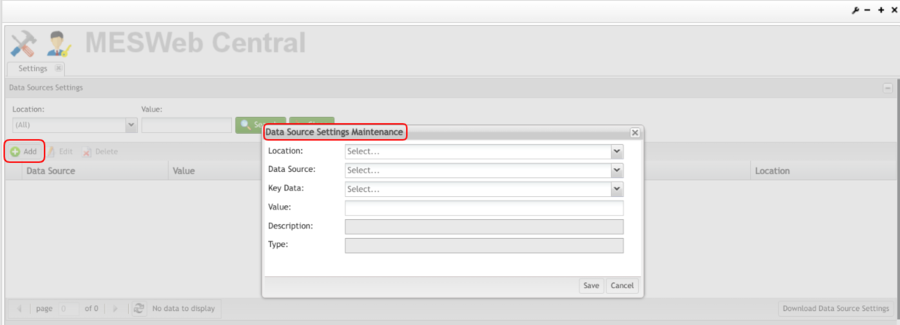
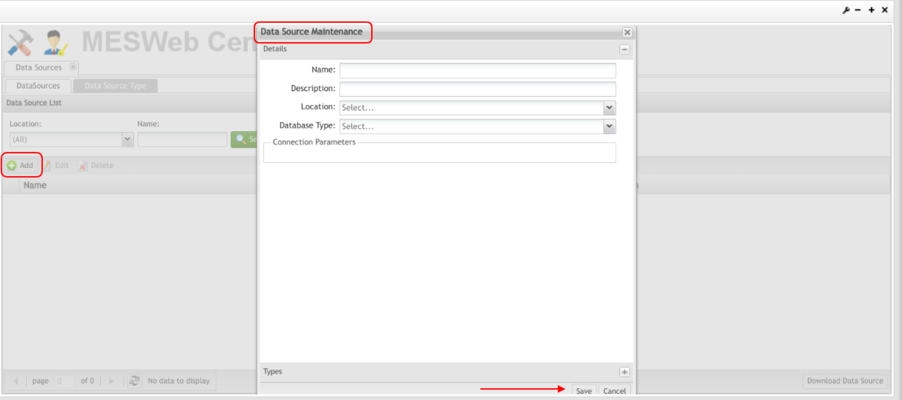
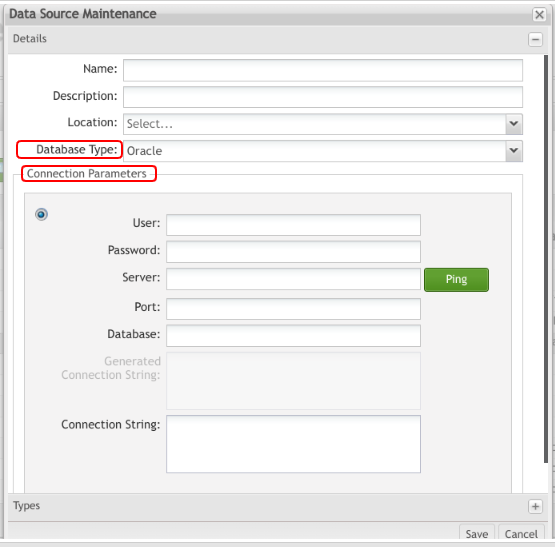
| − | + | This function allows the '''Administrator '''to add a data source setting based on the '''Location''', '''Data Source''', '''Value,''' '''Key Data''', '''Description''', and '''Type'''. | |
| − | + | Follow the steps below to add '''Data Source Settings''': | |
| − | + | 1. To add a '''Data Source Setting''', select '''Add''' located above the '''Data Source Settings''' list. | |
| − | + | 2. The '''Data Source Settings Maintenance''' pop-up displays. Fill in the fields and select '''Save'''. | |
| − | + | 3. Select '''Cancel''' to exit. A successful message is displayed. | |
| − | + | 4. Once the data source settings have been entered and saved, the created data source will appear in the list. | |
| − | + | | |
| − | + | '''Figure 6: Data Source Add''' | |
| − | + | [[File:MWC DataSourceAdd.png|x325px|MWC DataSourceAdd.png]] | |
| − | + | | |
| − | + | | |
| − | + | ==== <span class="mw-headline" id="Edit_Data_Source_Settings"><span class="mw-headline" id="Edit_Data_Source_Settings"><span class="mw-headline" id="Edit_Data_Source_Settings"><span class="mw-headline" id="Edit_Data_Source_Settings"><span class="mw-headline" id="Edit_Data_Source_Settings"><span class="mw-headline" id="Edit_Data_Source_Settings"><span class="mw-headline" id="Edit_Data_Source_Settings"><span class="mw-headline" id="Edit_Data_Source_Settings"><span class="mw-headline" id="Edit_Data_Source_Settings"><span class="mw-headline" id="Edit_Data_Source_Settings"><span class="mw-headline" id="Edit_Data_Source_Settings"><span class="mw-headline" id="Edit_Data_Source_Settings"><span class="mw-headline" id="Edit_Data_Source_Settings"><span class="mw-headline" id="Edit_Data_Source_Settings"><span class="mw-headline" id="Edit_Data_Source_Settings"><span class="mw-headline" id="Edit_Data_Source_Settings"><span class="mw-headline" id="Edit_Data_Source_Settings"><span class="mw-headline" id="Edit_Data_Source_Settings"><span class="mw-headline" id="Edit_Data_Source_Settings"><span class="mw-headline" id="Edit_Data_Source_Settings"><span class="mw-headline" id="Edit_Data_Source_Settings">Edit Data Source Settings</span></span></span></span></span></span></span></span></span></span></span></span></span></span></span></span></span></span></span></span></span> ==== | |
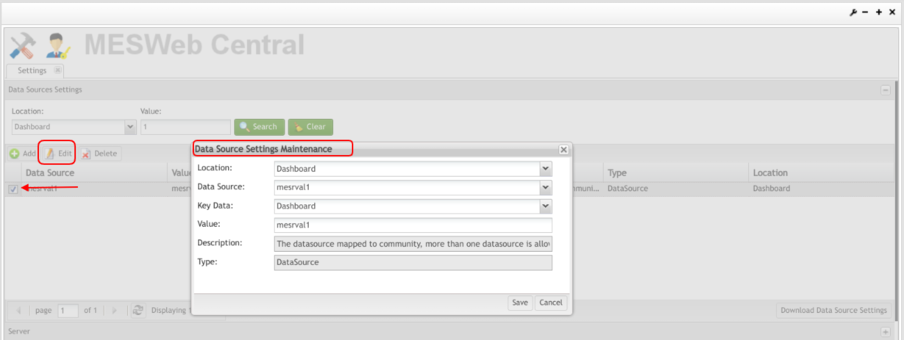
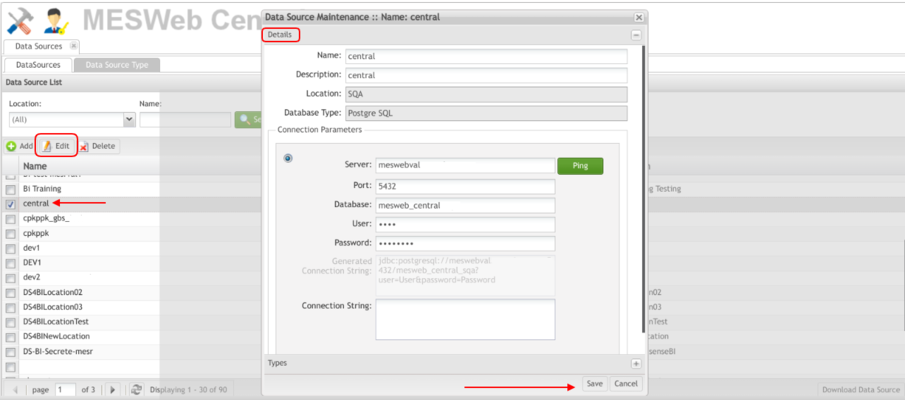
| − | 1. To | + | 1. To edit a '''Data Source Settings''', select the desired data source setting from the list. |
| − | ''' | + | 2. Select '''Edit '''located above the Data Source list. |
| − | + | 3. The '''Data Source Settings Maintenance''' pop-up displays. After editing the data, select '''Save''' to confirm. | |
| − | ''' | + | 4. Select '''Cancel '''to exit. |
| − | + | | |
| − | + | '''Figure 7: Data Source Edit''' | |
| − | + | [[File:MWC DataSourceEdit.png|x340px|MWC DataSourceEdit.png]] | |
| − | + | | |
| − | + | <br/> Delete Data Source Settings | |
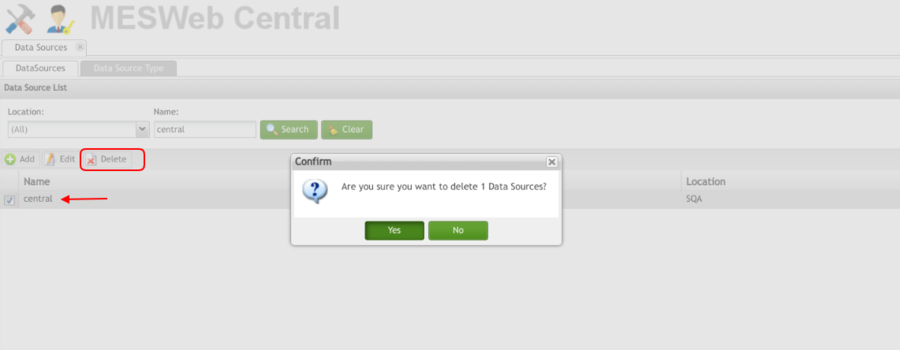
| − | ''' | + | 1. To delete a '''Data Source Settings''', select the '''Data Source''' from the list. |
| − | + | 2. Select '''Delete''' located above the '''Data Source''' list. | |
| − | + | A confirmation message is displayed. Selected''' '''to confirm or '''No '''to exit. | |
| − | + | | |
| − | + | '''Figure 8: Data Source Delete''' | |
| − | + | [[File:MWC DataSourceDelete.png|x263px|MWC DataSourceDelete.png]] | |
| − | + | | |
| − | + | | |
| − | + | === <span class="mw-headline" id="Server"><span class="mw-headline" id="Server"><span class="mw-headline" id="Server"><span class="mw-headline" id="Server"><span class="mw-headline" id="Server"><span class="mw-headline" id="Server"><span class="mw-headline" id="Server"><span class="mw-headline" id="Server"><span class="mw-headline" id="Server"><span class="mw-headline" id="Server"><span class="mw-headline" id="Server"><span class="mw-headline" id="Server"><span class="mw-headline" id="Server"><span class="mw-headline" id="Server"><span class="mw-headline" id="Server"><span class="mw-headline" id="Server"><span class="mw-headline" id="Server"><span class="mw-headline" id="Server"><span class="mw-headline" id="Server"><span class="mw-headline" id="Server"><span class="mw-headline" id="Server">Server</span></span></span></span></span></span></span></span></span></span></span></span></span></span></span></span></span></span></span></span></span> === | |
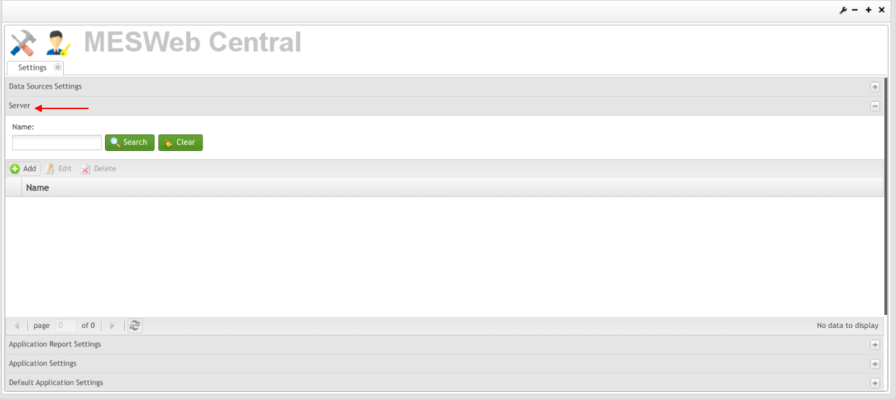
| − | + | Server is where the '''MESWeb Execution''' application is installed. | |
| − | + | The '''Server''' function is located in the '''Settings''' menu and allows the administrator users to add, edit or delete the servers. | |
| − | + | To access the '''Server''' function, click on the server menu located under the '''Settings''' menu or select '''“+”'''''' icon.'' | |
| − | + | '''Figure 9: Server Main Page''' | |
| − | + | [[File:MWC ServerMainPage.png|x400px|MWC ServerMainPage.png]] | |
| − | + | A '''Server''' list displays containing all previously created servers listed numerically and alphabetically. From this screen, the '''Administrator''' can add, edit or delete a server. | |
| − | + | <br/> | |
| − | + | ==== <span class="mw-headline" id="Filter_Server_Names"><span class="mw-headline" id="Filter_Server_Names"><span class="mw-headline" id="Filter_Server_Names"><span class="mw-headline" id="Filter_Server_Names"><span class="mw-headline" id="Filter_Server_Names"><span class="mw-headline" id="Filter_Server_Names"><span class="mw-headline" id="Filter_Server_Names"><span class="mw-headline" id="Filter_Server_Names"><span class="mw-headline" id="Filter_Server_Names"><span class="mw-headline" id="Filter_Server_Names"><span class="mw-headline" id="Filter_Server_Names"><span class="mw-headline" id="Filter_Server_Names"><span class="mw-headline" id="Filter_Server_Names"><span class="mw-headline" id="Filter_Server_Names"><span class="mw-headline" id="Filter_Server_Names"><span class="mw-headline" id="Filter_Server_Names"><span class="mw-headline" id="Filter_Server_Names"><span class="mw-headline" id="Filter_Server_Names"><span class="mw-headline" id="Filter_Server_Names"><span class="mw-headline" id="Filter_Server_Names"><span class="mw-headline" id="Filter_Server_Names">Filter Server Names</span></span></span></span></span></span></span></span></span></span></span></span></span></span></span></span></span></span></span></span></span> ==== | |
| − | + | To perform a search at the '''Server List''', fill at least one field and click on '''Search''' to continue. | |
| − | + | The list will be displayed according to the user search. | |
| − | + | '''Figure 10: Filter Servers''' | |
| − | + | [[File:MWC FilterServers.png|x215px|MWC FilterServers.png]] | |
| − | + | <br/> | |
| − | + | Add Server Name | |
| − | ''' | + | 1. To add a server, select '''Add''' located above the server name list. |
| − | + | 2. The '''Server Detail''' pop-up displays. Enter a name for the server and select '''Save'''. | |
| − | + | 3. Select '''Cancel '''to exit. | |
| − | + | 4. Once the server name has been entered and saved, the created server will appear in the server list. | |
| − | + | | |
| − | + | '''Figure 11: Add a Server Name''' | |
| − | + | [[File:MWC AddaServerName.png|x290px|MWC AddaServerName.png]] | |
| − | + | | |
| − | + | ==== <span class="mw-headline" id="Edit_Server_Name"><span class="mw-headline" id="Edit_Server_Name"><span class="mw-headline" id="Edit_Server_Name"><span class="mw-headline" id="Edit_Server_Name"><span class="mw-headline" id="Edit_Server_Name"><span class="mw-headline" id="Edit_Server_Name"><span class="mw-headline" id="Edit_Server_Name"><span class="mw-headline" id="Edit_Server_Name"><span class="mw-headline" id="Edit_Server_Name"><span class="mw-headline" id="Edit_Server_Name"><span class="mw-headline" id="Edit_Server_Name"><span class="mw-headline" id="Edit_Server_Name"><span class="mw-headline" id="Edit_Server_Name"><span class="mw-headline" id="Edit_Server_Name"><span class="mw-headline" id="Edit_Server_Name"><span class="mw-headline" id="Edit_Server_Name"><span class="mw-headline" id="Edit_Server_Name"><span class="mw-headline" id="Edit_Server_Name"><span class="mw-headline" id="Edit_Server_Name"><span class="mw-headline" id="Edit_Server_Name"><span class="mw-headline" id="Edit_Server_Name">Edit Server Name</span></span></span></span></span></span></span></span></span></span></span></span></span></span></span></span></span></span></span></span></span> ==== | |
| − | + | 1. To edit a '''Server '''name, select the desired server name from the list. | |
| − | ''' | + | 2. Select '''Edit '''located above the server name list. |
| − | ''' | + | 3. The '''Server Detail '''pop-up displays. After editing the server name, select '''Save '''to confirm. |
| − | + | 4. Select '''Cancel''' to exit. | |
| − | + | | |
| − | + | '''Figure 12: Edit Server''' | |
| − | + | [[File:MWC EditServer.png|x275px|MWC EditServer.png]] | |
| − | + | <br/> | |
| − | + | ==== <span class="mw-headline" id="Delete_Server"><span class="mw-headline" id="Delete_Server"><span class="mw-headline" id="Delete_Server"><span class="mw-headline" id="Delete_Server"><span class="mw-headline" id="Delete_Server"><span class="mw-headline" id="Delete_Server"><span class="mw-headline" id="Delete_Server"><span class="mw-headline" id="Delete_Server"><span class="mw-headline" id="Delete_Server"><span class="mw-headline" id="Delete_Server"><span class="mw-headline" id="Delete_Server"><span class="mw-headline" id="Delete_Server"><span class="mw-headline" id="Delete_Server"><span class="mw-headline" id="Delete_Server"><span class="mw-headline" id="Delete_Server"><span class="mw-headline" id="Delete_Server"><span class="mw-headline" id="Delete_Server"><span class="mw-headline" id="Delete_Server"><span class="mw-headline" id="Delete_Server"><span class="mw-headline" id="Delete_Server"><span class="mw-headline" id="Delete_Server">Delete Server</span></span></span></span></span></span></span></span></span></span></span></span></span></span></span></span></span></span></span></span></span> ==== | |
| − | + | 1. To delete a server, select the server name from the server list. | |
| − | ''' | + | 2. Select '''Delete''' located above the server name list. |
| − | + | 3. A confirmation message is displayed. Select '''Yes '''to confirm or '''No''' to exit. | |
| − | + | | |
| − | + | '''Figure 13: Delete Server Name''' | |
| − | + | [[File:MWC DeleteServerName.png|x294px|MWC DeleteServerName.png]] | |
| − | + | <u>'''Note''':</u> If the server has any location assigned, it will not be allowed to delete the server. | |
| − | + | | |
| − | + | | |
| − | + | === <span class="mw-headline" id="Application_Report_Settings"><span class="mw-headline" id="Application_Report_Settings"><span class="mw-headline" id="Application_Report_Settings"><span class="mw-headline" id="Application_Report_Settings"><span class="mw-headline" id="Application_Report_Settings"><span class="mw-headline" id="Application_Report_Settings"><span class="mw-headline" id="Application_Report_Settings"><span class="mw-headline" id="Application_Report_Settings"><span class="mw-headline" id="Application_Report_Settings"><span class="mw-headline" id="Application_Report_Settings"><span class="mw-headline" id="Application_Report_Settings"><span class="mw-headline" id="Application_Report_Settings"><span class="mw-headline" id="Application_Report_Settings"><span class="mw-headline" id="Application_Report_Settings"><span class="mw-headline" id="Application_Report_Settings"><span class="mw-headline" id="Application_Report_Settings"><span class="mw-headline" id="Application_Report_Settings"><span class="mw-headline" id="Application_Report_Settings"><span class="mw-headline" id="Application_Report_Settings"><span class="mw-headline" id="Application_Report_Settings"><span class="mw-headline" id="Application_Report_Settings">Application Report Settings</span></span></span></span></span></span></span></span></span></span></span></span></span></span></span></span></span></span></span></span></span> === | |
| − | + | In this section, the user can customize the configurations of the reports that belong to a specific application. | |
| − | + | The '''Application Report '''function is located in the Settings menu and allows the administrators' users to add, edit or delete the '''Application Reports'''. | |
| − | + | | |
| − | + | To access the Application '''Report '''function, click on the '''Application Report Settings''' menu located under the '''Settings '''menu or select “+” icon. | |
| − | + | | |
| − | + | ==== <span class="mw-headline" id="Filter_Application_Report_Settings"><span class="mw-headline" id="Filter_Application_Report_Settings"><span class="mw-headline" id="Filter_Application_Report_Settings"><span class="mw-headline" id="Filter_Application_Report_Settings"><span class="mw-headline" id="Filter_Application_Report_Settings"><span class="mw-headline" id="Filter_Application_Report_Settings"><span class="mw-headline" id="Filter_Application_Report_Settings"><span class="mw-headline" id="Filter_Application_Report_Settings"><span class="mw-headline" id="Filter_Application_Report_Settings"><span class="mw-headline" id="Filter_Application_Report_Settings"><span class="mw-headline" id="Filter_Application_Report_Settings"><span class="mw-headline" id="Filter_Application_Report_Settings"><span class="mw-headline" id="Filter_Application_Report_Settings"><span class="mw-headline" id="Filter_Application_Report_Settings"><span class="mw-headline" id="Filter_Application_Report_Settings"><span class="mw-headline" id="Filter_Application_Report_Settings"><span class="mw-headline" id="Filter_Application_Report_Settings"><span class="mw-headline" id="Filter_Application_Report_Settings"><span class="mw-headline" id="Filter_Application_Report_Settings"><span class="mw-headline" id="Filter_Application_Report_Settings"><span class="mw-headline" id="Filter_Application_Report_Settings">Filter Application Report Settings</span></span></span></span></span></span></span></span></span></span></span></span></span></span></span></span></span></span></span></span></span> ==== | |
| − | + | 1. To perform a search at the '''Application Report Settings List''', fill at least one field and click on '''Search''' to continue. | |
| − | + | 2. The List will be displayed according to the user search | |
| − | + | | |
| − | + | '''Figure 14: Filter Application Report Settings''' | |
| − | + | [[File:MWC FilterApplicationReportSettings.png|x400px|MWC FilterApplicationReportSettings.png]] | |
| − | + | | |
| − | + | ==== <span class="mw-headline" id="Add_Application_Report_Settings"><span class="mw-headline" id="Add_Application_Report_Settings"><span class="mw-headline" id="Add_Application_Report_Settings"><span class="mw-headline" id="Add_Application_Report_Settings"><span class="mw-headline" id="Add_Application_Report_Settings"><span class="mw-headline" id="Add_Application_Report_Settings"><span class="mw-headline" id="Add_Application_Report_Settings"><span class="mw-headline" id="Add_Application_Report_Settings"><span class="mw-headline" id="Add_Application_Report_Settings"><span class="mw-headline" id="Add_Application_Report_Settings"><span class="mw-headline" id="Add_Application_Report_Settings"><span class="mw-headline" id="Add_Application_Report_Settings"><span class="mw-headline" id="Add_Application_Report_Settings"><span class="mw-headline" id="Add_Application_Report_Settings"><span class="mw-headline" id="Add_Application_Report_Settings"><span class="mw-headline" id="Add_Application_Report_Settings"><span class="mw-headline" id="Add_Application_Report_Settings"><span class="mw-headline" id="Add_Application_Report_Settings"><span class="mw-headline" id="Add_Application_Report_Settings"><span class="mw-headline" id="Add_Application_Report_Settings"><span class="mw-headline" id="Add_Application_Report_Settings">Add Application Report Settings</span></span></span></span></span></span></span></span></span></span></span></span></span></span></span></span></span></span></span></span></span> ==== | |
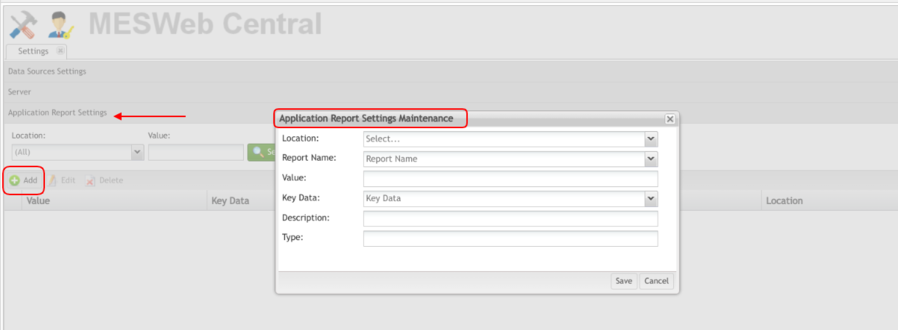
| − | + | 1. To add an '''Application Report Settings''', select '''Add''' located above the Application Report Settings list. | |
| − | + | 2. The '''Application Report Settings Maintenance''' pop-up displays. Fill the fields and select Save. | |
| − | ''' | + | 3. Select '''Cancel '''to exit. A successful message is displayed. |
| − | + | 4. Once the '''Application Report Settings '''have been entered and saved, the created data source will appear in the list. | |
| − | + | | |
| − | + | '''Figure 15: Add Application Report Settings''' | |
| − | + | [[File:MWC AddApplicationReportSettings.png|x330px|MWC AddApplicationReportSettings.png]] | |
| − | + | | |
| − | + | ==== <span class="mw-headline" id="Edit_Application_Report_Settings"><span class="mw-headline" id="Edit_Application_Report_Settings"><span class="mw-headline" id="Edit_Application_Report_Settings"><span class="mw-headline" id="Edit_Application_Report_Settings"><span class="mw-headline" id="Edit_Application_Report_Settings"><span class="mw-headline" id="Edit_Application_Report_Settings"><span class="mw-headline" id="Edit_Application_Report_Settings"><span class="mw-headline" id="Edit_Application_Report_Settings"><span class="mw-headline" id="Edit_Application_Report_Settings"><span class="mw-headline" id="Edit_Application_Report_Settings"><span class="mw-headline" id="Edit_Application_Report_Settings"><span class="mw-headline" id="Edit_Application_Report_Settings"><span class="mw-headline" id="Edit_Application_Report_Settings"><span class="mw-headline" id="Edit_Application_Report_Settings"><span class="mw-headline" id="Edit_Application_Report_Settings"><span class="mw-headline" id="Edit_Application_Report_Settings"><span class="mw-headline" id="Edit_Application_Report_Settings"><span class="mw-headline" id="Edit_Application_Report_Settings"><span class="mw-headline" id="Edit_Application_Report_Settings"><span class="mw-headline" id="Edit_Application_Report_Settings"><span class="mw-headline" id="Edit_Application_Report_Settings">Edit Application Report Settings</span></span></span></span></span></span></span></span></span></span></span></span></span></span></span></span></span></span></span></span></span> ==== | |
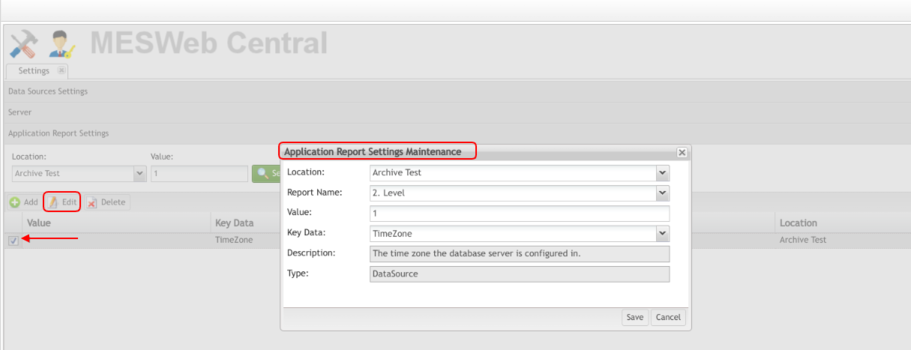
| − | ''' | + | 1. To edit an '''Application Report Settings''', select the desired App. Report Setting from the list. |
| − | + | 2. Select '''Edit '''located above the '''Application Report Settings '''list. | |
| − | + | 3. The '''Application Report Settings Maintenance '''pop-up displays. After editing the desired fields, select '''Save '''to confirm. | |
| − | + | 4. Select '''Cancel''' to exit. | |
| − | + | | |
| − | + | '''Figure 16: Edit Application Report Settings''' | |
| − | + | [[File:MWC EditApplicationReportSettings.png|x350px|MWC EditApplicationReportSettings.png]] | |
| − | + | <br/> | |
| − | + | ==== <span class="mw-headline" id="Delete_Application_Report_Settings"><span class="mw-headline" id="Delete_Application_Report_Settings"><span class="mw-headline" id="Delete_Application_Report_Settings"><span class="mw-headline" id="Delete_Application_Report_Settings"><span class="mw-headline" id="Delete_Application_Report_Settings"><span class="mw-headline" id="Delete_Application_Report_Settings"><span class="mw-headline" id="Delete_Application_Report_Settings"><span class="mw-headline" id="Delete_Application_Report_Settings"><span class="mw-headline" id="Delete_Application_Report_Settings"><span class="mw-headline" id="Delete_Application_Report_Settings"><span class="mw-headline" id="Delete_Application_Report_Settings"><span class="mw-headline" id="Delete_Application_Report_Settings"><span class="mw-headline" id="Delete_Application_Report_Settings"><span class="mw-headline" id="Delete_Application_Report_Settings"><span class="mw-headline" id="Delete_Application_Report_Settings"><span class="mw-headline" id="Delete_Application_Report_Settings"><span class="mw-headline" id="Delete_Application_Report_Settings"><span class="mw-headline" id="Delete_Application_Report_Settings"><span class="mw-headline" id="Delete_Application_Report_Settings"><span class="mw-headline" id="Delete_Application_Report_Settings"><span class="mw-headline" id="Delete_Application_Report_Settings">Delete Application Report Settings</span></span></span></span></span></span></span></span></span></span></span></span></span></span></span></span></span></span></span></span></span> ==== | |
| − | |||
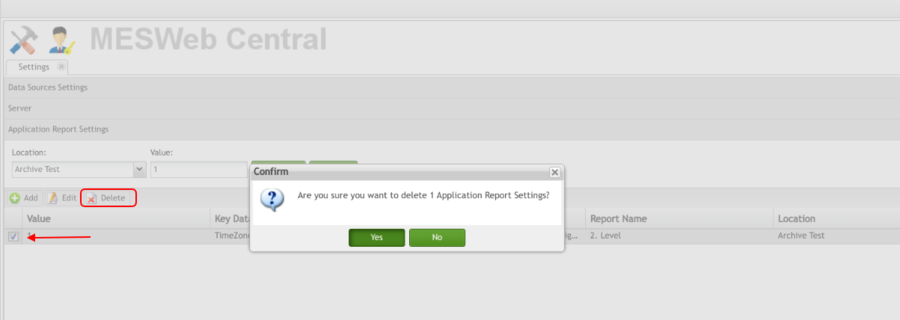
| − | + | 1. To delete the '''Application Report Settings'',''''' select the '''Application Report '''from the list. | |
| − | + | 2. Select '''Delete''' located above the '''Application Report Settings''' list. | |
| − | + | 3. A confirmation message is displayed. Select '''Yes''' to confirm or '''No''' to exit. | |
| − | + | | |
| − | + | '''Figure 17: Delete Application Report Settings''' | |
| − | + | [[File:MWC DeleteApplicationReportSettings .png|x320px|MWC DeleteApplicationReportSettings .png]] | |
| − | + | | |
| − | + | | |
| − | + | === <span class="mw-headline" id="Application_Settings"><span class="mw-headline" id="Application_Settings"><span class="mw-headline" id="Application_Settings"><span class="mw-headline" id="Application_Settings"><span class="mw-headline" id="Application_Settings"><span class="mw-headline" id="Application_Settings"><span class="mw-headline" id="Application_Settings"><span class="mw-headline" id="Application_Settings"><span class="mw-headline" id="Application_Settings"><span class="mw-headline" id="Application_Settings"><span class="mw-headline" id="Application_Settings"><span class="mw-headline" id="Application_Settings"><span class="mw-headline" id="Application_Settings"><span class="mw-headline" id="Application_Settings"><span class="mw-headline" id="Application_Settings"><span class="mw-headline" id="Application_Settings"><span class="mw-headline" id="Application_Settings"><span class="mw-headline" id="Application_Settings"><span class="mw-headline" id="Application_Settings"><span class="mw-headline" id="Application_Settings"><span class="mw-headline" id="Application_Settings">Application Settings</span></span></span></span></span></span></span></span></span></span></span></span></span></span></span></span></span></span></span></span></span> === | |
| − | + | In this section, the user can configure the application. | |
| − | + | The '''Application Settings '''function is located in the '''Settings''' menu and allows the administrators' users to add, edit or delete the '''Application Settings'''. | |
| − | + | To access the '''Application Settings''' function, click on the '''Application Settings''' menu located under the Settings menu or select “+” icon. | |
| − | + | | |
| − | + | ==== <span class="mw-headline" id="Filter_Application_Settings"><span class="mw-headline" id="Filter_Application_Settings"><span class="mw-headline" id="Filter_Application_Settings"><span class="mw-headline" id="Filter_Application_Settings"><span class="mw-headline" id="Filter_Application_Settings"><span class="mw-headline" id="Filter_Application_Settings"><span class="mw-headline" id="Filter_Application_Settings"><span class="mw-headline" id="Filter_Application_Settings"><span class="mw-headline" id="Filter_Application_Settings"><span class="mw-headline" id="Filter_Application_Settings"><span class="mw-headline" id="Filter_Application_Settings"><span class="mw-headline" id="Filter_Application_Settings"><span class="mw-headline" id="Filter_Application_Settings"><span class="mw-headline" id="Filter_Application_Settings"><span class="mw-headline" id="Filter_Application_Settings"><span class="mw-headline" id="Filter_Application_Settings"><span class="mw-headline" id="Filter_Application_Settings"><span class="mw-headline" id="Filter_Application_Settings"><span class="mw-headline" id="Filter_Application_Settings"><span class="mw-headline" id="Filter_Application_Settings"><span class="mw-headline" id="Filter_Application_Settings">Filter Application Settings</span></span></span></span></span></span></span></span></span></span></span></span></span></span></span></span></span></span></span></span></span> ==== | |
| − | ''' | + | To perform a search at the '''Application Settings List''', fill at least one field and click on '''Search '''to continue. |
| − | The | + | The List will be displayed according to the user search. |
| − | + | | |
| − | '''Figure | + | '''Figure 18: Filter Application Settings''' |
| − | [[ | + | [[File:MWC FilterApplicationSettings.png|x380px|MWC FilterApplicationSettings.png]] |
| − | + | | |
| − | + | | |
| − | + | ==== <span class="mw-headline" id="Application_Settings_2"><span class="mw-headline" id="Application_Settings_2"><span class="mw-headline" id="Application_Settings_2"><span class="mw-headline" id="Application_Settings_2"><span class="mw-headline" id="Application_Settings_2"><span class="mw-headline" id="Application_Settings_2"><span class="mw-headline" id="Application_Settings_2"><span class="mw-headline" id="Application_Settings_2"><span class="mw-headline" id="Application_Settings_2"><span class="mw-headline" id="Application_Settings_2"><span class="mw-headline" id="Application_Settings_2"><span class="mw-headline" id="Application_Settings_2"><span class="mw-headline" id="Application_Settings_2"><span class="mw-headline" id="Application_Settings_2"><span class="mw-headline" id="Application_Settings_2"><span class="mw-headline" id="Application_Settings_2"><span class="mw-headline" id="Application_Settings_2"><span class="mw-headline" id="Application_Settings_2"><span class="mw-headline" id="Application_Settings_2"><span class="mw-headline" id="Application_Settings_2"><span class="mw-headline" id="Application_Settings_2">Application Settings</span></span></span></span></span></span></span></span></span></span></span></span></span></span></span></span></span></span></span></span></span> ==== | |
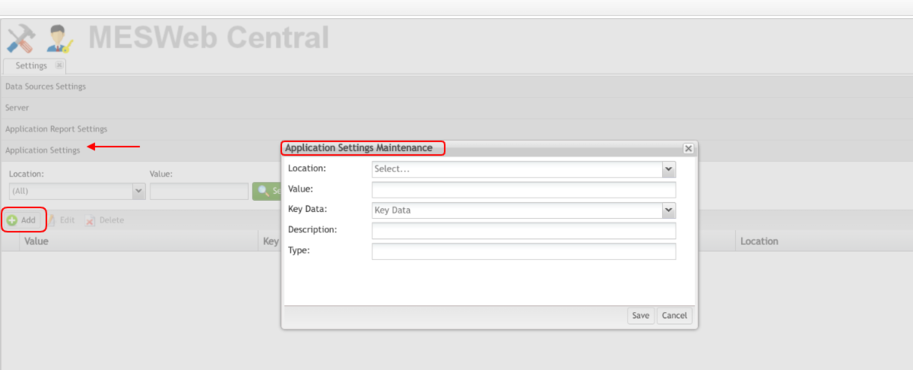
| − | + | 1. To add '''Application Settings''', select '''Add '''located above the '''Application Settings''' list. | |
| − | ''' | + | 2. The '''Application Settings Maintenance''' pop-up displays. Fill in the fields and select '''Save'''. |
| − | + | 3. Select '''Cancel''' to exit. A successful message is displayed. | |
| − | + | 4. Once the '''Application Settings''' have been entered and saved, the created '''Application Settings''' will appear in the list. | |
| − | + | | |
| − | + | '''Figure 19: Add Application Settings''' | |
| − | + | [[File:MWC AddApplicationSettings.png|x370px|MWC AddApplicationSettings.png]] | |
| − | + | <br/> | |
| − | + | ==== <span class="mw-headline" id="Edit_Application_Settings"><span class="mw-headline" id="Edit_Application_Settings"><span class="mw-headline" id="Edit_Application_Settings"><span class="mw-headline" id="Edit_Application_Settings"><span class="mw-headline" id="Edit_Application_Settings"><span class="mw-headline" id="Edit_Application_Settings"><span class="mw-headline" id="Edit_Application_Settings"><span class="mw-headline" id="Edit_Application_Settings"><span class="mw-headline" id="Edit_Application_Settings"><span class="mw-headline" id="Edit_Application_Settings"><span class="mw-headline" id="Edit_Application_Settings"><span class="mw-headline" id="Edit_Application_Settings"><span class="mw-headline" id="Edit_Application_Settings"><span class="mw-headline" id="Edit_Application_Settings"><span class="mw-headline" id="Edit_Application_Settings"><span class="mw-headline" id="Edit_Application_Settings"><span class="mw-headline" id="Edit_Application_Settings"><span class="mw-headline" id="Edit_Application_Settings"><span class="mw-headline" id="Edit_Application_Settings"><span class="mw-headline" id="Edit_Application_Settings"><span class="mw-headline" id="Edit_Application_Settings">Edit Application Settings</span></span></span></span></span></span></span></span></span></span></span></span></span></span></span></span></span></span></span></span></span> ==== | |
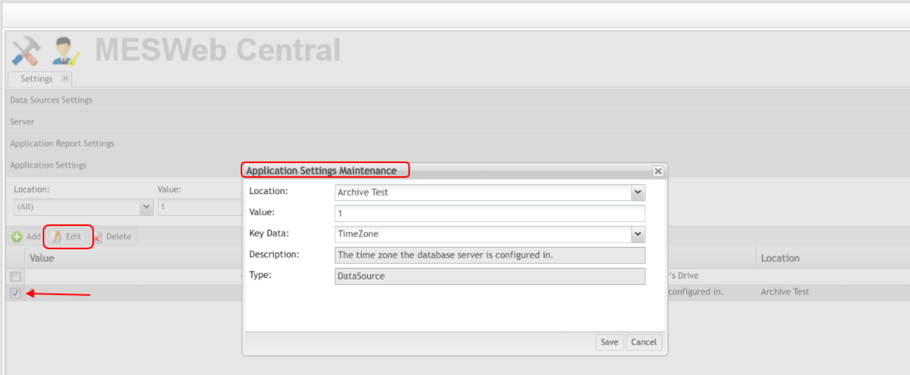
| − | + | 1. To edit an '''Application Settings''', select the desired '''App. Settings''' from the list. | |
| − | + | 2. Select '''Edit''' located above the '''Application Settings''' list. | |
| − | + | 3. The '''Application Settings Maintenance''' pop-up displays. After editing the desired fields, select '''Save''' to confirm. | |
| − | + | 4. Select '''Cancel '''to exit. | |
| − | + | | |
| − | ''' | + | '''Figure 20: Edit Application Settings''' |
| − | + | [[File:MWC EditApplicationSettings.png|x375px|MWC EditApplicationSettings.png]] | |
| − | + | | |
| − | + | ==== <span class="mw-headline" id="Delete_Application_Settings"><span class="mw-headline" id="Delete_Application_Settings"><span class="mw-headline" id="Delete_Application_Settings"><span class="mw-headline" id="Delete_Application_Settings"><span class="mw-headline" id="Delete_Application_Settings"><span class="mw-headline" id="Delete_Application_Settings"><span class="mw-headline" id="Delete_Application_Settings"><span class="mw-headline" id="Delete_Application_Settings"><span class="mw-headline" id="Delete_Application_Settings"><span class="mw-headline" id="Delete_Application_Settings"><span class="mw-headline" id="Delete_Application_Settings"><span class="mw-headline" id="Delete_Application_Settings"><span class="mw-headline" id="Delete_Application_Settings"><span class="mw-headline" id="Delete_Application_Settings"><span class="mw-headline" id="Delete_Application_Settings"><span class="mw-headline" id="Delete_Application_Settings"><span class="mw-headline" id="Delete_Application_Settings"><span class="mw-headline" id="Delete_Application_Settings"><span class="mw-headline" id="Delete_Application_Settings"><span class="mw-headline" id="Delete_Application_Settings"><span class="mw-headline" id="Delete_Application_Settings">Delete Application Settings</span></span></span></span></span></span></span></span></span></span></span></span></span></span></span></span></span></span></span></span></span> ==== | |
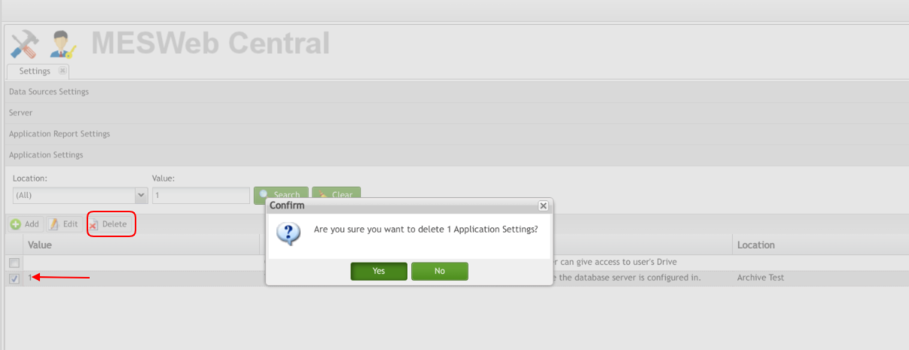
| − | ''' | + | 1. To delete '''Application Settings''', select the '''Application Settings''' from the list. |
| − | + | 2. Select '''Delete''' located above the '''Application Settings''' list. | |
| − | + | 3. A confirmation message is displayed. Select '''Yes '''to confirm or '''No '''to exit. | |
| − | + | | |
| − | ''' | + | '''Figure 21: Delete Application Settings''' |
| − | + | [[File:MWC DeleteApplicationSettings.png|x350px|MWC DeleteApplicationSettings.png]] | |
| − | + | <br/> | |
| − | + | | |
| − | + | === <span class="mw-headline" id="Default_Application_Settings"><span class="mw-headline" id="Default_Application_Settings"><span class="mw-headline" id="Default_Application_Settings"><span class="mw-headline" id="Default_Application_Settings"><span class="mw-headline" id="Default_Application_Settings"><span class="mw-headline" id="Default_Application_Settings"><span class="mw-headline" id="Default_Application_Settings"><span class="mw-headline" id="Default_Application_Settings"><span class="mw-headline" id="Default_Application_Settings"><span class="mw-headline" id="Default_Application_Settings"><span class="mw-headline" id="Default_Application_Settings"><span class="mw-headline" id="Default_Application_Settings"><span class="mw-headline" id="Default_Application_Settings"><span class="mw-headline" id="Default_Application_Settings"><span class="mw-headline" id="Default_Application_Settings"><span class="mw-headline" id="Default_Application_Settings"><span class="mw-headline" id="Default_Application_Settings"><span class="mw-headline" id="Default_Application_Settings"><span class="mw-headline" id="Default_Application_Settings"><span class="mw-headline" id="Default_Application_Settings"><span class="mw-headline" id="Default_Application_Settings">Default Application Settings</span></span></span></span></span></span></span></span></span></span></span></span></span></span></span></span></span></span></span></span></span> === | |
| − | + | In this section, the user can specify the default values to be used in a specific application. In this section, the user can add new CSS to override existing ones or add javascript codes. | |
| − | + | The '''Default Application Settings''' function is located in the '''Settings''' menu and allows the administrators' users to add, edit or delete the '''Default Application Settings'''. | |
| − | ''' | + | To access the '''Default Application Settings''' function, click on the '''Default Application Settings''' menu located under the '''Settings''' menu or select '''“+”''' icon. |
| − | + | | |
| − | + | ==== <span class="mw-headline" id="Filter_Default_Application_Settings"><span class="mw-headline" id="Filter_Default_Application_Settings"><span class="mw-headline" id="Filter_Default_Application_Settings"><span class="mw-headline" id="Filter_Default_Application_Settings"><span class="mw-headline" id="Filter_Default_Application_Settings"><span class="mw-headline" id="Filter_Default_Application_Settings"><span class="mw-headline" id="Filter_Default_Application_Settings"><span class="mw-headline" id="Filter_Default_Application_Settings"><span class="mw-headline" id="Filter_Default_Application_Settings"><span class="mw-headline" id="Filter_Default_Application_Settings"><span class="mw-headline" id="Filter_Default_Application_Settings"><span class="mw-headline" id="Filter_Default_Application_Settings"><span class="mw-headline" id="Filter_Default_Application_Settings"><span class="mw-headline" id="Filter_Default_Application_Settings"><span class="mw-headline" id="Filter_Default_Application_Settings"><span class="mw-headline" id="Filter_Default_Application_Settings"><span class="mw-headline" id="Filter_Default_Application_Settings"><span class="mw-headline" id="Filter_Default_Application_Settings"><span class="mw-headline" id="Filter_Default_Application_Settings"><span class="mw-headline" id="Filter_Default_Application_Settings"><span class="mw-headline" id="Filter_Default_Application_Settings">Filter Default Application Settings</span></span></span></span></span></span></span></span></span></span></span></span></span></span></span></span></span></span></span></span></span> ==== | |
| − | + | To perform a search at the '''Default Application Settings List''', fill the '''Value '''field and click on '''Search '''to continue. | |
| − | + | The List will be displayed according to the user search. | |
| − | + | <br/> '''Figure 22: Filter Default Application Settings''' | |
| − | + | [[File:MWC FilterDefaultApplicationSettings.png|x335px|MWC FilterDefaultApplicationSettings.png]] | |
| − | + | <br/> | |
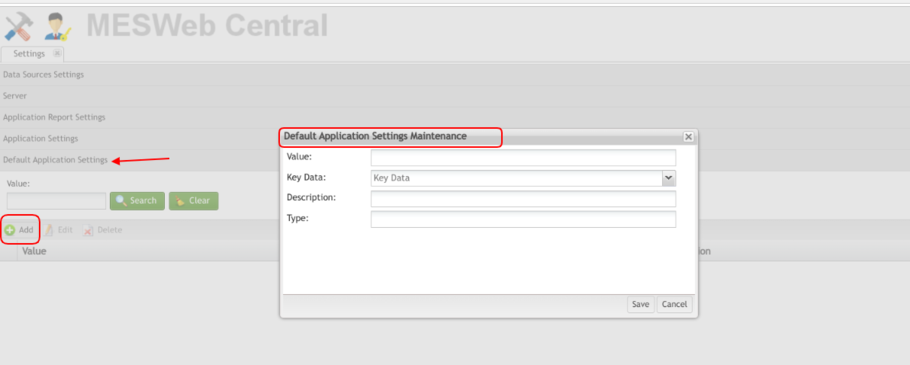
| − | + | ==== <span class="mw-headline" id="Add_Default_Application_Settings"><span class="mw-headline" id="Add_Default_Application_Settings"><span class="mw-headline" id="Add_Default_Application_Settings"><span class="mw-headline" id="Add_Default_Application_Settings"><span class="mw-headline" id="Add_Default_Application_Settings"><span class="mw-headline" id="Add_Default_Application_Settings"><span class="mw-headline" id="Add_Default_Application_Settings"><span class="mw-headline" id="Add_Default_Application_Settings"><span class="mw-headline" id="Add_Default_Application_Settings"><span class="mw-headline" id="Add_Default_Application_Settings"><span class="mw-headline" id="Add_Default_Application_Settings"><span class="mw-headline" id="Add_Default_Application_Settings"><span class="mw-headline" id="Add_Default_Application_Settings"><span class="mw-headline" id="Add_Default_Application_Settings"><span class="mw-headline" id="Add_Default_Application_Settings"><span class="mw-headline" id="Add_Default_Application_Settings"><span class="mw-headline" id="Add_Default_Application_Settings"><span class="mw-headline" id="Add_Default_Application_Settings"><span class="mw-headline" id="Add_Default_Application_Settings"><span class="mw-headline" id="Add_Default_Application_Settings"><span class="mw-headline" id="Add_Default_Application_Settings">Add Default Application Settings</span></span></span></span></span></span></span></span></span></span></span></span></span></span></span></span></span></span></span></span></span> ==== | |
| − | ''' | + | 1. To add a '''Default Application Settings''', select '''Add '''located above the '''Default Application Settings''' list. |
| − | + | 2. The '''Default Application Settings Maintenance''' pop-up displays. Fill the fields and select '''Save'''. | |
| − | ''' | + | 3. Select '''Cancel '''to exit. A successful message is displayed. |
| − | + | 4. Once the '''Default Application Settings''' have been entered and saved, the created '''Default Application Settings''' will appear in the list. | |
| − | + | <br/> '''Figure 23: Add Default Application Settings''' | |
| − | ---- | + | [[File:MWC AddDefaultApplicationSettings.png|x365px|MWC AddDefaultApplicationSettings.png]] |
| + | |||
| + | | ||
| + | |||
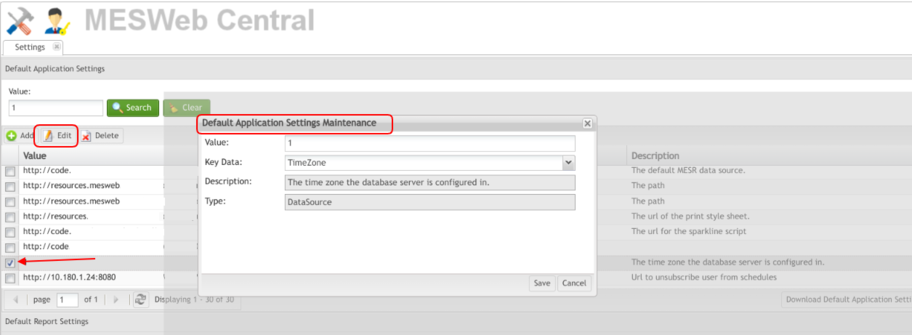
| + | Edit Default Application Settings | ||
| + | |||
| + | 1. To edit '''Default Application Settings''', select the desired '''Default Application Settings''' from the list. | ||
| + | |||
| + | 2. Select '''Edit''' located above the '''Default Application Settings''' list. | ||
| + | |||
| + | 3. The '''Default Application Settings Maintenance''' pop-up displays. After editing the desired fields, select '''Save''' to confirm. | ||
| + | |||
| + | 4. Select '''Cancel''' to exit. | ||
| + | |||
| + | | ||
| + | |||
| + | '''Figure 24: Edit Default Application Settings''' | ||
| + | |||
| + | [[File:MWC EditDefaultApplicationSettings.png|x335px|MWC EditDefaultApplicationSettings.png]] | ||
| + | |||
| + | | ||
| + | |||
| + | Delete Default Application Settings | ||
| + | |||
| + | 1. To delete '''Default Application Settings''', select '''Default Application Settings''' from the list. | ||
| + | |||
| + | 2. Select '''Delete '''located above the '''Default Application Settings''' list. | ||
| + | |||
| + | 3. A confirmation message is displayed. Select '''Yes''' to confirm or '''No''' to exit. | ||
| + | |||
| + | | ||
| + | |||
| + | '''Figure 25: Delete Default Application Settings''' | ||
| + | |||
| + | [[File:MWC DeleteDefaultApplicationSettings.png|x290px|MWC DeleteDefaultApplicationSettings.png]] | ||
| + | |||
| + | | ||
| + | |||
| + | | ||
| + | |||
| + | === <span class="mw-headline" id="Default_Report_Setting"><span class="mw-headline" id="Default_Report_Setting"><span class="mw-headline" id="Default_Report_Setting"><span class="mw-headline" id="Default_Report_Setting"><span class="mw-headline" id="Default_Report_Setting"><span class="mw-headline" id="Default_Report_Setting"><span class="mw-headline" id="Default_Report_Setting"><span class="mw-headline" id="Default_Report_Setting"><span class="mw-headline" id="Default_Report_Setting"><span class="mw-headline" id="Default_Report_Setting"><span class="mw-headline" id="Default_Report_Setting"><span class="mw-headline" id="Default_Report_Setting"><span class="mw-headline" id="Default_Report_Setting"><span class="mw-headline" id="Default_Report_Setting"><span class="mw-headline" id="Default_Report_Setting"><span class="mw-headline" id="Default_Report_Setting"><span class="mw-headline" id="Default_Report_Setting"><span class="mw-headline" id="Default_Report_Setting"><span class="mw-headline" id="Default_Report_Setting"><span class="mw-headline" id="Default_Report_Setting"><span class="mw-headline" id="Default_Report_Setting">Default Report Setting</span></span></span></span></span></span></span></span></span></span></span></span></span></span></span></span></span></span></span></span></span> === | ||
| + | |||
| + | In this section, the user can specify the default values to be used in a specific report. In this section, the user can add new CSS to override existing ones or add javascript codes. | ||
| + | |||
| + | The '''Default Report Settings''' function is located in the '''Settings''' menu and allows the administrators' users to add, edit or delete the '''Default Report Settings'''. | ||
| + | |||
| + | To access the '''Default Report Settings''' function, click on the '''Default Report Settings '''menu located under the '''Settings '''menu or select '''“+”''' icon. | ||
| + | |||
| + | | ||
| + | |||
| + | ==== <span class="mw-headline" id="Filter_Default_Report_Settings"><span class="mw-headline" id="Filter_Default_Report_Settings"><span class="mw-headline" id="Filter_Default_Report_Settings"><span class="mw-headline" id="Filter_Default_Report_Settings"><span class="mw-headline" id="Filter_Default_Report_Settings"><span class="mw-headline" id="Filter_Default_Report_Settings"><span class="mw-headline" id="Filter_Default_Report_Settings"><span class="mw-headline" id="Filter_Default_Report_Settings"><span class="mw-headline" id="Filter_Default_Report_Settings"><span class="mw-headline" id="Filter_Default_Report_Settings"><span class="mw-headline" id="Filter_Default_Report_Settings"><span class="mw-headline" id="Filter_Default_Report_Settings"><span class="mw-headline" id="Filter_Default_Report_Settings"><span class="mw-headline" id="Filter_Default_Report_Settings"><span class="mw-headline" id="Filter_Default_Report_Settings"><span class="mw-headline" id="Filter_Default_Report_Settings"><span class="mw-headline" id="Filter_Default_Report_Settings"><span class="mw-headline" id="Filter_Default_Report_Settings"><span class="mw-headline" id="Filter_Default_Report_Settings"><span class="mw-headline" id="Filter_Default_Report_Settings"><span class="mw-headline" id="Filter_Default_Report_Settings">Filter Default Report Settings</span></span></span></span></span></span></span></span></span></span></span></span></span></span></span></span></span></span></span></span></span> ==== | ||
| + | |||
| + | 1. To perform a search at the '''Default Report Settings List''', fill the '''Value''' field and click on '''Search''' to continue. | ||
| + | |||
| + | 2. The List will be displayed according to the user search. | ||
| + | |||
| + | | ||
| + | |||
| + | '''Figure 26: Filter Default Report Settings''' | ||
| + | |||
| + | [[File:MWC FilterDefaultReportSettings.png|x320px|MWC FilterDefaultReportSettings.png]] | ||
| + | |||
| + | <br/> | ||
| + | |||
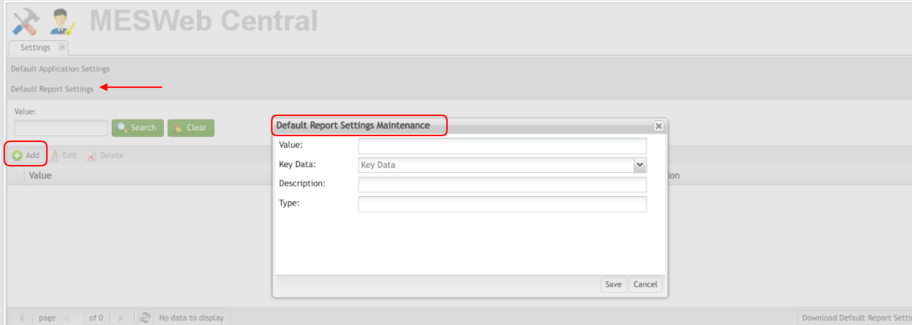
| + | ==== <span class="mw-headline" id="Add_Default_Report_Settings"><span class="mw-headline" id="Add_Default_Report_Settings"><span class="mw-headline" id="Add_Default_Report_Settings"><span class="mw-headline" id="Add_Default_Report_Settings"><span class="mw-headline" id="Add_Default_Report_Settings"><span class="mw-headline" id="Add_Default_Report_Settings"><span class="mw-headline" id="Add_Default_Report_Settings"><span class="mw-headline" id="Add_Default_Report_Settings"><span class="mw-headline" id="Add_Default_Report_Settings"><span class="mw-headline" id="Add_Default_Report_Settings"><span class="mw-headline" id="Add_Default_Report_Settings"><span class="mw-headline" id="Add_Default_Report_Settings"><span class="mw-headline" id="Add_Default_Report_Settings"><span class="mw-headline" id="Add_Default_Report_Settings"><span class="mw-headline" id="Add_Default_Report_Settings"><span class="mw-headline" id="Add_Default_Report_Settings"><span class="mw-headline" id="Add_Default_Report_Settings"><span class="mw-headline" id="Add_Default_Report_Settings"><span class="mw-headline" id="Add_Default_Report_Settings"><span class="mw-headline" id="Add_Default_Report_Settings"><span class="mw-headline" id="Add_Default_Report_Settings">Add Default Report Settings</span></span></span></span></span></span></span></span></span></span></span></span></span></span></span></span></span></span></span></span></span> ==== | ||
| + | |||
| + | 1. To add a '''Default Report Settings''', select '''Add '''located above the '''Default Report Settings''' list. | ||
| + | |||
| + | 2. The '''Default Report Settings Maintenance''' pop-up displays. Fill in the fields and select '''Save'''. | ||
| + | |||
| + | 3. Select '''Cancel '''to exit. A successful message is displayed. | ||
| + | |||
| + | | ||
| + | |||
| + | Once the '''Default Report Settings '''have been entered and saved, the created '''Default Report Settings''' will appear in the list. | ||
| + | |||
| + | <br/> '''Figure 27: Application Report Settings Maintenance to Add Default Report Settings ''' | ||
| + | |||
| + | [[File:MWC ApplicationReportSettingsMaint.png|x325px|MWC ApplicationReportSettingsMaint.png]] | ||
| + | |||
| + | <br/> | ||
| + | |||
| + | ==== <span class="mw-headline" id="Edit_Default_Report_Settings"><span class="mw-headline" id="Edit_Default_Report_Settings"><span class="mw-headline" id="Edit_Default_Report_Settings"><span class="mw-headline" id="Edit_Default_Report_Settings"><span class="mw-headline" id="Edit_Default_Report_Settings"><span class="mw-headline" id="Edit_Default_Report_Settings"><span class="mw-headline" id="Edit_Default_Report_Settings"><span class="mw-headline" id="Edit_Default_Report_Settings"><span class="mw-headline" id="Edit_Default_Report_Settings"><span class="mw-headline" id="Edit_Default_Report_Settings"><span class="mw-headline" id="Edit_Default_Report_Settings"><span class="mw-headline" id="Edit_Default_Report_Settings"><span class="mw-headline" id="Edit_Default_Report_Settings"><span class="mw-headline" id="Edit_Default_Report_Settings"><span class="mw-headline" id="Edit_Default_Report_Settings"><span class="mw-headline" id="Edit_Default_Report_Settings"><span class="mw-headline" id="Edit_Default_Report_Settings"><span class="mw-headline" id="Edit_Default_Report_Settings"><span class="mw-headline" id="Edit_Default_Report_Settings"><span class="mw-headline" id="Edit_Default_Report_Settings"><span class="mw-headline" id="Edit_Default_Report_Settings">Edit Default Report Settings</span></span></span></span></span></span></span></span></span></span></span></span></span></span></span></span></span></span></span></span></span> ==== | ||
| + | |||
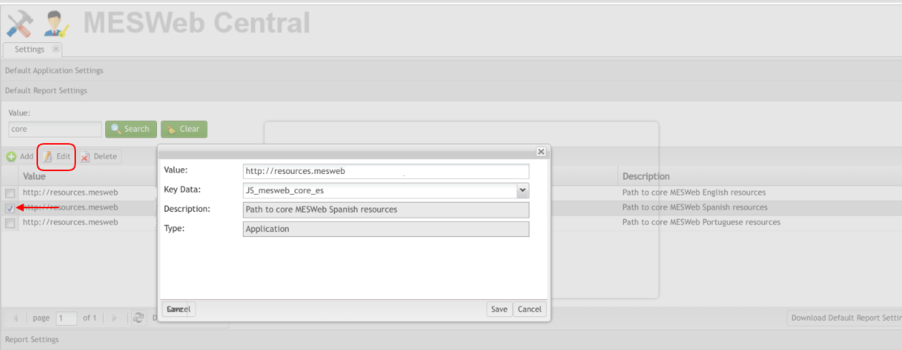
| + | 1. To edit a '''Default Report Settings''', select the desired '''Default Report Settings''' from the list. | ||
| + | |||
| + | 2. Select '''Edit''' located above the '''Default Report Settings''' list. | ||
| + | |||
| + | 3. The '''Default Report Settings Maintenance''' pop-up displays. After editing the desired fields, select '''Save''' to confirm. | ||
| + | |||
| + | 4. Select '''Cancel''' to exit. | ||
| + | |||
| + | | ||
| + | |||
| + | '''Figure 28: Application Report Settings Maintenance to Edit Default Report Settings ''' | ||
| + | |||
| + | [[File:MWC ApplicationReportSettingsMaintEdit.png|x350px|MWC ApplicationReportSettingsMaintEdit.png]] | ||
| + | |||
| + | | ||
| + | |||
| + | | ||
| + | |||
| + | | ||
| + | |||
| + | ==== <span class="mw-headline" id="Delete_Default_Report_Settings"><span class="mw-headline" id="Delete_Default_Report_Settings"><span class="mw-headline" id="Delete_Default_Report_Settings"><span class="mw-headline" id="Delete_Default_Report_Settings"><span class="mw-headline" id="Delete_Default_Report_Settings"><span class="mw-headline" id="Delete_Default_Report_Settings"><span class="mw-headline" id="Delete_Default_Report_Settings"><span class="mw-headline" id="Delete_Default_Report_Settings"><span class="mw-headline" id="Delete_Default_Report_Settings"><span class="mw-headline" id="Delete_Default_Report_Settings"><span class="mw-headline" id="Delete_Default_Report_Settings"><span class="mw-headline" id="Delete_Default_Report_Settings"><span class="mw-headline" id="Delete_Default_Report_Settings"><span class="mw-headline" id="Delete_Default_Report_Settings"><span class="mw-headline" id="Delete_Default_Report_Settings"><span class="mw-headline" id="Delete_Default_Report_Settings"><span class="mw-headline" id="Delete_Default_Report_Settings"><span class="mw-headline" id="Delete_Default_Report_Settings"><span class="mw-headline" id="Delete_Default_Report_Settings"><span class="mw-headline" id="Delete_Default_Report_Settings"><span class="mw-headline" id="Delete_Default_Report_Settings"><span class="mw-headline" id="Delete_Default_Report_Settings">Delete Default Report Settings</span></span></span></span></span></span></span></span></span></span></span></span></span></span></span></span></span></span></span></span></span></span> ==== | ||
| + | |||
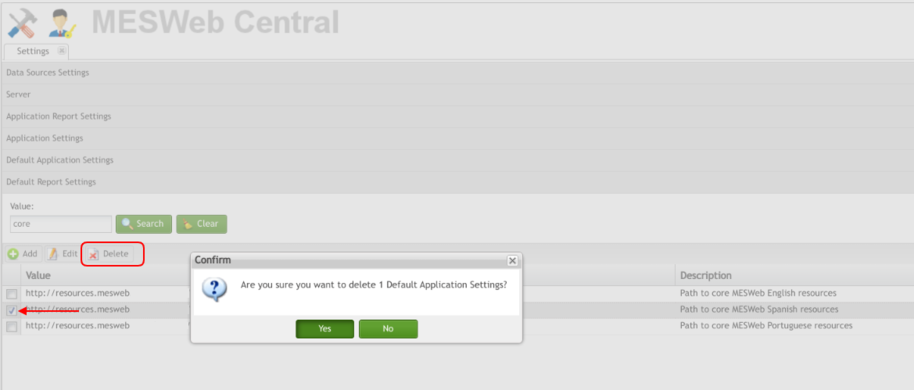
| + | 1. To delete '''Default Report Settings''', select '''Default Report Settings''' from the list. | ||
| + | |||
| + | 2. Select '''Delete''' located above the '''Default Report Settings '''list. | ||
| + | |||
| + | 3. A confirmation message is displayed. Select '''Yes '''to confirm or '''No''' to exit. | ||
| + | |||
| + | | ||
| + | |||
| + | '''Figure 29: Confirmation to Delete Default Report Settings''' | ||
| + | |||
| + | [[File:MWC ConfirmationDeleteDefaultRep.png|x390px|MWC ConfirmationDeleteDefaultRep.png]] | ||
| + | |||
| + | <br/> | ||
| + | |||
| + | === <span class="mw-headline" id="Report_Settings"><span class="mw-headline" id="Report_Settings"><span class="mw-headline" id="Report_Settings"><span class="mw-headline" id="Report_Settings"><span class="mw-headline" id="Report_Settings"><span class="mw-headline" id="Report_Settings"><span class="mw-headline" id="Report_Settings"><span class="mw-headline" id="Report_Settings"><span class="mw-headline" id="Report_Settings"><span class="mw-headline" id="Report_Settings"><span class="mw-headline" id="Report_Settings"><span class="mw-headline" id="Report_Settings"><span class="mw-headline" id="Report_Settings"><span class="mw-headline" id="Report_Settings"><span class="mw-headline" id="Report_Settings"><span class="mw-headline" id="Report_Settings"><span class="mw-headline" id="Report_Settings"><span class="mw-headline" id="Report_Settings"><span class="mw-headline" id="Report_Settings"><span class="mw-headline" id="Report_Settings">Report Settings</span></span></span></span></span></span></span></span></span></span></span></span></span></span></span></span></span></span></span></span> === | ||
| + | |||
| + | In this section, the user can customize configurations just for one report. One of the values that the user can change in this section is the timeout of the report | ||
| + | |||
| + | The '''Report Settings '''function is located in the Settings menu and allows the administrators' users to add, edit or delete the Report Settings. | ||
| + | |||
| + | To access the '''Report Settings '''function, click on the '''Report Settings''' menu located under the '''Settings''' menu or select '''“+”''' icon. | ||
| + | |||
| + | | ||
| + | |||
| + | <br/> '''Filter Report Settings''' | ||
| + | |||
| + | 1. To perform a search at the '''Report Settings List''', fill at least one field and click on '''Search '''to continue. | ||
| + | |||
| + | 2. The List will be displayed according to the user search. | ||
| + | |||
| + | <br/> '''Figure 30: Filter Report Settings''' | ||
| + | |||
| + | [[File:MWC FilterReportSettings.png|x350px|MWC FilterReportSettings.png]] | ||
| + | |||
| + | <br/> | ||
| + | |||
| + | ==== <span class="mw-headline" id="Add_Report_Settings"><span class="mw-headline" id="Add_Report_Settings"><span class="mw-headline" id="Add_Report_Settings"><span class="mw-headline" id="Add_Report_Settings"><span class="mw-headline" id="Add_Report_Settings"><span class="mw-headline" id="Add_Report_Settings"><span class="mw-headline" id="Add_Report_Settings"><span class="mw-headline" id="Add_Report_Settings"><span class="mw-headline" id="Add_Report_Settings"><span class="mw-headline" id="Add_Report_Settings"><span class="mw-headline" id="Add_Report_Settings"><span class="mw-headline" id="Add_Report_Settings"><span class="mw-headline" id="Add_Report_Settings"><span class="mw-headline" id="Add_Report_Settings"><span class="mw-headline" id="Add_Report_Settings"><span class="mw-headline" id="Add_Report_Settings"><span class="mw-headline" id="Add_Report_Settings"><span class="mw-headline" id="Add_Report_Settings"><span class="mw-headline" id="Add_Report_Settings"><span class="mw-headline" id="Add_Report_Settings">Add Report Settings</span></span></span></span></span></span></span></span></span></span></span></span></span></span></span></span></span></span></span></span> ==== | ||
| + | |||
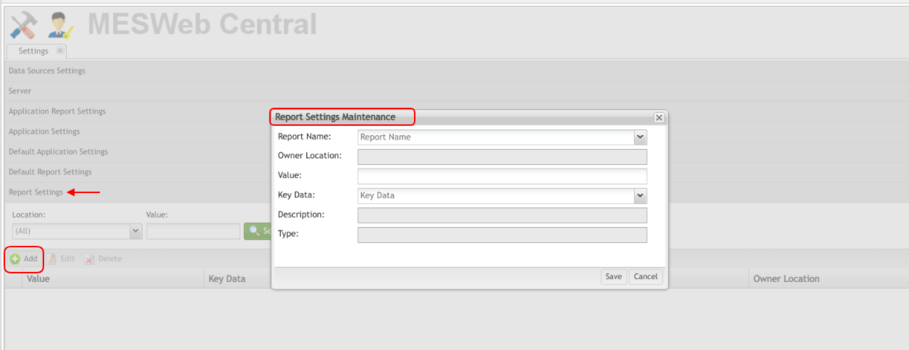
| + | 1. To add a '''Report Settings''', select '''Add '''located above the '''Report Settings''' list. | ||
| + | |||
| + | 2. The '''Report Settings Maintenance''' pop-up displays. Fill in the fields and select '''Save'''. | ||
| + | |||
| + | 3. Select'''Cancel '''to exit. A successful message is displayed. | ||
| + | |||
| + | 4. Once the '''Report Settings''' have been entered and saved, the created '''Report Settings''' will appear in the list. | ||
| + | |||
| + | | ||
| + | |||
| + | '''Figure 31: Add Report in Application Report Settings Maintenance''' | ||
| + | |||
| + | [[File:MWC AddRepAppRepSettingsMaint.png|x350px|MWC AddRepAppRepSettingsMaint.png]] | ||
| + | |||
| + | <br/> | ||
| + | |||
| + | ==== <span class="mw-headline" id="Edit_Report_Settings"><span class="mw-headline" id="Edit_Report_Settings"><span class="mw-headline" id="Edit_Report_Settings"><span class="mw-headline" id="Edit_Report_Settings"><span class="mw-headline" id="Edit_Report_Settings"><span class="mw-headline" id="Edit_Report_Settings"><span class="mw-headline" id="Edit_Report_Settings"><span class="mw-headline" id="Edit_Report_Settings"><span class="mw-headline" id="Edit_Report_Settings"><span class="mw-headline" id="Edit_Report_Settings"><span class="mw-headline" id="Edit_Report_Settings"><span class="mw-headline" id="Edit_Report_Settings"><span class="mw-headline" id="Edit_Report_Settings"><span class="mw-headline" id="Edit_Report_Settings"><span class="mw-headline" id="Edit_Report_Settings"><span class="mw-headline" id="Edit_Report_Settings"><span class="mw-headline" id="Edit_Report_Settings"><span class="mw-headline" id="Edit_Report_Settings"><span class="mw-headline" id="Edit_Report_Settings"><span class="mw-headline" id="Edit_Report_Settings">Edit Report Settings</span></span></span></span></span></span></span></span></span></span></span></span></span></span></span></span></span></span></span></span> ==== | ||
| + | |||
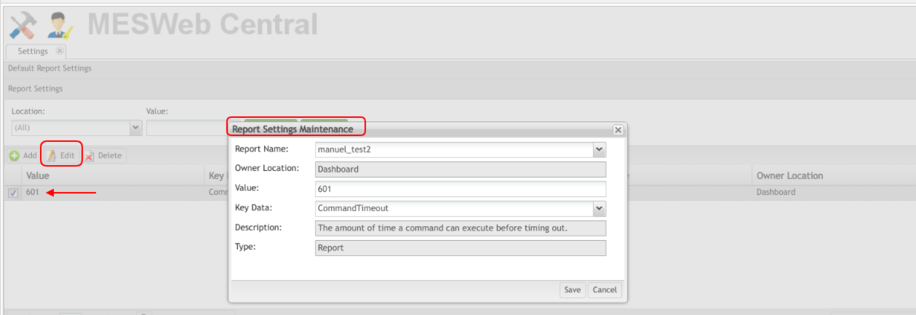
| + | 1. To edit a '''Report Settings''', select the desired '''Report Settings''' from the list. | ||
| + | |||
| + | 2. Select '''Edit '''located above the '''Report Settings''' list. | ||
| + | |||
| + | 3. The '''Report Settings Maintenance''' pop-up displays. After editing the desired fields, select '''Save''' to confirm. | ||
| + | |||
| + | 4. Select '''Cancel '''to exit. | ||
| + | |||
| + | <br/> <br/> '''Figure 32: Edit Report Settings ''' | ||
| + | |||
| + | [[File:MWC EditReportSettings.png|x315px|MWC EditReportSettings.png]] | ||
| + | |||
| + | | ||
| + | |||
| + | Delete Report Settings | ||
| + | |||
| + | 1. To delete '''Report Settings''', select '''Report Settings '''from the list. | ||
| + | |||
| + | 2. Select '''Delete '''located above the '''Report Settings''' list. | ||
| + | |||
| + | 3. A confirmation message is displayed. Select '''Yes''' to confirm or '''No''' to exit. | ||
| + | |||
| + | | ||
| + | |||
| + | '''Figure 33: Delete Report Settings''' | ||
| + | |||
| + | [[File:MWC DeleteReportSettings.png|x285px|MWC DeleteReportSettings.png]] | ||
| + | |||
| + | <br/> | ||
| + | |||
| + | === <span class="mw-headline" id="Server_Settings"><span class="mw-headline" id="Server_Settings"><span class="mw-headline" id="Server_Settings"><span class="mw-headline" id="Server_Settings"><span class="mw-headline" id="Server_Settings"><span class="mw-headline" id="Server_Settings"><span class="mw-headline" id="Server_Settings"><span class="mw-headline" id="Server_Settings"><span class="mw-headline" id="Server_Settings"><span class="mw-headline" id="Server_Settings"><span class="mw-headline" id="Server_Settings"><span class="mw-headline" id="Server_Settings"><span class="mw-headline" id="Server_Settings"><span class="mw-headline" id="Server_Settings"><span class="mw-headline" id="Server_Settings"><span class="mw-headline" id="Server_Settings"><span class="mw-headline" id="Server_Settings"><span class="mw-headline" id="Server_Settings"><span class="mw-headline" id="Server_Settings"><span class="mw-headline" id="Server_Settings">Server Settings</span></span></span></span></span></span></span></span></span></span></span></span></span></span></span></span></span></span></span></span> === | ||
| + | |||
| + | In this section, the user can configure settings for a specific server. In '''Mesweb''' a server is a container of applications. All these settings will apply to the whole server. | ||
| + | |||
| + | The '''Server Settings''' function is located in the '''Settings''' menu and allows the administrators' users to add, edit or delete the '''Server Settings'''. | ||
| + | |||
| + | | ||
| + | |||
| + | To access the '''Server Settings''' function, click on the '''Server Settings''' menu located under the '''Settings''' menu or select '''“+”''' icon. | ||
| + | |||
| + | | ||
| + | |||
| + | ==== <span class="mw-headline" id="Filter_Server_Settings"><span class="mw-headline" id="Filter_Server_Settings"><span class="mw-headline" id="Filter_Server_Settings"><span class="mw-headline" id="Filter_Server_Settings"><span class="mw-headline" id="Filter_Server_Settings"><span class="mw-headline" id="Filter_Server_Settings"><span class="mw-headline" id="Filter_Server_Settings"><span class="mw-headline" id="Filter_Server_Settings"><span class="mw-headline" id="Filter_Server_Settings"><span class="mw-headline" id="Filter_Server_Settings"><span class="mw-headline" id="Filter_Server_Settings"><span class="mw-headline" id="Filter_Server_Settings"><span class="mw-headline" id="Filter_Server_Settings"><span class="mw-headline" id="Filter_Server_Settings"><span class="mw-headline" id="Filter_Server_Settings"><span class="mw-headline" id="Filter_Server_Settings"><span class="mw-headline" id="Filter_Server_Settings"><span class="mw-headline" id="Filter_Server_Settings"><span class="mw-headline" id="Filter_Server_Settings"><span class="mw-headline" id="Filter_Server_Settings">Filter Server Settings</span></span></span></span></span></span></span></span></span></span></span></span></span></span></span></span></span></span></span></span> ==== | ||
| + | |||
| + | 1. To perform a search at the '''Server Settings''' List, fill at least one field and click on '''Search''' to continue. | ||
| + | |||
| + | 2. The List will be displayed according to the user search. | ||
| + | |||
| + | | ||
| + | |||
| + | '''Figure 34: Filter Server Settings''' | ||
| + | |||
| + | [[File:MWC FilterServerSettings.png|x375px|MWC FilterServerSettings.png]] | ||
| + | |||
| + | <br/> | ||
| + | |||
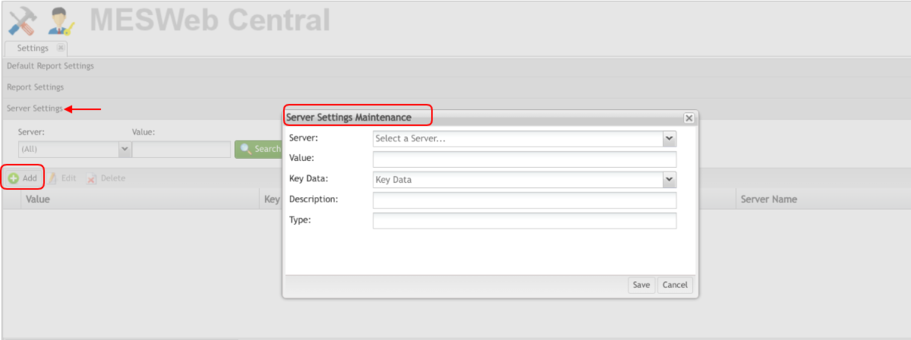
| + | ==== <span class="mw-headline" id="Add_Server_Settings"><span class="mw-headline" id="Add_Server_Settings"><span class="mw-headline" id="Add_Server_Settings"><span class="mw-headline" id="Add_Server_Settings"><span class="mw-headline" id="Add_Server_Settings"><span class="mw-headline" id="Add_Server_Settings"><span class="mw-headline" id="Add_Server_Settings"><span class="mw-headline" id="Add_Server_Settings"><span class="mw-headline" id="Add_Server_Settings"><span class="mw-headline" id="Add_Server_Settings"><span class="mw-headline" id="Add_Server_Settings"><span class="mw-headline" id="Add_Server_Settings"><span class="mw-headline" id="Add_Server_Settings"><span class="mw-headline" id="Add_Server_Settings"><span class="mw-headline" id="Add_Server_Settings"><span class="mw-headline" id="Add_Server_Settings"><span class="mw-headline" id="Add_Server_Settings"><span class="mw-headline" id="Add_Server_Settings"><span class="mw-headline" id="Add_Server_Settings"><span class="mw-headline" id="Add_Server_Settings">Add Server Settings</span></span></span></span></span></span></span></span></span></span></span></span></span></span></span></span></span></span></span></span> ==== | ||
| + | |||
| + | 1. To add a '''Server Settings''', select Add located above the '''Server Settings''' list. | ||
| + | |||
| + | 2. The '''Server Settings Maintenance''' pop-up displays. Fill in the fields and select '''Save'''. | ||
| + | |||
| + | 3. Select '''Cancel''' to exit. A successful message is displayed. | ||
| + | |||
| + | 4. Once the '''Server Settings''' have been entered and saved, the created '''Server Settings '''will appear in the list. | ||
| + | |||
| + | <br/> '''Figure 35: Add Server Settings ''' | ||
| + | |||
| + | [[File:MWC AddServerSettings.png|x340px|MWC AddServerSettings.png]] | ||
| + | |||
| + | <br/> | ||
| + | |||
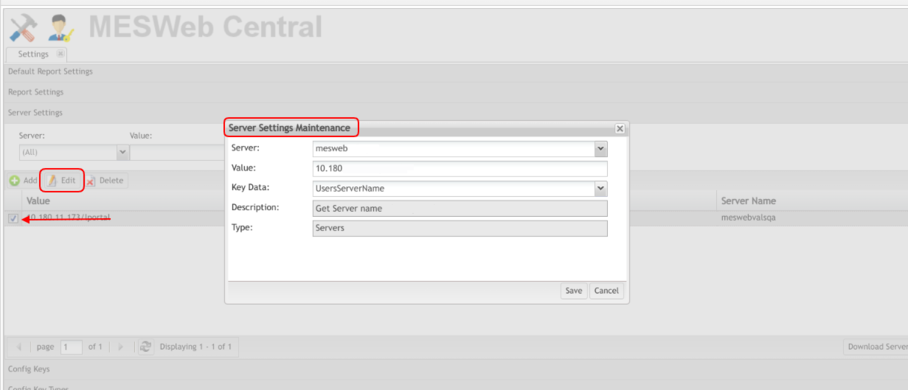
| + | ==== <span class="mw-headline" id="Edit_Server_Settings"><span class="mw-headline" id="Edit_Server_Settings"><span class="mw-headline" id="Edit_Server_Settings"><span class="mw-headline" id="Edit_Server_Settings"><span class="mw-headline" id="Edit_Server_Settings"><span class="mw-headline" id="Edit_Server_Settings"><span class="mw-headline" id="Edit_Server_Settings"><span class="mw-headline" id="Edit_Server_Settings"><span class="mw-headline" id="Edit_Server_Settings"><span class="mw-headline" id="Edit_Server_Settings"><span class="mw-headline" id="Edit_Server_Settings"><span class="mw-headline" id="Edit_Server_Settings"><span class="mw-headline" id="Edit_Server_Settings"><span class="mw-headline" id="Edit_Server_Settings"><span class="mw-headline" id="Edit_Server_Settings"><span class="mw-headline" id="Edit_Server_Settings"><span class="mw-headline" id="Edit_Server_Settings"><span class="mw-headline" id="Edit_Server_Settings"><span class="mw-headline" id="Edit_Server_Settings"><span class="mw-headline" id="Edit_Server_Settings">Edit Server Settings</span></span></span></span></span></span></span></span></span></span></span></span></span></span></span></span></span></span></span></span> ==== | ||
| + | |||
| + | 1. To edit '''Server Settings''', select the desired '''Server Settings '''from the list. | ||
| + | |||
| + | 2. Select '''Edit '''located above the '''Server Settings''' list. | ||
| + | |||
| + | 3. The '''Server Settings Maintenance''' pop-up displays. After editing the desired fields, select '''Save''' to confirm. | ||
| + | |||
| + | 4. Select '''Cancel''' to exit. | ||
| + | |||
| + | | ||
| + | |||
| + | '''Figure 36: Edit Server Settings''' | ||
| + | |||
| + | [[File:MWC EditServerSettings.png|x390px|MWC EditServerSettings.png]] | ||
| + | |||
| + | <br/> | ||
| + | |||
| + | ==== <span class="mw-headline" id="Delete_Server_Settings"><span class="mw-headline" id="Delete_Server_Settings"><span class="mw-headline" id="Delete_Server_Settings"><span class="mw-headline" id="Delete_Server_Settings"><span class="mw-headline" id="Delete_Server_Settings"><span class="mw-headline" id="Delete_Server_Settings"><span class="mw-headline" id="Delete_Server_Settings"><span class="mw-headline" id="Delete_Server_Settings"><span class="mw-headline" id="Delete_Server_Settings"><span class="mw-headline" id="Delete_Server_Settings"><span class="mw-headline" id="Delete_Server_Settings"><span class="mw-headline" id="Delete_Server_Settings"><span class="mw-headline" id="Delete_Server_Settings"><span class="mw-headline" id="Delete_Server_Settings"><span class="mw-headline" id="Delete_Server_Settings"><span class="mw-headline" id="Delete_Server_Settings"><span class="mw-headline" id="Delete_Server_Settings"><span class="mw-headline" id="Delete_Server_Settings"><span class="mw-headline" id="Delete_Server_Settings"><span class="mw-headline" id="Delete_Server_Settings">Delete Server Settings</span></span></span></span></span></span></span></span></span></span></span></span></span></span></span></span></span></span></span></span> ==== | ||
| + | |||
| + | 1. To delete '''Server Settings''', select '''Server Settings''' from the list. | ||
| + | |||
| + | 2. Select '''Delete''' located above the '''Server Settings''' list. | ||
| + | |||
| + | 3. A confirmation message is displayed. Select '''Yes''' to confirm or '''No '''to exit. | ||
| + | |||
| + | | ||
| + | |||
| + | '''Figure 37: Delete Server Settings ''' | ||
| + | |||
| + | [[File:MWC DeleteServerSettings .png|x320px|MWC DeleteServerSettings .png]] | ||
| + | |||
| + | <br/> | ||
| + | |||
| + | === <span class="mw-headline" id="Configuration_Keys"><span class="mw-headline" id="Configuration_Keys"><span class="mw-headline" id="Configuration_Keys"><span class="mw-headline" id="Configuration_Keys"><span class="mw-headline" id="Configuration_Keys"><span class="mw-headline" id="Config_Keys"><span class="mw-headline" id="Config_Keys"><span class="mw-headline" id="Config_Keys"><span class="mw-headline" id="Config_Keys"><span class="mw-headline" id="Config_Keys"><span class="mw-headline" id="Config_Keys"><span class="mw-headline" id="Config_Keys"><span class="mw-headline" id="Config_Keys"><span class="mw-headline" id="Config_Keys"><span class="mw-headline" id="Config_Keys"><span class="mw-headline" id="Config_Keys"><span class="mw-headline" id="Config_Keys"><span class="mw-headline" id="Config_Keys"><span class="mw-headline" id="Config_Keys"><span class="mw-headline" id="Config_Keys">Configuration Keys</span></span></span></span></span></span></span></span></span></span></span></span></span></span></span></span></span></span></span></span> === | ||
| + | |||
| + | '''Configuration Key''' is the key assigned to a configuration. If the user/administrator wants to create a new configuration, first the user/administrator needs to create a '''config key'''. In this section, they can create a new configuration available for the rest of the screens. | ||
| + | |||
| + | The '''Configuration Keys''' function is located in the '''Settings''' menu and allows the administrators' users to add, edit or delete the '''Config Keys'''. | ||
| + | |||
| + | | ||
| + | |||
| + | 1. To access the '''Config Keys''' function, click on the '''Config Keys menu''' located under the '''Settings''' menu or select '''“+”''' icon. | ||
| + | |||
| + | | ||
| + | |||
| + | ==== <span class="mw-headline" id="Filter_Config_Keys"><span class="mw-headline" id="Filter_Config_Keys"><span class="mw-headline" id="Filter_Config_Keys"><span class="mw-headline" id="Filter_Config_Keys"><span class="mw-headline" id="Filter_Config_Keys"><span class="mw-headline" id="Filter_Config_Keys"><span class="mw-headline" id="Filter_Config_Keys"><span class="mw-headline" id="Filter_Config_Keys"><span class="mw-headline" id="Filter_Config_Keys"><span class="mw-headline" id="Filter_Config_Keys"><span class="mw-headline" id="Filter_Config_Keys"><span class="mw-headline" id="Filter_Config_Keys"><span class="mw-headline" id="Filter_Config_Keys"><span class="mw-headline" id="Filter_Config_Keys"><span class="mw-headline" id="Filter_Config_Keys"><span class="mw-headline" id="Filter_Config_Keys"><span class="mw-headline" id="Filter_Config_Keys"><span class="mw-headline" id="Filter_Config_Keys"><span class="mw-headline" id="Filter_Config_Keys"><span class="mw-headline" id="Filter_Config_Keys">Filter Config Keys</span></span></span></span></span></span></span></span></span></span></span></span></span></span></span></span></span></span></span></span> ==== | ||
| + | |||
| + | 1. To perform a search at the '''Config Keys''' '''List''', fill '''Key Data '''field and click on '''Search''' to continue. | ||
| + | |||
| + | 2. The List will be displayed according to the user search. | ||
| + | |||
| + | | ||
| + | |||
| + | '''Figure 38: Filter Config Keys''' | ||
| + | |||
| + | [[File:MWC FilterConfigKeys.png|x320px|MWC FilterConfigKeys.png]] | ||
| + | |||
| + | <br/> | ||
| + | |||
| + | ==== <span class="mw-headline" id="Add_Config_Keys"><span class="mw-headline" id="Add_Config_Keys"><span class="mw-headline" id="Add_Config_Keys"><span class="mw-headline" id="Add_Config_Keys"><span class="mw-headline" id="Add_Config_Keys"><span class="mw-headline" id="Add_Config_Keys"><span class="mw-headline" id="Add_Config_Keys"><span class="mw-headline" id="Add_Config_Keys"><span class="mw-headline" id="Add_Config_Keys"><span class="mw-headline" id="Add_Config_Keys"><span class="mw-headline" id="Add_Config_Keys"><span class="mw-headline" id="Add_Config_Keys"><span class="mw-headline" id="Add_Config_Keys"><span class="mw-headline" id="Add_Config_Keys"><span class="mw-headline" id="Add_Config_Keys"><span class="mw-headline" id="Add_Config_Keys"><span class="mw-headline" id="Add_Config_Keys"><span class="mw-headline" id="Add_Config_Keys"><span class="mw-headline" id="Add_Config_Keys"><span class="mw-headline" id="Add_Config_Keys">Add Config Keys</span></span></span></span></span></span></span></span></span></span></span></span></span></span></span></span></span></span></span></span> ==== | ||
| + | |||
| + | 1. To add a '''Config Keys''', select Add located above the '''Config Keys''' list. | ||
| + | |||
| + | 2. The '''Config Keys''' ''' Maintenance''' pop-up displays. Fill in the fields and select '''Save'''. | ||
| + | |||
| + | 3. Select '''Cancel''' to exit. A successful message is displayed. | ||
| + | |||
| + | 4. Once the '''Config Keys''' have been entered and saved, the created '''Config Keys''' will appear in the list. | ||
| + | |||
| + | | ||
| + | |||
| + | '''Figure 39: Add Config Keys''' | ||
| + | |||
| + | [[File:MWC AddConfigKeys.png|x335px|MWC AddConfigKeys.png]] | ||
| + | |||
| + | <br/> | ||
| + | |||
| + | ==== <span class="mw-headline" id="Edit_Config_Keys"><span class="mw-headline" id="Edit_Config_Keys"><span class="mw-headline" id="Edit_Config_Keys"><span class="mw-headline" id="Edit_Config_Keys"><span class="mw-headline" id="Edit_Config_Keys"><span class="mw-headline" id="Edit_Config_Keys"><span class="mw-headline" id="Edit_Config_Keys"><span class="mw-headline" id="Edit_Config_Keys"><span class="mw-headline" id="Edit_Config_Keys"><span class="mw-headline" id="Edit_Config_Keys"><span class="mw-headline" id="Edit_Config_Keys"><span class="mw-headline" id="Edit_Config_Keys"><span class="mw-headline" id="Edit_Config_Keys"><span class="mw-headline" id="Edit_Config_Keys"><span class="mw-headline" id="Edit_Config_Keys"><span class="mw-headline" id="Edit_Config_Keys"><span class="mw-headline" id="Edit_Config_Keys"><span class="mw-headline" id="Edit_Config_Keys"><span class="mw-headline" id="Edit_Config_Keys"><span class="mw-headline" id="Edit_Config_Keys">Edit Config Keys</span></span></span></span></span></span></span></span></span></span></span></span></span></span></span></span></span></span></span></span> ==== | ||
| + | |||
| + | 1. To edit '''Config Keys''', select the desired '''Config Key''' from the list. | ||
| + | |||
| + | 2. Select '''Edit''' located above the '''Config Keys''' list. | ||
| + | |||
| + | 3. The '''Config Key Maintenance''' pop-up displays. After editing the desired fields, select '''Save''' to confirm. | ||
| + | |||
| + | 4. Select '''Cancel '''to exit. | ||
| + | |||
| + | <br/> '''Figure 40: Edit Config Keys''' | ||
| + | |||
| + | [[File:MWC EditConfigKeys.png|x330px|MWC EditConfigKeys.png]] | ||
| + | |||
| + | | ||
| + | |||
| + | ==== <span class="mw-headline" id="Delete_Config_Keys"><span class="mw-headline" id="Delete_Config_Keys"><span class="mw-headline" id="Delete_Config_Keys"><span class="mw-headline" id="Delete_Config_Keys"><span class="mw-headline" id="Delete_Config_Keys"><span class="mw-headline" id="Delete_Config_Keys"><span class="mw-headline" id="Delete_Config_Keys"><span class="mw-headline" id="Delete_Config_Keys"><span class="mw-headline" id="Delete_Config_Keys"><span class="mw-headline" id="Delete_Config_Keys"><span class="mw-headline" id="Delete_Config_Keys"><span class="mw-headline" id="Delete_Config_Keys"><span class="mw-headline" id="Delete_Config_Keys"><span class="mw-headline" id="Delete_Config_Keys"><span class="mw-headline" id="Delete_Config_Keys"><span class="mw-headline" id="Delete_Config_Keys"><span class="mw-headline" id="Delete_Config_Keys"><span class="mw-headline" id="Delete_Config_Keys"><span class="mw-headline" id="Delete_Config_Keys"><span class="mw-headline" id="Delete_Config_Keys">Delete Config Keys</span></span></span></span></span></span></span></span></span></span></span></span></span></span></span></span></span></span></span></span> ==== | ||
| + | |||
| + | 1. To delete '''Config Keys''', select a '''Config Key''' from the list. | ||
| + | |||
| + | 2. Select '''Delete '''located above the '''Config Keys''' list. | ||
| + | |||
| + | 3. A confirmation message is displayed. Select '''Yes''' to confirm or '''No''' to exit. | ||
| + | |||
| + | | ||
| + | |||
| + | '''Figure 41: Delete Config Keys''' | ||
| + | |||
| + | [[File:MWC DeleteConfigKeys.png|x290px|MWC DeleteConfigKeys.png]] | ||
| + | |||
| + | <br/> | ||
| + | |||
| + | === <span class="mw-headline" id="Config_Key_Types"><span class="mw-headline" id="Config_Key_Types"><span class="mw-headline" id="Config_Key_Types"><span class="mw-headline" id="Config_Key_Types"><span class="mw-headline" id="Config_Key_Types"><span class="mw-headline" id="Config_Key_Types"><span class="mw-headline" id="Config_Key_Types"><span class="mw-headline" id="Config_Key_Types"><span class="mw-headline" id="Config_Key_Types"><span class="mw-headline" id="Config_Key_Types"><span class="mw-headline" id="Config_Key_Types"><span class="mw-headline" id="Config_Key_Types"><span class="mw-headline" id="Config_Key_Types"><span class="mw-headline" id="Config_Key_Types"><span class="mw-headline" id="Config_Key_Types"><span class="mw-headline" id="Config_Key_Types"><span class="mw-headline" id="Config_Key_Types"><span class="mw-headline" id="Config_Key_Types"><span class="mw-headline" id="Config_Key_Types"><span class="mw-headline" id="Config_Key_Types">Config Key Types</span></span></span></span></span></span></span></span></span></span></span></span></span></span></span></span></span></span></span></span> === | ||
| + | |||
| + | '''Config Key Type''' is a category to group our custom configurations. The user/administrator can create a new '''Config Key Type '''if they want a new category for configurations. | ||
| + | |||
| + | | ||
| + | |||
| + | 1. The '''Config Key Types''' function is located in the '''Settings''' menu and allows the administrators' users to add, edit or delete the '''Config Key Types'''. | ||
| + | |||
| + | 2. To access the '''Config Key Types '''function, click on the '''Config Key Types''' menu located under the '''Settings''' menu or select '''“+”''' icon. | ||
| + | |||
| + | | ||
| + | |||
| + | ==== <span class="mw-headline" id="Filter_Config_Key_Types"><span class="mw-headline" id="Filter_Config_Key_Types"><span class="mw-headline" id="Filter_Config_Key_Types"><span class="mw-headline" id="Filter_Config_Key_Types"><span class="mw-headline" id="Filter_Config_Key_Types"><span class="mw-headline" id="Filter_Config_Key_Types"><span class="mw-headline" id="Filter_Config_Key_Types"><span class="mw-headline" id="Filter_Config_Key_Types"><span class="mw-headline" id="Filter_Config_Key_Types"><span class="mw-headline" id="Filter_Config_Key_Types"><span class="mw-headline" id="Filter_Config_Key_Types"><span class="mw-headline" id="Filter_Config_Key_Types"><span class="mw-headline" id="Filter_Config_Key_Types"><span class="mw-headline" id="Filter_Config_Key_Types"><span class="mw-headline" id="Filter_Config_Key_Types"><span class="mw-headline" id="Filter_Config_Key_Types"><span class="mw-headline" id="Filter_Config_Key_Types"><span class="mw-headline" id="Filter_Config_Key_Types"><span class="mw-headline" id="Filter_Config_Key_Types"><span class="mw-headline" id="Filter_Config_Key_Types">Filter Config Key Types</span></span></span></span></span></span></span></span></span></span></span></span></span></span></span></span></span></span></span></span> ==== | ||
| + | |||
| + | 1. To perform a search at the '''Config Key Types''' List, fill the '''Name''' field and click on '''Search''' to continue. | ||
| + | |||
| + | 2. The List will be displayed according to the user search. | ||
| + | |||
| + | | ||
| + | |||
| + | '''Figure 42: Filter Config Key Type''' | ||
| + | |||
| + | [[File:MWC FilterConfigKeyType.png|x330px|MWC FilterConfigKeyType.png]] | ||
| + | |||
| + | <br/> | ||
| + | |||
| + | ==== <span class="mw-headline" id="Add_Config_Keys_Types"><span class="mw-headline" id="Add_Config_Keys_Types"><span class="mw-headline" id="Add_Config_Keys_Types"><span class="mw-headline" id="Add_Config_Keys_Types"><span class="mw-headline" id="Add_Config_Keys_Types"><span class="mw-headline" id="Add_Config_Keys_Types"><span class="mw-headline" id="Add_Config_Keys_Types"><span class="mw-headline" id="Add_Config_Keys_Types"><span class="mw-headline" id="Add_Config_Keys_Types"><span class="mw-headline" id="Add_Config_Keys_Types"><span class="mw-headline" id="Add_Config_Keys_Types"><span class="mw-headline" id="Add_Config_Keys_Types"><span class="mw-headline" id="Add_Config_Keys_Types"><span class="mw-headline" id="Add_Config_Keys_Types"><span class="mw-headline" id="Add_Config_Keys_Types"><span class="mw-headline" id="Add_Config_Keys_Types"><span class="mw-headline" id="Add_Config_Keys_Types"><span class="mw-headline" id="Add_Config_Keys_Types"><span class="mw-headline" id="Add_Config_Keys_Types"><span class="mw-headline" id="Add_Config_Keys_Types">Add Config Keys Types</span></span></span></span></span></span></span></span></span></span></span></span></span></span></span></span></span></span></span></span> ==== | ||
| + | |||
| + | 1. To add a '''Config Key Types''', select Add located above the '''Config Key Types''' list. | ||
| + | |||
| + | 2. The '''Config Key Types''' '''Maintenance''' pop-up displays. Fill in the fields and select '''Save'''. | ||
| + | |||
| + | 3. Select '''Cancel '''to exit. A successful message is displayed. | ||
| + | |||
| + | 4. Once the '''Config Key Type''' has been entered and saved, the created '''Config Key Type '''will appear in the list. | ||
| + | |||
| + | | ||
| + | |||
| + | '''Figure 43: Add Config Key Type''' | ||
| + | |||
| + | [[File:MWC AddConfigKeyType.png|x235px|MWC AddConfigKeyType.png]] | ||
| + | |||
| + | | ||
| + | |||
| + | | ||
| + | |||
| + | ==== <span class="mw-headline" id="Edit_Config_Key_Type"><span class="mw-headline" id="Edit_Config_Key_Type"><span class="mw-headline" id="Edit_Config_Key_Type"><span class="mw-headline" id="Edit_Config_Key_Type"><span class="mw-headline" id="Edit_Config_Key_Type"><span class="mw-headline" id="Edit_Config_Key_Type"><span class="mw-headline" id="Edit_Config_Key_Type"><span class="mw-headline" id="Edit_Config_Key_Type"><span class="mw-headline" id="Edit_Config_Key_Type"><span class="mw-headline" id="Edit_Config_Key_Type"><span class="mw-headline" id="Edit_Config_Key_Type"><span class="mw-headline" id="Edit_Config_Key_Type"><span class="mw-headline" id="Edit_Config_Key_Type"><span class="mw-headline" id="Edit_Config_Key_Type"><span class="mw-headline" id="Edit_Config_Key_Type"><span class="mw-headline" id="Edit_Config_Key_Type"><span class="mw-headline" id="Edit_Config_Key_Type"><span class="mw-headline" id="Edit_Config_Key_Type"><span class="mw-headline" id="Edit_Config_Key_Type"><span class="mw-headline" id="Edit_Config_Key_Type">Edit Config Key Type</span></span></span></span></span></span></span></span></span></span></span></span></span></span></span></span></span></span></span></span> ==== | ||
| + | |||
| + | 1. To edit '''Config Key Types''', select the desired '''Config Key Type''' from the list. | ||
| + | |||
| + | 2. Select '''Edit '''located above the '''Config Key Types''' list. | ||
| + | |||
| + | 3. The '''Config Key Type''' '''Maintenance''' pop-up displays. After editing the desired fields, select '''Save''' to confirm. | ||
| + | |||
| + | 4. Select '''Cancel''' to exit. | ||
| + | |||
| + | | ||
| + | |||
| + | '''Figure 44: Edit Config Key Types''' | ||
| + | |||
| + | [[File:MWC EditConfigKeyTypes.png|x255px|MWC EditConfigKeyTypes.png]] | ||
| + | |||
| + | | ||
| + | |||
| + | | ||
| + | |||
| + | | ||
| + | |||
| + | ==== <span class="mw-headline" id="Delete_Config_Key_Type"><span class="mw-headline" id="Delete_Config_Key_Type"><span class="mw-headline" id="Delete_Config_Key_Type"><span class="mw-headline" id="Delete_Config_Key_Type"><span class="mw-headline" id="Delete_Config_Key_Type"><span class="mw-headline" id="Delete_Config_Key_Type"><span class="mw-headline" id="Delete_Config_Key_Type"><span class="mw-headline" id="Delete_Config_Key_Type"><span class="mw-headline" id="Delete_Config_Key_Type"><span class="mw-headline" id="Delete_Config_Key_Type"><span class="mw-headline" id="Delete_Config_Key_Type"><span class="mw-headline" id="Delete_Config_Key_Type"><span class="mw-headline" id="Delete_Config_Key_Type"><span class="mw-headline" id="Delete_Config_Key_Type"><span class="mw-headline" id="Delete_Config_Key_Type"><span class="mw-headline" id="Delete_Config_Key_Type"><span class="mw-headline" id="Delete_Config_Key_Type"><span class="mw-headline" id="Delete_Config_Key_Type"><span class="mw-headline" id="Delete_Config_Key_Type"><span class="mw-headline" id="Delete_Config_Key_Type"><span class="mw-headline" id="Delete_Config_Key_Type">Delete Config Key Type</span></span></span></span></span></span></span></span></span></span></span></span></span></span></span></span></span></span></span></span></span> ==== | ||
| + | |||
| + | 1. To delete '''Config Key Types''', select a '''Config Key Type''' from the list. | ||
| + | |||
| + | 2. Select '''Delete''' located above the '''Config Key Types''' list. | ||
| + | |||
| + | 3. A confirmation message is displayed. Select '''Yes''' to confirm or '''No''' to exit. | ||
| + | |||
| + | | ||
| + | |||
| + | '''Figure 45: Delete Config Key Type''' | ||
| + | |||
| + | [[File:MWC DeleteConfigKeyType.png|x247px|MWC DeleteConfigKeyType.png]] | ||
| + | |||
| + | | ||
| + | |||
| + | == <span class="mw-headline" id="Dashboard_Configuration"><span class="mw-headline" id="Dashboard_Configuration"><span class="mw-headline" id="Dashboard_Configuration"><span class="mw-headline" id="Dashboard_Configuration"><span class="mw-headline" id="Dashboard_Configuration"><span class="mw-headline" id="Dashboard_Configuration"><span class="mw-headline" id="Dashboard_Configuration"><span class="mw-headline" id="Dashboard_Configuration"><span class="mw-headline" id="Dashboard_Configuration"><span class="mw-headline" id="Dashboard_Configuration"><span class="mw-headline" id="Dashboard_Configuration"><span class="mw-headline" id="Dashboard_Configuration"><span class="mw-headline" id="Dashboard_Configuration"><span class="mw-headline" id="Dashboard_Configuration"><span class="mw-headline" id="Dashboard_Configuration"><span class="mw-headline" id="Dashboard_Configuration"><span class="mw-headline" id="Dashboard_Configuration"><span class="mw-headline" id="Dashboard_Configuration"><span class="mw-headline" id="Dashboard_Configuration"><span class="mw-headline" id="Dashboard_Configuration"><span class="mw-headline" id="Dashboard_Configuration"><span class="mw-headline" id="Dashboard_Configuration">Dashboard Configuration [[File:MWC logo2.png|MWC logo2.png]]</span></span></span></span></span></span></span></span></span></span></span></span></span></span></span></span></span></span></span></span></span></span> == | ||
| + | |||
| + | | ||
| + | |||
| + | The '''Dashboard Configuration''' section allows the user to configure widgets and reports as displayed in the next steps. | ||
| + | |||
| + | In this section, the administrator can configure widgets to be used in '''Operation Dashboard Monitor'''. | ||
| + | |||
| + | | ||
| + | |||
| + | === <span class="mw-headline" id="Widget_Configuration_Tab"><span class="mw-headline" id="Widget_Configuration_Tab"><span class="mw-headline" id="Widget_Configuration_Tab"><span class="mw-headline" id="Widget_Configuration_Tab"><span class="mw-headline" id="Widget_Configuration_Tab"><span class="mw-headline" id="Widget_Configuration_Tab"><span class="mw-headline" id="Widget_Configuration_Tab"><span class="mw-headline" id="Widget_Configuration_Tab"><span class="mw-headline" id="Widget_Configuration_Tab"><span class="mw-headline" id="Widget_Configuration_Tab"><span class="mw-headline" id="Widget_Configuration_Tab"><span class="mw-headline" id="Widget_Configuration_Tab"><span class="mw-headline" id="Widget_Configuration_Tab"><span class="mw-headline" id="Widget_Configuration_Tab"><span class="mw-headline" id="Widget_Configuration_Tab"><span class="mw-headline" id="Widget_Configuration_Tab"><span class="mw-headline" id="Widget_Configuration_Tab"><span class="mw-headline" id="Widget_Configuration_Tab"><span class="mw-headline" id="Widget_Configuration_Tab"><span class="mw-headline" id="Widget_Configuration_Tab"><span class="mw-headline" id="Widget_Configuration_Tab"><span class="mw-headline" id="Widget_Configuration_Tab">Widget Configuration Tab</span></span></span></span></span></span></span></span></span></span></span></span></span></span></span></span></span></span></span></span></span></span> === | ||
| + | |||
| + | In this section, the administrator can choose between the existing dashboard reports to assign to a specific widget. Also, the administrator can give priority to those reports. | ||
| + | |||
| + | The '''Dashboard Configuration''' function is located in the '''Dashboard Configuration Menu '''and allows the administrator's users to add, edit or delete the '''Widget Configuration'''. | ||
| + | |||
| + | To access the '''Widget Configuration''' function, click on the '''Widget Configuration''' tab located under the '''Dashboard Configuration '''menu. | ||
| + | |||
| + | | ||
| + | |||
| + | | ||
| + | |||
| + | ==== <span class="mw-headline" id="Widget_Filter"><span class="mw-headline" id="Widget_Filter"><span class="mw-headline" id="Widget_Filter"><span class="mw-headline" id="Widget_Filter"><span class="mw-headline" id="Widget_Filter"><span class="mw-headline" id="Widget_Filter"><span class="mw-headline" id="Widget_Filter"><span class="mw-headline" id="Widget_Filter"><span class="mw-headline" id="Widget_Filter"><span class="mw-headline" id="Widget_Filter"><span class="mw-headline" id="Widget_Filter"><span class="mw-headline" id="Widget_Filter"><span class="mw-headline" id="Widget_Filter"><span class="mw-headline" id="Widget_Filter"><span class="mw-headline" id="Widget_Filter"><span class="mw-headline" id="Widget_Filter"><span class="mw-headline" id="Widget_Filter"><span class="mw-headline" id="Widget_Filter"><span class="mw-headline" id="Widget_Filter"><span class="mw-headline" id="Widget_Filter"><span class="mw-headline" id="Widget_Filter"><span class="mw-headline" id="Widget_Filter"><span class="mw-headline" id="Widget_Filter">Widget Filter</span></span></span></span></span></span></span></span></span></span></span></span></span></span></span></span></span></span></span></span></span></span></span> ==== | ||
| + | |||
| + | 1. To perform a search at the '''Widget Configuration List''', fill in the '''Widget Name '''(Days) and click on '''Search '''to continue. | ||
| + | |||
| + | 2. The list will be displayed according to the user search. | ||
| + | |||
| + | | ||
| + | |||
| + | '''Figure 46: Widget Filter''' | ||
| + | |||
| + | [[File:MWC WidgetFilter.png|x355px|MWC WidgetFilter.png]] | ||
| + | |||
| + | <br/> | ||
| + | |||
| + | ==== <span class="mw-headline" id="Add_Widget_Configuration"><span class="mw-headline" id="Add_Widget_Configuration"><span class="mw-headline" id="Add_Widget_Configuration"><span class="mw-headline" id="Add_Widget_Configuration"><span class="mw-headline" id="Add_Widget_Configuration"><span class="mw-headline" id="Add_Widget_Configuration"><span class="mw-headline" id="Add_Widget_Configuration"><span class="mw-headline" id="Add_Widget_Configuration"><span class="mw-headline" id="Add_Widget_Configuration"><span class="mw-headline" id="Add_Widget_Configuration"><span class="mw-headline" id="Add_Widget_Configuration"><span class="mw-headline" id="Add_Widget_Configuration"><span class="mw-headline" id="Add_Widget_Configuration"><span class="mw-headline" id="Add_Widget_Configuration"><span class="mw-headline" id="Add_Widget_Configuration"><span class="mw-headline" id="Add_Widget_Configuration"><span class="mw-headline" id="Add_Widget_Configuration"><span class="mw-headline" id="Add_Widget_Configuration"><span class="mw-headline" id="Add_Widget_Configuration"><span class="mw-headline" id="Add_Widget_Configuration"><span class="mw-headline" id="Add_Widget_Configuration"><span class="mw-headline" id="Add_Widget_Configuration">Add Widget Configuration</span></span></span></span></span></span></span></span></span></span></span></span></span></span></span></span></span></span></span></span></span></span> ==== | ||
| + | |||
| + | 1. To add a '''Widget Configuration''', select '''Add '''located above the '''Widget Configuration''' list. | ||
| + | |||
| + | 2. The '''Dashboard Configuration''' pop-up displays. Fill the fields, add the '''Reports''' by selecting it from the drop-down list and select '''Save'''. | ||
| + | |||
| + | 3. Select '''Cancel''' to exit. A successful message is displayed. | ||
| + | |||
| + | 4. Once the '''Widget Configuration''' has been entered and saved, the created configuration will appear in the list. | ||
| + | |||
| + | | ||
| + | |||
| + | '''Figure 47: Add Widget Configuration''' | ||
| + | |||
| + | [[File:MWC AddWidgetConfiguration.png|x395px|MWC AddWidgetConfiguration.png]] | ||
| + | |||
| + | <u>'''Note''':</u> It is mandatory to enter '''at least one Report'''. | ||
| + | |||
| + | <br/> | ||
| + | |||
| + | ==== <span class="mw-headline" id="Edit_Widget"><span class="mw-headline" id="Edit_Widget"><span class="mw-headline" id="Edit_Widget"><span class="mw-headline" id="Edit_Widget"><span class="mw-headline" id="Edit_Widget"><span class="mw-headline" id="Edit_Widget"><span class="mw-headline" id="Edit_Widget"><span class="mw-headline" id="Edit_Widget"><span class="mw-headline" id="Edit_Widget"><span class="mw-headline" id="Edit_Widget"><span class="mw-headline" id="Edit_Widget"><span class="mw-headline" id="Edit_Widget"><span class="mw-headline" id="Edit_Widget"><span class="mw-headline" id="Edit_Widget"><span class="mw-headline" id="Edit_Widget"><span class="mw-headline" id="Edit_Widget"><span class="mw-headline" id="Edit_Widget"><span class="mw-headline" id="Edit_Widget"><span class="mw-headline" id="Edit_Widget"><span class="mw-headline" id="Edit_Widget"><span class="mw-headline" id="Edit_Widget"><span class="mw-headline" id="Edit_Widget">Edit Widget</span></span></span></span></span></span></span></span></span></span></span></span></span></span></span></span></span></span></span></span></span></span> ==== | ||
| + | |||
| + | 1. To edit the '''Dashboard Configuration''', select the desired '''Dashboard Configuration''' from the list. | ||
| + | |||
| + | 2. Select '''Edit''' located above the '''Dashboard Configuration '''list. | ||
| + | |||
| + | 3. The D'''ashboard Configuration''' pop-up displays. After editing the desired fields, select '''Save''' to confirm. | ||
| + | |||
| + | 4. Select '''Cancel''' to exit. | ||
| + | |||
| + | | ||
| + | |||
| + | '''Figure 48: Edit Widget Configuration''' | ||
| + | |||
| + | [[File:MWC EditWidgetConfig.png|x400px|MWC EditWidgetConfig.png]] | ||
| + | |||
| + | | ||
| + | |||
| + | <br/> Delete Widget Configuration | ||
| + | |||
| + | 1. To delete '''Widget Configuration''', select a '''Configuration''' from the list. | ||
| + | |||
| + | 2. Select '''Delete''' located above the '''Widget Configuration''' list. | ||
| + | |||
| + | 3. A confirmation message is displayed. Select '''Yes '''to confirm or '''No''' to exit. | ||
| + | |||
| + | | ||
| + | |||
| + | '''Figure 49: Delete Widget Configuration''' | ||
| + | |||
| + | [[File:MWC DeleteWidgetConfig.png|x365px|MWC DeleteWidgetConfig.png]] | ||
| + | |||
| + | <br/> | ||
| + | |||
| + | === <span class="mw-headline" id="Report_Configuration_Tab"><span class="mw-headline" id="Report_Configuration_Tab"><span class="mw-headline" id="Report_Configuration_Tab"><span class="mw-headline" id="Report_Configuration_Tab"><span class="mw-headline" id="Report_Configuration_Tab"><span class="mw-headline" id="Report_Configuration_Tab"><span class="mw-headline" id="Report_Configuration_Tab"><span class="mw-headline" id="Report_Configuration_Tab"><span class="mw-headline" id="Report_Configuration_Tab"><span class="mw-headline" id="Report_Configuration_Tab"><span class="mw-headline" id="Report_Configuration_Tab"><span class="mw-headline" id="Report_Configuration_Tab"><span class="mw-headline" id="Report_Configuration_Tab"><span class="mw-headline" id="Report_Configuration_Tab"><span class="mw-headline" id="Report_Configuration_Tab"><span class="mw-headline" id="Report_Configuration_Tab"><span class="mw-headline" id="Report_Configuration_Tab"><span class="mw-headline" id="Report_Configuration_Tab"><span class="mw-headline" id="Report_Configuration_Tab"><span class="mw-headline" id="Report_Configuration_Tab"><span class="mw-headline" id="Report_Configuration_Tab"><span class="mw-headline" id="Report_Configuration_Tab">Report Configuration Tab</span></span></span></span></span></span></span></span></span></span></span></span></span></span></span></span></span></span></span></span></span></span> === | ||
| + | |||
| + | In this section, the administrator can create new reports for the dashboard. One of the options that they can configure in these sections is the type of chart, colors, series, drill-downs, etc. | ||
| + | |||
| + | The '''Report Configuration '''function is located in the '''Dashboard Configuration Menu''' and allows the administrators' users to add, edit or delete '''Report Configuration '''and configure '''Series '''and '''Filters'''. | ||
| + | |||
| + | To access the '''Report Configuration''' function, click on the report''' Configuration''' tab located under the '''Dashboard Configuration''' menu. | ||
| + | |||
| + | | ||
| + | |||
| + | Filter Report Configuration | ||
| + | |||
| + | 1. To perform a search at the report''' Configuration''' List, fill the '''Chart Name '''field and click on '''Search '''to continue. | ||
| + | |||
| + | 2. The list will be displayed according to the user search. | ||
| + | |||
| + | <br/> '''Figure 50: Report Configuration Filter''' | ||
| + | |||
| + | [[File:MWC ReportConfigFilter.png|x320px|MWC ReportConfigFilter.png]] | ||
| + | |||
| + | <br/> <br/> | ||
| + | |||
| + | ==== <span class="mw-headline" id="Add_Report_Configuration"><span class="mw-headline" id="Add_Report_Configuration"><span class="mw-headline" id="Add_Report_Configuration"><span class="mw-headline" id="Add_Report_Configuration"><span class="mw-headline" id="Add_Report_Configuration"><span class="mw-headline" id="Add_Report_Configuration"><span class="mw-headline" id="Add_Report_Configuration"><span class="mw-headline" id="Add_Report_Configuration"><span class="mw-headline" id="Add_Report_Configuration"><span class="mw-headline" id="Add_Report_Configuration"><span class="mw-headline" id="Add_Report_Configuration"><span class="mw-headline" id="Add_Report_Configuration"><span class="mw-headline" id="Add_Report_Configuration"><span class="mw-headline" id="Add_Report_Configuration"><span class="mw-headline" id="Add_Report_Configuration"><span class="mw-headline" id="Add_Report_Configuration"><span class="mw-headline" id="Add_Report_Configuration"><span class="mw-headline" id="Add_Report_Configuration"><span class="mw-headline" id="Add_Report_Configuration"><span class="mw-headline" id="Add_Report_Configuration"><span class="mw-headline" id="Add_Report_Configuration"><span class="mw-headline" id="Add_Report_Configuration">Add Report Configuration</span></span></span></span></span></span></span></span></span></span></span></span></span></span></span></span></span></span></span></span></span></span> ==== | ||
| + | |||
| + | 1. To add a '''Report Configuration''', select Add located above the '''Widget Configuration''' list. | ||
| + | |||
| + | 2. The '''Dashboard Configuration''' pop-up displays. Fill in at least the mandatory fields ('''Chart Name, Chart Type, and Report Name'''. Select '''Save'''. See details below. | ||
| + | |||
| + | 3. Select '''Cancel''' to exit. A successful message is displayed. | ||
| + | |||
| + | 4. Once the '''Report Configuration '''has been entered and saved, the created configuration will appear in the list. | ||
| + | |||
| + | | ||
| + | |||
| + | '''Figure 51: Add Report Configuration in Dashboard Configuration''' | ||
| + | |||
| + | [[File:MWC AddReportConfig.png|x405px|MWC AddReportConfig.png]] | ||
| + | |||
| + | | ||
| + | |||
| + | '''Fields Description:''' | ||
| + | |||
| + | '''Chart Name''': Name of the report in Dashboard | ||
| + | |||
| + | '''Chart Type''': Type of chart that the user wants to display (bar, column, grid, text, etc) | ||
| + | |||
| + | '''Report Name''': List of reports available for Dashboards (reports created in Report section) | ||
| + | |||
| + | '''Widget Drill Down''': List of Dashboard Reports available to drill down | ||
| + | |||
| + | '''Previous Drill-Down:''' List of Dashboard Reports available to drill down | ||
| + | |||
| + | '''First Color''': List of colors to use in the chart | ||
| + | |||
| + | '''Text Color Day''': Default color for the specific report when the theme day is applied | ||
| + | |||
| + | '''Legend Align''': Align for the legend | ||
| + | |||
| + | '''Legend Vertical-Align''': Vertical Align for legends | ||
| + | |||
| + | '''Legend Layout''': List of layout legends available | ||
| + | |||
| + | '''Show Details''': If the report has this option enabled, the widget will show an option of details with more information about the report. | ||
| + | |||
| + | '''Daily''': If this option is enabled this report will be available when the Operation Dashboard has the option of daily enabled. | ||
| + | |||
| + | '''Grid Rows:''' The default number of rows that the widget is going to show by default. | ||
| + | |||
| + | '''Top''': Categorize the report (Top/Hourly Top) | ||
| + | |||
| + | '''Text Color Night''': Default color for the specific report when the theme night is applied. | ||
| + | |||
| + | | ||
| + | |||
| + | '''AXIS''': is to the two perpendicular lines or axes. | ||
| + | |||
| + | 1. The '''horizontal '''axis is normally called the '''X-axis''', though, if the chart is inverted, this is the vertical axis. In the case of multiple axes, the X-axis node is an array of configuration objects. | ||
| + | |||
| + | 2. The '''Y-axis''' is normally the '''vertical''' axis, though, if the chart is inverted, this is the horizontal axis. In the case of multiple Y-axes, the Y-axis node is an array of configuration objects. | ||
| + | |||
| + | | ||
| + | |||
| + | '''Figure 52: Report Configuration Axis''' | ||
| + | |||
| + | [[File:MWImage52.png|x285px|MWImage52.png]] | ||
| + | |||
| + | | ||
| + | |||
| + | '''Series''': is the series configuration. | ||
| + | |||
| + | | ||
| + | |||
| + | '''Figure 53: Report Configuration Series''' | ||
| + | |||
| + | [[File:MWImage53.png|x250px|MWImage53.png]] | ||
| + | |||
| + | '''Plot Options'''''':''' are the configuration options for the series. | ||
| + | |||
| + | | ||
| + | |||
| + | '''Figure 54: Report Configuration Plot Options''' | ||
| + | |||
| + | [[File:MWImage54.png|x150px|MWImage54.png]] | ||
| + | |||
| + | <br/> | ||
| + | |||
| + | '''Target Configuration''': is to configure colors per status. | ||
| + | |||
| + | | ||
| + | |||
| + | '''Figure 55: Report Configuration Target Config''' | ||
| + | |||
| + | [[File:MWImage55.png|x155px|MWImage55.png]] | ||
| + | |||
| + | | ||
| + | |||
| + | ==== <span class="mw-headline" id="Edit_Report_Configuration"><span class="mw-headline" id="Edit_Report_Configuration"><span class="mw-headline" id="Edit_Report_Configuration"><span class="mw-headline" id="Edit_Report_Configuration"><span class="mw-headline" id="Edit_Report_Configuration"><span class="mw-headline" id="Edit_Report_Configuration"><span class="mw-headline" id="Edit_Report_Configuration"><span class="mw-headline" id="Edit_Report_Configuration"><span class="mw-headline" id="Edit_Report_Configuration"><span class="mw-headline" id="Edit_Report_Configuration"><span class="mw-headline" id="Edit_Report_Configuration"><span class="mw-headline" id="Edit_Report_Configuration"><span class="mw-headline" id="Edit_Report_Configuration"><span class="mw-headline" id="Edit_Report_Configuration"><span class="mw-headline" id="Edit_Report_Configuration"><span class="mw-headline" id="Edit_Report_Configuration"><span class="mw-headline" id="Edit_Report_Configuration"><span class="mw-headline" id="Edit_Report_Configuration"><span class="mw-headline" id="Edit_Report_Configuration"><span class="mw-headline" id="Edit_Report_Configuration"><span class="mw-headline" id="Edit_Report_Configuration"><span class="mw-headline" id="Edit_Report_Configuration">Edit Report Configuration</span></span></span></span></span></span></span></span></span></span></span></span></span></span></span></span></span></span></span></span></span></span> ==== | ||
| + | |||
| + | 1. To edit '''Report Configuration''', select the desired '''Report Configuration '''from the list. | ||
| + | |||
| + | 2. Select '''Edit''' located above the '''Dashboard Configuration''' list. | ||
| + | |||
| + | 3. The '''Dashboard Configuration''' pop-up displays. After editing the desired fields, select '''Save''' to confirm. | ||
| + | |||
| + | 4. Select '''Cancel''' to exit. | ||
| + | |||
| + | | ||
| + | |||
| + | '''Figure 56: Edit Report Configuration''' | ||
| + | |||
| + | [[File:MWC EditReportConfig.png|x410px|MWC EditReportConfig.png]] | ||
| + | |||
| + | | ||
| + | |||
| + | ==== <span class="mw-headline" id="Delete_Report_Configuration"><span class="mw-headline" id="Delete_Report_Configuration"><span class="mw-headline" id="Delete_Report_Configuration"><span class="mw-headline" id="Delete_Report_Configuration"><span class="mw-headline" id="Delete_Report_Configuration"><span class="mw-headline" id="Delete_Report_Configuration"><span class="mw-headline" id="Delete_Report_Configuration"><span class="mw-headline" id="Delete_Report_Configuration"><span class="mw-headline" id="Delete_Report_Configuration"><span class="mw-headline" id="Delete_Report_Configuration"><span class="mw-headline" id="Delete_Report_Configuration"><span class="mw-headline" id="Delete_Report_Configuration"><span class="mw-headline" id="Delete_Report_Configuration"><span class="mw-headline" id="Delete_Report_Configuration"><span class="mw-headline" id="Delete_Report_Configuration"><span class="mw-headline" id="Delete_Report_Configuration"><span class="mw-headline" id="Delete_Report_Configuration"><span class="mw-headline" id="Delete_Report_Configuration"><span class="mw-headline" id="Delete_Report_Configuration"><span class="mw-headline" id="Delete_Report_Configuration"><span class="mw-headline" id="Delete_Report_Configuration"><span class="mw-headline" id="Delete_Report_Configuration">Delete Report Configuration</span></span></span></span></span></span></span></span></span></span></span></span></span></span></span></span></span></span></span></span></span></span> ==== | ||
| + | |||
| + | #To '''delete''' '''Report Configuration''', select a '''Configuration '''from the list. | ||
| + | #Select '''Delete''' located above the '''Report Configuration''' list. | ||
| + | #A confirmation message is displayed. Select '''Yes''' to confirm or '''No '''to exit. | ||
| + | |||
| + | | ||
| + | |||
| + | '''Figure 57: Delete Report Configuration HTTPS''' | ||
| + | |||
| + | [[File:MWC DeleteReportConfig.png|x350px|MWC DeleteReportConfig.png]] | ||
| + | |||
| + | | ||
| + | |||
| + | | ||
| + | |||
| + | ==== <span class="mw-headline" id="Series_Configuration"><span class="mw-headline" id="Series_Configuration"><span class="mw-headline" id="Series_Configuration"><span class="mw-headline" id="Series_Configuration"><span class="mw-headline" id="Series_Configuration"><span class="mw-headline" id="Series_Configuration"><span class="mw-headline" id="Series_Configuration"><span class="mw-headline" id="Series_Configuration"><span class="mw-headline" id="Series_Configuration"><span class="mw-headline" id="Series_Configuration"><span class="mw-headline" id="Series_Configuration"><span class="mw-headline" id="Series_Configuration"><span class="mw-headline" id="Series_Configuration"><span class="mw-headline" id="Series_Configuration"><span class="mw-headline" id="Series_Configuration"><span class="mw-headline" id="Series_Configuration"><span class="mw-headline" id="Series_Configuration"><span class="mw-headline" id="Series_Configuration"><span class="mw-headline" id="Series_Configuration"><span class="mw-headline" id="Series_Configuration"><span class="mw-headline" id="Series_Configuration"><span class="mw-headline" id="Series_Configuration">Series Configuration</span></span></span></span></span></span></span></span></span></span></span></span></span></span></span></span></span></span></span></span></span></span> ==== | ||
| + | |||
| + | '''Series''' is a set of data, in this section you can configure the series you want to have available in your '''Dashboard Report'''. | ||
| + | |||
| + | <br/> '''Figure 58: Report Series Configuration''' | ||
| + | |||
| + | [[File:MWC ReportSeriesConfig.png|x390px|MWC ReportSeriesConfig.png]] | ||
| + | |||
| + | <br/> | ||
| + | |||
| + | ==== <span class="mw-headline" id="Filter"><span class="mw-headline" id="Filter"><span class="mw-headline" id="Filter"><span class="mw-headline" id="Filter"><span class="mw-headline" id="Filter"><span class="mw-headline" id="Filter"><span class="mw-headline" id="Filter"><span class="mw-headline" id="Filter"><span class="mw-headline" id="Filter"><span class="mw-headline" id="Filter"><span class="mw-headline" id="Filter"><span class="mw-headline" id="Filter"><span class="mw-headline" id="Filter"><span class="mw-headline" id="Filter"><span class="mw-headline" id="Filter"><span class="mw-headline" id="Filter"><span class="mw-headline" id="Filter"><span class="mw-headline" id="Filter"><span class="mw-headline" id="Filter"><span class="mw-headline" id="Filter"><span class="mw-headline" id="Filter"><span class="mw-headline" id="Filter">Filter</span></span></span></span></span></span></span></span></span></span></span></span></span></span></span></span></span></span></span></span></span></span> ==== | ||
| + | |||
| + | In this section, you can configure filters to be available in '''Operation Dashboard.''' | ||
| + | |||
| + | 1. To perform a search at the '''Series List''', fill at least one field and click on '''Search '''to continue. | ||
| + | |||
| + | 2. The list will be displayed according to the user search. | ||
| + | |||
| + | | ||
| + | |||
| + | '''Figure 59: Report Configuration Filter''' | ||
| + | |||
| + | [[File:MWC ReportConfigFilters.png|x390px|MWC ReportConfigFilters.png]] | ||
| + | |||
| + | | ||
| + | |||
| + | | ||
| + | |||
| + | | ||
| + | |||
| + | | ||
| + | |||
| + | == <span class="mw-headline" id="Data_Sources"><span class="mw-headline" id="Data_Sources"><span class="mw-headline" id="Data_Sources"><span class="mw-headline" id="Data_Sources"><span class="mw-headline" id="Data_Sources"><span class="mw-headline" id="Data_Sources"><span class="mw-headline" id="Data_Sources"><span class="mw-headline" id="Data_Sources"><span class="mw-headline" id="Data_Sources"><span class="mw-headline" id="Data_Sources"><span class="mw-headline" id="Data_Sources"><span class="mw-headline" id="Data_Sources"><span class="mw-headline" id="Data_Sources"><span class="mw-headline" id="Data_Sources"><span class="mw-headline" id="Data_Sources"><span class="mw-headline" id="Data_Sources"><span class="mw-headline" id="Data_Sources"><span class="mw-headline" id="Data_Sources"><span class="mw-headline" id="Data_Sources"><span class="mw-headline" id="Data_Sources"><span class="mw-headline" id="Data_Sources"><span class="mw-headline" id="Data_Sources"><span class="mw-headline" id="Data_Sources">Data Sources [[File:MWC Logo2.png|MWC Logo2.png]]</span></span></span></span></span></span></span></span></span></span></span></span></span></span></span></span></span></span></span></span></span></span></span> == | ||
| + | |||
| + | | ||
| + | |||
| + | A''' '''given name to a database for a specific location. The reports will query data inside this database. | ||
| + | |||
| + | This function allows administrators to '''add, edit, '''or '''delete''''' ''data source types. | ||
| + | |||
| + | | ||
| + | |||
| + | === <span class="mw-headline" id="Filter_Data_Sources"><span class="mw-headline" id="Filter_Data_Sources"><span class="mw-headline" id="Filter_Data_Sources"><span class="mw-headline" id="Filter_Data_Sources"><span class="mw-headline" id="Filter_Data_Sources"><span class="mw-headline" id="Filter_Data_Sources"><span class="mw-headline" id="Filter_Data_Sources"><span class="mw-headline" id="Filter_Data_Sources"><span class="mw-headline" id="Filter_Data_Sources"><span class="mw-headline" id="Filter_Data_Sources"><span class="mw-headline" id="Filter_Data_Sources"><span class="mw-headline" id="Filter_Data_Sources"><span class="mw-headline" id="Filter_Data_Sources"><span class="mw-headline" id="Filter_Data_Sources"><span class="mw-headline" id="Filter_Data_Sources"><span class="mw-headline" id="Filter_Data_Sources"><span class="mw-headline" id="Filter_Data_Sources"><span class="mw-headline" id="Filter_Data_Sources"><span class="mw-headline" id="Filter_Data_Sources"><span class="mw-headline" id="Filter_Data_Sources"><span class="mw-headline" id="Filter_Data_Sources"><span class="mw-headline" id="Filter_Data_Sources"><span class="mw-headline" id="Filter_Data_Sources">Filter Data Sources</span></span></span></span></span></span></span></span></span></span></span></span></span></span></span></span></span></span></span></span></span></span></span> === | ||
| + | |||
| + | The filtering option located in the '''Data Sources '''tab allows the Administrator to search for specific '''data sources''' based on their '''location''' and/or '''name'''. | ||
| + | |||
| + | 1. To filter the '''Data Source''' list, select the locations from the drop-down box provided and/or enter the data source name. | ||
| + | |||
| + | 2. Select '''Search''' to filter the '''Data Source''' list. | ||
| + | |||
| + | 3. Select '''Clear''' to clear entries. | ||
| + | |||
| + | | ||
| + | |||
| + | '''Figure 60: Filter Data Source''' | ||
| + | |||
| + | [[File:MWC Filte DataSources.png|x340px|MWC Filte DataSources.png]] | ||
| + | |||
| + | | ||
| + | |||
| + | <br/> | ||
| + | |||
| + | === <span class="mw-headline" id="Add_Data_Sources"><span class="mw-headline" id="Add_Data_Sources"><span class="mw-headline" id="Add_Data_Sources"><span class="mw-headline" id="Add_Data_Sources"><span class="mw-headline" id="Add_Data_Sources"><span class="mw-headline" id="Add_Data_Sources"><span class="mw-headline" id="Add_Data_Sources"><span class="mw-headline" id="Add_Data_Sources"><span class="mw-headline" id="Add_Data_Sources"><span class="mw-headline" id="Add_Data_Sources"><span class="mw-headline" id="Add_Data_Sources"><span class="mw-headline" id="Add_Data_Sources"><span class="mw-headline" id="Add_Data_Sources"><span class="mw-headline" id="Add_Data_Sources"><span class="mw-headline" id="Add_Data_Sources"><span class="mw-headline" id="Add_Data_Sources"><span class="mw-headline" id="Add_Data_Sources"><span class="mw-headline" id="Add_Data_Sources"><span class="mw-headline" id="Add_Data_Sources"><span class="mw-headline" id="Add_Data_Sources"><span class="mw-headline" id="Add_Data_Sources"><span class="mw-headline" id="Add_Data_Sources"><span class="mw-headline" id="Add_Data_Sources">Add Data Sources</span></span></span></span></span></span></span></span></span></span></span></span></span></span></span></span></span></span></span></span></span></span></span> === | ||
| + | |||
| + | This function allows the '''Administrator''' to add a data source based on the '''name, description, location, database type, '''and '''connection parameters '''associated with the database type. | ||
| + | |||
| + | 1. To '''add '''a data source, select '''Add''' located above the '''Data Source''' list in the '''Data Sources''' tab. The details pop-up displays. | ||
| + | |||
| + | 2. Enter the data source '''Name, Description, Location, '''and '''Database Type '''into the '''details''' pop up. All fields except the description field are mandatory. | ||
| + | |||
| + | | ||
| + | |||
| + | '''Figure 61: Add Data Source''' | ||
| + | |||
| + | [[File:MWC AddDataSource.png|x400px|MWC AddDataSource.png]] | ||
| + | |||
| + | | ||
| + | |||
| + | Depending on the database type ('''Database Type''' field), a subsequent '''Connection Parameters''' pop-up displays below the '''Details''' pop-up. The information required in this pop-up is dependent upon the '''Database Type''' selected. Enter the required information into the '''Connection Parameters''' pop-up. | ||
| + | |||
| + | | ||
| + | |||
| + | '''Figure 62: Select Database Type and Connection Parameter''' | ||
| + | |||
| + | [[File:MWC SelectDbTypeConnectionPar.png|MWC SelectDbTypeConnectionPar.png]] | ||
| + | |||
| + | | ||
| + | |||
| + | 3. The '''Database Types''' available are '''MySQL, Oracle, Pervasive, Postgre SQL, SQL Server''', according to the '''Database Type '''selected. The screen will show the fields that the user needs to fill out to create the data source connection. | ||
| + | |||
| + | 4. Fill out '''Connection Parameters'''. | ||
| + | |||
| + | The user has two options: | ||
| + | |||
| + | *'''Fill out the fields''': Server, Port, Database, User, and Password. | ||
| + | |||
| + | *'''Fill out just the Connection String field'''. If the '''Connection String '''is valid, the fields '''Server, Port, Database, User, '''and '''Password''' will fill out automatically. Example of the Connection String: jdbc:postgresql://p88meswebl1.sanmina.com:5432/bem?user=user&password=pass | ||
| + | |||
| + | <br/> The Connection String should have the following format. | ||
| + | |||
| + | {| style="border-spacing: 5px; width: 883px;" | ||
| + | |- style="border:1pt solid #000001;padding:0.0694in;" | ||
| + | | style="width: 95px;" | <span style="font-family:arial,helvetica,sans-serif;">'''SQL Server''':</span> | ||
| + | | style="width: 778px;" | <span style="font-family:arial,helvetica,sans-serif;">jdbc:sqlserver://%Server%:%Port%;databaseName=%Database%;user=%User%;password=%Password%;encrypt=false</span> | ||
| + | |- style="border:1pt solid #000001;padding:0.0694in;" | ||
| + | | style="width: 95px;" | <span style="font-family:arial,helvetica,sans-serif;">'''Oracle''':</span> | ||
| + | | style="width: 778px;" | <span style="font-family:arial,helvetica,sans-serif;">JDBC:oracle:thin:%User%/%Password%@%Server%:%Port%:%Database%</span> | ||
| + | |- style="border:1pt solid #000001;padding:0.0694in;" | ||
| + | | style="width: 95px;" | <span style="font-family:arial,helvetica,sans-serif;">'''MySQL''':</span> | ||
| + | | style="width: 778px;" | <span style="font-family:arial,helvetica,sans-serif;">jdbc:mysql://%Server%:%Port%/%Database%?user=%User%&password=%Password%</span> | ||
| + | |- style="border:1pt solid #000001;padding:0.0694in;" | ||
| + | | style="width: 95px;" | <span style="font-family:arial,helvetica,sans-serif;">'''Pervasive''':</span> | ||
| + | | style="width: 778px;" | <span style="font-family:arial,helvetica,sans-serif;">jdbc:pervasive://%Server%:%Port%/%Database%?user=%User%&password=%Password%</span> | ||
| + | |- style="border:1pt solid #000001;padding:0.0694in;" | ||
| + | | style="width: 95px;" | <span style="font-family:arial,helvetica,sans-serif;">'''Postgres SQL''':</span> | ||
| + | | style="width: 778px;" | <span style="font-family:arial,helvetica,sans-serif;">JDBC:postgresql://%Server%:%Port%/%Database%?user=%User%&password=%Password%</span> | ||
| + | |} | ||
| + | |||
| + | | ||
| + | |||
| + | 5. Select '''DataSource Type'''(s). | ||
| + | |||
| + | 6. Click on the '''Save''' button. If the parameters of the connection are correct, the '''Data Source''' will save, if not an error will show the error description. | ||
| + | |||
| + | | ||
| + | |||
| + | '''Types''': These are the schemas that the created data source has. Select the schemas dragging the items from one list to another. | ||
| + | |||
| + | | ||
| + | |||
| + | === <span class="mw-headline" id="Edit_Data_Sources"><span class="mw-headline" id="Edit_Data_Sources"><span class="mw-headline" id="Edit_Data_Sources"><span class="mw-headline" id="Edit_Data_Sources"><span class="mw-headline" id="Edit_Data_Sources"><span class="mw-headline" id="Edit_Data_Sources"><span class="mw-headline" id="Edit_Data_Sources"><span class="mw-headline" id="Edit_Data_Sources"><span class="mw-headline" id="Edit_Data_Sources"><span class="mw-headline" id="Edit_Data_Sources"><span class="mw-headline" id="Edit_Data_Sources"><span class="mw-headline" id="Edit_Data_Sources"><span class="mw-headline" id="Edit_Data_Sources"><span class="mw-headline" id="Edit_Data_Sources"><span class="mw-headline" id="Edit_Data_Sources"><span class="mw-headline" id="Edit_Data_Sources"><span class="mw-headline" id="Edit_Data_Sources"><span class="mw-headline" id="Edit_Data_Sources"><span class="mw-headline" id="Edit_Data_Sources"><span class="mw-headline" id="Edit_Data_Sources"><span class="mw-headline" id="Edit_Data_Sources"><span class="mw-headline" id="Edit_Data_Sources"><span class="mw-headline" id="Edit_Data_Sources">Edit Data Sources</span></span></span></span></span></span></span></span></span></span></span></span></span></span></span></span></span></span></span></span></span></span></span> === | ||
| + | |||
| + | This function allows the '''Administrator '''to edit the '''name, description, '''and '''connection string''' of any data source. | ||
| + | |||
| + | | ||
| + | |||
| + | 1. To edit a data source, select the desired data source from the '''Data Source''' list located on the main page of the '''Data Sources''' tab. | ||
| + | |||
| + | 2. Select '''Edit '''located above the name list. | ||
| + | |||
| + | 3. The '''Data Source Details '''pop-up displays. The '''name '''and '''description''' are available for editing. The '''Connection Parameters''' section is not available to edit, but the '''Connection String''', below the '''Connection Parameters''', pops up and can be edited. | ||
| + | |||
| + | 4, After changing the desired information, select '''Save''' to confirm or '''Cancel''' to exit. | ||
| + | |||
| + | | ||
| + | |||
| + | '''Figure 63: Edit Data Source''' | ||
| + | |||
| + | [[File:MWC EditDataSource.png|x400px|MWC EditDataSource.png]] | ||
| + | |||
| + | <u>'''Note''': </u>Editing the '''Data Source''', the '''Connection Parameters''' field will be displayed according to the '''Database Type''' chosen during the data source addition. | ||
| + | |||
| + | | ||
| + | |||
| + | === <span class="mw-headline" id="Delete_Data_Source"><span class="mw-headline" id="Delete_Data_Source"><span class="mw-headline" id="Delete_Data_Source"><span class="mw-headline" id="Delete_Data_Source"><span class="mw-headline" id="Delete_Data_Source"><span class="mw-headline" id="Delete_Data_Source"><span class="mw-headline" id="Delete_Data_Source"><span class="mw-headline" id="Delete_Data_Source"><span class="mw-headline" id="Delete_Data_Source"><span class="mw-headline" id="Delete_Data_Source"><span class="mw-headline" id="Delete_Data_Source"><span class="mw-headline" id="Delete_Data_Source"><span class="mw-headline" id="Delete_Data_Source"><span class="mw-headline" id="Delete_Data_Source"><span class="mw-headline" id="Delete_Data_Source"><span class="mw-headline" id="Delete_Data_Source"><span class="mw-headline" id="Delete_Data_Source"><span class="mw-headline" id="Delete_Data_Source"><span class="mw-headline" id="Delete_Data_Source"><span class="mw-headline" id="Delete_Data_Source"><span class="mw-headline" id="Delete_Data_Source"><span class="mw-headline" id="Delete_Data_Source"><span class="mw-headline" id="Delete_Data_Source">Delete Data Source</span></span></span></span></span></span></span></span></span></span></span></span></span></span></span></span></span></span></span></span></span></span></span> === | ||
| + | |||
| + | This function allows the '''Administrator''' to delete any data source. | ||
| + | |||
| + | | ||
| + | |||
| + | 1. To '''delete''' a data source, select the desired '''data source''' from the '''name list''' located on the main page of the '''Data Sources''' tab. | ||
| + | |||
| + | 2. Select '''Delete '''located above the name list. | ||
| + | |||
| + | 3. A confirmation prompt will display. Select '''Yes''' to confirm or '''No''' to cancel. | ||
| + | |||
| + | <br/> '''Figure 64: Delete Data Source''' | ||
| + | |||
| + | [[File:MWC DeleteDataSource.png|x350px|MWC DeleteDataSource.png]] | ||
| + | |||
| + | <br/> | ||
| + | |||
| + | === <span class="mw-headline" id="Data_Source_Type"><span class="mw-headline" id="Data_Source_Type"><span class="mw-headline" id="Data_Source_Type"><span class="mw-headline" id="Data_Source_Type"><span class="mw-headline" id="Data_Source_Type"><span class="mw-headline" id="Data_Source_Type"><span class="mw-headline" id="Data_Source_Type"><span class="mw-headline" id="Data_Source_Type"><span class="mw-headline" id="Data_Source_Type"><span class="mw-headline" id="Data_Source_Type"><span class="mw-headline" id="Data_Source_Type"><span class="mw-headline" id="Data_Source_Type"><span class="mw-headline" id="Data_Source_Type"><span class="mw-headline" id="Data_Source_Type"><span class="mw-headline" id="Data_Source_Type"><span class="mw-headline" id="Data_Source_Type"><span class="mw-headline" id="Data_Source_Type"><span class="mw-headline" id="Data_Source_Type"><span class="mw-headline" id="Data_Source_Type"><span class="mw-headline" id="Data_Source_Type"><span class="mw-headline" id="Data_Source_Type"><span class="mw-headline" id="Data_Source_Type"><span class="mw-headline" id="Data_Source_Type">Data Source Type</span></span></span></span></span></span></span></span></span></span></span></span></span></span></span></span></span></span></span></span></span></span></span> === | ||
| + | |||
| + | The Data Source Type function located in the '''Data Sources''' tab allows the administrator user to '''add, edit '''or '''delete''' the '''data source types'''. | ||
| + | |||
| + | 1. To access the data '''source type''' function, select the '''Data Source Type''' icon located on the right of the main page under the '''Data Sources''' tab. | ||
| + | |||
| + | | ||
| + | |||
| + | <u>'''Note'''</u>: if a data '''source type''' is deleted reports associated with it may not work correctly. | ||
| + | |||
| + | | ||
| + | |||
| + | '''Figure 65: Data Source Type''' | ||
| + | |||
| + | [[File:MWC DataSourceType.png|x330px|MWC DataSourceType.png]] | ||
| + | |||
| + | A data '''source type list''' displays containing all previously created data sources listed alphabetically. From this screen, the '''Administrator''' user '''can add, edit '''or '''delete''' a '''data source type'''. | ||
| + | |||
| + | | ||
| + | |||
| + | ==== <span class="mw-headline" id="Add_Data_Source_Type"><span class="mw-headline" id="Add_Data_Source_Type"><span class="mw-headline" id="Add_Data_Source_Type"><span class="mw-headline" id="Add_Data_Source_Type"><span class="mw-headline" id="Add_Data_Source_Type"><span class="mw-headline" id="Add_Data_Source_Type"><span class="mw-headline" id="Add_Data_Source_Type"><span class="mw-headline" id="Add_Data_Source_Type"><span class="mw-headline" id="Add_Data_Source_Type"><span class="mw-headline" id="Add_Data_Source_Type"><span class="mw-headline" id="Add_Data_Source_Type"><span class="mw-headline" id="Add_Data_Source_Type"><span class="mw-headline" id="Add_Data_Source_Type"><span class="mw-headline" id="Add_Data_Source_Type"><span class="mw-headline" id="Add_Data_Source_Type"><span class="mw-headline" id="Add_Data_Source_Type"><span class="mw-headline" id="Add_Data_Source_Type"><span class="mw-headline" id="Add_Data_Source_Type"><span class="mw-headline" id="Add_Data_Source_Type"><span class="mw-headline" id="Add_Data_Source_Type"><span class="mw-headline" id="Add_Data_Source_Type"><span class="mw-headline" id="Add_Data_Source_Type"><span class="mw-headline" id="Add_Data_Source_Type">Add Data Source Type</span></span></span></span></span></span></span></span></span></span></span></span></span></span></span></span></span></span></span></span></span></span></span> ==== | ||
| + | |||
| + | 1. To add a '''data source type''', select '''Add '''located above the data source type list. | ||
| + | |||
| + | 2. Enter a '''data source type '''and '''description''', both mandatory fields. | ||
| + | |||
| + | 3. Select '''Save''' to create the '''Data Source Type'''. | ||
| + | |||
| + | 4. Select '''Cancel''' to exit. | ||
| + | |||
| + | | ||
| + | |||
| + | '''Figure 66: Add Data Source Type''' | ||
| + | |||
| + | [[File:MWC AddDataSourceType.png|x300px|MWC AddDataSourceType.png]] | ||
| + | |||
| + | | ||
| + | |||
| + | ==== <span class="mw-headline" id="Edit_Data_Source_Type"><span class="mw-headline" id="Edit_Data_Source_Type"><span class="mw-headline" id="Edit_Data_Source_Type"><span class="mw-headline" id="Edit_Data_Source_Type"><span class="mw-headline" id="Edit_Data_Source_Type"><span class="mw-headline" id="Edit_Data_Source_Type"><span class="mw-headline" id="Edit_Data_Source_Type"><span class="mw-headline" id="Edit_Data_Source_Type"><span class="mw-headline" id="Edit_Data_Source_Type"><span class="mw-headline" id="Edit_Data_Source_Type"><span class="mw-headline" id="Edit_Data_Source_Type"><span class="mw-headline" id="Edit_Data_Source_Type"><span class="mw-headline" id="Edit_Data_Source_Type"><span class="mw-headline" id="Edit_Data_Source_Type"><span class="mw-headline" id="Edit_Data_Source_Type"><span class="mw-headline" id="Edit_Data_Source_Type"><span class="mw-headline" id="Edit_Data_Source_Type"><span class="mw-headline" id="Edit_Data_Source_Type"><span class="mw-headline" id="Edit_Data_Source_Type"><span class="mw-headline" id="Edit_Data_Source_Type"><span class="mw-headline" id="Edit_Data_Source_Type"><span class="mw-headline" id="Edit_Data_Source_Type"><span class="mw-headline" id="Edit_Data_Source_Type">Edit Data Source Type</span></span></span></span></span></span></span></span></span></span></span></span></span></span></span></span></span></span></span></span></span></span></span> ==== | ||
| + | |||
| + | 1. To edit a d'''ata source type''', select the desired '''data source type''' from the list. | ||
| + | |||
| + | 2. Select '''Edit '''located above the '''Data Source Type list'''. | ||
| + | |||
| + | 3. Both the '''name '''and '''description fields''' are available to edit. After desired changes have been made, select '''Save''' to continue. | ||
| + | |||
| + | 4. Select '''Cancel''' to exit. | ||
| + | |||
| + | | ||
| + | |||
| + | '''Figure 67: Edit Data Source Type''' | ||
| + | |||
| + | [[File:MWC EditDataSourceType.png|x330px|MWC EditDataSourceType.png]] | ||
| + | |||
| + | <br/> | ||
| + | |||
| + | ==== <span class="mw-headline" id="Delete_Data_Source_Type"><span class="mw-headline" id="Delete_Data_Source_Type"><span class="mw-headline" id="Delete_Data_Source_Type"><span class="mw-headline" id="Delete_Data_Source_Type"><span class="mw-headline" id="Delete_Data_Source_Type"><span class="mw-headline" id="Delete_Data_Source_Type"><span class="mw-headline" id="Delete_Data_Source_Type"><span class="mw-headline" id="Delete_Data_Source_Type"><span class="mw-headline" id="Delete_Data_Source_Type"><span class="mw-headline" id="Delete_Data_Source_Type"><span class="mw-headline" id="Delete_Data_Source_Type"><span class="mw-headline" id="Delete_Data_Source_Type"><span class="mw-headline" id="Delete_Data_Source_Type"><span class="mw-headline" id="Delete_Data_Source_Type"><span class="mw-headline" id="Delete_Data_Source_Type"><span class="mw-headline" id="Delete_Data_Source_Type"><span class="mw-headline" id="Delete_Data_Source_Type"><span class="mw-headline" id="Delete_Data_Source_Type"><span class="mw-headline" id="Delete_Data_Source_Type"><span class="mw-headline" id="Delete_Data_Source_Type"><span class="mw-headline" id="Delete_Data_Source_Type"><span class="mw-headline" id="Delete_Data_Source_Type"><span class="mw-headline" id="Delete_Data_Source_Type">Delete Data Source Type</span></span></span></span></span></span></span></span></span></span></span></span></span></span></span></span></span></span></span></span></span></span></span> ==== | ||
| + | |||
| + | 1. To delete a '''data source type''', select the desired '''data source type''' from the list. | ||
| + | |||
| + | 2. Select '''Delete''' located above the '''Data Source Type list'''. | ||
| + | |||
| + | 3. A confirmation prompt will display. Select '''Yes''' to confirm or '''No''' to exit. | ||
| + | |||
| + | | ||
| + | |||
| + | '''Figure 68: Delete Data Source Type''' | ||
| + | |||
| + | [[File:MWC DeleteDataSourceType.png|x308px|MWC DeleteDataSourceType.png]] | ||
| + | |||
| + | | ||
| + | |||
| + | <u>'''Note'''</u>: It is not allowed to delete a data source type: | ||
| + | |||
| + | a) If is assigned to a data source; | ||
| + | |||
| + | b) If there is any report already created for this data source type. | ||
| + | |||
| + | | ||
| + | |||
| + | | ||
| + | |||
| + | | ||
| + | |||
| + | | ||
| + | |||
| + | == <span class="mw-headline" id="Reports"><span class="mw-headline" id="Reports"><span class="mw-headline" id="Reports"><span class="mw-headline" id="Reports"><span class="mw-headline" id="Reports"><span class="mw-headline" id="Reports"><span class="mw-headline" id="Reports"><span class="mw-headline" id="Reports"><span class="mw-headline" id="Reports"><span class="mw-headline" id="Reports"><span class="mw-headline" id="Reports"><span class="mw-headline" id="Reports"><span class="mw-headline" id="Reports"><span class="mw-headline" id="Reports"><span class="mw-headline" id="Reports"><span class="mw-headline" id="Reports"><span class="mw-headline" id="Reports"><span class="mw-headline" id="Reports"><span class="mw-headline" id="Reports"><span class="mw-headline" id="Reports"><span class="mw-headline" id="Reports"><span class="mw-headline" id="Reports"><span class="mw-headline" id="Reports">Reports [[File:MWC logo3.png|MWC logo3.png]]<br/> </span></span></span></span></span></span></span></span></span></span></span></span></span></span></span></span></span></span></span></span></span></span></span> == | ||
| + | |||
| + | The '''Reports Module''' was developed for employees with '''Security Manager''' (specific Location) and '''Administrator''' (all locations) roles. This section will cover how to navigate and execute all report activities. The '''Reports''' module allows the user to edit, copy or publish reports. | ||
| + | |||
| + | | ||
| + | |||
| + | === <span class="mw-headline" id="Filter_Reports"><span class="mw-headline" id="Filter_Reports"><span class="mw-headline" id="Filter_Reports"><span class="mw-headline" id="Filter_Reports"><span class="mw-headline" id="Filter_Reports"><span class="mw-headline" id="Filter_Reports"><span class="mw-headline" id="Filter_Reports"><span class="mw-headline" id="Filter_Reports"><span class="mw-headline" id="Filter_Reports"><span class="mw-headline" id="Filter_Reports"><span class="mw-headline" id="Filter_Reports"><span class="mw-headline" id="Filter_Reports"><span class="mw-headline" id="Filter_Reports"><span class="mw-headline" id="Filter_Reports"><span class="mw-headline" id="Filter_Reports"><span class="mw-headline" id="Filter_Reports"><span class="mw-headline" id="Filter_Reports"><span class="mw-headline" id="Filter_Reports"><span class="mw-headline" id="Filter_Reports"><span class="mw-headline" id="Filter_Reports"><span class="mw-headline" id="Filter_Reports"><span class="mw-headline" id="Filter_Reports"><span class="mw-headline" id="Filter_Reports">Filter Reports</span></span></span></span></span></span></span></span></span></span></span></span></span></span></span></span></span></span></span></span></span></span></span> === | ||
| + | |||
| + | | ||
| + | |||
| + | The filtering option located in the '''Reports''' tab allows the '''Administrator '''or '''Security Manager '''users to search for specific reports based on the '''owner location, report group, name, owner user, data source type, '''and/or '''status'''. | ||
| + | |||
| + | | ||
| + | |||
| + | 1. To filter the report list, select an owner '''Location, Report Group, Data Source Type, '''and/or '''Status''' from the drop-down boxes provided, or enter the Name and/or Owner User. | ||
| + | |||
| + | 2. Select '''Search''' to filter the list or '''Clear''' to clear all fields. | ||
| + | |||
| + | 3. The results will display in the report list. | ||
| + | |||
| + | | ||
| + | |||
| + | '''Figure 69: Filter Reports''' | ||
| + | |||
| + | [[File:MWC FilterReports.png|x330px|MWC FilterReports.png]] | ||
| + | |||
| + | <u>'''Note'''</u>: just the '''Publish''' functionality is available for the '''Reports '''module; the other functionalities are in '''WIP''' (work in progress) status. | ||
| + | |||
| + | <br/> | ||
| + | |||
| + | === <span class="mw-headline" id="Add_Reports"><span class="mw-headline" id="Add_Reports"><span class="mw-headline" id="Add_Reports"><span class="mw-headline" id="Add_Reports"><span class="mw-headline" id="Add_Reports"><span class="mw-headline" id="Add_Reports"><span class="mw-headline" id="Add_Reports"><span class="mw-headline" id="Add_Reports"><span class="mw-headline" id="Add_Reports"><span class="mw-headline" id="Add_Reports"><span class="mw-headline" id="Add_Reports"><span class="mw-headline" id="Add_Reports"><span class="mw-headline" id="Add_Reports"><span class="mw-headline" id="Add_Reports"><span class="mw-headline" id="Add_Reports"><span class="mw-headline" id="Add_Reports"><span class="mw-headline" id="Add_Reports"><span class="mw-headline" id="Add_Reports"><span class="mw-headline" id="Add_Reports"><span class="mw-headline" id="Add_Reports"><span class="mw-headline" id="Add_Reports"><span class="mw-headline" id="Add_Reports"><span class="mw-headline" id="Add_Reports">Add Reports</span></span></span></span></span></span></span></span></span></span></span></span></span></span></span></span></span></span></span></span></span></span></span> === | ||
| + | |||
| + | This feature allows users to '''add reports''' that will be executed in the '''Execution Module'''. | ||
| + | |||
| + | | ||
| + | |||
| + | '''Figure 70: Add Reports''' | ||
| + | |||
| + | [[File:MWC AddReports.png|x275px|MWC AddReports.png]] | ||
| + | |||
| + | | ||
| + | |||
| + | '''Figure 71: Basic Reports''' | ||
| + | |||
| + | [[File:MWC BasicReport.png|x400px|MWC BasicReport.png]] | ||
| + | |||
| + | | ||
| + | |||
| + | To '''add a report''' the user must enter all mandatory fields and go to the other configuration tabs to enter the necessary data into the report. Note that now, the '''admin''' and '''dev users''' can select the '''report project'''. Select '''Save''' to commit. For further information about these fields, see the respective modules ('''Location, Group (Report Group), '''and '''Data Source Type''') in the Portal. | ||
| + | |||
| + | | ||
| + | |||
| + | <u>'''Note'''</u>: Checking '''Private''' just the report owner will have permissions (open, edit, etc) for this report. | ||
| + | |||
| + | The default format will be the preselected format for the '''Execution Module''', but it could be changed during the execution. | ||
| + | |||
| + | | ||
| + | |||
| + | | ||
| + | |||
| + | ==== <span class="mw-headline" id="SQL_Code"><span class="mw-headline" id="SQL_Code"><span class="mw-headline" id="SQL_Code"><span class="mw-headline" id="SQL_Code"><span class="mw-headline" id="SQL_Code"><span class="mw-headline" id="SQL_Code"><span class="mw-headline" id="SQL_Code"><span class="mw-headline" id="SQL_Code"><span class="mw-headline" id="SQL_Code"><span class="mw-headline" id="SQL_Code"><span class="mw-headline" id="SQL_Code"><span class="mw-headline" id="SQL_Code"><span class="mw-headline" id="SQL_Code"><span class="mw-headline" id="SQL_Code"><span class="mw-headline" id="SQL_Code"><span class="mw-headline" id="SQL_Code"><span class="mw-headline" id="SQL_Code"><span class="mw-headline" id="SQL_Code"><span class="mw-headline" id="SQL_Code"><span class="mw-headline" id="SQL_Code"><span class="mw-headline" id="SQL_Code"><span class="mw-headline" id="SQL_Code"><span class="mw-headline" id="SQL_Code">SQL Code</span></span></span></span></span></span></span></span></span></span></span></span></span></span></span></span></span></span></span></span></span></span></span> ==== | ||
| + | |||
| + | | ||
| + | |||
| + | '''Figure 72: SQL Code Configuration''' | ||
| + | |||
| + | [[File:MWC SQLCodeConfig.png|x400px|MWC SQLCodeConfig.png]] | ||
| + | |||
| + | | ||
| + | |||
| + | This feature allows the user to '''add a query''' and check if the query is valid by clicking on '''Check Code SQL'''. To add a parameter it is necessary to use the syntax: <%shop_order%>. | ||
| + | |||
| + | | ||
| + | |||
| + | | ||
| + | |||
| + | ==== <span class="mw-headline" id="Parameters"><span class="mw-headline" id="Parameters"><span class="mw-headline" id="Parameters"><span class="mw-headline" id="Parameters"><span class="mw-headline" id="Parameters"><span class="mw-headline" id="Parameters"><span class="mw-headline" id="Parameters"><span class="mw-headline" id="Parameters"><span class="mw-headline" id="Parameters"><span class="mw-headline" id="Parameters"><span class="mw-headline" id="Parameters"><span class="mw-headline" id="Parameters"><span class="mw-headline" id="Parameters"><span class="mw-headline" id="Parameters"><span class="mw-headline" id="Parameters"><span class="mw-headline" id="Parameters"><span class="mw-headline" id="Parameters"><span class="mw-headline" id="Parameters"><span class="mw-headline" id="Parameters"><span class="mw-headline" id="Parameters"><span class="mw-headline" id="Parameters"><span class="mw-headline" id="Parameters"><span class="mw-headline" id="Parameters"><span class="mw-headline" id="Parameters">Parameters</span></span></span></span></span></span></span></span></span></span></span></span></span></span></span></span></span></span></span></span></span></span></span></span> ==== | ||
| + | |||
| + | At this point, the user will choose the parameters '''Types''' and '''Orders'''. For example, if the parameter will be a checkbox, a list box, a text box, etc. | ||
| + | |||
| + | The '''Report Maintenance''' page is displayed. Select the '''Parameters''' tab to add a parameter. | ||
| + | |||
| + | | ||
| + | |||
| + | '''Figure 73: Parameters''' | ||
| + | |||
| + | [[File:MWC Parameters.png|x400px|MWC Parameters.png]] | ||
| + | |||
| + | | ||
| + | |||
| + | The first thing to be done is to create a new parameter step. '''Parameter Steps''' give us the ability to establish '''parent-child relationships''' between parameters. | ||
| + | |||
| + | 1. Select "'''New Step'''" | ||
| + | |||
| + | 2. With a new step in place, we can begin adding our parameters. | ||
| + | |||
| + | 3. Select “'''New Parameters'''” to configure the parameters; | ||
| + | |||
| + | | ||
| + | |||
| + | '''Figure 74: New Parameter''' | ||
| + | |||
| + | [[File:MWC NewParameter.png|x400px|MWC NewParameter.png]] | ||
| + | |||
| + | Three fields are required for every parameter you setup: | ||
| + | |||
| + | 1. '''Name is straightforward''' - what you type here is what will be used as the parameters caption. For example, "Customers" in the WIP Distribution report. | ||
| + | |||
| + | 2. '''Instruction''' | ||
| + | |||
| + | The user will provide any important information for the end-user regarding this parameter. In most cases, this will be a very basic sentence such as "Indicate whether you want to see units that are in WIP or not" that are already intuitive by just looking at the parameter. However, you might come across situations as you develop your reports where you create a parameter whose relationship to the report is not so obvious and this field will give you a great way to explain it to the user. The text entered in this field will be displayed in this list. | ||
| + | |||
| + | 3. '''Parameter Type''' | ||
| + | |||
| + | The Parameter Type Field will allow the user to choose the type of parameter that will determine how this parameter is displayed. The available parameter types are listed below: | ||
| + | |||
| + | '''a. Drop Down List''' | ||
| + | |||
| + | Choosing this parameter type, the user will create a “list” according to the SQL code entered in the command line. | ||
| + | |||
| + | The Value field represents the value that will be replaced in the SQL Code. | ||
| + | |||
| + | | ||
| + | |||
| + | '''Figure 75: Drop Down List Parameter''' | ||
| + | |||
| + | [[File:MWC DropDownListParam.png|x400px|MWC DropDownListParam.png]] | ||
| + | |||
| + | | ||
| + | |||
| + | The user must enter the mandatory fields ('''Name, Instructions, Command, Data Type, Value Field, Display Field, '''and '''the Parameter SQL'''). | ||
| + | |||
| + | | ||
| + | |||
| + | '''Parameter SQL''': this is where the developer selects the text in their report SQL that will be replaced by the values in the parameter they are currently creating. So if in their report SQL they had "<%Customers%>" they would see an option in this field that would say "Customers". That's where the application would insert the customers that the users select when they execute the report. | ||
| + | |||
| + | '''Data Type''': this indicates what kind of data will be inserted. It is the value type (integer, string, date, and double); | ||
| + | |||
| + | '''Command''': This is used to enter the SQL query that will fill the list with the data; | ||
| + | |||
| + | '''Value Field''': This field is the column name. This value will be substituted in the SQL Code; | ||
| + | |||
| + | '''Display Field''': this column name that will be displayed to the user; | ||
| + | |||
| + | '''Required''': This field defines if the field is mandatory or not; | ||
| + | |||
| + | | ||
| + | |||
| + | <u>'''Note'''</u>: The '''Optional Item''' section will be displayed in the '''Required '''field is not checked and it will be used to remove or replace code lines in the '''SQL Code''' in the '''Execution Module'''. This action is the same for all parameter types. | ||
| + | |||
| + | Check the '''All Option''' check box if you want to add an option to choose “'''All'''“ items in the list. | ||
| + | |||
| + | Select '''Add''' to open the '''Optional Item Maintenance''' screen. | ||
| + | |||
| + | | ||
| + | |||
| + | '''Figure 76: Optional Item''' | ||
| + | |||
| + | [[File:MWC OptionalItem.png|x400px|MWC OptionalItem.png]]<br/> | ||
| + | |||
| + | For example, the user can remove the <%location%> command and replace it for any value he wants. | ||
| + | |||
| + | Select '''Save''' to commit. | ||
| + | |||
| + | During the report execution, if no value is entered for this command, it will be replaced or removed automatically. | ||
| + | |||
| + | Also, the user can '''Edit '''or'''Delete''' items by clicking on the '''Edit / Delete''' buttons. Select '''Save''' to commit. | ||
| + | |||
| + | | ||
| + | |||
| + | '''Figure 77: Parents''' | ||
| + | |||
| + | '''[[File:MWC Parents.png|x400px|MWC Parents.png]]''' | ||
| + | |||
| + | | ||
| + | |||
| + | Add '''Parent Parameter''' is a functionality that helps to share parameters between steps. | ||
| + | |||
| + | 1. Create a new '''Step'''; | ||
| + | |||
| + | 2. Create '''New Parameter''', fill out '''Parameter Name, Parameter Type''', etc; | ||
| + | |||
| + | 3. Click '''Add Parents''' to be able to use a parameter from another step. In this case, we have available the '''Data Source''' parameter because is the parameter in step 1; | ||
| + | |||
| + | Now the user can use the parent parameter to write a query in the '''Command''' field.<br/> The parents are the parameters created in the previous steps and they could be used in the command query. | ||
| + | |||
| + | For example: | ||
| + | |||
| + | select ***** where *** = <%param_2%><br/> where the tag <%param_2%> is related to the selected parent parameter (chosen as the parent). | ||
| + | |||
| + | | ||
| + | |||
| + | '''b. List Box''' | ||
| + | |||
| + | Choosing this parameter type, the user will create a “'''Multiple Choice List'''” according to the '''SQL''' code entered in the command line. | ||
| + | |||
| + | | ||
| + | |||
| + | '''Figure 78: List Box''' | ||
| + | |||
| + | [[File:MWC ListBox.png|x415px|MWC ListBox.png]] | ||
| + | |||
| + | The user must enter the mandatory fields ('''Name, Instructions, Command, Data Type, Value Field, Display Field, '''and '''the Parameter SQL''') already described and: | ||
| + | |||
| + | | ||
| + | |||
| + | '''Rows''': this allows developers to configure how many rows the user can see in the boxes at a time. When's there's going to be several hundred choices for the user it might help for them to select a higher number making it easier to search through all of them; | ||
| + | |||
| + | '''Select Maximum''': this puts a limit on how many items the user can select in the parameter. If there are maybe 10,000 options for the user to choose you wouldn't want to allow them to select that many; | ||
| + | |||
| + | '''Max Exceeded Msg''': message that will be displayed if the user tries to select more data that was set in the '''Select Maximum''' field. | ||
| + | |||
| + | It is the same for options. The user must enter the mandatory fields ('''Name, Instructions, '''and the '''Parameter SQL'''). | ||
| + | |||
| + | | ||
| + | |||
| + | '''c. Data Range''' | ||
| + | |||
| + | This option is used to set a range of dates. | ||
| + | |||
| + | | ||
| + | |||
| + | '''Figure 79: Date Range''' | ||
| + | |||
| + | [[File:MWC DateRange.png|x400px|MWC DateRange.png]] | ||
| + | |||
| + | The user must enter the mandatory fields ('''Name''' and '''instructions''') already described; | ||
| + | |||
| + | | ||
| + | |||
| + | '''Start SQL''': it is the parameter name that will be substituted for the initial date range; | ||
| + | |||
| + | '''End SQL''': it is the parameter name that will be substituted for the final date range; | ||
| + | |||
| + | '''Max Day Range''': it is the maximum quantity of days in the initial and final date range; | ||
| + | |||
| + | '''Display Time''': choosing this check box, the field to choose the time is displayed; | ||
| + | |||
| + | | ||
| + | |||
| + | '''d. Date Time''' | ||
| + | |||
| + | This parameter type will allow the user to choose a date and time. | ||
| + | |||
| + | | ||
| + | |||
| + | '''Figure 80: Date Time''' | ||
| + | |||
| + | [[File:MWC DateTime.png|x400px|MWC DateTime.png]] | ||
| + | |||
| + | The user must enter the mandatory fields ('''Name, Parameter SQL, '''and '''Instructions''') already described; | ||
| + | |||
| + | | ||
| + | |||
| + | '''e. Check Box''' | ||
| + | |||
| + | This will allow the user to choose values ('''Yes '''or '''No, On '''or '''Off, '''or '''True '''or '''False'''). | ||
| + | |||
| + | | ||
| + | |||
| + | '''Figure 81: Check Box''' | ||
| + | |||
| + | [[File:MWC CheckBox.png|x400px|MWC CheckBox.png]] | ||
| + | |||
| + | | ||
| + | |||
| + | The user must enter the mandatory fields ('''Name, Parameter SQL, '''and '''Instructions''') already described; | ||
| + | |||
| + | | ||
| + | |||
| + | '''f. Text Box''' | ||
| + | |||
| + | This allows the user to set any text entry. | ||
| + | |||
| + | '''Figure 82: Text Box''' | ||
| + | |||
| + | [[File:MWC TextBox.png|x400px|MWC TextBox.png]] | ||
| + | |||
| + | The user must enter the mandatory fields ('''Name, Parameter SQL, '''and '''Instructions''') already described; | ||
| + | |||
| + | '''Default Value''': this is the initial value that will be displayed in the '''Execution Module'''. | ||
| + | |||
| + | '''Validation''': it will allow the user to add validation for this field ('''Text Box'''). | ||
| + | |||
| + | | ||
| + | |||
| + | '''Figure 83: Validation Field''' | ||
| + | |||
| + | [[File:MWC ValidationField.png|x380px|MWC ValidationField.png]] | ||
| + | |||
| + | There are the following validation types: | ||
| + | |||
| + | | ||
| + | |||
| + | '''a. Data Type Validation''' | ||
| + | |||
| + | | ||
| + | |||
| + | '''Figure 84: Validation Data Type''' | ||
| + | |||
| + | [[File:MWC ValidationDataType.png|x380px|MWC ValidationDataType.png]] | ||
| + | |||
| + | If the user enters a different value chosen in the '''Data Type''', the field will be invalid and an error message that was configured in the “'''Error Msg'''” field is displayed. | ||
| + | |||
| + | | ||
| + | |||
| + | '''b. Expression Validation''' | ||
| + | |||
| + | | ||
| + | |||
| + | '''Figure 85: Validation Expression''' | ||
| + | |||
| + | [[File:MWC ValidationExpression.png|x380px|MWC ValidationExpression.png]] | ||
| + | |||
| + | Choosing the “'''Expression'''” as validation, the user is able to add an expression (e.g. /^[a-zA-Z0-9][a-zA-Z0-9\._-]+@([a-zA-Z0-9\._-]+\.)[a-zA-Z-0-9]{2}/)). | ||
| + | |||
| + | If the user enters a different value that is not accepted for the expression, the field will be invalid and an error message that was configured in the “'''Error Msg'''” field is displayed. | ||
| + | |||
| + | | ||
| + | |||
| + | '''c. Range Validation''' | ||
| + | |||
| + | | ||
| + | |||
| + | '''Figure 86: Validation Range''' | ||
| + | |||
| + | [[File:MWC ValidationRange.png|x380px|MWC ValidationRange.png]] | ||
| + | |||
| + | Choosing the “'''Range'''” as validation, the user can set a value interval with maximum and minimum values that are configured in the '''Min. Value '''and'''Max. Value''' fields. | ||
| + | |||
| + | If the user enters a different interval that is not accepted for the expression, the field will be invalid and an error message that was configured in the “Error Msg” field is displayed. | ||
| + | |||
| + | | ||
| + | |||
| + | '''d. Value Validation''' | ||
| + | |||
| + | | ||
| + | |||
| + | '''Figure 87: Validation Value''' | ||
| + | |||
| + | [[File:MWC ValidationValue.png|x380px|MWC ValidationValue.png]] | ||
| + | |||
| + | Choosing the “'''Value'''” as validation, the user can set a validation for '''Operator''' (combo box) that defines which comparison will be done. | ||
| + | |||
| + | | ||
| + | |||
| + | '''Figure 88: Operator Field''' | ||
| + | |||
| + | [[File:MWC OperatorField.png|x380px|MWC OperatorField.png]] | ||
| + | |||
| + | Compare to the field will receive the value to be compared with the value entered by the user. | ||
| + | |||
| + | If the user enters a different value that is not accepted for the comparison, the field will be invalid and an error message that was configured in the “'''Error Msg'''” field is displayed. | ||
| + | |||
| + | | ||
| + | |||
| + | '''e. Multi-Line Text Box''' | ||
| + | |||
| + | | ||
| + | |||
| + | It is like the '''Text Box''', the difference is that the user can enter '''Multiple Data'''. Each data must be in different lines. | ||
| + | |||
| + | '''Figure 89: Multi-Line Text Box''' | ||
| + | |||
| + | '''[[File:MWC MultiLineTextBox.png|x400px|MWC MultiLineTextBox.png]]''' | ||
| + | |||
| + | | ||
| + | |||
| + | '''Input Limit''' will define the quantity of data that can be entered. | ||
| + | |||
| + | Checking the '''Is Case Sensitive''' will allow distinguishing '''Lowercase''' and '''Uppercase'''. | ||
| + | |||
| + | | ||
| + | |||
| + | '''f. Radio Button List''' | ||
| + | |||
| + | Choosing the '''Radio Button''' parameter type, all results of the '''SQL Code''' configured in the '''Command''' field will be a radio button. | ||
| + | |||
| + | | ||
| + | |||
| + | '''Figure 90: Radio Button List''' | ||
| + | |||
| + | [[File:MWC RadioButtonList.png|x400px|MWC RadioButtonList.png]] | ||
| + | |||
| + | <u>'''Note'''</u>: The user will be able to select just one '''Radio Button'''. | ||
| + | |||
| + | Select '''Save Parameters''' to commit. | ||
| + | |||
| + | <u>'''Note'''</u>: If there is just one parameter created for a step and the user removes this parameter, the step will be automatically removed. | ||
| + | |||
| + | | ||
| + | |||
| + | ==== <span class="mw-headline" id="Drill_Down"><span class="mw-headline" id="Drill_Down"><span class="mw-headline" id="Drill_Down"><span class="mw-headline" id="Drill_Down"><span class="mw-headline" id="Drill_Down"><span class="mw-headline" id="Drill_Down"><span class="mw-headline" id="Drill_Down"><span class="mw-headline" id="Drill_Down"><span class="mw-headline" id="Drill_Down"><span class="mw-headline" id="Drill_Down"><span class="mw-headline" id="Drill_Down"><span class="mw-headline" id="Drill_Down"><span class="mw-headline" id="Drill_Down"><span class="mw-headline" id="Drill_Down"><span class="mw-headline" id="Drill_Down"><span class="mw-headline" id="Drill_Down"><span class="mw-headline" id="Drill_Down"><span class="mw-headline" id="Drill_Down"><span class="mw-headline" id="Drill_Down"><span class="mw-headline" id="Drill_Down"><span class="mw-headline" id="Drill_Down"><span class="mw-headline" id="Drill_Down"><span class="mw-headline" id="Drill_Down">Drill Down</span></span></span></span></span></span></span></span></span></span></span></span></span></span></span></span></span></span></span></span></span></span></span> ==== | ||
| + | |||
| + | '''Drill Down''' is a link to another report. It is used to see detailed data in a separate report. | ||
| + | |||
| + | | ||
| + | |||
| + | '''Figure 91: Drill Down''' | ||
| + | |||
| + | [[File:MWC DrillDowns.png|x400px|MWC DrillDowns.png]] | ||
| + | |||
| + | <br/> | ||
| + | |||
| + | ===== <span class="mw-headline" id="Add_Drill_Down"><span class="mw-headline" id="Add_Drill_Down"><span class="mw-headline" id="Add_Drill_Down"><span class="mw-headline" id="Add_Drill_Down"><span class="mw-headline" id="Add_Drill_Down"><span class="mw-headline" id="Add_Drill_Down"><span class="mw-headline" id="Add_Drill_Down"><span class="mw-headline" id="Add_Drill_Down"><span class="mw-headline" id="Add_Drill_Down"><span class="mw-headline" id="Add_Drill_Down"><span class="mw-headline" id="Add_Drill_Down"><span class="mw-headline" id="Add_Drill_Down"><span class="mw-headline" id="Add_Drill_Down"><span class="mw-headline" id="Add_Drill_Down"><span class="mw-headline" id="Add_Drill_Down"><span class="mw-headline" id="Add_Drill_Down"><span class="mw-headline" id="Add_Drill_Down"><span class="mw-headline" id="Add_Drill_Down"><span class="mw-headline" id="Add_Drill_Down"><span class="mw-headline" id="Add_Drill_Down"><span class="mw-headline" id="Add_Drill_Down"><span class="mw-headline" id="Add_Drill_Down"><span class="mw-headline" id="Add_Drill_Down">Add Drill Down</span></span></span></span></span></span></span></span></span></span></span></span></span></span></span></span></span></span></span></span></span></span></span> ===== | ||
| + | |||
| + | 1. To add a '''Drill Down report''', select the '''Drill Down''' tab and click on the '''Add '''button; | ||
| + | |||
| + | | ||
| + | |||
| + | '''Figure 92: Add Drill Down Report''' | ||
| + | |||
| + | [[File:MWC AddDrillDownReport.png|x400px|MWC AddDrillDownReport.png]] | ||
| + | |||
| + | *'''Current Report Column''' | ||
| + | |||
| + | It is possible to create one drill-down report per column. All available parent report columns are displayed in the combo box list. | ||
| + | |||
| + | *'''Child Report''' | ||
| + | |||
| + | It will display just reports that have the same data source type and were published in the same location as the parent report. | ||
| + | |||
| + | When the user selects a '''Child Report''', all their parameters will be displayed in the list to be set the values that the parameters will receive when the report is executed. For each parameter, three values types could be set as follows: | ||
| + | |||
| + | *'''No index entries were found.''' | ||
| + | *'''Static Value''': will set a fixed value to the '''Drill Down''' report parameter | ||
| + | *'''Field Value''': it will be the link value of the parent report that will be displayed in the parameter field in the '''Drill Down''' report | ||
| + | |||
| + | All parent report columns will be displayed. | ||
| + | |||
| + | *'''Parent Parameter''': the value of a parameter in the report already chosen as the main will be displayed in the parameter field of the '''Drill Down''' report | ||
| + | |||
| + | All parent report parameters will be displayed. | ||
| + | |||
| + | To finish, click on the '''Save''' button or '''Close''' to cancel the action. | ||
| + | |||
| + | | ||
| + | |||
| + | ===== <span class="mw-headline" id="Remove_Drill_Down"><span class="mw-headline" id="Remove_Drill_Down"><span class="mw-headline" id="Remove_Drill_Down"><span class="mw-headline" id="Remove_Drill_Down"><span class="mw-headline" id="Remove_Drill_Down"><span class="mw-headline" id="Remove_Drill_Down"><span class="mw-headline" id="Remove_Drill_Down"><span class="mw-headline" id="Remove_Drill_Down"><span class="mw-headline" id="Remove_Drill_Down"><span class="mw-headline" id="Remove_Drill_Down"><span class="mw-headline" id="Remove_Drill_Down"><span class="mw-headline" id="Remove_Drill_Down"><span class="mw-headline" id="Remove_Drill_Down"><span class="mw-headline" id="Remove_Drill_Down"><span class="mw-headline" id="Remove_Drill_Down"><span class="mw-headline" id="Remove_Drill_Down"><span class="mw-headline" id="Remove_Drill_Down"><span class="mw-headline" id="Remove_Drill_Down"><span class="mw-headline" id="Remove_Drill_Down"><span class="mw-headline" id="Remove_Drill_Down"><span class="mw-headline" id="Remove_Drill_Down"><span class="mw-headline" id="Remove_Drill_Down"><span class="mw-headline" id="Remove_Drill_Down">Remove Drill Down</span></span></span></span></span></span></span></span></span></span></span></span></span></span></span></span></span></span></span></span></span></span></span> ===== | ||
| + | |||
| + | To remove a drill-down, select the report and click on the '''Remove''' button. Click on '''Yes''' to confirm or '''Cancel''' to cancel the action. | ||
| + | |||
| + | '''Figure 93: Remove Drill Down''' | ||
| + | |||
| + | [[File:MWC RemoveDrillDown.png|x360px|MWC RemoveDrillDown.png]]<br/> | ||
| + | |||
| + | | ||
| + | |||
| + | ==== <span class="mw-headline" id="Testing"><span class="mw-headline" id="Testing"><span class="mw-headline" id="Testing"><span class="mw-headline" id="Testing"><span class="mw-headline" id="Testing"><span class="mw-headline" id="Testing"><span class="mw-headline" id="Testing"><span class="mw-headline" id="Testing"><span class="mw-headline" id="Testing"><span class="mw-headline" id="Testing"><span class="mw-headline" id="Testing"><span class="mw-headline" id="Testing"><span class="mw-headline" id="Testing"><span class="mw-headline" id="Testing"><span class="mw-headline" id="Testing"><span class="mw-headline" id="Testing"><span class="mw-headline" id="Testing"><span class="mw-headline" id="Testing"><span class="mw-headline" id="Testing"><span class="mw-headline" id="Testing"><span class="mw-headline" id="Testing"><span class="mw-headline" id="Testing"><span class="mw-headline" id="Testing"><span class="mw-headline" id="Testing"><span class="mw-headline" id="Testing">Testing</span></span></span></span></span></span></span></span></span></span></span></span></span></span></span></span></span></span></span></span></span></span></span></span></span> ==== | ||
| + | |||
| + | It is useful to test the reports before publishing, to do this, after creating a report, select the '''Testing''' tab. | ||
| + | |||
| + | | ||
| + | |||
| + | '''Figure 94: Testing Reports''' | ||
| + | |||
| + | [[File:MWC TestingReports.png|x400px|MWC TestingReports.png]] | ||
| + | |||
| + | Note that for each step, there are instructions displayed according to what was defined in the Instruction field. | ||
| + | |||
| + | | ||
| + | |||
| + | '''Step1''' | ||
| + | |||
| + | This step will be the '''Data Source''' according to the '''Location '''and'''Data Source Type''' already configured. | ||
| + | |||
| + | | ||
| + | |||
| + | '''Figure 95: Step1''' | ||
| + | |||
| + | '''[[File:MWC Step1.png|x320px|MWC Step1.png]]''' | ||
| + | |||
| + | If there is just a single option of data source, it will be automatically displayed. Select '''Next Step''' to continue. | ||
| + | |||
| + | <u>'''Note'''</u>: If there is no other step created, the '''Output''' is displayed. Select '''Go''' to see the result. | ||
| + | |||
| + | | ||
| + | |||
| + | ==== <span class="mw-headline" id="Summary"><span class="mw-headline" id="Summary"><span class="mw-headline" id="Summary"><span class="mw-headline" id="Summary"><span class="mw-headline" id="Summary"><span class="mw-headline" id="Summary"><span class="mw-headline" id="Summary"><span class="mw-headline" id="Summary"><span class="mw-headline" id="Summary"><span class="mw-headline" id="Summary"><span class="mw-headline" id="Summary"><span class="mw-headline" id="Summary"><span class="mw-headline" id="Summary"><span class="mw-headline" id="Summary"><span class="mw-headline" id="Summary"><span class="mw-headline" id="Summary"><span class="mw-headline" id="Summary"><span class="mw-headline" id="Summary"><span class="mw-headline" id="Summary"><span class="mw-headline" id="Summary"><span class="mw-headline" id="Summary"><span class="mw-headline" id="Summary"><span class="mw-headline" id="Summary">Summary</span></span></span></span></span></span></span></span></span></span></span></span></span></span></span></span></span></span></span></span></span></span></span> ==== | ||
| + | |||
| + | Go to the '''Summary '''tab to publish the report. | ||
| + | |||
| + | '''Figure 96: Summary''' | ||
| + | |||
| + | [[File:MWC Summary.png|x400px|MWC Summary.png]] | ||
| + | |||
| + | Here the user will see the information about the report, the '''SQL Code,''' and the parameters. This page can’t be edited, it just brings the report summary. | ||
| + | |||
| + | 1. Would you like to publish this report? Select '''Yes''', I want to. | ||
| + | |||
| + | 2. The message should be displayed: '''Thank You''' | ||
| + | |||
| + | Your report is now published and ready to be executed in the production environment. | ||
| + | |||
| + | <br/> | ||
| + | |||
| + | === <span class="mw-headline" id="Edit_Reports"><span class="mw-headline" id="Edit_Reports"><span class="mw-headline" id="Edit_Reports"><span class="mw-headline" id="Edit_Reports"><span class="mw-headline" id="Edit_Reports"><span class="mw-headline" id="Edit_Reports"><span class="mw-headline" id="Edit_Reports"><span class="mw-headline" id="Edit_Reports"><span class="mw-headline" id="Edit_Reports"><span class="mw-headline" id="Edit_Reports"><span class="mw-headline" id="Edit_Reports"><span class="mw-headline" id="Edit_Reports"><span class="mw-headline" id="Edit_Reports"><span class="mw-headline" id="Edit_Reports"><span class="mw-headline" id="Edit_Reports"><span class="mw-headline" id="Edit_Reports"><span class="mw-headline" id="Edit_Reports"><span class="mw-headline" id="Edit_Reports"><span class="mw-headline" id="Edit_Reports"><span class="mw-headline" id="Edit_Reports"><span class="mw-headline" id="Edit_Reports"><span class="mw-headline" id="Edit_Reports"><span class="mw-headline" id="Edit_Reports"><span class="mw-headline" id="Edit_Reports">Edit Reports</span></span></span></span></span></span></span></span></span></span></span></span></span></span></span></span></span></span></span></span></span></span></span></span> === | ||
| + | |||
| + | The '''Edit Report''' page is the same for '''Add Reports'''. See below the exceptions: | ||
| + | |||
| + | 1. If the report was already published, the '''Owner Location''' can’t be updated; | ||
| + | |||
| + | 2. If the report was already published, the '''Summary''' page message is: “Would you like to update this report?” Clicking on '''Yes, I want '''a new version of this report is created. | ||
| + | |||
| + | | ||
| + | |||
| + | <u>'''Note'''</u>: The user can edit several reports at the same time. | ||
| + | |||
| + | <br/> | ||
| + | |||
| + | === <span class="mw-headline" id="Copy_Report"><span class="mw-headline" id="Copy_Report"><span class="mw-headline" id="Copy_Report"><span class="mw-headline" id="Copy_Report"><span class="mw-headline" id="Copy_Report"><span class="mw-headline" id="Copy_Report"><span class="mw-headline" id="Copy_Report"><span class="mw-headline" id="Copy_Report"><span class="mw-headline" id="Copy_Report"><span class="mw-headline" id="Copy_Report"><span class="mw-headline" id="Copy_Report"><span class="mw-headline" id="Copy_Report"><span class="mw-headline" id="Copy_Report"><span class="mw-headline" id="Copy_Report"><span class="mw-headline" id="Copy_Report"><span class="mw-headline" id="Copy_Report"><span class="mw-headline" id="Copy_Report"><span class="mw-headline" id="Copy_Report"><span class="mw-headline" id="Copy_Report"><span class="mw-headline" id="Copy_Report"><span class="mw-headline" id="Copy_Report"><span class="mw-headline" id="Copy_Report"><span class="mw-headline" id="Copy_Report"><span class="mw-headline" id="Copy_Report">Copy Report</span></span></span></span></span></span></span></span></span></span></span></span></span></span></span></span></span></span></span></span></span></span></span></span> === | ||
| + | |||
| + | 1. To copy a report, select the report and select the '''Copy''' button. | ||
| + | |||
| + | 2. The '''Copy Report''' page is displayed. | ||
| + | |||
| + | | ||
| + | |||
| + | '''Figure 97: Copy Report''' | ||
| + | |||
| + | [[File:MCW CopyReport.png|x400px|MCW CopyReport.png]] | ||
| + | |||
| + | 3. Enter the '''Mandatory''' fields and select Save to commit. The '''Edit''' page is displayed to make any updates if necessary. | ||
| + | |||
| + | | ||
| + | |||
| + | <u>'''Note'''</u>: Only '''Locations''' with the data source of the same type as this report are available to copy. | ||
| + | |||
| + | <br/> | ||
| + | |||
| + | === <span class="mw-headline" id="Publish_Reports"><span class="mw-headline" id="Publish_Reports"><span class="mw-headline" id="Publish_Reports"><span class="mw-headline" id="Publish_Reports"><span class="mw-headline" id="Publish_Reports"><span class="mw-headline" id="Publish_Reports"><span class="mw-headline" id="Publish_Reports"><span class="mw-headline" id="Publish_Reports"><span class="mw-headline" id="Publish_Reports"><span class="mw-headline" id="Publish_Reports"><span class="mw-headline" id="Publish_Reports"><span class="mw-headline" id="Publish_Reports"><span class="mw-headline" id="Publish_Reports"><span class="mw-headline" id="Publish_Reports"><span class="mw-headline" id="Publish_Reports"><span class="mw-headline" id="Publish_Reports"><span class="mw-headline" id="Publish_Reports"><span class="mw-headline" id="Publish_Reports"><span class="mw-headline" id="Publish_Reports"><span class="mw-headline" id="Publish_Reports"><span class="mw-headline" id="Publish_Reports"><span class="mw-headline" id="Publish_Reports"><span class="mw-headline" id="Publish_Reports"><span class="mw-headline" id="Publish_Reports"><span class="mw-headline" id="Publish_Reports"><span class="mw-headline" id="Publish_Reports"><span class="mw-headline" id="Publish_Reports"><span class="mw-headline" id="Publish_Reports"><span class="mw-headline" id="Publish_Reports">Publish Reports</span></span></span></span></span></span></span></span></span></span></span></span></span></span></span></span></span></span></span></span></span></span></span></span></span></span></span></span></span> === | ||
| + | |||
| + | 1. To publish a report, select the report from the list and select '''Publish'''. | ||
| + | |||
| + | Note that '''Security Manager''' users can publish for locations that have been assigned. | ||
| + | |||
| + | In this functionality, if the report was created and published from the '''Add''' or '''Edit''' for the chosen location, it will be available to publish for others. Otherwise, the '''Publish''' button will not be available. | ||
| + | |||
| + | | ||
| + | |||
| + | '''Figure 98: Publishing Reports''' | ||
| + | |||
| + | [[File:MWC PublishingReports.png|x400px|MWC PublishingReports.png]] | ||
| + | |||
| + | | ||
| + | |||
| + | The '''Administrator''' user can: | ||
| + | |||
| + | a. '''Update the report status''' that will define if the report will be displayed in the Execution module. Just the Active status will be displayed. | ||
| + | |||
| + | b. '''Choose the location and the report group to publish the report'''. | ||
| + | |||
| + | | ||
| + | |||
| + | <u>'''Note'''</u>: Clicking on '''Test this Report''' will execute this report and an execution screen is displayed; To remove the location, select the location and select '''Delete'''. The report is not published anymore for the selected location. | ||
| + | |||
| + | <u>'''Note'''</u>: It is not allowed to delete the location where the report was created. | ||
| + | |||
| + | For further information about this page, see the Testing tab. | ||
| + | |||
| + | Select Save to commit.<br/> | ||
| + | |||
| + | | ||
| + | |||
| + | === <span class="mw-headline" id="History_Reports"><span class="mw-headline" id="History_Reports"><span class="mw-headline" id="History_Reports"><span class="mw-headline" id="History_Reports"><span class="mw-headline" id="History_Reports"><span class="mw-headline" id="History_Reports"><span class="mw-headline" id="History_Reports"><span class="mw-headline" id="History_Reports"><span class="mw-headline" id="History_Reports"><span class="mw-headline" id="History_Reports"><span class="mw-headline" id="History_Reports"><span class="mw-headline" id="History_Reports"><span class="mw-headline" id="History_Reports"><span class="mw-headline" id="History_Reports"><span class="mw-headline" id="History_Reports"><span class="mw-headline" id="History_Reports"><span class="mw-headline" id="History_Reports"><span class="mw-headline" id="History_Reports"><span class="mw-headline" id="History_Reports"><span class="mw-headline" id="History_Reports"><span class="mw-headline" id="History_Reports"><span class="mw-headline" id="History_Reports"><span class="mw-headline" id="History_Reports"><span class="mw-headline" id="History_Reports">History Reports</span></span></span></span></span></span></span></span></span></span></span></span></span></span></span></span></span></span></span></span></span></span></span></span> === | ||
| + | |||
| + | This page displays all created report versions. | ||
| + | |||
| + | '''Figure 99: History Report''' | ||
| + | |||
| + | [[File:MWC HistoryReport.png|x400px|MWC HistoryReport.png]] | ||
| + | |||
| + | The version displayed in blue is the current version. | ||
| + | |||
| + | The user can roll back''' the version''' if there are old versions in the list selecting the version and clicking on the '''RollBack''' button. The Edit page will be displayed and an update can be done. See '''Edit''' topic for further information. | ||
| + | |||
| + | Selecting any version and clicking on the '''Execute''' button, the '''Execute''' page is displayed. See '''Test the Report''' topic for further information. | ||
| + | |||
| + | | ||
| + | |||
| + | === <span class="mw-headline" id="Predefined"><span class="mw-headline" id="Predefined"><span class="mw-headline" id="Predefined"><span class="mw-headline" id="Predefined"><span class="mw-headline" id="Predefined"><span class="mw-headline" id="Predefined"><span class="mw-headline" id="Predefined"><span class="mw-headline" id="Predefined"><span class="mw-headline" id="Predefined"><span class="mw-headline" id="Predefined"><span class="mw-headline" id="Predefined"><span class="mw-headline" id="Predefined"><span class="mw-headline" id="Predefined"><span class="mw-headline" id="Predefined"><span class="mw-headline" id="Predefined"><span class="mw-headline" id="Predefined"><span class="mw-headline" id="Predefined"><span class="mw-headline" id="Predefined"><span class="mw-headline" id="Predefined"><span class="mw-headline" id="Predefined"><span class="mw-headline" id="Predefined"><span class="mw-headline" id="Predefined"><span class="mw-headline" id="Predefined">Predefined</span></span></span></span></span></span></span></span></span></span></span></span></span></span></span></span></span></span></span></span></span></span></span> === | ||
| + | |||
| + | The predefined reports code cannot be changed. This kind of report is considered complex and their code is maintained for the '''MESWeb''' development team. | ||
| + | |||
| + | In the '''MESWeb Central Predefined''' functionality, the users can map or manage the reports ('''add and/or edit'''). | ||
| + | |||
| + | | ||
| + | |||
| + | ==== <span class="mw-headline" id="Predefined_Mapping"><span class="mw-headline" id="Predefined_Mapping"><span class="mw-headline" id="Predefined_Mapping"><span class="mw-headline" id="Predefined_Mapping"><span class="mw-headline" id="Predefined_Mapping"><span class="mw-headline" id="Predefined_Mapping"><span class="mw-headline" id="Predefined_Mapping"><span class="mw-headline" id="Predefined_Mapping"><span class="mw-headline" id="Predefined_Mapping"><span class="mw-headline" id="Predefined_Mapping"><span class="mw-headline" id="Predefined_Mapping"><span class="mw-headline" id="Predefined_Mapping"><span class="mw-headline" id="Predefined_Mapping"><span class="mw-headline" id="Predefined_Mapping"><span class="mw-headline" id="Predefined_Mapping"><span class="mw-headline" id="Predefined_Mapping"><span class="mw-headline" id="Predefined_Mapping"><span class="mw-headline" id="Predefined_Mapping"><span class="mw-headline" id="Predefined_Mapping"><span class="mw-headline" id="Predefined_Mapping"><span class="mw-headline" id="Predefined_Mapping"><span class="mw-headline" id="Predefined_Mapping"><span class="mw-headline" id="Predefined_Mapping"><span class="mw-headline" id="Predefined_Mapping">Predefined Mapping</span></span></span></span></span></span></span></span></span></span></span></span></span></span></span></span></span></span></span></span></span></span></span></span> ==== | ||
| + | |||
| + | '''Figure 100: Mapping Predefined Reports''' | ||
| + | |||
| + | [[File:MWC MappingPredRep.png|x410px|MWC MappingPredRep.png]] | ||
| + | |||
| + | '''Administrator''' and '''Security Manager''' users can execute this functionality. Due to the chosen location, the users select the reports that the location will have access to. These reports will be displayed in the '''Default Reports''' list of the chosen location. | ||
| + | |||
| + | | ||
| + | |||
| + | ==== <span class="mw-headline" id="Predefined_Maintenance"><span class="mw-headline" id="Predefined_Maintenance"><span class="mw-headline" id="Predefined_Maintenance"><span class="mw-headline" id="Predefined_Maintenance"><span class="mw-headline" id="Predefined_Maintenance"><span class="mw-headline" id="Predefined_Maintenance"><span class="mw-headline" id="Predefined_Maintenance"><span class="mw-headline" id="Predefined_Maintenance"><span class="mw-headline" id="Predefined_Maintenance"><span class="mw-headline" id="Predefined_Maintenance"><span class="mw-headline" id="Predefined_Maintenance"><span class="mw-headline" id="Predefined_Maintenance"><span class="mw-headline" id="Predefined_Maintenance"><span class="mw-headline" id="Predefined_Maintenance"><span class="mw-headline" id="Predefined_Maintenance"><span class="mw-headline" id="Predefined_Maintenance"><span class="mw-headline" id="Predefined_Maintenance"><span class="mw-headline" id="Predefined_Maintenance"><span class="mw-headline" id="Predefined_Maintenance"><span class="mw-headline" id="Predefined_Maintenance"><span class="mw-headline" id="Predefined_Maintenance"><span class="mw-headline" id="Predefined_Maintenance"><span class="mw-headline" id="Predefined_Maintenance">Predefined Maintenance</span></span></span></span></span></span></span></span></span></span></span></span></span></span></span></span></span></span></span></span></span></span></span> ==== | ||
| + | |||
| + | '''Administrators '''and '''Security Manager''' users can execute this functionality and it gives access to chosen reports to others. | ||
| + | |||
| + | | ||
| + | |||
| + | ===== <span class="mw-headline" id="Edit_Predefined_Reports_.28Maintenance.29"><span class="mw-headline" id="Edit_Predefined_Reports_.28Maintenance.29"><span class="mw-headline" id="Edit_Predefined_Reports_.28Maintenance.29"><span class="mw-headline" id="Edit_Predefined_Reports_.28Maintenance.29"><span class="mw-headline" id="Edit_Predefined_Reports_.28Maintenance.29"><span class="mw-headline" id="Edit_Predefined_Reports_.28Maintenance.29"><span class="mw-headline" id="Edit_Predefined_Reports_.28Maintenance.29"><span class="mw-headline" id="Edit_Predefined_Reports_.28Maintenance.29"><span class="mw-headline" id="Edit_Predefined_Reports_.28Maintenance.29"><span class="mw-headline" id="Edit_Predefined_Reports_.28Maintenance.29"><span class="mw-headline" id="Edit_Predefined_Reports_.28Maintenance.29"><span class="mw-headline" id="Edit_Predefined_Reports_.28Maintenance.29"><span class="mw-headline" id="Edit_Predefined_Reports_.28Maintenance.29"><span class="mw-headline" id="Edit_Predefined_Reports_.28Maintenance.29"><span class="mw-headline" id="Edit_Predefined_Reports_.28Maintenance.29"><span class="mw-headline" id="Edit_Predefined_Reports_.28Maintenance.29"><span class="mw-headline" id="Edit_Predefined_Reports_.28Maintenance.29"><span class="mw-headline" id="Edit_Predefined_Reports_.28Maintenance.29"><span class="mw-headline" id="Edit_Predefined_Reports_.28Maintenance.29"><span class="mw-headline" id="Edit_Predefined_Reports_.28Maintenance.29"><span class="mw-headline" id="Edit_Predefined_Reports_.28Maintenance.29"><span class="mw-headline" id="Edit_Predefined_Reports_.28Maintenance.29"><span class="mw-headline" id="Edit_Predefined_Reports_.28Maintenance.29">Edit Predefined Reports (Maintenance)</span></span></span></span></span></span></span></span></span></span></span></span></span></span></span></span></span></span></span></span></span></span></span> ===== | ||
| + | |||
| + | Just Administrator users can edit '''Predefined Reports'''. | ||
| + | |||
| + | Click on '''Edit''' and the '''Predefined Maintenance''' pop-up displays. | ||
| + | |||
| + | | ||
| + | |||
| + | '''Figure 101: Edit Predefined Reports''' | ||
| + | |||
| + | [[File:MWC EditPredRep.png|x330px|MWC EditPredRep.png]] | ||
| + | |||
| + | To edit '''Predefined''' reports, update the necessary information and select '''Save'''. | ||
| + | |||
| + | '''Figure 102: Edit Predefined Reports''' | ||
| + | |||
| + | '''[[File:MWC EditPrefRep1.png|x290px|MWC EditPrefRep1.png]]''' | ||
| + | |||
| + | | ||
| + | |||
| + | === <span class="mw-headline" id="Data_Dictionary"><span class="mw-headline" id="Data_Dictionary"><span class="mw-headline" id="Data_Dictionary"><span class="mw-headline" id="Data_Dictionary"><span class="mw-headline" id="Data_Dictionary"><span class="mw-headline" id="Data_Dictionary"><span class="mw-headline" id="Data_Dictionary"><span class="mw-headline" id="Data_Dictionary"><span class="mw-headline" id="Data_Dictionary"><span class="mw-headline" id="Data_Dictionary"><span class="mw-headline" id="Data_Dictionary"><span class="mw-headline" id="Data_Dictionary"><span class="mw-headline" id="Data_Dictionary"><span class="mw-headline" id="Data_Dictionary"><span class="mw-headline" id="Data_Dictionary"><span class="mw-headline" id="Data_Dictionary"><span class="mw-headline" id="Data_Dictionary"><span class="mw-headline" id="Data_Dictionary"><span class="mw-headline" id="Data_Dictionary"><span class="mw-headline" id="Data_Dictionary"><span class="mw-headline" id="Data_Dictionary"><span class="mw-headline" id="Data_Dictionary"><span class="mw-headline" id="Data_Dictionary">Data Dictionary</span></span></span></span></span></span></span></span></span></span></span></span></span></span></span></span></span></span></span></span></span></span></span> === | ||
| + | |||
| + | The '''Data dictionary''' button opens a monitor with the inventory of data elements in our database (MESR) with a detailed description of its format and relationships. | ||
| + | |||
| + | | ||
| + | |||
| + | '''Figure 103: Access Data Dictionary''' | ||
| + | |||
| + | [[File:MWC AccessDataDictionary.png|x315px|MWC AccessDataDictionary.png]] | ||
| + | |||
| + | | ||
| + | |||
| + | '''Figure 104: Data Dictionary''' | ||
| + | |||
| + | [[File:MWImage114.png|x485px|MWImage114.png]] | ||
| + | |||
| + | | ||
| + | |||
| + | | ||
| + | |||
| + | === <span class="mw-headline" id="Default_Reports"><span class="mw-headline" id="Default_Reports"><span class="mw-headline" id="Default_Reports"><span class="mw-headline" id="Default_Reports"><span class="mw-headline" id="Default_Reports"><span class="mw-headline" id="Default_Reports"><span class="mw-headline" id="Default_Reports"><span class="mw-headline" id="Default_Reports"><span class="mw-headline" id="Default_Reports"><span class="mw-headline" id="Default_Reports"><span class="mw-headline" id="Default_Reports"><span class="mw-headline" id="Default_Reports"><span class="mw-headline" id="Default_Reports"><span class="mw-headline" id="Default_Reports"><span class="mw-headline" id="Default_Reports"><span class="mw-headline" id="Default_Reports"><span class="mw-headline" id="Default_Reports"><span class="mw-headline" id="Default_Reports"><span class="mw-headline" id="Default_Reports"><span class="mw-headline" id="Default_Reports"><span class="mw-headline" id="Default_Reports"><span class="mw-headline" id="Default_Reports"><span class="mw-headline" id="Default_Reports">Default Reports</span></span></span></span></span></span></span></span></span></span></span></span></span></span></span></span></span></span></span></span></span></span></span> === | ||
| + | |||
| + | The button '''Add to Default''' assign the report you selected to the default group in '''MESWeb''' application | ||
| + | |||
| + | 1. Select a report and click on the '''Add to Default'''. | ||
| + | |||
| + | 2. The selected report will be added to the '''Default Report list'''. | ||
| + | |||
| + | | ||
| + | |||
| + | '''Figure 105: Add to Default''' | ||
| + | |||
| + | [[File:MWC AddtoDefault .png|x330px|MWC AddtoDefault .png]] | ||
| + | |||
| + | '''<u>Note:</u> '''If a report was added to the Default Reports list, it is possible to remove it again, a Remove from Default button will also show on the screen.<br/> | ||
| + | |||
| + | | ||
| + | |||
| + | == <span class="mw-headline" id="Report_Groups"><span class="mw-headline" id="Report_Groups"><span class="mw-headline" id="Report_Groups"><span class="mw-headline" id="Report_Groups"><span class="mw-headline" id="Report_Groups"><span class="mw-headline" id="Report_Groups"><span class="mw-headline" id="Report_Groups"><span class="mw-headline" id="Report_Groups"><span class="mw-headline" id="Report_Groups"><span class="mw-headline" id="Report_Groups"><span class="mw-headline" id="Report_Groups"><span class="mw-headline" id="Report_Groups"><span class="mw-headline" id="Report_Groups"><span class="mw-headline" id="Report_Groups"><span class="mw-headline" id="Report_Groups"><span class="mw-headline" id="Report_Groups"><span class="mw-headline" id="Report_Groups"><span class="mw-headline" id="Report_Groups"><span class="mw-headline" id="Report_Groups"><span class="mw-headline" id="Report_Groups">Report Groups [[File:MWC Logo4.png|MWC Logo4.png]]</span></span></span></span></span></span></span></span></span></span></span></span></span></span></span></span></span></span></span></span> == | ||
| + | |||
| + | | ||
| + | |||
| + | With this submodule the '''Administrator '''and '''Security Manager''' users can access report group maintenance to perform '''searches, create, edit '''or '''delete''' report groups and add reports to groups. | ||
| + | |||
| + | | ||
| + | |||
| + | === <span class="mw-headline" id="Filter_Report_Groups"><span class="mw-headline" id="Filter_Report_Groups"><span class="mw-headline" id="Filter_Report_Groups"><span class="mw-headline" id="Filter_Report_Groups"><span class="mw-headline" id="Filter_Report_Groups"><span class="mw-headline" id="Filter_Report_Groups"><span class="mw-headline" id="Filter_Report_Groups"><span class="mw-headline" id="Filter_Report_Groups"><span class="mw-headline" id="Filter_Report_Groups"><span class="mw-headline" id="Filter_Report_Groups"><span class="mw-headline" id="Filter_Report_Groups"><span class="mw-headline" id="Filter_Report_Groups"><span class="mw-headline" id="Filter_Report_Groups"><span class="mw-headline" id="Filter_Report_Groups"><span class="mw-headline" id="Filter_Report_Groups"><span class="mw-headline" id="Filter_Report_Groups"><span class="mw-headline" id="Filter_Report_Groups"><span class="mw-headline" id="Filter_Report_Groups"><span class="mw-headline" id="Filter_Report_Groups"><span class="mw-headline" id="Filter_Report_Groups">Filter Report Groups</span></span></span></span></span></span></span></span></span></span></span></span></span></span></span></span></span></span></span></span> === | ||
| + | |||
| + | The filtering option located in the '''Report Groups '''tab allows the Administrator user to search for specific report groups based on the '''location, name, '''and/or '''description'''. | ||
| + | |||
| + | 1. To filter the report group list, select a '''Location''' from the drop-down box provided, and/or enter the '''Name '''and/or '''Description'''. | ||
| + | |||
| + | 2. Select '''Search''' to filter the list or '''Clear''' to clear all fields. | ||
| + | |||
| + | 3. The results will display in the report group list. | ||
| + | |||
| + | | ||
| + | |||
| + | '''Figure 106: Filter Report Groups''' | ||
| + | |||
| + | [[File:MWC FilterReportGroups.png|x410px|MWC FilterReportGroups.png]] | ||
| + | |||
| + | | ||
| + | |||
| + | | ||
| + | |||
| + | === <span class="mw-headline" id="Add_Report_Groups"><span class="mw-headline" id="Add_Report_Groups"><span class="mw-headline" id="Add_Report_Groups"><span class="mw-headline" id="Add_Report_Groups"><span class="mw-headline" id="Add_Report_Groups"><span class="mw-headline" id="Add_Report_Groups"><span class="mw-headline" id="Add_Report_Groups"><span class="mw-headline" id="Add_Report_Groups"><span class="mw-headline" id="Add_Report_Groups"><span class="mw-headline" id="Add_Report_Groups"><span class="mw-headline" id="Add_Report_Groups"><span class="mw-headline" id="Add_Report_Groups"><span class="mw-headline" id="Add_Report_Groups"><span class="mw-headline" id="Add_Report_Groups"><span class="mw-headline" id="Add_Report_Groups"><span class="mw-headline" id="Add_Report_Groups"><span class="mw-headline" id="Add_Report_Groups"><span class="mw-headline" id="Add_Report_Groups"><span class="mw-headline" id="Add_Report_Groups"><span class="mw-headline" id="Add_Report_Groups">Add Report Groups</span></span></span></span></span></span></span></span></span></span></span></span></span></span></span></span></span></span></span></span> === | ||
| + | |||
| + | This function allows the '''Administrator''' to add a report group based on the '''report group name, description, '''and '''location'''. | ||
| + | |||
| + | 1. To add a report group, select '''Add''' located above the '''Report Group list'''. | ||
| + | |||
| + | 2. The '''Report Group Detail''' pop-up displays. | ||
| + | |||
| + | | ||
| + | |||
| + | '''Figure 107: Add Report Group''' | ||
| + | |||
| + | '''[[File:MWC AddReportGroup.png|x370px|MWC AddReportGroup.png]]''' | ||
| + | |||
| + | 3. Enter the '''Report Group Name '''and'''Description''' and select a Location from the drop-down box provided. All fields are mandatory | ||
| + | |||
| + | 4. Select '''Save''' to confirm the addition. | ||
| + | |||
| + | 5. Select '''Cancel''' to exit. | ||
| + | |||
| + | 6. The new report group will appear alphabetically in the report group list. | ||
| + | |||
| + | | ||
| + | |||
| + | | ||
| + | |||
| + | | ||
| + | |||
| + | === <span class="mw-headline" id="Edit_Report_Groups"><span class="mw-headline" id="Edit_Report_Groups"><span class="mw-headline" id="Edit_Report_Groups"><span class="mw-headline" id="Edit_Report_Groups"><span class="mw-headline" id="Edit_Report_Groups"><span class="mw-headline" id="Edit_Report_Groups"><span class="mw-headline" id="Edit_Report_Groups"><span class="mw-headline" id="Edit_Report_Groups"><span class="mw-headline" id="Edit_Report_Groups"><span class="mw-headline" id="Edit_Report_Groups"><span class="mw-headline" id="Edit_Report_Groups"><span class="mw-headline" id="Edit_Report_Groups"><span class="mw-headline" id="Edit_Report_Groups"><span class="mw-headline" id="Edit_Report_Groups"><span class="mw-headline" id="Edit_Report_Groups"><span class="mw-headline" id="Edit_Report_Groups"><span class="mw-headline" id="Edit_Report_Groups"><span class="mw-headline" id="Edit_Report_Groups"><span class="mw-headline" id="Edit_Report_Groups"><span class="mw-headline" id="Edit_Report_Groups"><span class="mw-headline" id="Edit_Report_Groups"><span class="mw-headline" id="Edit_Report_Groups"><span class="mw-headline" id="Edit_Report_Groups">Edit Report Groups</span></span></span></span></span></span></span></span></span></span></span></span></span></span></span></span></span></span></span></span></span></span></span> === | ||
| + | |||
| + | This function allows the Administrator and Security Manager users to edit a report group’s name, description, and/or location. | ||
| + | |||
| + | 1. To edit a report group, select the desired report group from the list. | ||
| + | |||
| + | 2. Select '''Edit''' located above the report group list. | ||
| + | |||
| + | 3. The '''Report Group Detail''' pop-up displays. | ||
| + | |||
| + | | ||
| + | |||
| + | '''Figure 108: Edit Report Group''' | ||
| + | |||
| + | [[File:MWC EditReportGroup.png|x400px|MWC EditReportGroup.png]] | ||
| + | |||
| + | '''<u>Note</u>''': '''Location''' is a read-only field. | ||
| + | |||
| + | | ||
| + | |||
| + | 4. After completing changes, select '''Save''' to confirm. | ||
| + | |||
| + | 5. Select '''Cancel''' to exit without saving. | ||
| + | |||
| + | | ||
| + | |||
| + | === <span class="mw-headline" id="Delete_Report_Groups"><span class="mw-headline" id="Delete_Report_Groups"><span class="mw-headline" id="Delete_Report_Groups"><span class="mw-headline" id="Delete_Report_Groups"><span class="mw-headline" id="Delete_Report_Groups"><span class="mw-headline" id="Delete_Report_Groups"><span class="mw-headline" id="Delete_Report_Groups"><span class="mw-headline" id="Delete_Report_Groups"><span class="mw-headline" id="Delete_Report_Groups"><span class="mw-headline" id="Delete_Report_Groups"><span class="mw-headline" id="Delete_Report_Groups"><span class="mw-headline" id="Delete_Report_Groups"><span class="mw-headline" id="Delete_Report_Groups"><span class="mw-headline" id="Delete_Report_Groups"><span class="mw-headline" id="Delete_Report_Groups"><span class="mw-headline" id="Delete_Report_Groups"><span class="mw-headline" id="Delete_Report_Groups"><span class="mw-headline" id="Delete_Report_Groups"><span class="mw-headline" id="Delete_Report_Groups"><span class="mw-headline" id="Delete_Report_Groups"><span class="mw-headline" id="Delete_Report_Groups"><span class="mw-headline" id="Delete_Report_Groups"><span class="mw-headline" id="Delete_Report_Groups">Delete Report Groups</span></span></span></span></span></span></span></span></span></span></span></span></span></span></span></span></span></span></span></span></span></span></span> === | ||
| + | |||
| + | This function allows the '''Administrator''' to delete a report group from the report group list. | ||
| + | |||
| + | 1. To '''delete a report group''', select the desired report group from the list. | ||
| + | |||
| + | 2. Select '''Delete''' located above the report group list. | ||
| + | |||
| + | 3. A confirmation prompt will display. Select '''Yes''' to confirm or '''No''' to exit. | ||
| + | |||
| + | 4. The report group will be removed from the report group list. | ||
| + | |||
| + | | ||
| + | |||
| + | '''Figure 109: Delete Report Group''' | ||
| + | |||
| + | [[File:MWC DeleteReportGroup.png|MWC DeleteReportGroup.png]] | ||
| + | |||
| + | <u>'''Note'''</u>: It is not allowed to delete a report group if: | ||
| + | |||
| + | 1. A report was created or published in the report group. | ||
| + | |||
| + | 2. Any user has permission for this report group. | ||
| + | |||
| + | | ||
| − | + | | |
| − | + | === <span class="mw-headline" id="Add_Report_to_Group"><span class="mw-headline" id="Add_Report_to_Group"><span class="mw-headline" id="Add_Report_to_Group"><span class="mw-headline" id="Add_Report_to_Group"><span class="mw-headline" id="Add_Report_to_Group"><span class="mw-headline" id="Add_Report_to_Group"><span class="mw-headline" id="Add_Report_to_Group"><span class="mw-headline" id="Add_Report_to_Group"><span class="mw-headline" id="Add_Report_to_Group"><span class="mw-headline" id="Add_Report_to_Group"><span class="mw-headline" id="Add_Report_to_Group"><span class="mw-headline" id="Add_Report_to_Group"><span class="mw-headline" id="Add_Report_to_Group"><span class="mw-headline" id="Add_Report_to_Group"><span class="mw-headline" id="Add_Report_to_Group"><span class="mw-headline" id="Add_Report_to_Group"><span class="mw-headline" id="Add_Report_to_Group"><span class="mw-headline" id="Add_Report_to_Group"><span class="mw-headline" id="Add_Report_to_Group"><span class="mw-headline" id="Add_Report_to_Group"><span class="mw-headline" id="Add_Report_to_Group">Add Report to Group</span></span></span></span></span></span></span></span></span></span></span></span></span></span></span></span></span></span></span></span></span> === | |
| − | ''' | + | This function allows the '''Administrator''' to add a report to a report group by searching for its '''location''' and data '''source type'''. |
| − | + | 1. To add a report to a report group, select the desired report group from the list. | |
| − | + | 2. Select '''Add Report to Group''' located above the report group list. | |
| − | + | | |
| − | ''' | + | '''Figure 110: Add Report to Group''' |
| − | + | [[File:MWC AddReporttoGroup.png|x400px|MWC AddReporttoGroup.png]] | |
| − | + | 3. The '''Report to Group''' pop-up displays. Search for the specific report by selecting the location and data source type of the report from the drop-down boxes provided. | |
| − | - | + | 4. Select the search icon located to the right of the drop-down boxes. |
| − | + | 5. The report will display in the left Available column. To move the report to the '''Selected''' column, double-click or drag and drop the report. | |
| − | + | 6. Select '''Save''' to add the report to the report group. | |
| − | ''' | + | 7. Select '''Cancel''' to exit. |
| − | + | | |
| − | + | | |
| − | |||
| − | + | == <span class="mw-headline" id="Locations"><span class="mw-headline" id="Locations"><span class="mw-headline" id="Locations"><span class="mw-headline" id="Locations"><span class="mw-headline" id="Locations"><span class="mw-headline" id="Locations"><span class="mw-headline" id="Locations"><span class="mw-headline" id="Locations"><span class="mw-headline" id="Locations"><span class="mw-headline" id="Locations"><span class="mw-headline" id="Locations"><span class="mw-headline" id="Locations"><span class="mw-headline" id="Locations"><span class="mw-headline" id="Locations"><span class="mw-headline" id="Locations"><span class="mw-headline" id="Locations"><span class="mw-headline" id="Locations"><span class="mw-headline" id="Locations"><span class="mw-headline" id="Locations"><span class="mw-headline" id="Locations"><span class="mw-headline" id="Locations"><span class="mw-headline" id="Locations">Locations [[File:MWC Logo5.png|MWC Logo5.png]]</span></span></span></span></span></span></span></span></span></span></span></span></span></span></span></span></span></span></span></span></span></span> == | |
| − | ''' | + | '''Location''' is a specific site or plant, this function allows '''administrators''' to '''add, edit, '''or '''delete''' locations. Also located in this module is the ability to add, edit, or delete the location. |
| − | + | | |
| − | + | === <span class="mw-headline" id="Location_Tab"><span class="mw-headline" id="Location_Tab"><span class="mw-headline" id="Location_Tab"><span class="mw-headline" id="Location_Tab"><span class="mw-headline" id="Location_Tab"><span class="mw-headline" id="Location_Tab"><span class="mw-headline" id="Location_Tab"><span class="mw-headline" id="Location_Tab"><span class="mw-headline" id="Location_Tab"><span class="mw-headline" id="Location_Tab"><span class="mw-headline" id="Location_Tab"><span class="mw-headline" id="Location_Tab"><span class="mw-headline" id="Location_Tab"><span class="mw-headline" id="Location_Tab"><span class="mw-headline" id="Location_Tab"><span class="mw-headline" id="Location_Tab"><span class="mw-headline" id="Location_Tab"><span class="mw-headline" id="Location_Tab"><span class="mw-headline" id="Location_Tab"><span class="mw-headline" id="Location_Tab"><span class="mw-headline" id="Location_Tab"><span class="mw-headline" id="Location_Tab">Location Tab</span></span></span></span></span></span></span></span></span></span></span></span></span></span></span></span></span></span></span></span></span></span> === | |
| − | + | A location in '''Mesweb''' is a new application available to use, each plant or customer in our environment has a different location. We can group reports and users for specific locations. | |
| − | + | | |
| − | + | ==== <span class="mw-headline" id="Filter_Locations"><span class="mw-headline" id="Filter_Locations"><span class="mw-headline" id="Filter_Locations"><span class="mw-headline" id="Filter_Locations"><span class="mw-headline" id="Filter_Locations"><span class="mw-headline" id="Filter_Locations"><span class="mw-headline" id="Filter_Locations"><span class="mw-headline" id="Filter_Locations"><span class="mw-headline" id="Filter_Locations"><span class="mw-headline" id="Filter_Locations"><span class="mw-headline" id="Filter_Locations"><span class="mw-headline" id="Filter_Locations"><span class="mw-headline" id="Filter_Locations"><span class="mw-headline" id="Filter_Locations"><span class="mw-headline" id="Filter_Locations"><span class="mw-headline" id="Filter_Locations"><span class="mw-headline" id="Filter_Locations"><span class="mw-headline" id="Filter_Locations"><span class="mw-headline" id="Filter_Locations"><span class="mw-headline" id="Filter_Locations"><span class="mw-headline" id="Filter_Locations"><span class="mw-headline" id="Filter_Locations"><span class="mw-headline" id="Filter_Locations">Filter Locations</span></span></span></span></span></span></span></span></span></span></span></span></span></span></span></span></span></span></span></span></span></span></span> ==== | |
| − | ''' | + | The filtering option located in the '''Locations tab''' allows the '''Administrator '''to search for specific locations based on their name and/or domain. The list displays empty and the user needs to search to load the data on the page. |
| − | ''' | + | 1. To filter the list, enter the '''location name''' and/or '''Domain''' and select the domain from the drop-down box provided. |
| − | ''' | + | 2. Select '''Search '''to filter the name list. |
| − | ''' | + | 3. Select '''Clear '''to clear entries. |
| − | + | | |
| − | + | '''Figure 111: Filter Locations''' | |
| − | + | [[File:MWC FilterLocations.png|x400px|MWC FilterLocations.png]] | |
| − | + | | |
| − | + | ==== <span class="mw-headline" id="Add_Location"><span class="mw-headline" id="Add_Location"><span class="mw-headline" id="Add_Location"><span class="mw-headline" id="Add_Location"><span class="mw-headline" id="Add_Location"><span class="mw-headline" id="Add_Location"><span class="mw-headline" id="Add_Location"><span class="mw-headline" id="Add_Location"><span class="mw-headline" id="Add_Location"><span class="mw-headline" id="Add_Location"><span class="mw-headline" id="Add_Location"><span class="mw-headline" id="Add_Location"><span class="mw-headline" id="Add_Location"><span class="mw-headline" id="Add_Location"><span class="mw-headline" id="Add_Location"><span class="mw-headline" id="Add_Location"><span class="mw-headline" id="Add_Location"><span class="mw-headline" id="Add_Location"><span class="mw-headline" id="Add_Location"><span class="mw-headline" id="Add_Location"><span class="mw-headline" id="Add_Location"><span class="mw-headline" id="Add_Location"><span class="mw-headline" id="Add_Location"><span class="mw-headline" id="Add_Location"><span class="mw-headline" id="Add_Location"><span class="mw-headline" id="Add_Location"><span class="mw-headline" id="Add_Location"><span class="mw-headline" id="Add_Location"><span class="mw-headline" id="Add_Location"><span class="mw-headline" id="Add_Location"><span class="mw-headline" id="Add_Location">Add Location</span></span></span></span></span></span></span></span></span></span></span></span></span></span></span></span></span></span></span></span></span></span></span></span></span></span></span></span></span></span></span> ==== | |
| − | + | This function allows Administrators to add a location based on the '''name, server, domain, time zone, '''and '''culture '''of the location. | |
| − | + | 1. To add a location, select '''Add''' located above the location list in the '''Locations tab'''. | |
| − | + | 2. Enter the '''location Name, Server, Domain'', '''''<b>Time Zone</b>''''', '''''<b>Culture</b>''', '''and '''Region'''. All fields are mandatory. | |
| − | + | 3. Select '''Save''' to confirm or '''Cancel''' to exit. | |
| − | + | | |
| − | + | '''Figure 112: Add Location''' | |
| − | + | [[File:MWC AddLocation.png|x400px]] | |
| − | + | | |
| − | + | 4. After all information has been entered and saved, the new location will be placed in the name list on the main screen of the '''Locations''' tab. | |
| − | ''' | + | 5. After creating the location, a report group ('''Default Reports''') is created (for this created location) and all predefined reports are assigned to this report group. |
| − | + | <br/> | |
| − | + | ==== <span class="mw-headline" id="Edit_Location"><span class="mw-headline" id="Edit_Location"><span class="mw-headline" id="Edit_Location"><span class="mw-headline" id="Edit_Location"><span class="mw-headline" id="Edit_Location"><span class="mw-headline" id="Edit_Location"><span class="mw-headline" id="Edit_Location"><span class="mw-headline" id="Edit_Location"><span class="mw-headline" id="Edit_Location"><span class="mw-headline" id="Edit_Location"><span class="mw-headline" id="Edit_Location"><span class="mw-headline" id="Edit_Location"><span class="mw-headline" id="Edit_Location"><span class="mw-headline" id="Edit_Location"><span class="mw-headline" id="Edit_Location"><span class="mw-headline" id="Edit_Location"><span class="mw-headline" id="Edit_Location"><span class="mw-headline" id="Edit_Location"><span class="mw-headline" id="Edit_Location"><span class="mw-headline" id="Edit_Location"><span class="mw-headline" id="Edit_Location"><span class="mw-headline" id="Edit_Location"><span class="mw-headline" id="Edit_Location"><span class="mw-headline" id="Edit_Location"><span class="mw-headline" id="Edit_Location"><span class="mw-headline" id="Edit_Location"><span class="mw-headline" id="Edit_Location">Edit Location</span></span></span></span></span></span></span></span></span></span></span></span></span></span></span></span></span></span></span></span></span></span></span></span></span></span></span> ==== | |
| − | ''' | + | This function allows the '''Administrator''' to edit any '''location’s name, server, domain, time zone, '''and/or '''culture'''. |
| − | ''' | + | 1. To edit a location, select the desired location from the name list and then select '''Edit''' |
| − | ''' | + | 2. The '''Location Detail''' pop-up displays. All fields are available to edit. After changing the desired information, select '''Save''' to confirm. |
| − | + | 3. Select '''Cancel''' to exit. | |
| − | + | | |
| − | '''Figure | + | '''Figure 113: Edit Location''' |
| − | [[ | + | [[File:MWC EditLocation.png|x400px]] |
| − | + | The changes to the location will appear in the name list on the main screen of the '''Locations tab'''. | |
| − | + | <br/> | |
| − | + | ==== <span class="mw-headline" id="Delete_Location"><span class="mw-headline" id="Delete_Location"><span class="mw-headline" id="Delete_Location"><span class="mw-headline" id="Delete_Location"><span class="mw-headline" id="Delete_Location"><span class="mw-headline" id="Delete_Location"><span class="mw-headline" id="Delete_Location"><span class="mw-headline" id="Delete_Location"><span class="mw-headline" id="Delete_Location"><span class="mw-headline" id="Delete_Location"><span class="mw-headline" id="Delete_Location"><span class="mw-headline" id="Delete_Location"><span class="mw-headline" id="Delete_Location"><span class="mw-headline" id="Delete_Location"><span class="mw-headline" id="Delete_Location"><span class="mw-headline" id="Delete_Location"><span class="mw-headline" id="Delete_Location"><span class="mw-headline" id="Delete_Location"><span class="mw-headline" id="Delete_Location"><span class="mw-headline" id="Delete_Location"><span class="mw-headline" id="Delete_Location"><span class="mw-headline" id="Delete_Location">Delete Location</span></span></span></span></span></span></span></span></span></span></span></span></span></span></span></span></span></span></span></span></span></span> ==== | |
| − | + | This function allows the '''Administrator''' to delete a location from the '''Location Name''' list. | |
| − | + | 1. To delete a location from the location name list, select the desired location and then select '''Delete'''. | |
| − | + | 2. A confirmation prompt will display. Select '''Yes''' to confirm deletion or '''No''' to cancel. | |
| − | + | | |
| − | + | '''Figure 114: Delete Location''' | |
| − | + | [[File:MWC DeleteLocation.png|x400px]] | |
| − | + | The location will be removed from the name list on the main screen of the Locations tab. | |
| − | ''' | + | <u>'''Note'''</u>: It is not allowed to delete a location if data sources, report groups, reports, or user permissions are created for this location. |
| − | + | <br/> | |
| − | + | === <span class="mw-headline" id="Map_Locations_Tab"><span class="mw-headline" id="Map_Locations_Tab"><span class="mw-headline" id="Map_Locations_Tab"><span class="mw-headline" id="Map_Locations_Tab"><span class="mw-headline" id="Map_Locations_Tab"><span class="mw-headline" id="Map_Locations_Tab"><span class="mw-headline" id="Map_Locations_Tab"><span class="mw-headline" id="Map_Locations_Tab"><span class="mw-headline" id="Map_Locations_Tab"><span class="mw-headline" id="Map_Locations_Tab"><span class="mw-headline" id="Map_Locations_Tab"><span class="mw-headline" id="Map_Locations_Tab"><span class="mw-headline" id="Map_Locations_Tab"><span class="mw-headline" id="Map_Locations_Tab"><span class="mw-headline" id="Map_Locations_Tab"><span class="mw-headline" id="Map_Locations_Tab"><span class="mw-headline" id="Map_Locations_Tab"><span class="mw-headline" id="Map_Locations_Tab"><span class="mw-headline" id="Map_Locations_Tab"><span class="mw-headline" id="Map_Locations_Tab"><span class="mw-headline" id="Map_Locations_Tab"><span class="mw-headline" id="Map_Locations_Tab">Map Locations Tab</span></span></span></span></span></span></span></span></span></span></span></span></span></span></span></span></span></span></span></span></span></span> === | |
| − | + | '''Map locations '''represent the coordinates latitude and longitude of a specific city or town. With these coordinates, we can draw a pin on a map. We use these map locations for 42Q Live. | |
| − | + | | |
| − | + | ==== <span class="mw-headline" id="Filter_Map_Location"><span class="mw-headline" id="Filter_Map_Location"><span class="mw-headline" id="Filter_Map_Location"><span class="mw-headline" id="Filter_Map_Location"><span class="mw-headline" id="Filter_Map_Location"><span class="mw-headline" id="Filter_Map_Location"><span class="mw-headline" id="Filter_Map_Location"><span class="mw-headline" id="Filter_Map_Location"><span class="mw-headline" id="Filter_Map_Location"><span class="mw-headline" id="Filter_Map_Location"><span class="mw-headline" id="Filter_Map_Location"><span class="mw-headline" id="Filter_Map_Location"><span class="mw-headline" id="Filter_Map_Location"><span class="mw-headline" id="Filter_Map_Location"><span class="mw-headline" id="Filter_Map_Location"><span class="mw-headline" id="Filter_Map_Location"><span class="mw-headline" id="Filter_Map_Location"><span class="mw-headline" id="Filter_Map_Location"><span class="mw-headline" id="Filter_Map_Location"><span class="mw-headline" id="Filter_Map_Location"><span class="mw-headline" id="Filter_Map_Location"><span class="mw-headline" id="Filter_Map_Location">Filter Map Location</span></span></span></span></span></span></span></span></span></span></span></span></span></span></span></span></span></span></span></span></span></span> ==== | |
| − | + | 1. To perform a search at the '''Map Location''' List, fill in the '''Location''' '''Name''' field and click on '''Search''' to continue. | |
| − | + | 2. The List will be displayed according to the user search. | |
| − | + | | |
| − | '''Figure | + | '''Figure 115: Filter Map Location''' |
| − | [[ | + | [[File:MWC FilterMapLocation.png|x400px]] |
| − | + | <br/> | |
| − | + | ==== <span class="mw-headline" id="Add_Map_Locations"><span class="mw-headline" id="Add_Map_Locations"><span class="mw-headline" id="Add_Map_Locations"><span class="mw-headline" id="Add_Map_Locations"><span class="mw-headline" id="Add_Map_Locations"><span class="mw-headline" id="Add_Map_Locations"><span class="mw-headline" id="Add_Map_Locations"><span class="mw-headline" id="Add_Map_Locations"><span class="mw-headline" id="Add_Map_Locations"><span class="mw-headline" id="Add_Map_Locations"><span class="mw-headline" id="Add_Map_Locations"><span class="mw-headline" id="Add_Map_Locations"><span class="mw-headline" id="Add_Map_Locations"><span class="mw-headline" id="Add_Map_Locations"><span class="mw-headline" id="Add_Map_Locations"><span class="mw-headline" id="Add_Map_Locations"><span class="mw-headline" id="Add_Map_Locations"><span class="mw-headline" id="Add_Map_Locations"><span class="mw-headline" id="Add_Map_Locations"><span class="mw-headline" id="Add_Map_Locations"><span class="mw-headline" id="Add_Map_Locations"><span class="mw-headline" id="Add_Map_Locations"><span class="mw-headline" id="Add_Map_Locations"><span class="mw-headline" id="Add_Map_Locations">Add Map Locations</span></span></span></span></span></span></span></span></span></span></span></span></span></span></span></span></span></span></span></span></span></span></span></span> ==== | |
| − | + | This function allows Administrators to '''add map locations''' based on the '''name, server, domain, time zone, '''and '''culture''' of the location | |
| − | + | 1. To add map locations, select '''Add '''located above the location map list in the '''Locations '''tab. | |
| − | + | 2. Enter the Name, Latitude, and Longitude. All fields are mandatory. | |
| − | ''' | + | 3. Select '''Save t'''o confirm or '''Cancel''' to exit. |
| − | + | <br/> '''Figure 116: Add Map Location''' | |
| − | + | [[File:MWC AddMapLocation.png|x400px]] | |
| − | + | | |
| − | + | 4. After all information has been entered and saved, the new location mapped, will be placed in the list on the main screen of the Locations tab. | |
| − | + | <br/> | |
| − | + | ==== <span class="mw-headline" id="Edit_Map_Location"><span class="mw-headline" id="Edit_Map_Location"><span class="mw-headline" id="Edit_Map_Location"><span class="mw-headline" id="Edit_Map_Location"><span class="mw-headline" id="Edit_Map_Location"><span class="mw-headline" id="Edit_Map_Location"><span class="mw-headline" id="Edit_Map_Location"><span class="mw-headline" id="Edit_Map_Location"><span class="mw-headline" id="Edit_Map_Location"><span class="mw-headline" id="Edit_Map_Location"><span class="mw-headline" id="Edit_Map_Location"><span class="mw-headline" id="Edit_Map_Location"><span class="mw-headline" id="Edit_Map_Location"><span class="mw-headline" id="Edit_Map_Location"><span class="mw-headline" id="Edit_Map_Location"><span class="mw-headline" id="Edit_Map_Location"><span class="mw-headline" id="Edit_Map_Location"><span class="mw-headline" id="Edit_Map_Location"><span class="mw-headline" id="Edit_Map_Location"><span class="mw-headline" id="Edit_Map_Location"><span class="mw-headline" id="Edit_Map_Location"><span class="mw-headline" id="Edit_Map_Location">Edit Map Location</span></span></span></span></span></span></span></span></span></span></span></span></span></span></span></span></span></span></span></span></span></span> ==== | |
| − | + | This function allows the Administrator to edit any location map information. | |
| − | + | 1. To edit a location map, select the desired location map from the list and then select '''Edit'''. | |
| − | + | 2. The '''Map Location Maintenance''' pop-up displays. All fields are available to edit. After changing the desired information, select '''Save '''to confirm. | |
| − | ''' | + | 3. Select '''Cancel '''to exit. |
| − | + | | |
| − | + | '''Figure 117: Edit Map Location''' | |
| − | + | [[File:MWC EditMapLocation.png|x400px]] | |
| − | + | | |
| − | + | The changes to the location will appear in the name list on the main screen of the Locations tab. | |
| − | + | | |
| − | + | ==== <span class="mw-headline" id="Delete_Map_Locations"><span class="mw-headline" id="Delete_Map_Locations"><span class="mw-headline" id="Delete_Map_Locations"><span class="mw-headline" id="Delete_Map_Locations"><span class="mw-headline" id="Delete_Map_Locations"><span class="mw-headline" id="Delete_Map_Locations"><span class="mw-headline" id="Delete_Map_Locations"><span class="mw-headline" id="Delete_Map_Locations"><span class="mw-headline" id="Delete_Map_Locations"><span class="mw-headline" id="Delete_Map_Locations"><span class="mw-headline" id="Delete_Map_Locations"><span class="mw-headline" id="Delete_Map_Locations"><span class="mw-headline" id="Delete_Map_Locations"><span class="mw-headline" id="Delete_Map_Locations"><span class="mw-headline" id="Delete_Map_Locations"><span class="mw-headline" id="Delete_Map_Locations"><span class="mw-headline" id="Delete_Map_Locations"><span class="mw-headline" id="Delete_Map_Locations"><span class="mw-headline" id="Delete_Map_Locations"><span class="mw-headline" id="Delete_Map_Locations"><span class="mw-headline" id="Delete_Map_Locations"><span class="mw-headline" id="Delete_Map_Locations">Delete Map Locations</span></span></span></span></span></span></span></span></span></span></span></span></span></span></span></span></span></span></span></span></span></span> ==== | |
| − | + | This function allows the Administrator to delete a location map from the Location Name list. | |
| − | + | 1. To delete a map location from the location name list, select the desired map location and then select Delete. | |
| − | + | 2. A confirmation prompt will display. Select Yes to confirm deletion or No to cancel. | |
| − | + | <br/> | |
| − | + | '''Figure 118: Delete Map Locations''' | |
| − | + | [[File:MWC DeleteMapLocations.png|x400px]] | |
| − | + | | |
| − | + | The map location will be removed from the list. | |
| − | + | | |
| − | ==== | + | == <span class="mw-headline" id="Data_Dictionary_Settings"><span class="mw-headline" id="Data_Dictionary_Settings"><span class="mw-headline" id="Data_Dictionary_Settings"><span class="mw-headline" id="Data_Dictionary_Settings"><span class="mw-headline" id="Data_Dictionary_Settings"><span class="mw-headline" id="Data_Dictionary_Settings"><span class="mw-headline" id="Data_Dictionary_Settings"><span class="mw-headline" id="Data_Dictionary_Settings"><span class="mw-headline" id="Data_Dictionary_Settings"><span class="mw-headline" id="Data_Dictionary_Settings"><span class="mw-headline" id="Data_Dictionary_Settings"><span class="mw-headline" id="Data_Dictionary_Settings"><span class="mw-headline" id="Data_Dictionary_Settings"><span class="mw-headline" id="Data_Dictionary_Settings"><span class="mw-headline" id="Data_Dictionary_Settings"><span class="mw-headline" id="Data_Dictionary_Settings"><span class="mw-headline" id="Data_Dictionary_Settings"><span class="mw-headline" id="Data_Dictionary_Settings"><span class="mw-headline" id="Data_Dictionary_Settings"><span class="mw-headline" id="Data_Dictionary_Settings"><span class="mw-headline" id="Data_Dictionary_Settings">Data Dictionary Settings [[File:MWC Logo7.png|MWC Logo7.png]]</span></span></span></span></span></span></span></span></span></span></span></span></span></span></span></span></span></span></span></span></span> == |
| − | + | <br/> | |
| − | + | This sub-module was developed to allow the admin users to add, edit or delete data dictionary, view descriptions, and field descriptions. | |
| − | + | It is divided into two tabs as follow: | |
| − | + | | |
| − | + | === <span class="mw-headline" id="Tables"><span class="mw-headline" id="Tables"><span class="mw-headline" id="Tables"><span class="mw-headline" id="Tables"><span class="mw-headline" id="Tables"><span class="mw-headline" id="Tables"><span class="mw-headline" id="Tables"><span class="mw-headline" id="Tables"><span class="mw-headline" id="Tables"><span class="mw-headline" id="Tables"><span class="mw-headline" id="Tables"><span class="mw-headline" id="Tables"><span class="mw-headline" id="Tables"><span class="mw-headline" id="Tables"><span class="mw-headline" id="Tables"><span class="mw-headline" id="Tables"><span class="mw-headline" id="Tables"><span class="mw-headline" id="Tables"><span class="mw-headline" id="Tables"><span class="mw-headline" id="Tables"><span class="mw-headline" id="Tables">Tables</span></span></span></span></span></span></span></span></span></span></span></span></span></span></span></span></span></span></span></span></span> === | |
| − | + | Data Dictionary shows the information related to our schema (tables, and fields). We can add descriptions to our tables to be more user-friendly. With those comments, the users can better understand the purpose of the table. In this section, we can add more tables if our schema grows or we can edit the information we are showing in Data Dictionary Monitor. | |
| − | + | | |
| − | + | ==== <span class="mw-headline" id="Filter_Tables"><span class="mw-headline" id="Filter_Tables"><span class="mw-headline" id="Filter_Tables"><span class="mw-headline" id="Filter_Tables"><span class="mw-headline" id="Filter_Tables"><span class="mw-headline" id="Filter_Tables"><span class="mw-headline" id="Filter_Tables"><span class="mw-headline" id="Filter_Tables"><span class="mw-headline" id="Filter_Tables"><span class="mw-headline" id="Filter_Tables"><span class="mw-headline" id="Filter_Tables"><span class="mw-headline" id="Filter_Tables"><span class="mw-headline" id="Filter_Tables"><span class="mw-headline" id="Filter_Tables"><span class="mw-headline" id="Filter_Tables"><span class="mw-headline" id="Filter_Tables"><span class="mw-headline" id="Filter_Tables"><span class="mw-headline" id="Filter_Tables"><span class="mw-headline" id="Filter_Tables"><span class="mw-headline" id="Filter_Tables"><span class="mw-headline" id="Filter_Tables">Filter Tables </span></span></span></span></span></span></span></span></span></span></span></span></span></span></span></span></span></span></span></span></span> ==== | |
| − | + | | |
| − | + | 1. To perform a search at the Tables List, fill the Table Name field and click on Search to continue. | |
| − | + | 2. The List will be displayed according to the user search. | |
| − | + | | |
| − | + | '''Figure 119: Filter Tables''' | |
| − | + | [[File:MWC FilterTables.png|x400px|MWC FilterTables.png]] | |
| − | + | <br/> | |
| − | + | ==== <span class="mw-headline" id="Add_Tables"><span class="mw-headline" id="Add_Tables"><span class="mw-headline" id="Add_Tables"><span class="mw-headline" id="Add_Tables"><span class="mw-headline" id="Add_Tables"><span class="mw-headline" id="Add_Tables"><span class="mw-headline" id="Add_Tables"><span class="mw-headline" id="Add_Tables"><span class="mw-headline" id="Add_Tables"><span class="mw-headline" id="Add_Tables"><span class="mw-headline" id="Add_Tables"><span class="mw-headline" id="Add_Tables"><span class="mw-headline" id="Add_Tables"><span class="mw-headline" id="Add_Tables"><span class="mw-headline" id="Add_Tables"><span class="mw-headline" id="Add_Tables"><span class="mw-headline" id="Add_Tables"><span class="mw-headline" id="Add_Tables"><span class="mw-headline" id="Add_Tables"><span class="mw-headline" id="Add_Tables"><span class="mw-headline" id="Add_Tables">Add Tables</span></span></span></span></span></span></span></span></span></span></span></span></span></span></span></span></span></span></span></span></span> ==== | |
| − | + | This function allows Administrators to add tables based on the table name, comment, and description fields. | |
| − | + | 1. To add tables, select Add located above the table list in the Table tab. | |
| − | + | 2. Enter the Table Name, Comment, and Description. | |
| − | + | 3. Select “is Principal” if the information of the Table has common use for the Report. | |
| − | + | 4. Select Save to confirm or Cancel to exit. | |
| − | + | 5. Drag and drop to add or remove categories. | |
| − | + | | |
| − | + | '''Figure 120: Add Tables''' | |
| − | + | [[File:MWC AddTables.png|x400px|MWC AddTables.png]] | |
| − | + | | |
| − | + | 6. After all information has been entered and saved, the new table will be placed in the list on the main screen of the table tab. | |
| − | + | <br/> | |
| − | ==== Edit | + | ==== <span class="mw-headline" id="Edit_Tables"><span class="mw-headline" id="Edit_Tables"><span class="mw-headline" id="Edit_Tables"><span class="mw-headline" id="Edit_Tables"><span class="mw-headline" id="Edit_Tables"><span class="mw-headline" id="Edit_Tables"><span class="mw-headline" id="Edit_Tables"><span class="mw-headline" id="Edit_Tables"><span class="mw-headline" id="Edit_Tables"><span class="mw-headline" id="Edit_Tables"><span class="mw-headline" id="Edit_Tables"><span class="mw-headline" id="Edit_Tables"><span class="mw-headline" id="Edit_Tables"><span class="mw-headline" id="Edit_Tables"><span class="mw-headline" id="Edit_Tables"><span class="mw-headline" id="Edit_Tables"><span class="mw-headline" id="Edit_Tables"><span class="mw-headline" id="Edit_Tables"><span class="mw-headline" id="Edit_Tables"><span class="mw-headline" id="Edit_Tables"><span class="mw-headline" id="Edit_Tables">Edit Tables</span></span></span></span></span></span></span></span></span></span></span></span></span></span></span></span></span></span></span></span></span> ==== |
| − | + | This function allows the Administrator to edit any Table information. | |
| − | 1. | + | 1. To edit a table, select the desired table from the list and then select Edit. |
| − | 2. | + | 2. Table Maintenance pop-up displays. All fields are available to edit. After changing the desired information, select Save to confirm. |
| − | + | 3. Select Cancel to exit. | |
| − | + | | |
| − | + | '''Figure 121: Edit Tables''' | |
| − | + | [[File:MWC EditTables.png|x400px|MWC EditTables.png]] | |
| − | + | 4. The changes to the table will appear in the name list on the main screen of the Locations tab. | |
| − | + | <br/> | |
| − | + | ==== <span class="mw-headline" id="Delete_Tables"><span class="mw-headline" id="Delete_Tables"><span class="mw-headline" id="Delete_Tables"><span class="mw-headline" id="Delete_Tables"><span class="mw-headline" id="Delete_Tables"><span class="mw-headline" id="Delete_Tables"><span class="mw-headline" id="Delete_Tables"><span class="mw-headline" id="Delete_Tables"><span class="mw-headline" id="Delete_Tables"><span class="mw-headline" id="Delete_Tables"><span class="mw-headline" id="Delete_Tables"><span class="mw-headline" id="Delete_Tables"><span class="mw-headline" id="Delete_Tables"><span class="mw-headline" id="Delete_Tables"><span class="mw-headline" id="Delete_Tables"><span class="mw-headline" id="Delete_Tables"><span class="mw-headline" id="Delete_Tables"><span class="mw-headline" id="Delete_Tables"><span class="mw-headline" id="Delete_Tables"><span class="mw-headline" id="Delete_Tables"><span class="mw-headline" id="Delete_Tables">Delete Tables</span></span></span></span></span></span></span></span></span></span></span></span></span></span></span></span></span></span></span></span></span> ==== | |
| − | + | This function allows the Administrator to delete a table from the Table Name list. | |
| − | + | 1. To delete a table from the table name list, select the desired table and then select Delete. | |
| − | + | 2. A confirmation prompt will display. Select Yes to confirm deletion or No to cancel. | |
| − | + | <br/> <br/> '''Figure 122: Delete Tables''' | |
| − | + | [[File:MWC DeleteTables.png|x400px|MWC DeleteTables.png]] | |
| − | + | The table will be removed from the table name list. | |
| − | + | <br/> | |
| − | + | ==== <span class="mw-headline" id="Add.2FDelete_Views"><span class="mw-headline" id="Add.2FDelete_Views"><span class="mw-headline" id="Add.2FDelete_Views"><span class="mw-headline" id="Add.2FDelete_Views"><span class="mw-headline" id="Add.2FDelete_Views"><span class="mw-headline" id="Add.2FDelete_Views"><span class="mw-headline" id="Add.2FDelete_Views"><span class="mw-headline" id="Add.2FDelete_Views"><span class="mw-headline" id="Add.2FDelete_Views"><span class="mw-headline" id="Add.2FDelete_Views"><span class="mw-headline" id="Add.2FDelete_Views"><span class="mw-headline" id="Add.2FDelete_Views"><span class="mw-headline" id="Add.2FDelete_Views"><span class="mw-headline" id="Add.2FDelete_Views"><span class="mw-headline" id="Add.2FDelete_Views"><span class="mw-headline" id="Add.2FDelete_Views"><span class="mw-headline" id="Add.2FDelete_Views"><span class="mw-headline" id="Add.2FDelete_Views"><span class="mw-headline" id="Add.2FDelete_Views"><span class="mw-headline" id="Add.2FDelete_Views"><span class="mw-headline" id="Add.2FDelete_Views">Add/Delete Views</span></span></span></span></span></span></span></span></span></span></span></span></span></span></span></span></span></span></span></span></span> ==== | |
| − | + | This function allows adding View tables based on view name and table name. | |
| − | |||
| − | + | 1. To add or delete views, select Add View located above the table list in the Table tab. | |
| − | + | 2. Enter the View Name for the selected Table. | |
| − | + | 3. Select Save to confirm, Cancel to exit, or if you want to delete an existing view, select Delete to remove it. | |
| − | + | <br/> | |
| − | + | '''Figure 123: Add View Table''' | |
| − | + | [[File:MWC AddViewTable.png|x380px|MWC AddViewTable.png]] | |
| − | + | <br/> | |
| − | ==== | + | === <span class="mw-headline" id="Fields"><span class="mw-headline" id="Fields"><span class="mw-headline" id="Fields"><span class="mw-headline" id="Fields"><span class="mw-headline" id="Fields"><span class="mw-headline" id="Fields"><span class="mw-headline" id="Fields"><span class="mw-headline" id="Fields"><span class="mw-headline" id="Fields"><span class="mw-headline" id="Fields"><span class="mw-headline" id="Fields"><span class="mw-headline" id="Fields"><span class="mw-headline" id="Fields"><span class="mw-headline" id="Fields"><span class="mw-headline" id="Fields"><span class="mw-headline" id="Fields"><span class="mw-headline" id="Fields"><span class="mw-headline" id="Fields"><span class="mw-headline" id="Fields"><span class="mw-headline" id="Fields"><span class="mw-headline" id="Fields">Fields</span></span></span></span></span></span></span></span></span></span></span></span></span></span></span></span></span></span></span></span></span> === |
| − | ''' | + | '''Data Dictionary '''shows the information related to our schema (tables, and fields). We can add descriptions to our fields to be more user-friendly. With those comments, the users can better understand the purpose of the field. In this section, we can add more fields if our schema grows or we can edit the information we are showing in Data Dictionary Monitor |
| − | + | <br/> | |
| − | + | ==== <span class="mw-headline" id="Filter_Fields"><span class="mw-headline" id="Filter_Fields"><span class="mw-headline" id="Filter_Fields"><span class="mw-headline" id="Filter_Fields"><span class="mw-headline" id="Filter_Fields"><span class="mw-headline" id="Filter_Fields"><span class="mw-headline" id="Filter_Fields"><span class="mw-headline" id="Filter_Fields"><span class="mw-headline" id="Filter_Fields"><span class="mw-headline" id="Filter_Fields"><span class="mw-headline" id="Filter_Fields"><span class="mw-headline" id="Filter_Fields"><span class="mw-headline" id="Filter_Fields"><span class="mw-headline" id="Filter_Fields"><span class="mw-headline" id="Filter_Fields"><span class="mw-headline" id="Filter_Fields"><span class="mw-headline" id="Filter_Fields"><span class="mw-headline" id="Filter_Fields"><span class="mw-headline" id="Filter_Fields"><span class="mw-headline" id="Filter_Fields"><span class="mw-headline" id="Filter_Fields">Filter Fields</span></span></span></span></span></span></span></span></span></span></span></span></span></span></span></span></span></span></span></span></span> ==== | |
| − | + | 1. To perform a search at the Field List, fill the Field Name field and click on Search to continue. | |
| − | + | 2. The List will be displayed according to the user search. | |
| − | + | | |
| − | + | '''Figure 124: Filter Fields''' | |
| − | + | [[File:MWC FilterFields.png|x400px|MWC FilterFields.png]] | |
| − | + | <br/> | |
| − | + | | |
| − | + | ==== <span class="mw-headline" id="Add_Fields"><span class="mw-headline" id="Add_Fields"><span class="mw-headline" id="Add_Fields"><span class="mw-headline" id="Add_Fields"><span class="mw-headline" id="Add_Fields"><span class="mw-headline" id="Add_Fields"><span class="mw-headline" id="Add_Fields"><span class="mw-headline" id="Add_Fields"><span class="mw-headline" id="Add_Fields"><span class="mw-headline" id="Add_Fields"><span class="mw-headline" id="Add_Fields"><span class="mw-headline" id="Add_Fields"><span class="mw-headline" id="Add_Fields"><span class="mw-headline" id="Add_Fields"><span class="mw-headline" id="Add_Fields"><span class="mw-headline" id="Add_Fields"><span class="mw-headline" id="Add_Fields"><span class="mw-headline" id="Add_Fields"><span class="mw-headline" id="Add_Fields"><span class="mw-headline" id="Add_Fields"><span class="mw-headline" id="Add_Fields"><span class="mw-headline" id="Add_Fields"><span class="mw-headline" id="Add_Fields">Add Fields</span></span></span></span></span></span></span></span></span></span></span></span></span></span></span></span></span></span></span></span></span></span></span> ==== | |
| − | + | This function allows Administrators to add Fields based on the field name, comment, and description fields. | |
| − | + | 1. To add fields, select Add located above the field name list in the Field tab. | |
| − | + | 2. Enter the Name, Comment, and Description. | |
| − | + | 3. Select the Table Name from the drop-down list. Table Name and Field Name are mandatory. | |
| − | + | 4. Select Save to confirm or Cancel to exit. | |
| − | + | <br/> '''Figure 125: Add Fields''' | |
| − | + | [[File:MWC AddFields.png|x400px|MWC AddFields.png]] | |
| − | + | | |
| − | + | 5. After all the information has been entered and saved, the new field name created will be placed in the list. | |
| − | + | <br/> | |
| − | === | + | ==== <span class="mw-headline" id="Edit_Fields"><span class="mw-headline" id="Edit_Fields"><span class="mw-headline" id="Edit_Fields"><span class="mw-headline" id="Edit_Fields"><span class="mw-headline" id="Edit_Fields"><span class="mw-headline" id="Edit_Fields"><span class="mw-headline" id="Edit_Fields"><span class="mw-headline" id="Edit_Fields"><span class="mw-headline" id="Edit_Fields"><span class="mw-headline" id="Edit_Fields"><span class="mw-headline" id="Edit_Fields"><span class="mw-headline" id="Edit_Fields"><span class="mw-headline" id="Edit_Fields"><span class="mw-headline" id="Edit_Fields"><span class="mw-headline" id="Edit_Fields"><span class="mw-headline" id="Edit_Fields"><span class="mw-headline" id="Edit_Fields"><span class="mw-headline" id="Edit_Fields"><span class="mw-headline" id="Edit_Fields"><span class="mw-headline" id="Edit_Fields"><span class="mw-headline" id="Edit_Fields">Edit Fields</span></span></span></span></span></span></span></span></span></span></span></span></span></span></span></span></span></span></span></span></span> ==== |
| − | + | This function allows the Administrator to edit any Field information. | |
| − | + | 1. To edit a field, select the desired Field from the list and then select Edit. | |
| − | The | + | 2. The Data Dictionary Field Maintenance pop-up displays. All fields are available to edit. After changing the desired information, select Save to confirm. |
| − | + | 3. Select Cancel to exit. | |
| − | + | <br/> '''Figure 126: Edit Fields''' | |
| − | + | [[File:MWC EditFields.png|x400px|MWC EditFields.png]] | |
| − | + | | |
| − | + | The changes to the field will appear in the field list. | |
| − | + | | |
| − | + | ==== <span class="mw-headline" id="Delete_Fields"><span class="mw-headline" id="Delete_Fields"><span class="mw-headline" id="Delete_Fields"><span class="mw-headline" id="Delete_Fields"><span class="mw-headline" id="Delete_Fields"><span class="mw-headline" id="Delete_Fields"><span class="mw-headline" id="Delete_Fields"><span class="mw-headline" id="Delete_Fields"><span class="mw-headline" id="Delete_Fields"><span class="mw-headline" id="Delete_Fields"><span class="mw-headline" id="Delete_Fields"><span class="mw-headline" id="Delete_Fields"><span class="mw-headline" id="Delete_Fields"><span class="mw-headline" id="Delete_Fields"><span class="mw-headline" id="Delete_Fields"><span class="mw-headline" id="Delete_Fields"><span class="mw-headline" id="Delete_Fields"><span class="mw-headline" id="Delete_Fields"><span class="mw-headline" id="Delete_Fields"><span class="mw-headline" id="Delete_Fields"><span class="mw-headline" id="Delete_Fields">Delete Fields</span></span></span></span></span></span></span></span></span></span></span></span></span></span></span></span></span></span></span></span></span> ==== | |
| − | + | This function allows the Administrator to delete a field from the Field Name list. | |
| − | + | 1. To delete a field from the field name list, select the desired field and then select Delete. | |
| − | + | 2. A confirmation prompt will display. Select Yes to confirm deletion or No to cancel. | |
| − | + | | |
| − | + | '''Figure 127: Delete Fields''' | |
| − | + | [[File:MWC DeleteFields.png|x400px|MWC DeleteFields.png]] | |
| − | + | | |
| − | + | The field will be removed from the table name list. | |
| − | + | | |
| − | + | | |
| − | + | = <span class="mw-headline" id="Access_Control"><span class="mw-headline" id="Access_Control"><span class="mw-headline" id="Access_Control"><span class="mw-headline" id="Access_Control"><span class="mw-headline" id="Access_Control"><span class="mw-headline" id="Access_Control"><span class="mw-headline" id="Access_Control"><span class="mw-headline" id="Access_Control"><span class="mw-headline" id="Access_Control"><span class="mw-headline" id="Access_Control"><span class="mw-headline" id="Access_Control"><span class="mw-headline" id="Access_Control"><span class="mw-headline" id="Access_Control"><span class="mw-headline" id="Access_Control"><span class="mw-headline" id="Access_Control"><span class="mw-headline" id="Access_Control"><span class="mw-headline" id="Access_Control">Access Control [[File:MWC Logo8.png|MWC Logo8.png]]</span></span></span></span></span></span></span></span></span></span></span></span></span></span></span></span></span> = | |
| − | + | | |
| − | + | The Access Control module was developed for employees with Administrator and Security Manager roles. This section will cover how to navigate and execute functions in Access Control. With the Access Control module, the Administrator can search, add, delete or edit users or user groups (will be developed). | |
| − | + | 1. To access MESWeb, navigate to'''Administration > MESWeb Central''' | |
| − | + | 2. Select the Access Control icon located on the MESWeb Central Main page. | |
| − | + | | |
| − | + | '''Figure 128: MESWeb Central Access Control''' | |
| − | + | [[File:MWC MESWebCentralAccessControl.png|x315px|MWC MESWebCentralAccessControl.png]] | |
| − | + | | |
| − | + | 3. Upon selecting the Access Control icon, two additional icons become available: Users and User Groups. | |
| − | + | | |
| − | + | '''Figure 129: Access Control Functions''' | |
| − | + | [[File:MWC AccessControlFunctions.png|x270px|MWC AccessControlFunctions.png]] | |
| − | + | | |
| − | + | 4. Once either icon is selected, it is placed in a tab at the top of the Access Control page. The user can navigate between both icons by placing them in tabs that can be easily accessed. | |
| − | + | <br/> | |
| − | |||
| − | |||
| − | |||
| − | + | == <span class="mw-headline" id="Users"><span class="mw-headline" id="Users"><span class="mw-headline" id="Users"><span class="mw-headline" id="Users"><span class="mw-headline" id="Users"><span class="mw-headline" id="Users"><span class="mw-headline" id="Users"><span class="mw-headline" id="Users"><span class="mw-headline" id="Users"><span class="mw-headline" id="Users"><span class="mw-headline" id="Users"><span class="mw-headline" id="Users"><span class="mw-headline" id="Users"><span class="mw-headline" id="Users"><span class="mw-headline" id="Users"><span class="mw-headline" id="Users"><span class="mw-headline" id="Users"><span class="mw-headline" id="Users"><span class="mw-headline" id="Users">Users [[File:MWC Logo9.png|MWC Logo9.png]]</span></span></span></span></span></span></span></span></span></span></span></span></span></span></span></span></span></span></span> == | |
| − | + | The Users icon under the Access Control screen in MESWeb Central allows Administrators to manage user permissions and edit user information. With this portlet, administrators can assign Administrator permissions to specific users for assigned locations and edit the user’s information. | |
| − | + | | |
| − | + | === <span class="mw-headline" id="Filter_Users"><span class="mw-headline" id="Filter_Users"><span class="mw-headline" id="Filter_Users"><span class="mw-headline" id="Filter_Users"><span class="mw-headline" id="Filter_Users"><span class="mw-headline" id="Filter_Users"><span class="mw-headline" id="Filter_Users"><span class="mw-headline" id="Filter_Users"><span class="mw-headline" id="Filter_Users"><span class="mw-headline" id="Filter_Users"><span class="mw-headline" id="Filter_Users"><span class="mw-headline" id="Filter_Users"><span class="mw-headline" id="Filter_Users"><span class="mw-headline" id="Filter_Users"><span class="mw-headline" id="Filter_Users"><span class="mw-headline" id="Filter_Users"><span class="mw-headline" id="Filter_Users"><span class="mw-headline" id="Filter_Users"><span class="mw-headline" id="Filter_Users">Filter Users</span></span></span></span></span></span></span></span></span></span></span></span></span></span></span></span></span></span></span> === | |
| − | + | The filtering option located in the Users tab allows the Administrator to search for specific employees by User Name, Full Name, and/or Email. | |
| − | + | 1. To filter the User List, enter the desired User Name, Full Name, and/or Email address into the provided fields. | |
| − | + | 2. Select Search to filter users. | |
| − | + | 3. Select Clear to clear all fields. | |
| − | + | | |
| − | + | '''Figure 130: Filter User List''' | |
| − | + | [[File:MWC FilterUserList.png|x400px|MWC FilterUserList.png]] | |
| − | + | | |
| − | + | | |
| − | + | === <span class="mw-headline" id="Manage_Permissions"><span class="mw-headline" id="Manage_Permissions"><span class="mw-headline" id="Manage_Permissions"><span class="mw-headline" id="Manage_Permissions"><span class="mw-headline" id="Manage_Permissions"><span class="mw-headline" id="Manage_Permissions"><span class="mw-headline" id="Manage_Permissions"><span class="mw-headline" id="Manage_Permissions"><span class="mw-headline" id="Manage_Permissions"><span class="mw-headline" id="Manage_Permissions"><span class="mw-headline" id="Manage_Permissions"><span class="mw-headline" id="Manage_Permissions"><span class="mw-headline" id="Manage_Permissions"><span class="mw-headline" id="Manage_Permissions"><span class="mw-headline" id="Manage_Permissions"><span class="mw-headline" id="Manage_Permissions"><span class="mw-headline" id="Manage_Permissions"><span class="mw-headline" id="Manage_Permissions"><span class="mw-headline" id="Manage_Permissions">Manage Permissions</span></span></span></span></span></span></span></span></span></span></span></span></span></span></span></span></span></span></span> === | |
| − | + | This function allows Administrators to assign Administrator permissions to users for specific locations. | |
| − | + | 1. To assign Administrator permissions to a user, select a user from the list by placing a check in the box to the left of the User Name. | |
| − | + | 2. Select Manage Permissions. | |
| − | + | 3. The User Permissions pop-up displays. | |
| − | + | | |
| − | + | '''Figure 131: User Permissions''' | |
| − | + | [[File:MWC UserPermissions.png|x400px|MWC UserPermissions.png]] | |
| − | + | | |
| − | + | 4. With this pop-up, the administrator can assign Administrator permissions to a user by checking the box to the right of the Administrator option. | |
| − | + | 5. Upon selecting a location, two panels display allowing the Administrator to assign Roles, Report Groups, Reports, Mesr Customers, Data Source, and Group Permissions to the user. | |
| − | + | | |
| − | + | '''Figure 132: Assign Privileges (User Permissions)''' | |
| − | + | [[File:MWC AssignPrivileges(User Permissions).png|x415px|MWC AssignPrivileges(User Permissions).png]] | |
| − | + | 6. To move an Available Role/Report Group/Report/Mesr Customer/Data Sources to the Selected column, double-click or drag and drop the selection. | |
| − | + | <u>'''Note'''</u>: Under the Mesr Customers tab, the Administrator must first select a Data Source from the drop-down box before moving customers to the selected column. | |
| − | + | 7. After moving all applicable selections in each tab, select Save to assign permissions to the user. | |
| − | + | 8. Select Cancel to exit. | |
| − | + | 9. The user will appear in the user list with the Administrator box selected. | |
| − | |||
| − | + | | |
| − | + | === <span class="mw-headline" id="Sisense_access_permission"><span class="mw-headline" id="Sisense_access_permission">Sisense access permission</span></span> === | |
| − | + | The Sisense ElastiCube is a high-performance analytics database that allows users to bring data from multiple sources or even from multiple physical locations to merge, manipulate and query it as if it was one consolidated data set. This data information is displayed into four default dashboards (Production Historical, Production Live, Quality Historical, and Quality Live). Each of them has four default widgets (Daily Yield, Daily TP, Top 5 Defects, and Top 5 Repairs) where the data can be displayed as users decide to help them to find statistical data and to know the real-time status of a specific product. To access this database, Administrators or security managers should provide the correct permissions to regular users in the MESWeb Central portlet by following these steps: | |
| − | + | #Navigate to'''Administration > MESWeb Central ''' | |
| + | #Select the Access Control icon to display the options, '''User''' and '''User''' '''Groups'''. | ||
| + | #Then select the '''Users''' icon. | ||
| + | #Search for the user who will be given Sisense access for a specific location. | ||
| + | #Check the box of the selected user. | ||
| + | #Select the '''Manage Permissions button''' located above the user’s list to display the '''User Permission''' window where administrators or security managers can define the role and the locations available for the selected user. | ||
| + | #Select the '''Sisense Role''': | ||
| + | ##'''Designer ''' | ||
| + | ##'''Viewer''' | ||
| + | #Select a '''Location'''. | ||
| + | #Then, in the Role tab, drag ‘Sisense’ from the Available column and drop it into the Selected column. | ||
| + | #Finally, select the Save button to proceed or Cancel to quit. | ||
| − | + | | |
| − | '''Figure | + | '''Figure 133: Sisense Permissions ''' |
| − | [[ | + | '''[[File:MWC Sisencepermissions .png|x400px|MWC Sisencepermissions .png]]''' |
| − | + | '''<u>Note:</u> '''Just like the above image shows, the list will also show the option Sissense, only if the user has enough access. | |
| − | + | | |
| − | + | Once this configuration is done, users with this new permission will see the group of locations where they were added at Sisense, as well as the four default dashboards mentioned at the beginning of this section. Users can click on the Sisense logo to get the user permissions and locations list. | |
| − | + | | |
| − | + | '''Figure 134: Sisense Permission''' | |
| − | + | '''[[File:MWC SisenceUsersPermissions .png|x400px|MWC SisenceUsersPermissions .png]]''' | |
| − | + | | |
| − | + | | |
| − | ==== Edit Users | + | === <span class="mw-headline" id="Edit_Users"><span class="mw-headline" id="Edit_Users"><span class="mw-headline" id="Edit_Users"><span class="mw-headline" id="Edit_Users"><span class="mw-headline" id="Edit_Users"><span class="mw-headline" id="Edit_Users"><span class="mw-headline" id="Edit_Users"><span class="mw-headline" id="Edit_Users"><span class="mw-headline" id="Edit_Users"><span class="mw-headline" id="Edit_Users"><span class="mw-headline" id="Edit_Users"><span class="mw-headline" id="Edit_Users"><span class="mw-headline" id="Edit_Users"><span class="mw-headline" id="Edit_Users"><span class="mw-headline" id="Edit_Users"><span class="mw-headline" id="Edit_Users"><span class="mw-headline" id="Edit_Users"><span class="mw-headline" id="Edit_Users"><span class="mw-headline" id="Edit_Users"><span class="mw-headline" id="Edit_Users"><span class="mw-headline" id="Edit_Users"><span class="mw-headline" id="Edit_Users"><span class="mw-headline" id="Edit_Users"><span class="mw-headline" id="Edit_Users"><span class="mw-headline" id="Edit_Users"><span class="mw-headline" id="Edit_Users"><span class="mw-headline" id="Edit_Users">Edit Users</span></span></span></span></span></span></span></span></span></span></span></span></span></span></span></span></span></span></span></span></span></span></span></span></span></span></span> === |
| − | This function allows Administrators to edit the following user information: | + | This function allows Administrators to edit the following user information: |
*Full Name | *Full Name | ||
*Email | *Email | ||
*Language (under development) | *Language (under development) | ||
| − | *If Active | + | *If Active (if it is in the database and this user can log in) |
| − | *If Expires | + | *If Expires (to tell the system when the active status of the user will expire) |
| − | + | *If Customer (user from the client) | |
| − | *If Customer | + | *Hide Main Navigation (happens when the user is inactive) |
| − | *Hide Main Navigation | + | *Show Icons (to let the user see the main menu) |
| − | *Show Icons | + | *Expiration Date (the day when this is going to expire by selecting a date) |
| + | |||
| + | To edit users, select the desired user from the User Name List and then select Edit. | ||
| + | |||
| + | | ||
| + | |||
| + | '''Figure 135: Edit Users''' | ||
| + | |||
| + | [[File:MWC EditUsers133.png|x415px|MWC EditUsers133.png]] | ||
| + | |||
| + | | ||
| + | |||
| + | 2. The User Search Detail pop-up will display. All fields are available to edit except for the user name. Make the desired changes and then select '''Save'''. | ||
| + | |||
| + | 3. Select '''Cancel''' to exit. | ||
| + | |||
| + | | ||
| + | |||
| + | === <span class="mw-headline" id="Import_Users"><span class="mw-headline" id="Import_Users"><span class="mw-headline" id="Import_Users"><span class="mw-headline" id="Import_Users"><span class="mw-headline" id="Import_Users"><span class="mw-headline" id="Import_Users"><span class="mw-headline" id="Import_Users"><span class="mw-headline" id="Import_Users"><span class="mw-headline" id="Import_Users"><span class="mw-headline" id="Import_Users"><span class="mw-headline" id="Import_Users"><span class="mw-headline" id="Import_Users"><span class="mw-headline" id="Import_Users"><span class="mw-headline" id="Import_Users"><span class="mw-headline" id="Import_Users"><span class="mw-headline" id="Import_Users"><span class="mw-headline" id="Import_Users"><span class="mw-headline" id="Import_Users"><span class="mw-headline" id="Import_Users"><span class="mw-headline" id="Import_Users"><span class="mw-headline" id="Import_Users">Import Users</span></span></span></span></span></span></span></span></span></span></span></span></span></span></span></span></span></span></span></span></span> === | ||
| + | |||
| + | This function allows Administrators to import several users at the same time using the available Template. | ||
| + | |||
| + | Select the '''Import''' button and the Import Users dialog displays. | ||
| + | |||
| + | | ||
| + | |||
| + | '''Figure 136: Import Users''' | ||
| + | |||
| + | [[File:MWC ImportUsers.png|x360px|MWC ImportUsers.png]] | ||
| + | |||
| + | | ||
| + | |||
| + | 2. Search the file and select it. It is possible to skip existing users or update them by selecting the radio buttons. | ||
| + | |||
| + | By selecting the '''Get Template button''', the user will get a template automatically downloaded to the user computer that can be filled and imported with new users. | ||
| + | |||
| + | | ||
| + | |||
| + | === <span class="mw-headline" id="Location.2FRole"><span class="mw-headline" id="Location.2FRole"><span class="mw-headline" id="Location.2FRole"><span class="mw-headline" id="Location.2FRole"><span class="mw-headline" id="Location.2FRole"><span class="mw-headline" id="Location.2FRole"><span class="mw-headline" id="Location.2FRole"><span class="mw-headline" id="Location.2FRole"><span class="mw-headline" id="Location.2FRole"><span class="mw-headline" id="Location.2FRole"><span class="mw-headline" id="Location.2FRole"><span class="mw-headline" id="Location.2FRole"><span class="mw-headline" id="Location.2FRole"><span class="mw-headline" id="Location.2FRole"><span class="mw-headline" id="Location.2FRole"><span class="mw-headline" id="Location.2FRole"><span class="mw-headline" id="Location.2FRole"><span class="mw-headline" id="Location.2FRole"><span class="mw-headline" id="Location.2FRole">Location/Role</span></span></span></span></span></span></span></span></span></span></span></span></span></span></span></span></span></span></span> === | ||
| + | |||
| + | This section shows the privileges of the user. All of the locations that the user has access to and which access has for each location. | ||
| + | |||
| + | | ||
| + | |||
| + | '''Figure 137: Location Role''' | ||
| + | |||
| + | [[File:MWC LocationRole.png|x380px]] | ||
| + | |||
| + | <br/> | ||
| + | |||
| + | |||
| + | == <span class="mw-headline" id="User_Groups"><span class="mw-headline" id="User_Groups"><span class="mw-headline" id="User_Groups"><span class="mw-headline" id="User_Groups"><span class="mw-headline" id="User_Groups"><span class="mw-headline" id="User_Groups"><span class="mw-headline" id="User_Groups"><span class="mw-headline" id="User_Groups"><span class="mw-headline" id="User_Groups"><span class="mw-headline" id="User_Groups"><span class="mw-headline" id="User_Groups"><span class="mw-headline" id="User_Groups"><span class="mw-headline" id="User_Groups"><span class="mw-headline" id="User_Groups">User Groups [[File:MWC Logo10.png|MWC Logo10.png]]</span></span></span></span></span></span></span></span></span></span></span></span></span></span> == | ||
| + | |||
| + | The User Groups icon under the Access Control screen in MESWeb Central allows Administrators to manage user Groups by adding, editing, deleting, managing users, and managing permissions. | ||
| + | |||
| + | To access the User Groups, select the '''User Groups''' icon in the left panel. The User Groups tab is displayed. | ||
| + | |||
| + | | ||
| + | |||
| + | === <span class="mw-headline" id="Filter_User_Groups"><span class="mw-headline" id="Filter_User_Groups"><span class="mw-headline" id="Filter_User_Groups"><span class="mw-headline" id="Filter_User_Groups"><span class="mw-headline" id="Filter_User_Groups"><span class="mw-headline" id="Filter_User_Groups"><span class="mw-headline" id="Filter_User_Groups"><span class="mw-headline" id="Filter_User_Groups"><span class="mw-headline" id="Filter_User_Groups"><span class="mw-headline" id="Filter_User_Groups"><span class="mw-headline" id="Filter_User_Groups"><span class="mw-headline" id="Filter_User_Groups"><span class="mw-headline" id="Filter_User_Groups"><span class="mw-headline" id="Filter_User_Groups">Filter User Groups</span></span></span></span></span></span></span></span></span></span></span></span></span></span> === | ||
| + | |||
| + | The filtering option located in the User Groups tab allows the Administrator to search for specific groups by User Groups Name or Location. | ||
| + | |||
| + | 1. To filter the User Group List, enter the desired name, and/or Location into the provided fields. | ||
| + | |||
| + | 2. Select Search to filter users. | ||
| + | |||
| + | 3. Select Clear to clear all fields. | ||
| + | |||
| + | | ||
| + | |||
| + | '''Figure 138: Filter User Groups''' | ||
| + | |||
| + | [[File:MWC FilterUserList (1).png|x400px|MWC FilterUserList (1).png]] | ||
| + | |||
| + | | ||
| + | |||
| + | === <span class="mw-headline" id="Add_User_Groups"><span class="mw-headline" id="Add_User_Groups"><span class="mw-headline" id="Add_User_Groups"><span class="mw-headline" id="Add_User_Groups"><span class="mw-headline" id="Add_User_Groups"><span class="mw-headline" id="Add_User_Groups"><span class="mw-headline" id="Add_User_Groups"><span class="mw-headline" id="Add_User_Groups"><span class="mw-headline" id="Add_User_Groups"><span class="mw-headline" id="Add_User_Groups"><span class="mw-headline" id="Add_User_Groups"><span class="mw-headline" id="Add_User_Groups"><span class="mw-headline" id="Add_User_Groups"><span class="mw-headline" id="Add_User_Groups">Add User Groups</span></span></span></span></span></span></span></span></span></span></span></span></span></span> === | ||
| + | |||
| + | This function allows the Administrator to add a User Group based on the user group name, description, and location. | ||
| + | |||
| + | 1. To add a user group, select '''Add''' located above the User Group list. | ||
| + | |||
| + | 2. The User Group Detail pop-up will display. | ||
| + | |||
| + | | ||
| + | |||
| + | '''Figure 139: Add User Group''' | ||
| + | |||
| + | [[File:MWC AddUserGroup.png|x400px|MWC AddUserGroup.png]] | ||
| + | |||
| + | | ||
| + | |||
| + | 3. Enter the Name and Description and select a Location from the drop-down box provided. All fields are mandatory. | ||
| + | |||
| + | 4. Select Save to confirm the addition. | ||
| + | |||
| + | 5. Select Cancel to exit. | ||
| + | |||
| + | 6. The new user group will appear alphabetically in the report group list. | ||
| + | |||
| + | <br/> | ||
| + | |||
| + | === <span class="mw-headline" id="Edit_User_Groups"><span class="mw-headline" id="Edit_User_Groups"><span class="mw-headline" id="Edit_User_Groups"><span class="mw-headline" id="Edit_User_Groups"><span class="mw-headline" id="Edit_User_Groups"><span class="mw-headline" id="Edit_User_Groups"><span class="mw-headline" id="Edit_User_Groups"><span class="mw-headline" id="Edit_User_Groups"><span class="mw-headline" id="Edit_User_Groups"><span class="mw-headline" id="Edit_User_Groups"><span class="mw-headline" id="Edit_User_Groups"><span class="mw-headline" id="Edit_User_Groups"><span class="mw-headline" id="Edit_User_Groups"><span class="mw-headline" id="Edit_User_Groups">Edit User Groups</span></span></span></span></span></span></span></span></span></span></span></span></span></span> === | ||
| + | |||
| + | This function allows the Administrator and Security Manager users to edit a user group’s name and/or description. | ||
| + | |||
| + | 1. To edit a User Group, select the desired User Group from the list. | ||
| + | |||
| + | 2. Select '''Edit,''' located above the User Group List. | ||
| + | |||
| + | 3. The User Group Detail pop-up will display. | ||
| + | |||
| + | | ||
| + | |||
| + | '''Figure 140: Edit User Group''' | ||
| + | |||
| + | [[File:MWC EditUserGroup.png|x400px|MWC EditUserGroup.png]] | ||
| + | |||
| + | <u>'''Note'''</u>: Location is a read-only field. | ||
| + | |||
| + | | ||
| + | |||
| + | 4. After completing changes, select Save to confirm. | ||
| + | |||
| + | 5. Select Cancel to exit without saving. | ||
| + | |||
| + | <br/> | ||
| + | |||
| + | === <span class="mw-headline" id="Delete_User_Groups"><span class="mw-headline" id="Delete_User_Groups"><span class="mw-headline" id="Delete_User_Groups"><span class="mw-headline" id="Delete_User_Groups"><span class="mw-headline" id="Delete_User_Groups"><span class="mw-headline" id="Delete_User_Groups"><span class="mw-headline" id="Delete_User_Groups"><span class="mw-headline" id="Delete_User_Groups"><span class="mw-headline" id="Delete_User_Groups"><span class="mw-headline" id="Delete_User_Groups"><span class="mw-headline" id="Delete_User_Groups"><span class="mw-headline" id="Delete_User_Groups"><span class="mw-headline" id="Delete_User_Groups"><span class="mw-headline" id="Delete_User_Groups">Delete User Groups</span></span></span></span></span></span></span></span></span></span></span></span></span></span> === | ||
| + | |||
| + | This function allows the Administrator to delete a User Group from the User Group List. | ||
| + | |||
| + | 1. To delete a User Group, select the desired User Group from the list. | ||
| + | |||
| + | 2. Select '''Delete''' located above the User Group List. | ||
| + | |||
| + | 3. A confirmation prompt will display. Select '''Yes''' to confirm or '''No''' to exit. | ||
| + | |||
| + | 4. The User Group will be removed from the User Group List. | ||
| + | |||
| + | | ||
| + | |||
| + | '''Figure 141: Delete Report Group''' | ||
| + | |||
| + | [[File:MWC DeleteReportGroup (1).png|x400px|MWC DeleteReportGroup (1).png]] | ||
| + | |||
| + | | ||
| + | |||
| + | <u>'''Note'''</u>: It is not allowed to delete a User Group if: | ||
| + | |||
| + | 1. the User Group has users assigned; | ||
| + | |||
| + | It is possible to select more than a User Group at the same time to make a massive delete. | ||
| + | |||
| + | <br/> | ||
| + | |||
| + | === <span class="mw-headline" id="Mapping_User"><span class="mw-headline" id="Mapping_User"><span class="mw-headline" id="Mapping_User"><span class="mw-headline" id="Mapping_User"><span class="mw-headline" id="Mapping_User"><span class="mw-headline" id="Mapping_User"><span class="mw-headline" id="Mapping_User"><span class="mw-headline" id="Mapping_User"><span class="mw-headline" id="Mapping_User"><span class="mw-headline" id="Mapping_User"><span class="mw-headline" id="Mapping_User"><span class="mw-headline" id="Mapping_User"><span class="mw-headline" id="Mapping_User"><span class="mw-headline" id="Mapping_User">Mapping User</span></span></span></span></span></span></span></span></span></span></span></span></span></span> === | ||
| + | |||
| + | This function maps the user to a selected group. | ||
| + | |||
| + | To map users, follow the steps below: | ||
| + | |||
| + | 1. Select a group name in the list and select '''Mapping User'''; | ||
| + | |||
| + | 2. The '''Mapping User pop-up''' displays; | ||
| + | |||
| + | 3. On the right side of the page, the filter will display the users registered in the system. Just drag and drop the user to the left side and it will be part of the group. | ||
| + | |||
| + | 4. To remove users from the group, drag and drop the user to the right side. | ||
| + | |||
| + | | ||
| + | |||
| + | '''Figure 142: Mapping User''' | ||
| + | |||
| + | [[File:MWC MappingUser .png|x400px|MWC MappingUser .png]] | ||
| + | |||
| + | | ||
| + | |||
| + | | ||
| + | |||
| + | ==== <span class="mw-headline" id="Import_Users_to_Group"><span class="mw-headline" id="Import_Users_to_Group"><span class="mw-headline" id="Import_Users_to_Group"><span class="mw-headline" id="Import_Users_to_Group"><span class="mw-headline" id="Import_Users_to_Group"><span class="mw-headline" id="Import_Users_to_Group"><span class="mw-headline" id="Import_Users_to_Group"><span class="mw-headline" id="Import_Users_to_Group"><span class="mw-headline" id="Import_Users_to_Group"><span class="mw-headline" id="Import_Users_to_Group"><span class="mw-headline" id="Import_Users_to_Group"><span class="mw-headline" id="Import_Users_to_Group"><span class="mw-headline" id="Import_Users_to_Group"><span class="mw-headline" id="Import_Users_to_Group"><span class="mw-headline" id="Import_Users_to_Group">Import Users to Group</span></span></span></span></span></span></span></span></span></span></span></span></span></span></span> ==== | ||
| + | |||
| + | This function allows Administrators to import several uses at the same time using the available Template. | ||
| + | |||
| + | 1. Select the '''Import''' button and the Import Users pop-up displays. | ||
| + | |||
| + | | ||
| + | |||
| + | '''Figure 143: Import Users to Group''' | ||
| + | |||
| + | [[File:MWC ImportUserstoGroup.png|x400px|MWC ImportUserstoGroup.png]] | ||
| + | |||
| + | | ||
| + | |||
| + | 2. Search the file and select it. It is possible to skip not found users or update them by selecting the available radio buttons. | ||
| + | |||
| + | By selecting the '''Get Template button''', the user will get a template automatically downloaded to the user computer that can be filled and imported with new users. | ||
| + | |||
| + | | ||
| + | |||
| + | | ||
| + | |||
| + | === <span class="mw-headline" id="Manage_Permissions"><span class="mw-headline" id="Manage_Permissions_2"><span class="mw-headline" id="Manage_Permissions"><span class="mw-headline" id="Manage_Permissions"><span class="mw-headline" id="Manage_Permissions"><span class="mw-headline" id="Manage_Permissions_2"><span class="mw-headline" id="Manage_Permissions_2"><span class="mw-headline" id="Manage_Permissions_2"><span class="mw-headline" id="Manage_Permissions_2"><span class="mw-headline" id="Manage_Permissions_2"><span class="mw-headline" id="Manage_Permissions_2"><span class="mw-headline" id="Manage_Permissions_2"><span class="mw-headline" id="Manage_Permissions_2"><span class="mw-headline" id="Manage_Permissions_2"><span class="mw-headline" id="Manage_Permissions_2"><span class="mw-headline" id="Manage_Permissions_2"><span class="mw-headline" id="Manage_Permissions_2">Manage Permissions</span></span></span></span></span></span></span></span></span></span></span></span></span></span></span></span></span> === | ||
| + | |||
| + | This function allows Administrators to assign permissions for groups. | ||
| + | |||
| + | 1. To assign user group permissions, select a Name from the list by placing a check in the box to the left of the Name. | ||
| + | |||
| + | 2. Select Manage Permissions. | ||
| + | |||
| + | 3. The User Group Permissions pop-up will display. | ||
| + | |||
| + | | ||
| + | |||
| + | '''Figure 144: Manage User Group Permissions ''' | ||
| + | |||
| + | [[File:MWC ManageUserGroupPermissions .png|x410px|MWC ManageUserGroupPermissions .png]] | ||
| − | + | <br/> 4. To move an Available Role/Report, Group/Report/Mesr, Customer/Data Sources to the '''Selected''' column, double-click or drag and drop the selection. | |
| − | + | | |
| − | + | <u>'''Note'''</u>: Under the Mesr Customers tab, the Administrator must first select a Data Source from the drop-down list before moving customers to the selected column. | |
| − | + | | |
| − | + | 5. After moving all applicable selections in each tab, select Save to assign permissions to the user. | |
| − | + | 6. Select Cancel to exit. | |
| − | + | 7. The user will appear in the user list with the Administrator box selected. | |
| − | ---- | + | |
| + | |||
| + | = <span class="mw-headline" id="Report_Builder"><span class="mw-headline" id="Report_Builder"><span class="mw-headline" id="Report_Builder"><span class="mw-headline" id="Report_Builder"><span class="mw-headline" id="Report_Builder"><span class="mw-headline" id="Report_Builder"><span class="mw-headline" id="Report_Builder"><span class="mw-headline" id="Report_Builder"><span class="mw-headline" id="Report_Builder"><span class="mw-headline" id="Report_Builder"><span class="mw-headline" id="Report_Builder"><span class="mw-headline" id="Report_Builder"><span class="mw-headline" id="Report_Builder"><span class="mw-headline" id="Report_Builder"><span class="mw-headline" id="Report_Builder"><span class="mw-headline" id="Report_Builder"><span class="mw-headline" id="Report_Builder">Report Builder</span></span></span></span></span></span></span></span></span></span></span></span></span></span></span></span></span> = | ||
| + | |||
| + | | ||
| + | |||
| + | 42Q Solution to help production plants organize, create and run reports is found in the Report Builder tool. | ||
| + | |||
| + | The Report Builder manages permissions for all the single reports in the MES System. It is a simple, Straightforward, and Intuitive tool and includes features for Businesses and Administrators. | ||
| − | + | | |
| − | + | | |
| − | + | = <span class="mw-headline" id="Appendix_A"><span class="mw-headline" id="Appendix_A"><span class="mw-headline" id="Appendix_A"><span class="mw-headline" id="Appendix_A"><span class="mw-headline" id="Appendix_A"><span class="mw-headline" id="Appendix_A"><span class="mw-headline" id="Appendix_A"><span class="mw-headline" id="Appendix_A"><span class="mw-headline" id="Appendix_A"><span class="mw-headline" id="Appendix_A"><span class="mw-headline" id="Appendix_A"><span class="mw-headline" id="Appendix_A"><span class="mw-headline" id="Appendix_A"><span class="mw-headline" id="Appendix_A"><span class="mw-headline" id="Appendix_A"><span class="mw-headline" id="Appendix_A">Appendix A</span></span></span></span></span></span></span></span></span></span></span></span></span></span></span></span> = | |
| − | ''' | + | '''Access Control''' |
| − | the | + | It is a module that will set the permissions for users and external customers of 42Q |
| − | ''' | + | '''administrator''' |
| − | + | the System Administration has full access to MESWeb - alls, all reports, all customers. | |
| − | ''' | + | '''customer user''' |
| − | for the | + | user for external customers to access the application |
| − | ''' | + | '''find username''' |
| − | + | for the "find" when we look up the username we use a web service at the Helpdesk, so it's finding something separate from MESWeb | |
| − | ''' | + | '''MES Web''' |
| − | + | the application that provides reporting capabilities through a web-based interface. | |
| − | ''' | + | '''parameters''' |
| − | + | definitions for data, reports, or configurations. | |
| − | ''' | + | '''roles''' |
| − | + | user profile inside MESWeb | |
| − | ''' | + | '''SiteMinder''' |
| − | + | Universal login of 42Q | |
| − | ''' | + | '''user''' |
| − | the | + | the User role can execute only those reports specifically granted access to him/her, and may not create new reports or modify existing reports. Administrators may restrict users' access to only that data belonging to specific customers. |
| − | + | '''username''' | |
| − | + | the username is the SiteMinder username (or a partial string) | |
| − | + | ---- | |
| − | |||
| − | |||
| − | |||
| − | |||
| − | |||
| − | |||
| − | |||
| − | |||
| − | |||
| − | |||
| − | |||
| − | |||
| − | |||
| − | |||
| − | |||
| − | |||
| − | |||
| − | |||
| − | |||
| − | |||
| − | |||
| − | |||
| − | |||
| − | |||
| − | |||
| − | |||
| − | + | | |
Latest revision as of 20:28, 13 September 2022
42Q Home > Administration > MESWeb Central
Contents
- 1 Introduction
- 2 Administration
- 2.1 Settings
- 2.2 Dashboard Configuration
- 2.3 Data Sources
- 2.4 Reports
- 2.5 Report Groups
- 2.6 Locations
- 2.7 Data Dictionary Settings
- 3 Access Control
- 4 Report Builder
- 5 Appendix A
Introduction
MESWeb is a powerful business intelligence application designed from the ground up to simplify reporting from manufacturing execution systems, and empower end-users with a streamlined and full-featured web interface. The application includes an ad hoc report design tool that allows users to easily build their own reports and modify existing ones with little to no training. Also, create rich, customized reports from heterogeneous data sources.
Decentralized custom reports, redundant data, lack of pop-up security controls, and convoluted development requirements are problems faced by all 42Q s, and MESWeb has been designed to resolve these issues while maximizing usability and performance.
The purpose of this application is to manage the permissions for every report in our MES Web application. It provides 42Q s with an easy mechanism for managing users, roles, applications, services, and the relations among them.
Administration
There are 2 types of roles in MESWeb, the first type grants certain permissions to the user in the Central module and those are:*
- Administrator: user with this role has full permissions to all locations in the Central module.
- Security Manager: can grant access to all kinds of permissions except Administrator to other users and himself, including roles and reports.
- Report Manager: this role has all permission in the Report Module but just for the specific Location assigned. (Create, edit, copy, and publish reports)
- Data Source Manager: this role has all permission in the Data source module but just for the specific Location assigned. (Create, edit, delete data sources)
The following roles will only take effect on the report execution:*
- All MESR Customers: this role allows the user to see all customers of a specific location.
- All data sources: this role allows users to see all data sources of a specific location.
- All Reports: this role allows the user to see and execute all reports available in a specific location.
To access MESWeb
- Navigate to Administration > MESWeb Central
- Select the Administration icon located on the MESWeb Central Main page.
Figure 1: MESWeb Central Administration
- Upon selecting the Administration icon, six additional icons become available: Settings, Dashboard Configuration, Data Sources, Reports, Report Groups, Locations, and Data Dictionary Settings.
Figure 2: Administration Functions
- Once an icon is selected, it is placed in a tab at the top of the Administration Page. The user can navigate between icons by placing them in tabs that can be easily accessed.
Settings 
The Settings section is organized as an accordion layout that allows easy access to each functionality, in this way, when the user clicks each section will be able to see the screen related to that section.
In this section, users can configure applications, data sources, servers, and reports.
Figure 3: Functions in Tabs
Data Source Settings
In this section, the user can configure the data source for the Dashboard and 42Q Live application.
TheData Source function is located in the Settings menu and allows the administrators' users to add, edit or delete the Data Sources.
To access the Data Source function, click on the Data Source menu located under the Settings menu or select “+” icon.
Figure 4: Data Source Settings Main page
The Data Source List displays containing all previously created data sources, listed numerically and alphabetically. From this screen, the Administrator can add, edit or delete data sources.
Filter Data Source Settings
To perform a search at the Data Source List, fill at least one field and click on Search to continue.
Figure 5: Data Source Filter
The List will be displayed according to the user search.
Add Data Source Settings
This function allows the Administrator to add a data source setting based on the Location, Data Source, Value, Key Data, Description, and Type.
Follow the steps below to add Data Source Settings:
1. To add a Data Source Setting, select Add located above the Data Source Settings list.
2. The Data Source Settings Maintenance pop-up displays. Fill in the fields and select Save.
3. Select Cancel to exit. A successful message is displayed.
4. Once the data source settings have been entered and saved, the created data source will appear in the list.
Figure 6: Data Source Add
Edit Data Source Settings
1. To edit a Data Source Settings, select the desired data source setting from the list.
2. Select Edit located above the Data Source list.
3. The Data Source Settings Maintenance pop-up displays. After editing the data, select Save to confirm.
4. Select Cancel to exit.
Figure 7: Data Source Edit
Delete Data Source Settings
1. To delete a Data Source Settings, select the Data Source from the list.
2. Select Delete located above the Data Source list.
A confirmation message is displayed. Selected to confirm or No to exit.
Figure 8: Data Source Delete
Server
Server is where the MESWeb Execution application is installed.
The Server function is located in the Settings menu and allows the administrator users to add, edit or delete the servers.
To access the Server function, click on the server menu located under the Settings menu or select “+”' icon.
Figure 9: Server Main Page
A Server list displays containing all previously created servers listed numerically and alphabetically. From this screen, the Administrator can add, edit or delete a server.
Filter Server Names
To perform a search at the Server List, fill at least one field and click on Search to continue.
The list will be displayed according to the user search.
Figure 10: Filter Servers
Add Server Name
1. To add a server, select Add located above the server name list.
2. The Server Detail pop-up displays. Enter a name for the server and select Save.
3. Select Cancel to exit.
4. Once the server name has been entered and saved, the created server will appear in the server list.
Figure 11: Add a Server Name
Edit Server Name
1. To edit a Server name, select the desired server name from the list.
2. Select Edit located above the server name list.
3. The Server Detail pop-up displays. After editing the server name, select Save to confirm.
4. Select Cancel to exit.
Figure 12: Edit Server
Delete Server
1. To delete a server, select the server name from the server list.
2. Select Delete located above the server name list.
3. A confirmation message is displayed. Select Yes to confirm or No to exit.
Figure 13: Delete Server Name
Note: If the server has any location assigned, it will not be allowed to delete the server.
Application Report Settings
In this section, the user can customize the configurations of the reports that belong to a specific application.
The Application Report function is located in the Settings menu and allows the administrators' users to add, edit or delete the Application Reports.
To access the Application Report function, click on the Application Report Settings menu located under the Settings menu or select “+” icon.
Filter Application Report Settings
1. To perform a search at the Application Report Settings List, fill at least one field and click on Search to continue.
2. The List will be displayed according to the user search
Figure 14: Filter Application Report Settings
Add Application Report Settings
1. To add an Application Report Settings, select Add located above the Application Report Settings list.
2. The Application Report Settings Maintenance pop-up displays. Fill the fields and select Save.
3. Select Cancel to exit. A successful message is displayed.
4. Once the Application Report Settings have been entered and saved, the created data source will appear in the list.
Figure 15: Add Application Report Settings
Edit Application Report Settings
1. To edit an Application Report Settings, select the desired App. Report Setting from the list.
2. Select Edit located above the Application Report Settings list.
3. The Application Report Settings Maintenance pop-up displays. After editing the desired fields, select Save to confirm.
4. Select Cancel to exit.
Figure 16: Edit Application Report Settings
Delete Application Report Settings
1. To delete the Application Report Settings, select the Application Report from the list.
2. Select Delete located above the Application Report Settings list.
3. A confirmation message is displayed. Select Yes to confirm or No to exit.
Figure 17: Delete Application Report Settings
Application Settings
In this section, the user can configure the application.
The Application Settings function is located in the Settings menu and allows the administrators' users to add, edit or delete the Application Settings.
To access the Application Settings function, click on the Application Settings menu located under the Settings menu or select “+” icon.
Filter Application Settings
To perform a search at the Application Settings List, fill at least one field and click on Search to continue.
The List will be displayed according to the user search.
Figure 18: Filter Application Settings
Application Settings
1. To add Application Settings, select Add located above the Application Settings list.
2. The Application Settings Maintenance pop-up displays. Fill in the fields and select Save.
3. Select Cancel to exit. A successful message is displayed.
4. Once the Application Settings have been entered and saved, the created Application Settings will appear in the list.
Figure 19: Add Application Settings
Edit Application Settings
1. To edit an Application Settings, select the desired App. Settings from the list.
2. Select Edit located above the Application Settings list.
3. The Application Settings Maintenance pop-up displays. After editing the desired fields, select Save to confirm.
4. Select Cancel to exit.
Figure 20: Edit Application Settings
Delete Application Settings
1. To delete Application Settings, select the Application Settings from the list.
2. Select Delete located above the Application Settings list.
3. A confirmation message is displayed. Select Yes to confirm or No to exit.
Figure 21: Delete Application Settings
Default Application Settings
In this section, the user can specify the default values to be used in a specific application. In this section, the user can add new CSS to override existing ones or add javascript codes.
The Default Application Settings function is located in the Settings menu and allows the administrators' users to add, edit or delete the Default Application Settings.
To access the Default Application Settings function, click on the Default Application Settings menu located under the Settings menu or select “+” icon.
Filter Default Application Settings
To perform a search at the Default Application Settings List, fill the Value field and click on Search to continue.
The List will be displayed according to the user search.
Figure 22: Filter Default Application Settings
Add Default Application Settings
1. To add a Default Application Settings, select Add located above the Default Application Settings list.
2. The Default Application Settings Maintenance pop-up displays. Fill the fields and select Save.
3. Select Cancel to exit. A successful message is displayed.
4. Once the Default Application Settings have been entered and saved, the created Default Application Settings will appear in the list.
Figure 23: Add Default Application Settings
Edit Default Application Settings
1. To edit Default Application Settings, select the desired Default Application Settings from the list.
2. Select Edit located above the Default Application Settings list.
3. The Default Application Settings Maintenance pop-up displays. After editing the desired fields, select Save to confirm.
4. Select Cancel to exit.
Figure 24: Edit Default Application Settings
Delete Default Application Settings
1. To delete Default Application Settings, select Default Application Settings from the list.
2. Select Delete located above the Default Application Settings list.
3. A confirmation message is displayed. Select Yes to confirm or No to exit.
Figure 25: Delete Default Application Settings
Default Report Setting
In this section, the user can specify the default values to be used in a specific report. In this section, the user can add new CSS to override existing ones or add javascript codes.
The Default Report Settings function is located in the Settings menu and allows the administrators' users to add, edit or delete the Default Report Settings.
To access the Default Report Settings function, click on the Default Report Settings menu located under the Settings menu or select “+” icon.
Filter Default Report Settings
1. To perform a search at the Default Report Settings List, fill the Value field and click on Search to continue.
2. The List will be displayed according to the user search.
Figure 26: Filter Default Report Settings
Add Default Report Settings
1. To add a Default Report Settings, select Add located above the Default Report Settings list.
2. The Default Report Settings Maintenance pop-up displays. Fill in the fields and select Save.
3. Select Cancel to exit. A successful message is displayed.
Once the Default Report Settings have been entered and saved, the created Default Report Settings will appear in the list.
Figure 27: Application Report Settings Maintenance to Add Default Report Settings
Edit Default Report Settings
1. To edit a Default Report Settings, select the desired Default Report Settings from the list.
2. Select Edit located above the Default Report Settings list.
3. The Default Report Settings Maintenance pop-up displays. After editing the desired fields, select Save to confirm.
4. Select Cancel to exit.
Figure 28: Application Report Settings Maintenance to Edit Default Report Settings
Delete Default Report Settings
1. To delete Default Report Settings, select Default Report Settings from the list.
2. Select Delete located above the Default Report Settings list.
3. A confirmation message is displayed. Select Yes to confirm or No to exit.
Figure 29: Confirmation to Delete Default Report Settings
Report Settings
In this section, the user can customize configurations just for one report. One of the values that the user can change in this section is the timeout of the report
The Report Settings function is located in the Settings menu and allows the administrators' users to add, edit or delete the Report Settings.
To access the Report Settings function, click on the Report Settings menu located under the Settings menu or select “+” icon.
Filter Report Settings
1. To perform a search at the Report Settings List, fill at least one field and click on Search to continue.
2. The List will be displayed according to the user search.
Figure 30: Filter Report Settings
Add Report Settings
1. To add a Report Settings, select Add located above the Report Settings list.
2. The Report Settings Maintenance pop-up displays. Fill in the fields and select Save.
3. SelectCancel to exit. A successful message is displayed.
4. Once the Report Settings have been entered and saved, the created Report Settings will appear in the list.
Figure 31: Add Report in Application Report Settings Maintenance
Edit Report Settings
1. To edit a Report Settings, select the desired Report Settings from the list.
2. Select Edit located above the Report Settings list.
3. The Report Settings Maintenance pop-up displays. After editing the desired fields, select Save to confirm.
4. Select Cancel to exit.
Figure 32: Edit Report Settings
Delete Report Settings
1. To delete Report Settings, select Report Settings from the list.
2. Select Delete located above the Report Settings list.
3. A confirmation message is displayed. Select Yes to confirm or No to exit.
Figure 33: Delete Report Settings
Server Settings
In this section, the user can configure settings for a specific server. In Mesweb a server is a container of applications. All these settings will apply to the whole server.
The Server Settings function is located in the Settings menu and allows the administrators' users to add, edit or delete the Server Settings.
To access the Server Settings function, click on the Server Settings menu located under the Settings menu or select “+” icon.
Filter Server Settings
1. To perform a search at the Server Settings List, fill at least one field and click on Search to continue.
2. The List will be displayed according to the user search.
Figure 34: Filter Server Settings
Add Server Settings
1. To add a Server Settings, select Add located above the Server Settings list.
2. The Server Settings Maintenance pop-up displays. Fill in the fields and select Save.
3. Select Cancel to exit. A successful message is displayed.
4. Once the Server Settings have been entered and saved, the created Server Settings will appear in the list.
Figure 35: Add Server Settings
Edit Server Settings
1. To edit Server Settings, select the desired Server Settings from the list.
2. Select Edit located above the Server Settings list.
3. The Server Settings Maintenance pop-up displays. After editing the desired fields, select Save to confirm.
4. Select Cancel to exit.
Figure 36: Edit Server Settings
Delete Server Settings
1. To delete Server Settings, select Server Settings from the list.
2. Select Delete located above the Server Settings list.
3. A confirmation message is displayed. Select Yes to confirm or No to exit.
Figure 37: Delete Server Settings
Configuration Keys
Configuration Key is the key assigned to a configuration. If the user/administrator wants to create a new configuration, first the user/administrator needs to create a config key. In this section, they can create a new configuration available for the rest of the screens.
The Configuration Keys function is located in the Settings menu and allows the administrators' users to add, edit or delete the Config Keys.
1. To access the Config Keys function, click on the Config Keys menu located under the Settings menu or select “+” icon.
Filter Config Keys
1. To perform a search at the Config Keys List, fill Key Data field and click on Search to continue.
2. The List will be displayed according to the user search.
Figure 38: Filter Config Keys
Add Config Keys
1. To add a Config Keys, select Add located above the Config Keys list.
2. The Config Keys Maintenance pop-up displays. Fill in the fields and select Save.
3. Select Cancel to exit. A successful message is displayed.
4. Once the Config Keys have been entered and saved, the created Config Keys will appear in the list.
Figure 39: Add Config Keys
Edit Config Keys
1. To edit Config Keys, select the desired Config Key from the list.
2. Select Edit located above the Config Keys list.
3. The Config Key Maintenance pop-up displays. After editing the desired fields, select Save to confirm.
4. Select Cancel to exit.
Figure 40: Edit Config Keys
Delete Config Keys
1. To delete Config Keys, select a Config Key from the list.
2. Select Delete located above the Config Keys list.
3. A confirmation message is displayed. Select Yes to confirm or No to exit.
Figure 41: Delete Config Keys
Config Key Types
Config Key Type is a category to group our custom configurations. The user/administrator can create a new Config Key Type if they want a new category for configurations.
1. The Config Key Types function is located in the Settings menu and allows the administrators' users to add, edit or delete the Config Key Types.
2. To access the Config Key Types function, click on the Config Key Types menu located under the Settings menu or select “+” icon.
Filter Config Key Types
1. To perform a search at the Config Key Types List, fill the Name field and click on Search to continue.
2. The List will be displayed according to the user search.
Figure 42: Filter Config Key Type
Add Config Keys Types
1. To add a Config Key Types, select Add located above the Config Key Types list.
2. The Config Key Types Maintenance pop-up displays. Fill in the fields and select Save.
3. Select Cancel to exit. A successful message is displayed.
4. Once the Config Key Type has been entered and saved, the created Config Key Type will appear in the list.
Figure 43: Add Config Key Type
Edit Config Key Type
1. To edit Config Key Types, select the desired Config Key Type from the list.
2. Select Edit located above the Config Key Types list.
3. The Config Key Type Maintenance pop-up displays. After editing the desired fields, select Save to confirm.
4. Select Cancel to exit.
Figure 44: Edit Config Key Types
Delete Config Key Type
1. To delete Config Key Types, select a Config Key Type from the list.
2. Select Delete located above the Config Key Types list.
3. A confirmation message is displayed. Select Yes to confirm or No to exit.
Figure 45: Delete Config Key Type
Dashboard Configuration 
The Dashboard Configuration section allows the user to configure widgets and reports as displayed in the next steps.
In this section, the administrator can configure widgets to be used in Operation Dashboard Monitor.
Widget Configuration Tab
In this section, the administrator can choose between the existing dashboard reports to assign to a specific widget. Also, the administrator can give priority to those reports.
The Dashboard Configuration function is located in the Dashboard Configuration Menu and allows the administrator's users to add, edit or delete the Widget Configuration.
To access the Widget Configuration function, click on the Widget Configuration tab located under the Dashboard Configuration menu.
Widget Filter
1. To perform a search at the Widget Configuration List, fill in the Widget Name (Days) and click on Search to continue.
2. The list will be displayed according to the user search.
Figure 46: Widget Filter
Add Widget Configuration
1. To add a Widget Configuration, select Add located above the Widget Configuration list.
2. The Dashboard Configuration pop-up displays. Fill the fields, add the Reports by selecting it from the drop-down list and select Save.
3. Select Cancel to exit. A successful message is displayed.
4. Once the Widget Configuration has been entered and saved, the created configuration will appear in the list.
Figure 47: Add Widget Configuration
Note: It is mandatory to enter at least one Report.
Edit Widget
1. To edit the Dashboard Configuration, select the desired Dashboard Configuration from the list.
2. Select Edit located above the Dashboard Configuration list.
3. The Dashboard Configuration pop-up displays. After editing the desired fields, select Save to confirm.
4. Select Cancel to exit.
Figure 48: Edit Widget Configuration
Delete Widget Configuration
1. To delete Widget Configuration, select a Configuration from the list.
2. Select Delete located above the Widget Configuration list.
3. A confirmation message is displayed. Select Yes to confirm or No to exit.
Figure 49: Delete Widget Configuration
Report Configuration Tab
In this section, the administrator can create new reports for the dashboard. One of the options that they can configure in these sections is the type of chart, colors, series, drill-downs, etc.
The Report Configuration function is located in the Dashboard Configuration Menu and allows the administrators' users to add, edit or delete Report Configuration and configure Series and Filters.
To access the Report Configuration function, click on the report Configuration tab located under the Dashboard Configuration menu.
Filter Report Configuration
1. To perform a search at the report Configuration List, fill the Chart Name field and click on Search to continue.
2. The list will be displayed according to the user search.
Figure 50: Report Configuration Filter
Add Report Configuration
1. To add a Report Configuration, select Add located above the Widget Configuration list.
2. The Dashboard Configuration pop-up displays. Fill in at least the mandatory fields (Chart Name, Chart Type, and Report Name. Select Save. See details below.
3. Select Cancel to exit. A successful message is displayed.
4. Once the Report Configuration has been entered and saved, the created configuration will appear in the list.
Figure 51: Add Report Configuration in Dashboard Configuration
Fields Description:
Chart Name: Name of the report in Dashboard
Chart Type: Type of chart that the user wants to display (bar, column, grid, text, etc)
Report Name: List of reports available for Dashboards (reports created in Report section)
Widget Drill Down: List of Dashboard Reports available to drill down
Previous Drill-Down: List of Dashboard Reports available to drill down
First Color: List of colors to use in the chart
Text Color Day: Default color for the specific report when the theme day is applied
Legend Align: Align for the legend
Legend Vertical-Align: Vertical Align for legends
Legend Layout: List of layout legends available
Show Details: If the report has this option enabled, the widget will show an option of details with more information about the report.
Daily: If this option is enabled this report will be available when the Operation Dashboard has the option of daily enabled.
Grid Rows: The default number of rows that the widget is going to show by default.
Top: Categorize the report (Top/Hourly Top)
Text Color Night: Default color for the specific report when the theme night is applied.
AXIS: is to the two perpendicular lines or axes.
1. The horizontal axis is normally called the X-axis, though, if the chart is inverted, this is the vertical axis. In the case of multiple axes, the X-axis node is an array of configuration objects.
2. The Y-axis is normally the vertical axis, though, if the chart is inverted, this is the horizontal axis. In the case of multiple Y-axes, the Y-axis node is an array of configuration objects.
Figure 52: Report Configuration Axis
Series: is the series configuration.
Figure 53: Report Configuration Series
'Plot Options': are the configuration options for the series.
Figure 54: Report Configuration Plot Options
Target Configuration: is to configure colors per status.
Figure 55: Report Configuration Target Config
Edit Report Configuration
1. To edit Report Configuration, select the desired Report Configuration from the list.
2. Select Edit located above the Dashboard Configuration list.
3. The Dashboard Configuration pop-up displays. After editing the desired fields, select Save to confirm.
4. Select Cancel to exit.
Figure 56: Edit Report Configuration
Delete Report Configuration
- To delete Report Configuration, select a Configuration from the list.
- Select Delete located above the Report Configuration list.
- A confirmation message is displayed. Select Yes to confirm or No to exit.
Figure 57: Delete Report Configuration HTTPS
Series Configuration
Series is a set of data, in this section you can configure the series you want to have available in your Dashboard Report.
Figure 58: Report Series Configuration
Filter
In this section, you can configure filters to be available in Operation Dashboard.
1. To perform a search at the Series List, fill at least one field and click on Search to continue.
2. The list will be displayed according to the user search.
Figure 59: Report Configuration Filter
Data Sources 
A given name to a database for a specific location. The reports will query data inside this database.
This function allows administrators to add, edit, or delete data source types.
Filter Data Sources
The filtering option located in the Data Sources tab allows the Administrator to search for specific data sources based on their location and/or name.
1. To filter the Data Source list, select the locations from the drop-down box provided and/or enter the data source name.
2. Select Search to filter the Data Source list.
3. Select Clear to clear entries.
Figure 60: Filter Data Source
Add Data Sources
This function allows the Administrator to add a data source based on the name, description, location, database type, and connection parameters associated with the database type.
1. To add a data source, select Add located above the Data Source list in the Data Sources tab. The details pop-up displays.
2. Enter the data source Name, Description, Location, and Database Type into the details pop up. All fields except the description field are mandatory.
Figure 61: Add Data Source
Depending on the database type (Database Type field), a subsequent Connection Parameters pop-up displays below the Details pop-up. The information required in this pop-up is dependent upon the Database Type selected. Enter the required information into the Connection Parameters pop-up.
Figure 62: Select Database Type and Connection Parameter
3. The Database Types available are MySQL, Oracle, Pervasive, Postgre SQL, SQL Server, according to the Database Type selected. The screen will show the fields that the user needs to fill out to create the data source connection.
4. Fill out Connection Parameters.
The user has two options:
- Fill out the fields: Server, Port, Database, User, and Password.
- Fill out just the Connection String field. If the Connection String is valid, the fields Server, Port, Database, User, and Password will fill out automatically. Example of the Connection String: jdbc:postgresql://p88meswebl1.sanmina.com:5432/bem?user=user&password=pass
The Connection String should have the following format.
| SQL Server: | jdbc:sqlserver://%Server%:%Port%;databaseName=%Database%;user=%User%;password=%Password%;encrypt=false |
| Oracle: | JDBC:oracle:thin:%User%/%Password%@%Server%:%Port%:%Database% |
| MySQL: | jdbc:mysql://%Server%:%Port%/%Database%?user=%User%&password=%Password% |
| Pervasive: | jdbc:pervasive://%Server%:%Port%/%Database%?user=%User%&password=%Password% |
| Postgres SQL: | JDBC:postgresql://%Server%:%Port%/%Database%?user=%User%&password=%Password% |
5. Select DataSource Type(s).
6. Click on the Save button. If the parameters of the connection are correct, the Data Source will save, if not an error will show the error description.
Types: These are the schemas that the created data source has. Select the schemas dragging the items from one list to another.
Edit Data Sources
This function allows the Administrator to edit the name, description, and connection string of any data source.
1. To edit a data source, select the desired data source from the Data Source list located on the main page of the Data Sources tab.
2. Select Edit located above the name list.
3. The Data Source Details pop-up displays. The name and description are available for editing. The Connection Parameters section is not available to edit, but the Connection String, below the Connection Parameters, pops up and can be edited.
4, After changing the desired information, select Save to confirm or Cancel to exit.
Figure 63: Edit Data Source
Note: Editing the Data Source, the Connection Parameters field will be displayed according to the Database Type chosen during the data source addition.
Delete Data Source
This function allows the Administrator to delete any data source.
1. To delete a data source, select the desired data source from the name list located on the main page of the Data Sources tab.
2. Select Delete located above the name list.
3. A confirmation prompt will display. Select Yes to confirm or No to cancel.
Figure 64: Delete Data Source
Data Source Type
The Data Source Type function located in the Data Sources tab allows the administrator user to add, edit or delete the data source types.
1. To access the data source type function, select the Data Source Type icon located on the right of the main page under the Data Sources tab.
Note: if a data source type is deleted reports associated with it may not work correctly.
Figure 65: Data Source Type
A data source type list displays containing all previously created data sources listed alphabetically. From this screen, the Administrator user can add, edit or delete a data source type.
Add Data Source Type
1. To add a data source type, select Add located above the data source type list.
2. Enter a data source type and description, both mandatory fields.
3. Select Save to create the Data Source Type.
4. Select Cancel to exit.
Figure 66: Add Data Source Type
Edit Data Source Type
1. To edit a data source type, select the desired data source type from the list.
2. Select Edit located above the Data Source Type list.
3. Both the name and description fields are available to edit. After desired changes have been made, select Save to continue.
4. Select Cancel to exit.
Figure 67: Edit Data Source Type
Delete Data Source Type
1. To delete a data source type, select the desired data source type from the list.
2. Select Delete located above the Data Source Type list.
3. A confirmation prompt will display. Select Yes to confirm or No to exit.
Figure 68: Delete Data Source Type
Note: It is not allowed to delete a data source type:
a) If is assigned to a data source;
b) If there is any report already created for this data source type.
Reports 
The Reports Module was developed for employees with Security Manager (specific Location) and Administrator (all locations) roles. This section will cover how to navigate and execute all report activities. The Reports module allows the user to edit, copy or publish reports.
Filter Reports
The filtering option located in the Reports tab allows the Administrator or Security Manager users to search for specific reports based on the owner location, report group, name, owner user, data source type, and/or status.
1. To filter the report list, select an owner Location, Report Group, Data Source Type, and/or Status from the drop-down boxes provided, or enter the Name and/or Owner User.
2. Select Search to filter the list or Clear to clear all fields.
3. The results will display in the report list.
Figure 69: Filter Reports
Note: just the Publish functionality is available for the Reports module; the other functionalities are in WIP (work in progress) status.
Add Reports
This feature allows users to add reports that will be executed in the Execution Module.
Figure 70: Add Reports
Figure 71: Basic Reports
To add a report the user must enter all mandatory fields and go to the other configuration tabs to enter the necessary data into the report. Note that now, the admin and dev users can select the report project. Select Save to commit. For further information about these fields, see the respective modules (Location, Group (Report Group), and Data Source Type) in the Portal.
Note: Checking Private just the report owner will have permissions (open, edit, etc) for this report.
The default format will be the preselected format for the Execution Module, but it could be changed during the execution.
SQL Code
Figure 72: SQL Code Configuration
This feature allows the user to add a query and check if the query is valid by clicking on Check Code SQL. To add a parameter it is necessary to use the syntax: <%shop_order%>.
Parameters
At this point, the user will choose the parameters Types and Orders. For example, if the parameter will be a checkbox, a list box, a text box, etc.
The Report Maintenance page is displayed. Select the Parameters tab to add a parameter.
Figure 73: Parameters
The first thing to be done is to create a new parameter step. Parameter Steps give us the ability to establish parent-child relationships between parameters.
1. Select "New Step"
2. With a new step in place, we can begin adding our parameters.
3. Select “New Parameters” to configure the parameters;
Figure 74: New Parameter
Three fields are required for every parameter you setup:
1. Name is straightforward - what you type here is what will be used as the parameters caption. For example, "Customers" in the WIP Distribution report.
2. Instruction
The user will provide any important information for the end-user regarding this parameter. In most cases, this will be a very basic sentence such as "Indicate whether you want to see units that are in WIP or not" that are already intuitive by just looking at the parameter. However, you might come across situations as you develop your reports where you create a parameter whose relationship to the report is not so obvious and this field will give you a great way to explain it to the user. The text entered in this field will be displayed in this list.
3. Parameter Type
The Parameter Type Field will allow the user to choose the type of parameter that will determine how this parameter is displayed. The available parameter types are listed below:
a. Drop Down List
Choosing this parameter type, the user will create a “list” according to the SQL code entered in the command line.
The Value field represents the value that will be replaced in the SQL Code.
Figure 75: Drop Down List Parameter
The user must enter the mandatory fields (Name, Instructions, Command, Data Type, Value Field, Display Field, and the Parameter SQL).
Parameter SQL: this is where the developer selects the text in their report SQL that will be replaced by the values in the parameter they are currently creating. So if in their report SQL they had "<%Customers%>" they would see an option in this field that would say "Customers". That's where the application would insert the customers that the users select when they execute the report.
Data Type: this indicates what kind of data will be inserted. It is the value type (integer, string, date, and double);
Command: This is used to enter the SQL query that will fill the list with the data;
Value Field: This field is the column name. This value will be substituted in the SQL Code;
Display Field: this column name that will be displayed to the user;
Required: This field defines if the field is mandatory or not;
Note: The Optional Item section will be displayed in the Required field is not checked and it will be used to remove or replace code lines in the SQL Code in the Execution Module. This action is the same for all parameter types.
Check the All Option check box if you want to add an option to choose “All“ items in the list.
Select Add to open the Optional Item Maintenance screen.
Figure 76: Optional Item
For example, the user can remove the <%location%> command and replace it for any value he wants.
Select Save to commit.
During the report execution, if no value is entered for this command, it will be replaced or removed automatically.
Also, the user can Edit orDelete items by clicking on the Edit / Delete buttons. Select Save to commit.
Figure 77: Parents
Add Parent Parameter is a functionality that helps to share parameters between steps.
1. Create a new Step;
2. Create New Parameter, fill out Parameter Name, Parameter Type, etc;
3. Click Add Parents to be able to use a parameter from another step. In this case, we have available the Data Source parameter because is the parameter in step 1;
Now the user can use the parent parameter to write a query in the Command field.
The parents are the parameters created in the previous steps and they could be used in the command query.
For example:
select ***** where *** = <%param_2%>
where the tag <%param_2%> is related to the selected parent parameter (chosen as the parent).
b. List Box
Choosing this parameter type, the user will create a “Multiple Choice List” according to the SQL code entered in the command line.
Figure 78: List Box
The user must enter the mandatory fields (Name, Instructions, Command, Data Type, Value Field, Display Field, and the Parameter SQL) already described and:
Rows: this allows developers to configure how many rows the user can see in the boxes at a time. When's there's going to be several hundred choices for the user it might help for them to select a higher number making it easier to search through all of them;
Select Maximum: this puts a limit on how many items the user can select in the parameter. If there are maybe 10,000 options for the user to choose you wouldn't want to allow them to select that many;
Max Exceeded Msg: message that will be displayed if the user tries to select more data that was set in the Select Maximum field.
It is the same for options. The user must enter the mandatory fields (Name, Instructions, and the Parameter SQL).
c. Data Range
This option is used to set a range of dates.
Figure 79: Date Range
The user must enter the mandatory fields (Name and instructions) already described;
Start SQL: it is the parameter name that will be substituted for the initial date range;
End SQL: it is the parameter name that will be substituted for the final date range;
Max Day Range: it is the maximum quantity of days in the initial and final date range;
Display Time: choosing this check box, the field to choose the time is displayed;
d. Date Time
This parameter type will allow the user to choose a date and time.
Figure 80: Date Time
The user must enter the mandatory fields (Name, Parameter SQL, and Instructions) already described;
e. Check Box
This will allow the user to choose values (Yes or No, On or Off, or True or False).
Figure 81: Check Box
The user must enter the mandatory fields (Name, Parameter SQL, and Instructions) already described;
f. Text Box
This allows the user to set any text entry.
Figure 82: Text Box
The user must enter the mandatory fields (Name, Parameter SQL, and Instructions) already described;
Default Value: this is the initial value that will be displayed in the Execution Module.
Validation: it will allow the user to add validation for this field (Text Box).
Figure 83: Validation Field
There are the following validation types:
a. Data Type Validation
Figure 84: Validation Data Type
If the user enters a different value chosen in the Data Type, the field will be invalid and an error message that was configured in the “Error Msg” field is displayed.
b. Expression Validation
Figure 85: Validation Expression
Choosing the “Expression” as validation, the user is able to add an expression (e.g. /^[a-zA-Z0-9][a-zA-Z0-9\._-]+@([a-zA-Z0-9\._-]+\.)[a-zA-Z-0-9]{2}/)).
If the user enters a different value that is not accepted for the expression, the field will be invalid and an error message that was configured in the “Error Msg” field is displayed.
c. Range Validation
Figure 86: Validation Range
Choosing the “Range” as validation, the user can set a value interval with maximum and minimum values that are configured in the Min. Value andMax. Value fields.
If the user enters a different interval that is not accepted for the expression, the field will be invalid and an error message that was configured in the “Error Msg” field is displayed.
d. Value Validation
Figure 87: Validation Value
Choosing the “Value” as validation, the user can set a validation for Operator (combo box) that defines which comparison will be done.
Figure 88: Operator Field
Compare to the field will receive the value to be compared with the value entered by the user.
If the user enters a different value that is not accepted for the comparison, the field will be invalid and an error message that was configured in the “Error Msg” field is displayed.
e. Multi-Line Text Box
It is like the Text Box, the difference is that the user can enter Multiple Data. Each data must be in different lines.
Figure 89: Multi-Line Text Box
Input Limit will define the quantity of data that can be entered.
Checking the Is Case Sensitive will allow distinguishing Lowercase and Uppercase.
f. Radio Button List
Choosing the Radio Button parameter type, all results of the SQL Code configured in the Command field will be a radio button.
Figure 90: Radio Button List
Note: The user will be able to select just one Radio Button.
Select Save Parameters to commit.
Note: If there is just one parameter created for a step and the user removes this parameter, the step will be automatically removed.
Drill Down
Drill Down is a link to another report. It is used to see detailed data in a separate report.
Figure 91: Drill Down
Add Drill Down
1. To add a Drill Down report, select the Drill Down tab and click on the Add button;
Figure 92: Add Drill Down Report
- Current Report Column
It is possible to create one drill-down report per column. All available parent report columns are displayed in the combo box list.
- Child Report
It will display just reports that have the same data source type and were published in the same location as the parent report.
When the user selects a Child Report, all their parameters will be displayed in the list to be set the values that the parameters will receive when the report is executed. For each parameter, three values types could be set as follows:
- No index entries were found.
- Static Value: will set a fixed value to the Drill Down report parameter
- Field Value: it will be the link value of the parent report that will be displayed in the parameter field in the Drill Down report
All parent report columns will be displayed.
- Parent Parameter: the value of a parameter in the report already chosen as the main will be displayed in the parameter field of the Drill Down report
All parent report parameters will be displayed.
To finish, click on the Save button or Close to cancel the action.
Remove Drill Down
To remove a drill-down, select the report and click on the Remove button. Click on Yes to confirm or Cancel to cancel the action.
Figure 93: Remove Drill Down
Testing
It is useful to test the reports before publishing, to do this, after creating a report, select the Testing tab.
Figure 94: Testing Reports
Note that for each step, there are instructions displayed according to what was defined in the Instruction field.
Step1
This step will be the Data Source according to the Location andData Source Type already configured.
Figure 95: Step1
If there is just a single option of data source, it will be automatically displayed. Select Next Step to continue.
Note: If there is no other step created, the Output is displayed. Select Go to see the result.
Summary
Go to the Summary tab to publish the report.
Figure 96: Summary
Here the user will see the information about the report, the SQL Code, and the parameters. This page can’t be edited, it just brings the report summary.
1. Would you like to publish this report? Select Yes, I want to.
2. The message should be displayed: Thank You
Your report is now published and ready to be executed in the production environment.
Edit Reports
The Edit Report page is the same for Add Reports. See below the exceptions:
1. If the report was already published, the Owner Location can’t be updated;
2. If the report was already published, the Summary page message is: “Would you like to update this report?” Clicking on Yes, I want a new version of this report is created.
Note: The user can edit several reports at the same time.
Copy Report
1. To copy a report, select the report and select the Copy button.
2. The Copy Report page is displayed.
Figure 97: Copy Report
3. Enter the Mandatory fields and select Save to commit. The Edit page is displayed to make any updates if necessary.
Note: Only Locations with the data source of the same type as this report are available to copy.
Publish Reports
1. To publish a report, select the report from the list and select Publish.
Note that Security Manager users can publish for locations that have been assigned.
In this functionality, if the report was created and published from the Add or Edit for the chosen location, it will be available to publish for others. Otherwise, the Publish button will not be available.
Figure 98: Publishing Reports
The Administrator user can:
a. Update the report status that will define if the report will be displayed in the Execution module. Just the Active status will be displayed.
b. Choose the location and the report group to publish the report.
Note: Clicking on Test this Report will execute this report and an execution screen is displayed; To remove the location, select the location and select Delete. The report is not published anymore for the selected location.
Note: It is not allowed to delete the location where the report was created.
For further information about this page, see the Testing tab.
Select Save to commit.
History Reports
This page displays all created report versions.
Figure 99: History Report
The version displayed in blue is the current version.
The user can roll back the version if there are old versions in the list selecting the version and clicking on the RollBack button. The Edit page will be displayed and an update can be done. See Edit topic for further information.
Selecting any version and clicking on the Execute button, the Execute page is displayed. See Test the Report topic for further information.
Predefined
The predefined reports code cannot be changed. This kind of report is considered complex and their code is maintained for the MESWeb development team.
In the MESWeb Central Predefined functionality, the users can map or manage the reports (add and/or edit).
Predefined Mapping
Figure 100: Mapping Predefined Reports
Administrator and Security Manager users can execute this functionality. Due to the chosen location, the users select the reports that the location will have access to. These reports will be displayed in the Default Reports list of the chosen location.
Predefined Maintenance
Administrators and Security Manager users can execute this functionality and it gives access to chosen reports to others.
Edit Predefined Reports (Maintenance)
Just Administrator users can edit Predefined Reports.
Click on Edit and the Predefined Maintenance pop-up displays.
Figure 101: Edit Predefined Reports
To edit Predefined reports, update the necessary information and select Save.
Figure 102: Edit Predefined Reports
Data Dictionary
The Data dictionary button opens a monitor with the inventory of data elements in our database (MESR) with a detailed description of its format and relationships.
Figure 103: Access Data Dictionary
Figure 104: Data Dictionary
Default Reports
The button Add to Default assign the report you selected to the default group in MESWeb application
1. Select a report and click on the Add to Default.
2. The selected report will be added to the Default Report list.
Figure 105: Add to Default
Note: If a report was added to the Default Reports list, it is possible to remove it again, a Remove from Default button will also show on the screen.
Report Groups 
With this submodule the Administrator and Security Manager users can access report group maintenance to perform searches, create, edit or delete report groups and add reports to groups.
Filter Report Groups
The filtering option located in the Report Groups tab allows the Administrator user to search for specific report groups based on the location, name, and/or description.
1. To filter the report group list, select a Location from the drop-down box provided, and/or enter the Name and/or Description.
2. Select Search to filter the list or Clear to clear all fields.
3. The results will display in the report group list.
Figure 106: Filter Report Groups
Add Report Groups
This function allows the Administrator to add a report group based on the report group name, description, and location.
1. To add a report group, select Add located above the Report Group list.
2. The Report Group Detail pop-up displays.
Figure 107: Add Report Group
3. Enter the Report Group Name andDescription and select a Location from the drop-down box provided. All fields are mandatory
4. Select Save to confirm the addition.
5. Select Cancel to exit.
6. The new report group will appear alphabetically in the report group list.
Edit Report Groups
This function allows the Administrator and Security Manager users to edit a report group’s name, description, and/or location.
1. To edit a report group, select the desired report group from the list.
2. Select Edit located above the report group list.
3. The Report Group Detail pop-up displays.
Figure 108: Edit Report Group
Note: Location is a read-only field.
4. After completing changes, select Save to confirm.
5. Select Cancel to exit without saving.
Delete Report Groups
This function allows the Administrator to delete a report group from the report group list.
1. To delete a report group, select the desired report group from the list.
2. Select Delete located above the report group list.
3. A confirmation prompt will display. Select Yes to confirm or No to exit.
4. The report group will be removed from the report group list.
Figure 109: Delete Report Group
Note: It is not allowed to delete a report group if:
1. A report was created or published in the report group.
2. Any user has permission for this report group.
Add Report to Group
This function allows the Administrator to add a report to a report group by searching for its location and data source type.
1. To add a report to a report group, select the desired report group from the list.
2. Select Add Report to Group located above the report group list.
Figure 110: Add Report to Group
3. The Report to Group pop-up displays. Search for the specific report by selecting the location and data source type of the report from the drop-down boxes provided.
4. Select the search icon located to the right of the drop-down boxes.
5. The report will display in the left Available column. To move the report to the Selected column, double-click or drag and drop the report.
6. Select Save to add the report to the report group.
7. Select Cancel to exit.
Locations 
Location is a specific site or plant, this function allows administrators to add, edit, or delete locations. Also located in this module is the ability to add, edit, or delete the location.
Location Tab
A location in Mesweb is a new application available to use, each plant or customer in our environment has a different location. We can group reports and users for specific locations.
Filter Locations
The filtering option located in the Locations tab allows the Administrator to search for specific locations based on their name and/or domain. The list displays empty and the user needs to search to load the data on the page.
1. To filter the list, enter the location name and/or Domain and select the domain from the drop-down box provided.
2. Select Search to filter the name list.
3. Select Clear to clear entries.
Figure 111: Filter Locations
Add Location
This function allows Administrators to add a location based on the name, server, domain, time zone, and culture of the location.
1. To add a location, select Add located above the location list in the Locations tab.
2. Enter the location Name, Server, Domain, Time Zone, Culture, and Region. All fields are mandatory.
3. Select Save to confirm or Cancel to exit.
Figure 112: Add Location
4. After all information has been entered and saved, the new location will be placed in the name list on the main screen of the Locations tab.
5. After creating the location, a report group (Default Reports) is created (for this created location) and all predefined reports are assigned to this report group.
Edit Location
This function allows the Administrator to edit any location’s name, server, domain, time zone, and/or culture.
1. To edit a location, select the desired location from the name list and then select Edit
2. The Location Detail pop-up displays. All fields are available to edit. After changing the desired information, select Save to confirm.
3. Select Cancel to exit.
Figure 113: Edit Location
The changes to the location will appear in the name list on the main screen of the Locations tab.
Delete Location
This function allows the Administrator to delete a location from the Location Name list.
1. To delete a location from the location name list, select the desired location and then select Delete.
2. A confirmation prompt will display. Select Yes to confirm deletion or No to cancel.
Figure 114: Delete Location
The location will be removed from the name list on the main screen of the Locations tab.
Note: It is not allowed to delete a location if data sources, report groups, reports, or user permissions are created for this location.
Map Locations Tab
Map locations represent the coordinates latitude and longitude of a specific city or town. With these coordinates, we can draw a pin on a map. We use these map locations for 42Q Live.
Filter Map Location
1. To perform a search at the Map Location List, fill in the Location Name field and click on Search to continue.
2. The List will be displayed according to the user search.
Figure 115: Filter Map Location
Add Map Locations
This function allows Administrators to add map locations based on the name, server, domain, time zone, and culture of the location
1. To add map locations, select Add located above the location map list in the Locations tab.
2. Enter the Name, Latitude, and Longitude. All fields are mandatory.
3. Select Save to confirm or Cancel to exit.
Figure 116: Add Map Location
4. After all information has been entered and saved, the new location mapped, will be placed in the list on the main screen of the Locations tab.
Edit Map Location
This function allows the Administrator to edit any location map information.
1. To edit a location map, select the desired location map from the list and then select Edit.
2. The Map Location Maintenance pop-up displays. All fields are available to edit. After changing the desired information, select Save to confirm.
3. Select Cancel to exit.
Figure 117: Edit Map Location
The changes to the location will appear in the name list on the main screen of the Locations tab.
Delete Map Locations
This function allows the Administrator to delete a location map from the Location Name list.
1. To delete a map location from the location name list, select the desired map location and then select Delete.
2. A confirmation prompt will display. Select Yes to confirm deletion or No to cancel.
Figure 118: Delete Map Locations
The map location will be removed from the list.
Data Dictionary Settings 
This sub-module was developed to allow the admin users to add, edit or delete data dictionary, view descriptions, and field descriptions.
It is divided into two tabs as follow:
Tables
Data Dictionary shows the information related to our schema (tables, and fields). We can add descriptions to our tables to be more user-friendly. With those comments, the users can better understand the purpose of the table. In this section, we can add more tables if our schema grows or we can edit the information we are showing in Data Dictionary Monitor.
Filter Tables
1. To perform a search at the Tables List, fill the Table Name field and click on Search to continue.
2. The List will be displayed according to the user search.
Figure 119: Filter Tables
Add Tables
This function allows Administrators to add tables based on the table name, comment, and description fields.
1. To add tables, select Add located above the table list in the Table tab.
2. Enter the Table Name, Comment, and Description.
3. Select “is Principal” if the information of the Table has common use for the Report.
4. Select Save to confirm or Cancel to exit.
5. Drag and drop to add or remove categories.
Figure 120: Add Tables
6. After all information has been entered and saved, the new table will be placed in the list on the main screen of the table tab.
Edit Tables
This function allows the Administrator to edit any Table information.
1. To edit a table, select the desired table from the list and then select Edit.
2. Table Maintenance pop-up displays. All fields are available to edit. After changing the desired information, select Save to confirm.
3. Select Cancel to exit.
Figure 121: Edit Tables
4. The changes to the table will appear in the name list on the main screen of the Locations tab.
Delete Tables
This function allows the Administrator to delete a table from the Table Name list.
1. To delete a table from the table name list, select the desired table and then select Delete.
2. A confirmation prompt will display. Select Yes to confirm deletion or No to cancel.
Figure 122: Delete Tables
The table will be removed from the table name list.
Add/Delete Views
This function allows adding View tables based on view name and table name.
1. To add or delete views, select Add View located above the table list in the Table tab.
2. Enter the View Name for the selected Table.
3. Select Save to confirm, Cancel to exit, or if you want to delete an existing view, select Delete to remove it.
Figure 123: Add View Table
Fields
Data Dictionary shows the information related to our schema (tables, and fields). We can add descriptions to our fields to be more user-friendly. With those comments, the users can better understand the purpose of the field. In this section, we can add more fields if our schema grows or we can edit the information we are showing in Data Dictionary Monitor
Filter Fields
1. To perform a search at the Field List, fill the Field Name field and click on Search to continue.
2. The List will be displayed according to the user search.
Figure 124: Filter Fields
Add Fields
This function allows Administrators to add Fields based on the field name, comment, and description fields.
1. To add fields, select Add located above the field name list in the Field tab.
2. Enter the Name, Comment, and Description.
3. Select the Table Name from the drop-down list. Table Name and Field Name are mandatory.
4. Select Save to confirm or Cancel to exit.
Figure 125: Add Fields
5. After all the information has been entered and saved, the new field name created will be placed in the list.
Edit Fields
This function allows the Administrator to edit any Field information.
1. To edit a field, select the desired Field from the list and then select Edit.
2. The Data Dictionary Field Maintenance pop-up displays. All fields are available to edit. After changing the desired information, select Save to confirm.
3. Select Cancel to exit.
Figure 126: Edit Fields
The changes to the field will appear in the field list.
Delete Fields
This function allows the Administrator to delete a field from the Field Name list.
1. To delete a field from the field name list, select the desired field and then select Delete.
2. A confirmation prompt will display. Select Yes to confirm deletion or No to cancel.
Figure 127: Delete Fields
The field will be removed from the table name list.
Access Control 
The Access Control module was developed for employees with Administrator and Security Manager roles. This section will cover how to navigate and execute functions in Access Control. With the Access Control module, the Administrator can search, add, delete or edit users or user groups (will be developed).
1. To access MESWeb, navigate toAdministration > MESWeb Central
2. Select the Access Control icon located on the MESWeb Central Main page.
Figure 128: MESWeb Central Access Control
3. Upon selecting the Access Control icon, two additional icons become available: Users and User Groups.
Figure 129: Access Control Functions
4. Once either icon is selected, it is placed in a tab at the top of the Access Control page. The user can navigate between both icons by placing them in tabs that can be easily accessed.
Users 
The Users icon under the Access Control screen in MESWeb Central allows Administrators to manage user permissions and edit user information. With this portlet, administrators can assign Administrator permissions to specific users for assigned locations and edit the user’s information.
Filter Users
The filtering option located in the Users tab allows the Administrator to search for specific employees by User Name, Full Name, and/or Email.
1. To filter the User List, enter the desired User Name, Full Name, and/or Email address into the provided fields.
2. Select Search to filter users.
3. Select Clear to clear all fields.
Figure 130: Filter User List
Manage Permissions
This function allows Administrators to assign Administrator permissions to users for specific locations.
1. To assign Administrator permissions to a user, select a user from the list by placing a check in the box to the left of the User Name.
2. Select Manage Permissions.
3. The User Permissions pop-up displays.
Figure 131: User Permissions
4. With this pop-up, the administrator can assign Administrator permissions to a user by checking the box to the right of the Administrator option.
5. Upon selecting a location, two panels display allowing the Administrator to assign Roles, Report Groups, Reports, Mesr Customers, Data Source, and Group Permissions to the user.
Figure 132: Assign Privileges (User Permissions)
6. To move an Available Role/Report Group/Report/Mesr Customer/Data Sources to the Selected column, double-click or drag and drop the selection.
Note: Under the Mesr Customers tab, the Administrator must first select a Data Source from the drop-down box before moving customers to the selected column.
7. After moving all applicable selections in each tab, select Save to assign permissions to the user.
8. Select Cancel to exit.
9. The user will appear in the user list with the Administrator box selected.
Sisense access permission
The Sisense ElastiCube is a high-performance analytics database that allows users to bring data from multiple sources or even from multiple physical locations to merge, manipulate and query it as if it was one consolidated data set. This data information is displayed into four default dashboards (Production Historical, Production Live, Quality Historical, and Quality Live). Each of them has four default widgets (Daily Yield, Daily TP, Top 5 Defects, and Top 5 Repairs) where the data can be displayed as users decide to help them to find statistical data and to know the real-time status of a specific product. To access this database, Administrators or security managers should provide the correct permissions to regular users in the MESWeb Central portlet by following these steps:
- Navigate toAdministration > MESWeb Central
- Select the Access Control icon to display the options, User and User Groups.
- Then select the Users icon.
- Search for the user who will be given Sisense access for a specific location.
- Check the box of the selected user.
- Select the Manage Permissions button located above the user’s list to display the User Permission window where administrators or security managers can define the role and the locations available for the selected user.
- Select the Sisense Role:
- Designer
- Viewer
- Select a Location.
- Then, in the Role tab, drag ‘Sisense’ from the Available column and drop it into the Selected column.
- Finally, select the Save button to proceed or Cancel to quit.
Figure 133: Sisense Permissions
Note: Just like the above image shows, the list will also show the option Sissense, only if the user has enough access.
Once this configuration is done, users with this new permission will see the group of locations where they were added at Sisense, as well as the four default dashboards mentioned at the beginning of this section. Users can click on the Sisense logo to get the user permissions and locations list.
Figure 134: Sisense Permission
Edit Users
This function allows Administrators to edit the following user information:
- Full Name
- Language (under development)
- If Active (if it is in the database and this user can log in)
- If Expires (to tell the system when the active status of the user will expire)
- If Customer (user from the client)
- Hide Main Navigation (happens when the user is inactive)
- Show Icons (to let the user see the main menu)
- Expiration Date (the day when this is going to expire by selecting a date)
To edit users, select the desired user from the User Name List and then select Edit.
Figure 135: Edit Users
2. The User Search Detail pop-up will display. All fields are available to edit except for the user name. Make the desired changes and then select Save.
3. Select Cancel to exit.
Import Users
This function allows Administrators to import several users at the same time using the available Template.
Select the Import button and the Import Users dialog displays.
Figure 136: Import Users
2. Search the file and select it. It is possible to skip existing users or update them by selecting the radio buttons.
By selecting the Get Template button, the user will get a template automatically downloaded to the user computer that can be filled and imported with new users.
Location/Role
This section shows the privileges of the user. All of the locations that the user has access to and which access has for each location.
Figure 137: Location Role
User Groups 
The User Groups icon under the Access Control screen in MESWeb Central allows Administrators to manage user Groups by adding, editing, deleting, managing users, and managing permissions.
To access the User Groups, select the User Groups icon in the left panel. The User Groups tab is displayed.
Filter User Groups
The filtering option located in the User Groups tab allows the Administrator to search for specific groups by User Groups Name or Location.
1. To filter the User Group List, enter the desired name, and/or Location into the provided fields.
2. Select Search to filter users.
3. Select Clear to clear all fields.
Figure 138: Filter User Groups
Add User Groups
This function allows the Administrator to add a User Group based on the user group name, description, and location.
1. To add a user group, select Add located above the User Group list.
2. The User Group Detail pop-up will display.
Figure 139: Add User Group
3. Enter the Name and Description and select a Location from the drop-down box provided. All fields are mandatory.
4. Select Save to confirm the addition.
5. Select Cancel to exit.
6. The new user group will appear alphabetically in the report group list.
Edit User Groups
This function allows the Administrator and Security Manager users to edit a user group’s name and/or description.
1. To edit a User Group, select the desired User Group from the list.
2. Select Edit, located above the User Group List.
3. The User Group Detail pop-up will display.
Figure 140: Edit User Group
Note: Location is a read-only field.
4. After completing changes, select Save to confirm.
5. Select Cancel to exit without saving.
Delete User Groups
This function allows the Administrator to delete a User Group from the User Group List.
1. To delete a User Group, select the desired User Group from the list.
2. Select Delete located above the User Group List.
3. A confirmation prompt will display. Select Yes to confirm or No to exit.
4. The User Group will be removed from the User Group List.
Figure 141: Delete Report Group
Note: It is not allowed to delete a User Group if:
1. the User Group has users assigned;
It is possible to select more than a User Group at the same time to make a massive delete.
Mapping User
This function maps the user to a selected group.
To map users, follow the steps below:
1. Select a group name in the list and select Mapping User;
2. The Mapping User pop-up displays;
3. On the right side of the page, the filter will display the users registered in the system. Just drag and drop the user to the left side and it will be part of the group.
4. To remove users from the group, drag and drop the user to the right side.
Figure 142: Mapping User
Import Users to Group
This function allows Administrators to import several uses at the same time using the available Template.
1. Select the Import button and the Import Users pop-up displays.
Figure 143: Import Users to Group
2. Search the file and select it. It is possible to skip not found users or update them by selecting the available radio buttons.
By selecting the Get Template button, the user will get a template automatically downloaded to the user computer that can be filled and imported with new users.
Manage Permissions
This function allows Administrators to assign permissions for groups.
1. To assign user group permissions, select a Name from the list by placing a check in the box to the left of the Name.
2. Select Manage Permissions.
3. The User Group Permissions pop-up will display.
Figure 144: Manage User Group Permissions
4. To move an Available Role/Report, Group/Report/Mesr, Customer/Data Sources to the Selected column, double-click or drag and drop the selection.
Note: Under the Mesr Customers tab, the Administrator must first select a Data Source from the drop-down list before moving customers to the selected column.
5. After moving all applicable selections in each tab, select Save to assign permissions to the user.
6. Select Cancel to exit.
7. The user will appear in the user list with the Administrator box selected.
Report Builder
42Q Solution to help production plants organize, create and run reports is found in the Report Builder tool.
The Report Builder manages permissions for all the single reports in the MES System. It is a simple, Straightforward, and Intuitive tool and includes features for Businesses and Administrators.
Appendix A
Access Control
It is a module that will set the permissions for users and external customers of 42Q
administrator
the System Administration has full access to MESWeb - alls, all reports, all customers.
customer user
user for external customers to access the application
find username
for the "find" when we look up the username we use a web service at the Helpdesk, so it's finding something separate from MESWeb
MES Web
the application that provides reporting capabilities through a web-based interface.
parameters
definitions for data, reports, or configurations.
roles
user profile inside MESWeb
SiteMinder
Universal login of 42Q
user
the User role can execute only those reports specifically granted access to him/her, and may not create new reports or modify existing reports. Administrators may restrict users' access to only that data belonging to specific customers.
username
the username is the SiteMinder username (or a partial string)
