Difference between revisions of "SOP-42Q-MES0095 AppGarden Quick Guide"
Helena wang (talk | contribs) |
|||
| (19 intermediate revisions by 3 users not shown) | |||
| Line 1: | Line 1: | ||
| − | <small>[[42Q_Cloud-Based_MES/MOMS|42Q Home]] > [[Tools|Tools]] > App Garden Quick Guide</small><br/> | + | <small>[[42Q_Cloud-Based_MES/MOMS|42Q Home]] > [[Tools|Tools]] > App Garden Quick Guide</small><br/> |
| | ||
| − | <center>'''Tools'''</center> <center>'''App Garden Quick Guide'''</center> <center>'''Version MES15.3.3 | + | <center>'''Tools'''</center> <center>'''App Garden Quick Guide'''</center> <center>'''Version MES15.3.3'''</center> <center>'''Revision B1'''</center> <center> </center> <center> </center> <center> </center> |
| | ||
| − | |||
| − | |||
| − | + | = <span class="mw-headline" id="Introduction"><span class="mw-headline" id="Introduction">Introduction</span></span> = | |
| − | = Introduction = | ||
AppGarden is 42Q’s solution to manage and ensure compliance concerning the applications that may run on its Android tablets on the shop floor. This document explains the primary functions in AppGarden. It is assumed that the user has a tablet with AppGarden installed. | AppGarden is 42Q’s solution to manage and ensure compliance concerning the applications that may run on its Android tablets on the shop floor. This document explains the primary functions in AppGarden. It is assumed that the user has a tablet with AppGarden installed. | ||
| Line 16: | Line 13: | ||
*'''''APK''''' “Android Package Maintenance” (MES Portal) : Serves as a repository for Android tablet applications | *'''''APK''''' “Android Package Maintenance” (MES Portal) : Serves as a repository for Android tablet applications | ||
| + | |||
Android Application Package (APK) is the format for the installation and distribution of application software implemented by Android’s operating system. The MES development team has provided a mobile data collection solution that allows for manufacturing execution at the shop floor level through the use of convenient tablets. These inexpensive tablets provide mobility, flexibility, and scalability to increase productivity while decreasing overhead costs. | Android Application Package (APK) is the format for the installation and distribution of application software implemented by Android’s operating system. The MES development team has provided a mobile data collection solution that allows for manufacturing execution at the shop floor level through the use of convenient tablets. These inexpensive tablets provide mobility, flexibility, and scalability to increase productivity while decreasing overhead costs. | ||
| − | *'''''Android Device Maintenance''''' (MES Portal) | + | *'''''Android Device Maintenance''''' (MES Portal): Manages the tablets. |
| + | |||
Android Device Maintenance is the primary module for managing the tablets to which the Package Maintenance applications are pushed. | Android Device Maintenance is the primary module for managing the tablets to which the Package Maintenance applications are pushed. | ||
| − | *'''''AppGarden''''' (Installed on every tablet) | + | *'''''AppGarden''''' (Installed on every tablet): Allows installation and updates on Android mobile devices |
| − | |||
| + | AppGarden APK is an Android management tool, which is used to manage APK installation and uninstall and update on android devices, access, and system information collection; this APK should be the last install after installing all/any other MES Android Applications. | ||
For more information on '''Android Package Maintenance''', '''Android Device Maintenance''', and/or '''AppGarden''' solutions visit [https://42qrpt1.42-q.com/mes_wiki/index.php/SOP-5-I-42Q-MES0106-C_42Q_APK https://42qrpt1.42-q.com/mes_wiki/index.php/SOP-5-I-42Q-MES0106-C_42Q_APK]. | For more information on '''Android Package Maintenance''', '''Android Device Maintenance''', and/or '''AppGarden''' solutions visit [https://42qrpt1.42-q.com/mes_wiki/index.php/SOP-5-I-42Q-MES0106-C_42Q_APK https://42qrpt1.42-q.com/mes_wiki/index.php/SOP-5-I-42Q-MES0106-C_42Q_APK]. | ||
| Line 29: | Line 28: | ||
| | ||
| − | + | | |
| − | + | = <span class="mw-headline" id="Installation_on_Device"><span class="mw-headline" id="Installation_on_Device">Installation on Device</span></span> = | |
| − | + | To install the APK package follow the following steps: | |
| − | + | Use File Manager of your own device to Install; | |
| − | + | Click '''File Explorer''' of your own device to locate your SD card or USB for the AppGarden APK installation package and double click to install. | |
| − | + | '''Figure 1: AppGarden Main Tablet Screen''' | |
| − | + | [[File:Figure 1- AppGarden Main Tablet Screen.png|700px|Figure 1- AppGarden Main Tablet Screen.png]] | |
| − | + | Select the AppGarden APK, users could turn on the “'''Delete Installer Package'''” checkbox and click '''Install'''. | |
| − | + | '''Figure 2: AppGarden Delete Installer Package''' | |
| − | |||
| − | |||
| − | + | [[File:Figure 2- AppGarden Delete Installer Package.jpg|700px|Figure 2- AppGarden Delete Installer Package.jpg]] | |
| − | ''' | + | Click '''Confirm'''. |
| − | + | '''Figure 3: AppGarden App Installed''' | |
| − | + | '''[[File:Figure 3- AppGarden App Installed.jpg|700px|Figure 3- AppGarden App Installed.jpg]]''' | |
| − | ''' | + | With '''AppGarden''' installed, users can click '''Done''' or '''Open''' on the AppGarden directly. |
| − | + | '''Figure 4: AppGarden Permissions''' | |
| − | + | [[File:Figure 4- AppGarden Permissions.jpg|700px|Figure 4- AppGarden Permissions.jpg]] | |
| − | + | | |
| | ||
| − | ''' | + | == <span class="mw-headline" id="AppGarden_Features"><span class="mw-headline" id="AppGarden_Features">'''AppGarden Features'''</span></span> == |
| − | + | #"'''Password Protection'''" restricts anyone to exit this AppGarden unless a password has been entered. | |
| | ||
| − | + | '''Figure 5: Password Protection''' | |
| − | + | [[File:Figure 5- Password Protection.jpg|700px|Figure 5- Password Protection.jpg]] | |
| + | <ol start="2"> | ||
| + | <li>'''Auto Starts '''when Android devices boot. Once booted, the devices will always go to AppGarden, just like an enterprise environment, unless click “Exit Appgarden”.</li> | ||
| + | </ol> | ||
| − | + | | |
| − | + | '''Figure 6: Exit AppGarden''' | |
| − | + | [[File:Figure 6- Exit AppGarden.png|700px|Figure 6- Exit AppGarden.png]] | |
| − | + | <ol start="3"> | |
| − | + | <li>Show the Asset No, Name, Group, Plant, Device Type, Sync-Time, Service Host, current IP address by clicking the “Information” tab.</li> | |
| − | + | </ol> | |
| − | |||
| | ||
| − | '''Figure | + | '''Figure 7: App Information Icon''' |
| − | + | [[File:Figure 7- App Information Icon .png|700px|Figure 7- App Information Icon .png]] | |
| − | + | | |
Selecting Information from the main menu displays the specifications for the tablet and its respective configuration with regards to 42Q. The information that is listed includes | Selecting Information from the main menu displays the specifications for the tablet and its respective configuration with regards to 42Q. The information that is listed includes | ||
| Line 115: | Line 114: | ||
| | ||
| − | '''Figure | + | '''Figure 8: App Information''' |
| − | + | [[File:Figure 8- App Information .png|700px|Figure 8- App Information .png]] | |
| − | = | + | |
| + | |||
| + | '''Figure 9: App System Setting''' | ||
| + | |||
| + | [[File:Figure 9- App System Setting .png|700px|Figure 9- App System Setting .png]] | ||
| + | <ol start="4"> | ||
| + | <li>Show the Android system settings by clicking the “System Setting” tab.</li> | ||
| + | </ol> | ||
| − | Selecting System Settings directs the user to the device’s system settings hub, where, for example, options concerning network connectivity and accounts are selected. | + | The main menu contains the following selections: |
| + | |||
| + | *Information | ||
| + | *System Setting | ||
| + | *Exit AppGarden | ||
| + | *Re-register Asset No. | ||
| + | *Delete Installation Files | ||
| + | *Close | ||
| + | |||
| + | <u>'''Note'''</u>: Selecting System Settings directs the user to the device’s system settings hub, where, for example, options concerning network connectivity and accounts are selected. | ||
| | ||
| − | '''Figure | + | '''Figure 10: App Settings''' |
| − | + | [[File:Figure 10- App Settings.png|700px|Figure 10- App Settings.png]] | |
| + | <ol start="5"> | ||
| + | <li>Get Started register Asset NO. by clicking the “Re-register Asset No.” tab, e.g. portal-uat.42-q.com.</li> | ||
| + | </ol> | ||
| − | + | | |
| − | + | '''Figure 11: Re-Register Asset''' | |
| + | |||
| + | [[File:Figure 11- Re-Register Asset .png|700px|Figure 11- Re-Register Asset .png]] | ||
| | ||
| − | + | '''Re-register Asset No.''' | |
| − | This function allows the plant administrator to re-register the Asset Number for the device. This feature applies to when the plant administrator needs to connect the device to a different MES Portal server, or when the Asset Number that was previously registered is incorrect. To use this function | + | This function allows the plant administrator to re-register the Asset Number for the device. This feature applies to when the plant administrator needs to connect the device to a different MES Portal server, or when the Asset Number that was previously registered is incorrect. To use this function, enter the '''Service Host''' in the initial field provided and select the arrow icon to the right of the field to confirm the entry. A new field appears directly below the Service Host field. In the new field enter the '''Asset Number'''. The user is then directed to the User Info screen where the status of the Asset Number is given, along with the Asset Number itself and its respective Name, Group, Plant, and Device Type. |
| + | |||
| + | | ||
| − | + | '''Figure 12: Get Started''' | |
| − | + | [[File:Figure 12- Get Started .jpg|700px|Figure 12- Get Started .jpg]] | |
| + | <ol start="6"> | ||
| + | <li>The APK Installation files could be deleted by clicking the “Delete Installation files” tab.</li> | ||
| + | </ol> | ||
| | ||
| − | '''Figure | + | '''Figure 13: Delete Installation Files''' |
| + | |||
| + | [[File:Figure 13- Delete Installation Files .png|700px|Figure 13- Delete Installation Files .png]] | ||
| − | + | | |
| − | + | In the process of air deployment, there will be installation files that are downloaded to the table to be initialized at a scheduled time. It may be preferred, however, that these files be deleted in order to save space or because an error occurs during the download of the installation files. The Delete Installation Files function allows the user to delete these files. To perform this action, simply select Delete Installation Files from the AppGarden menu. The message, “Delete installation files completed!” appears at the bottom of the screen. | |
| − | + | '''Figure 14: File Browser''' | |
| − | + | '''[[File:Figure 14- File Browser .png|700px|Figure 14- File Browser .png]]''' | |
| − | + | There are some indicated shows on the Appgarden screen, such as the Service Host, Asset No., Latest network time, Latest heartbeat time, Download Task, Remove Task, Device Time, Submit Time, and the download status indicate: PSI download finished, please wait. | |
| | ||
| + | |||
| + | '''Figure 15: Indicators''' | ||
| + | |||
| + | '''[[File:Figure 15- Indicators .png|700px|Figure 15- Indicators .png]]''' | ||
| + | |||
| + | | ||
| + | |||
| + | == <span class="mw-headline" id="AppGarden_Login"><span class="mw-headline" id="AppGarden_Login">'''AppGarden Login'''</span></span> == | ||
| + | |||
| + | #Open the AppGarden application | ||
| + | #First-time users will enter the Service Host (i.e., MES Portal IP) to login into the field provided. | ||
| + | |||
| + | '''<u>Note:</u> '''Clicking the “H” button will show the latest 3 Host histories for returning users. | ||
| + | |||
| + | '''Figure 16: Get Started''' | ||
| + | |||
| + | [[File:Figure 16- Get Started .png|700px|Figure 16- Get Started .png]] | ||
| + | |||
| + | <u>'''Note''':</u> The new 2.05 version was updated to add a scanner and “H” host function. | ||
| + | |||
| + | '''Figure 17: Host Information''' | ||
| + | |||
| + | [[File:Figure 17- CustomKeyboard.png|700px|Figure 17- CustomKeyboard.png]] | ||
| + | |||
| + | | ||
| + | <ol start="3"> | ||
| + | <li>Select the arrow icon to continue to the next row to insert “Asset Number”.</li> | ||
| + | <li>Input the Register and Asset No. Fields, there is a scanner button beside that asset No. as well.</li> | ||
| + | </ol> | ||
| + | |||
| + | <br/> <u>'''Note''':</u> Customer Keyboard and ‘H’ function apply only for Android 7, 8, and 9 using “Appgarden-42Q-2.06.apk“. For Android 5 and 6, still use “Appgarden-42Q_2.05.apk”. For Android 4, still use the remaining “Appgarden-42Q-2.05.1.apk”. | ||
| | ||
| − | = | + | '''Figure 18: Enter Asset Number''' |
| + | |||
| + | '''[[File:Figure 18- Enter Asset Number.png|700px|Figure 18- Enter Asset Number.png]]''' | ||
| + | <ol start="5"> | ||
| + | <li>We have added the Re-register Asset No. control on the Appgarden 2.05 if the tablet already registers an activated asset No v8., and when users try to register a new inactive asset No 92. it will pop up this message “Your device has already registered. Do you want to switch to a new asset No?“. Users can click ‘Register' to continue or click the 'back’ button to exit register a new asset No.</li> | ||
| + | </ol> | ||
| + | |||
| + | '''Figure 19: Asset Already Exist Message''' | ||
| − | + | '''[[File:Figure 19- Asset List Report.png|700px|Figure 19- Asset List Report.png]]''' | |
| − | |- | + | |
| − | + | | |
| − | + | <ol start="6"> | |
| − | | | + | <li>Click Register</li> |
| − | + | </ol> | |
| − | + | ||
| − | + | '''Figure 20 : Register Page''' | |
| − | + | ||
| − | + | [[File:Figure 20 - Register Page.png|700px|Figure 20 - Register Page.png]] | |
| − | | | + | <ol start="7"> |
| − | | | + | <li>Added below 6 indicated fields on the AppGarden home screen.</li> |
| − | + | </ol> | |
| − | + | ||
| − | + | '''Figure 21: New Fields in the Home Screen''' | |
| − | + | ||
| − | + | [[File:Figure 21- New Fields in the Home Screen .png|700px|Figure 21- New Fields in the Home Screen .png]] | |
| − | + | ||
| − | + | '''Note''': Clicking the colorful icon located at the button right allows you to enter in a password to gain access to the application. | |
| − | + | ||
| + | ---- | ||
| + | |||
| + | | ||
Latest revision as of 17:36, 8 October 2021
42Q Home > Tools > App Garden Quick Guide
Introduction
AppGarden is 42Q’s solution to manage and ensure compliance concerning the applications that may run on its Android tablets on the shop floor. This document explains the primary functions in AppGarden. It is assumed that the user has a tablet with AppGarden installed.
In order to control permissions for tablet users, stream updates and configure the installation to tablet applications, therefore, 42Q provides three solutions to manage tablet use on the factory floor, the tools should be used together.
- APK “Android Package Maintenance” (MES Portal) : Serves as a repository for Android tablet applications
Android Application Package (APK) is the format for the installation and distribution of application software implemented by Android’s operating system. The MES development team has provided a mobile data collection solution that allows for manufacturing execution at the shop floor level through the use of convenient tablets. These inexpensive tablets provide mobility, flexibility, and scalability to increase productivity while decreasing overhead costs.
- Android Device Maintenance (MES Portal): Manages the tablets.
Android Device Maintenance is the primary module for managing the tablets to which the Package Maintenance applications are pushed.
- AppGarden (Installed on every tablet): Allows installation and updates on Android mobile devices
AppGarden APK is an Android management tool, which is used to manage APK installation and uninstall and update on android devices, access, and system information collection; this APK should be the last install after installing all/any other MES Android Applications.
For more information on Android Package Maintenance, Android Device Maintenance, and/or AppGarden solutions visit https://42qrpt1.42-q.com/mes_wiki/index.php/SOP-5-I-42Q-MES0106-C_42Q_APK.
Installation on Device
To install the APK package follow the following steps:
Use File Manager of your own device to Install;
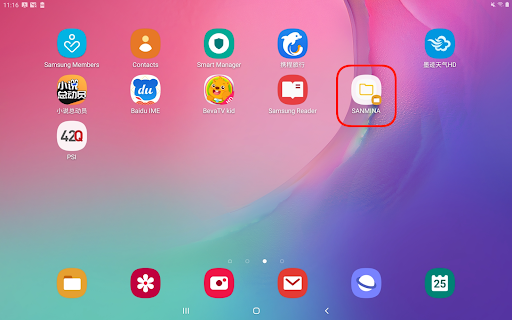
Click File Explorer of your own device to locate your SD card or USB for the AppGarden APK installation package and double click to install.
Figure 1: AppGarden Main Tablet Screen
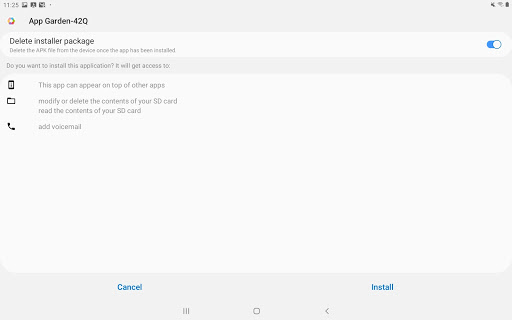
Select the AppGarden APK, users could turn on the “Delete Installer Package” checkbox and click Install.
Figure 2: AppGarden Delete Installer Package
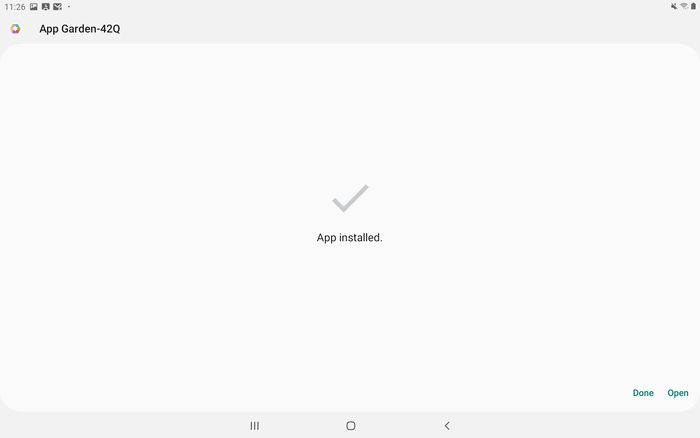
Click Confirm.
Figure 3: AppGarden App Installed
With AppGarden installed, users can click Done or Open on the AppGarden directly.
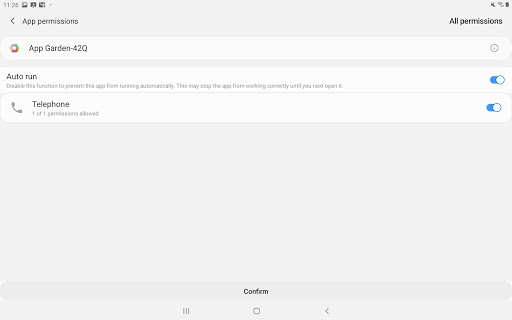
Figure 4: AppGarden Permissions
AppGarden Features
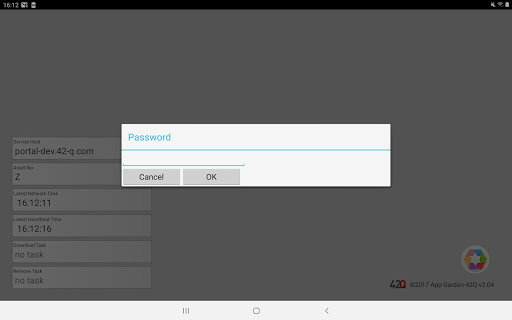
- "Password Protection" restricts anyone to exit this AppGarden unless a password has been entered.
Figure 5: Password Protection
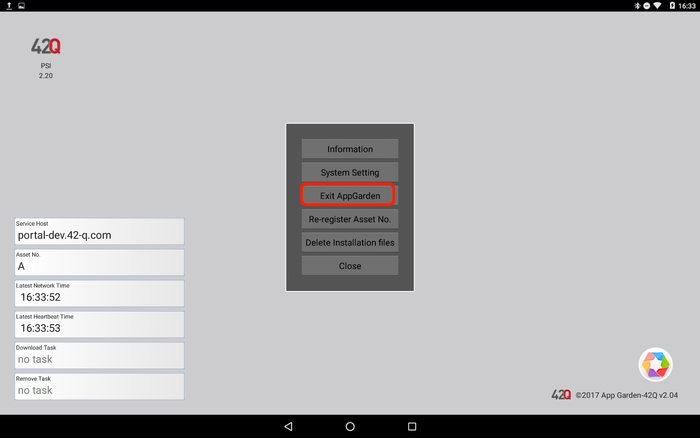
- Auto Starts when Android devices boot. Once booted, the devices will always go to AppGarden, just like an enterprise environment, unless click “Exit Appgarden”.
Figure 6: Exit AppGarden
- Show the Asset No, Name, Group, Plant, Device Type, Sync-Time, Service Host, current IP address by clicking the “Information” tab.
Figure 7: App Information Icon
Selecting Information from the main menu displays the specifications for the tablet and its respective configuration with regards to 42Q. The information that is listed includes
• Asset No: The asset number of the device unique to the group
• Name: The name given to the device.
• Group: The group to which the device was added.
• Plant: The plant where the device operates.
• Device Type: Designates the type of device.
• Sync Time: Designates the Sync interval (in minutes) for the device.
• Service Host: Designates the Service Host IP.
• IP Address: Represents the IP used by the device.
Figure 8: App Information
Figure 9: App System Setting
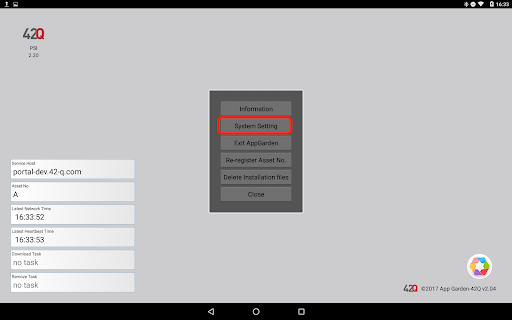
- Show the Android system settings by clicking the “System Setting” tab.
The main menu contains the following selections:
- Information
- System Setting
- Exit AppGarden
- Re-register Asset No.
- Delete Installation Files
- Close
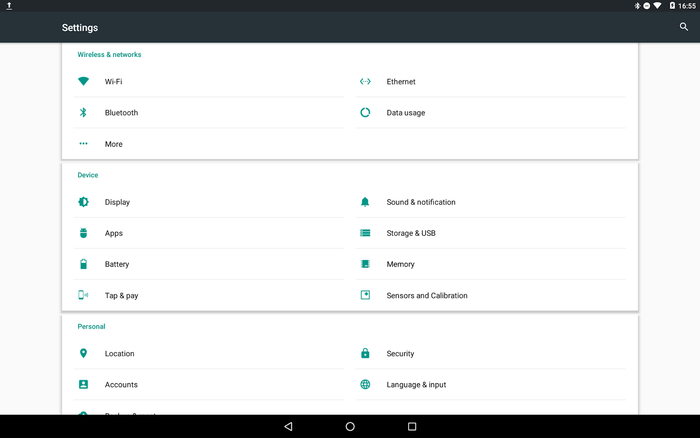
Note: Selecting System Settings directs the user to the device’s system settings hub, where, for example, options concerning network connectivity and accounts are selected.
Figure 10: App Settings
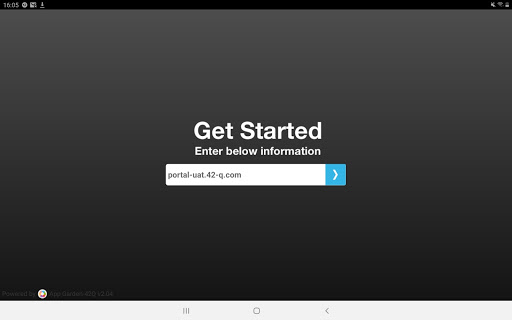
- Get Started register Asset NO. by clicking the “Re-register Asset No.” tab, e.g. portal-uat.42-q.com.
Figure 11: Re-Register Asset
Re-register Asset No.
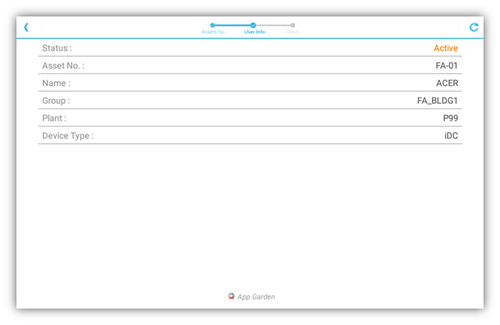
This function allows the plant administrator to re-register the Asset Number for the device. This feature applies to when the plant administrator needs to connect the device to a different MES Portal server, or when the Asset Number that was previously registered is incorrect. To use this function, enter the Service Host in the initial field provided and select the arrow icon to the right of the field to confirm the entry. A new field appears directly below the Service Host field. In the new field enter the Asset Number. The user is then directed to the User Info screen where the status of the Asset Number is given, along with the Asset Number itself and its respective Name, Group, Plant, and Device Type.
Figure 12: Get Started
- The APK Installation files could be deleted by clicking the “Delete Installation files” tab.
Figure 13: Delete Installation Files
In the process of air deployment, there will be installation files that are downloaded to the table to be initialized at a scheduled time. It may be preferred, however, that these files be deleted in order to save space or because an error occurs during the download of the installation files. The Delete Installation Files function allows the user to delete these files. To perform this action, simply select Delete Installation Files from the AppGarden menu. The message, “Delete installation files completed!” appears at the bottom of the screen.
Figure 14: File Browser
There are some indicated shows on the Appgarden screen, such as the Service Host, Asset No., Latest network time, Latest heartbeat time, Download Task, Remove Task, Device Time, Submit Time, and the download status indicate: PSI download finished, please wait.
Figure 15: Indicators
AppGarden Login
- Open the AppGarden application
- First-time users will enter the Service Host (i.e., MES Portal IP) to login into the field provided.
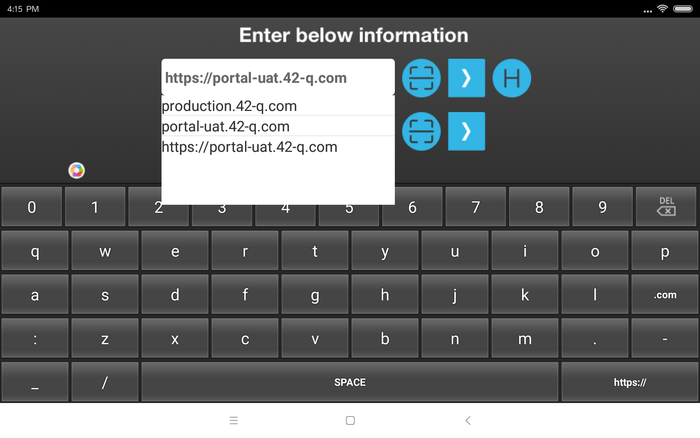
Note: Clicking the “H” button will show the latest 3 Host histories for returning users.
Figure 16: Get Started
Note: The new 2.05 version was updated to add a scanner and “H” host function.
Figure 17: Host Information
- Select the arrow icon to continue to the next row to insert “Asset Number”.
- Input the Register and Asset No. Fields, there is a scanner button beside that asset No. as well.
Note: Customer Keyboard and ‘H’ function apply only for Android 7, 8, and 9 using “Appgarden-42Q-2.06.apk“. For Android 5 and 6, still use “Appgarden-42Q_2.05.apk”. For Android 4, still use the remaining “Appgarden-42Q-2.05.1.apk”.
Figure 18: Enter Asset Number
- We have added the Re-register Asset No. control on the Appgarden 2.05 if the tablet already registers an activated asset No v8., and when users try to register a new inactive asset No 92. it will pop up this message “Your device has already registered. Do you want to switch to a new asset No?“. Users can click ‘Register' to continue or click the 'back’ button to exit register a new asset No.
Figure 19: Asset Already Exist Message
- Click Register
Figure 20 : Register Page
- Added below 6 indicated fields on the AppGarden home screen.
Figure 21: New Fields in the Home Screen
Note: Clicking the colorful icon located at the button right allows you to enter in a password to gain access to the application.
