Difference between revisions of "MES15 Portal 1.0 User Manual"
Alice Zhong (talk | contribs) (Created page with "== Introduction == This page covers commom functionalities of MES15 Portal 1.0, from how to login, setup User Maintenance, Plant Maintenance, Site Maintenance, Profile Maintena...") |
|||
| (14 intermediate revisions by 2 users not shown) | |||
| Line 1: | Line 1: | ||
| − | |||
| − | This | + | <small>[[42Q_Cloud-Based_MES/MOMS|42Q Home]] </small><br/> |
| + | <p style="text-align: center;">''' '''<br/> <br/> <br/> <br/> '''42Q'''</p> <p style="text-align: center;">'''Version MES15.69'''<br/> <br/> <br/> This is 42Q’s corporate standard.</p> <p style="text-align: center;">This document is under revision control.</p> <p style="text-align: center;">Once printed it is an uncontrolled copy. Changes to this document require approval.</p> <p style="text-align: center;">Contact 42Q to submit suggested alterations and or updates. <br/> </p> | ||
| + | <span class="mw-headline" id=""> </span> | ||
| − | < | + | == <span class="mw-headline" id="Introduction"><span class="mw-headline" id="Introduction"><span class="mw-headline" id="Introduction"><span class="mw-headline" id="Introduction"><span class="mw-headline" id="Introduction">Introduction</span></span></span></span></span> == |
| − | + | This page covers common functionalities of the MES Portal, from how to log in, setup '''User Maintenance''', '''Plant Maintenance''', '''Site Maintenance''', '''Profile Maintenance''', '''System Log''', '''Server Information''', '''Audit Report''', '''Application Version,''' and how to sign out the application, which is intended to guide administrators on how to manage and maintain local '''MES Portal''', as well as to provide specific user groups a common sense of portal operation. | |
| − | + | | |
| − | < | + | == <span class="mw-headline" id="Accessing_MES_Portal"><span class="mw-headline" id="Accessing_MES_Portal"><span class="mw-headline" id="Accessing_MES_Portal"><span class="mw-headline" id="Accessing_MES_Portal"><span class="mw-headline" id="Accessing_MES_Portal"><span class="mw-headline" id="Accessing_MES_Portal"><span class="mw-headline" id="Accessing_MES_Portal"><span class="mw-headline" id="Accessing_MES_Portal"><span class="mw-headline" id="Accessing_MES_Portal"><span class="mw-headline" id="Accessing_MES_Portal">Accessing MES Portal</span></span></span></span></span></span></span></span></span></span> == |
| − | [ | + | To access the MES Portal using the following URL:'''[https://portal-uat.42-q.com https://portal-uat.42-q.com] '''the '''Welcome''' page will be shown as '''Figure 1''' below describes. |
| − | + | | |
| − | + | '''Figure 1: Welcome Page''' | |
| − | + | '''[[File:42Q Welcome Page.png|700px|42Q Welcome Page.png]]''' | |
| − | + | '''<u>Note:</u> '''The portal supports multi-languages as shown in the top right corner of the below image. | |
| − | + | | |
| − | |||
| − | + | To log in, users must type their '''user_name''' and click '''Next''', the screen will change and request the '''Password''' as Figure 2 shows. | |
| − | + | #Enter valid '''Username''' and '''Password'''; | |
| + | #Click on '''Sign In'''. | ||
| − | + | '''Figure 2: Password''' | |
| − | [[ | + | '''[[File:42Q Password.png|42Q Password.png]]''' |
| − | + | | |
| − | + | '''<u>Note:</u>''''' ''The options Back and Forgot Password are available as well as Learn More. | |
| − | + | | |
| − | |||
| − | |||
| − | + | If users want to know more about 42Q this option will redirect to the 42Q official site [https://www.42-q.com/ https://www.42-q.com/] | |
| − | + | '''Figure 3: 42Q ''' | |
| − | + | '''[[File:42Q Learn More.png|42Q Learn More.png]]''' | |
| − | + | | |
| − | + | == <span class="mw-headline" id="MES_Portal_Overview"><span class="mw-headline" id="MES_Portal_Overview"><span class="mw-headline" id="MES_Portal_Overview"><span class="mw-headline" id="MES_Portal_Overview"><span class="mw-headline" id="MES_Portal_Overview"><span class="mw-headline" id="MES_Portal_Overview"><span class="mw-headline" id="MES_Portal_Overview"><span class="mw-headline" id="MES_Portal_Overview">MES Portal Overview</span></span></span></span></span></span></span></span> == | |
| − | + | | |
| − | ''' | + | After signed in, the main menu of the '''MES Portal''' will be activated, the '''Welcome Page '''picture includes all the official Welcome words according to different countries where deployed or will deploy the MES Portal. |
| − | + | Let's overview a little bit and pay attention to the highlights in below figure: | |
| − | | + | '''Figure 4: Welcome Menu''' |
| − | + | [[File:42Q Welcome.png|700px|42Q Welcome.png]] | |
| − | | + | |
| − | + | The '''Welcome''' Menu Bar contains the following sections: | |
| − | + | *Account Services | |
| + | *Application version | ||
| + | *Audit Report | ||
| + | *System Log | ||
| − | + | The '''Administrator''' Menu Bar contains the following sections: | |
| − | + | *User Maintenance | |
| + | *Site Maintenance | ||
| + | *Plant Maintenance | ||
| + | *Profile Maintenance | ||
| + | *Migration Assistant | ||
| + | *Andriod Package Maintenance | ||
| + | *+ Multimedia Admin | ||
| + | *+ LaunchPad | ||
| − | + | | |
| − | + | '''Figure 5: Administrator''' | |
| − | + | [[File:42Q Administrator Menu.png|700px|42Q Administrator Menu.png]] | |
| − | + | '''<u>Note:</u> '''The modules displayed are different depending on the user roles in '''MES Portal.''' | |
| − | < | + | == <span class="mw-headline" id="Setup_User_Maintenance"><span class="mw-headline" id="Setup_User_Maintenance"><span class="mw-headline" id="Setup_User_Maintenance"><span class="mw-headline" id="Setup_User_Maintenance"><span class="mw-headline" id="Setup_User_Maintenance"><span class="mw-headline" id="Setup_User_Maintenance"><span class="mw-headline" id="Setup_User_Maintenance">Setup User Maintenance</span></span></span></span></span></span></span> == |
| − | + | User Maintenance allows the administrator to add, edit, activate, deactivate, and delete users. Non-LDAP users can also change their passwords with the User Maintenance portlet. | |
| − | + | To access the '''User Maintenance '''page, navigate to '''Administration> User Maintenance.''' | |
| − | + | All available users will be listed alphabetically. | |
| − | + | ''' ''' | |
| − | + | '''Figure 6: Add User''' | |
| − | [[ | + | '''[[File:42Q UserMaint.png|700px|42Q UserMaint.png]]''' |
| − | + | | |
| − | + | Please visit [https://42qrpt1.42-q.com/mes_wiki/index.php/SOP-5-I-MES0034-C_RA1_Admin_User_Maintenance SOP-5-I-MES0034-C RA1 Admin User Maintenance] for more information. | |
| − | + | == <span class="mw-headline" id="Setup_Plant_Maintenance"><span class="mw-headline" id="Setup_Plant_Maintenance"><span class="mw-headline" id="Setup_Plant_Maintenance"><span class="mw-headline" id="Setup_Plant_Maintenance"><span class="mw-headline" id="Setup_Plant_Maintenance">Setup Plant Maintenance</span></span></span></span></span> == | |
| − | + | This section covers how to perform plant maintenance in MES Portal, including how to create or maintain plants. | |
| − | + | | |
| − | + | Clicking on the '''Plant Maintenance''' from vertical menu, the '''Plant Maintenance''' page will be displayed, refer to below figure: | |
| − | + | [[File:Plant maintenance v1.3-1.png|Plant maintenance v1.3-1.png]] | |
| − | + | | |
| − | + | | |
| − | + | Click on Add button to create a new plant detail. Refer to the figure below as an example. | |
| − | + | [[File:Plant maintenance v1.3-3.png|Plant maintenance v1.3-3.png]] | |
| − | + | | |
| − | + | If user wants to edit plant information, please select one plant first: | |
| − | + | [[File:Plant maintenance v1.3-4.png|Plant maintenance v1.3-4.png]] | |
| − | + | | |
| − | + | After selecting specified plant to edit: | |
| − | + | [[File:Plant maintenance v1.3-2.png|Plant maintenance v1.3-2.png]] | |
| − | ''' | + | Click '''Save''' to save modification, Otherwise Click '''Cancel''' to exit. |
| − | + | | |
| − | [[ | + | Once Plant detail had been saved successfully in Plant Maintenance,refer to the figure below:<br/> [[File:Plant maintenance v1.3-5.png|Plant maintenance v1.3-5.png]] |
| − | + | | |
| − | + | == <span class="mw-headline" id="Setup_Site_Maintenance"><span class="mw-headline" id="Setup_Site_Maintenance"><span class="mw-headline" id="Setup_Site_Maintenance"><span class="mw-headline" id="Setup_Site_Maintenance"><span class="mw-headline" id="Setup_Site_Maintenance">Setup Site Maintenance </span></span></span></span></span> == | |
| − | + | This section covers how to perform '''Site Maintenance''' in MES Portal, including how to add/edit a site, how to assign user to the site and manage site's page. | |
| − | <br> | + | <br/> '''How to use site maintenance'''<br/> First click Add highlighted with red panel in bottom right.<br/> [[File:Site maintenance v1.3-1.png|Site maintenance v1.3-1.png]] |
| − | + | <br/> '''Add a site:''' | |
| − | <br> | + | Click Add, the following page will appear:<br/> [[File:Site maintanence v1.3-7.png|Site maintanence v1.3-7.png]] |
| − | ''' | + | '''Name: '''stand for the name of the site. such as'''plant code + server:''' '''E68-mds01''' |
| − | + | '''Plant:''' Which plant that site is belong to. such as '''E68'''. | |
| − | + | '''Description: '''stand for the description of the site. | |
| − | + | Click '''Add''' to create a site or click '''Cancel''' to discard. | |
| − | + | | |
| − | + | '''Edit a site''' | |
| − | + | User can select one site to edit site's details. | |
| − | + | [[File:Site maintenance v1.3-3.png|Site maintenance v1.3-3.png]] | |
| − | + | | |
| − | + | Once selected, Click Edit, the following page will appear. | |
| − | + | [[File:Site maintenance v1.3-4.png|Site maintenance v1.3-4.png]] | |
| − | + | | |
| − | + | Click '''Save''' to effect modification or click '''Cancel''' to discard. | |
| − | + | | |
| − | + | '''Assign User''' | |
| − | + | Once '''E68-mds01''' site is generated. Click the '''Assign User''' button to assign '''Alice Zhong''' into the site"E68-mds01". | |
| − | + | [[File:Site maintenance v1.3-8.png|Site maintenance v1.3-8.png]] | |
| − | + | | |
| − | + | Once selected, user can be assigned to this site: | |
| − | + | [[File:Site maintenance v1.3-5.png|Site maintenance v1.3-5.png]] | |
| − | + | | |
| − | ''' | + | Make sure the '''Site Admin''' checkbox is checked, Otherwise Alice Zhong can't add page and portlet for site E68-mds01. |
| − | Click the | + | Then, Click '''Save''' to effect the configuration or click '''Cancel''' to disacard. |
| − | + | <br/> '''Manage Pages''' | |
| − | + | Admin user can create page and portlet for sites. Here's the step: | |
| − | + | [[File:Site maintenance v1.3-10.png|Site maintenance v1.3-10.png]] | |
| − | + | | |
| − | + | Then User create or import page or portlet. | |
| − | + | [[File:Site maintenance v1.3-14.png|Site maintenance v1.3-14.png]] | |
| − | + | | |
| − | ' | + | A site must have at least page unless the site can't be displayed for the user to go to. |
| − | < | + | == <span class="mw-headline" id="Setup_Profile_Maintenance"><span class="mw-headline" id="Setup_Profile_Maintenance"><span class="mw-headline" id="Setup_Profile_Maintenance"><span class="mw-headline" id="Setup_Profile_Maintenance"><span class="mw-headline" id="Setup_Profile_Maintenance">Setup Profile Maintenance</span></span></span></span></span> == |
| − | ''' | + | This section covers how to setup '''Profile Maintenance''' in MES Portal, including how to add/edit the role and assign user to the role. |
| − | + | <br/> Click the '''Profile Maintenance '''portlet. All the Roles will list out.<br/> [[File:Profile maintenance v1.3-1.png|Profile maintenance v1.3-1.png]] | |
| − | + | | |
| − | + | '''Add Role''' | |
| − | + | Click the Add button in top right to create a new role. | |
| − | + | [[File:Profile maintenance v1.3-6.png|Profile maintenance v1.3-6.png]] | |
| − | + | | |
| − | + | Key in a '''Name''' for the role to be created. Fill in more details in '''Description''' field if possible. And select which S'''ite''' that role is belong to. Such as '''E68-mds01.''' | |
| − | + | Each '''action''' which belong to''' E68-mds01''' are shown. For example, grant access of MDS and Server Information action to the role '''Alicetesting.''' Then click '''Add '''button at the bottom to save the role'''Alicetesting.''' | |
| − | + | [[File:Profile maintenance v1.3-2.png|Profile maintenance v1.3-2.png]] | |
| − | + | | |
| − | + | [[File:Profile maintenance v1.3-3.png|Profile maintenance v1.3-3.png]]<br/> | |
| − | ''' | + | '''Alicetesting''' role is saved successfully after clicking Add. Or user can click '''Cancel''' to exit. |
| − | + | | |
| − | + | '''Assign User''' | |
| − | + | After selecting one role, click '''Assign User''' button to assign alice_zhong to this role. | |
| − | + | Ps: Role is able to be edited by clicking on the '''Edit''' button. | |
| − | + | [[File:Profile maintenance v1.3-7.png|Profile maintenance v1.3-7.png]] | |
| − | + | | |
| − | + | | |
| − | + | Select Site, Click on '''alice_zhong''' and '''save''' it. | |
| − | [[ | + | [[File:Profile maintenance v1.3-4.png|Profile maintenance v1.3-4.png]]<br/> |
| − | + | Click '''Save''' to take effect, and then click '''Back''' to profile maintenance portlet. | |
| − | + | | |
| − | + | == <span class="mw-headline" id="Server_Information"><span class="mw-headline" id="Server_Information"><span class="mw-headline" id="Server_Information"><span class="mw-headline" id="Server_Information"><span class="mw-headline" id="Server_Information">Server Information</span></span></span></span></span> == | |
| − | + | This section covers how to add, edit and delete server info details of SFDC/SPC/PTS/JMDS to '''server information''' portlet. | |
| − | ''' | + | '''How to use server Infomation Portlet (Admin only)''' |
| − | + | Through this portlet, Admin can add, edit and delete a server. | |
| − | + | First click edit highlighted with red pane in Options. | |
| − | + | [[File:Server info v1.3-2.png|Server info v1.3-2.png]] | |
| − | + | | |
| − | + | To Edit or Delete a server info, please select one server and then click edit or delete. | |
| − | + | [[File:Server info v1.3-3.png|Server info v1.3-3.png]] | |
| − | | + | |
| − | + | Here please note that, if user wants to edit or delete a server, it is required to select one server first. Otherwise, the following message will promp up. | |
| − | + | [[File:Server info v1.3-4.png|Server info v1.3-4.png]] | |
| − | + | | |
| − | + | To add a server, please select add, then the following will appear. Here we'll take SFDC programe as an example. | |
| − | + | [[File:Server info v1.31.png|Server info v1.31.png]] | |
| − | + | | |
| − | + | ''' Program:'''which program is applicated in the host.such as:'''SFDC''' ''' Plant:''' Which plant the users belong to. such as:'''E68(SZX4)''' | |
| − | + | ''' Name:''' stand for the name of the host. such as:'''172.26.100.185''' | |
| − | + | ''' Customer''':stand for Customer name that the host belong to. such as:'''alice''' | |
| − | + | '''IP''':stand for the internet protocol address. such as:'''172.26.100.185''' | |
| − | + | ''' AppServer''' '''Port''':which internet port the host user. such as:'''8080''' | |
| − | + | '''Context Path''':to locate the program position in host address. such as:'''/sfdc-webservice''' | |
| − | + | '''Status''':stand for the status of the program applied in the host. such as:'''Active''' | |
| − | + | '''Description''':the version of the program applied in the host. such as:'''SFDC III6.1''' | |
| − | + | | |
| − | + | Each program selected have different configuration, please refer to separeate application. | |
| − | + | [[File:Server info v1.3-5.png|Server info v1.3-5.png]] | |
| − | + | | |
| − | + | For PTS server info configuration, please refer to [http://hsvmeswiki.sanmina.com/mes_wiki/index.php/PTS_User_Guide PTS User Guide] (WIP, PTS Team will provide after server info configuration post to wiki) | |
| − | + | For SPC server info configuration, please refer to [http://hsvmeswiki.sanmina-sci.com/mes_wiki/index.php/SPC_3.2_User_Manual#Create_SPC_Server Create SPC Server under SPC User Guide] | |
| − | [ | + | For SFDC server info configuration, please refer to [http://hsvmeswiki/mes_wiki/index.php/Emanual-updated_1.4#SFDC_Admin SFDC Admin under eManual User Guide] |
| − | + | For Measurement server info configuration, please refer to [http://hsvmeswiki.sanmina.com/mes_wiki/index.php/Measurement Measurement Guide] (TBD) | |
| − | + | For JMDS server info configuration, please refer to [http://hsvmeswiki.sanmina.com/mes_wiki/index.php/MDS_Portal MDS Guide] (TBD) | |
| − | + | For PTS IIS server info configuration, please refer to [http://hsvmeswiki.sanmina.com/mes_wiki/index.php/PTS_User_Guide PTS IIIS User Guide] (WIP, PTS Team will provide after server info configuration post to wiki) | |
| − | + | | |
| − | + | == <span class="mw-headline" id="System_Log"><span class="mw-headline" id="System_Log"><span class="mw-headline" id="System_Log"><span class="mw-headline" id="System_Log"><span class="mw-headline" id="System_Log">System Log</span></span></span></span></span> == | |
| − | + | This section covers display log of each applications in a portlet which include “info.log” “error.log” “tomcat” etc. | |
| − | ''' | + | Select Log '''Folder''' and then '''Log file''' to display each application's log. |
| − | + | | |
| − | + | [[File:System log v1.3-4.png|System log v1.3-4.png]] | |
| − | + | | |
| − | + | == <span class="mw-headline" id="Application_Version"><span class="mw-headline" id="Application_Version"><span class="mw-headline" id="Application_Version"><span class="mw-headline" id="Application_Version"><span class="mw-headline" id="Application_Version">Application Version</span></span></span></span></span> == | |
| − | + | This section covers what rpm packages included in current MES Portal 1.3 server by applicaiton name, application version and its install date. | |
| − | ''' | + | Click on '''Application Versions'''.The following screen will appear. User can clearly know which application had been installed and its related information. |
| − | + | [[File:Application version v1.3-1.png|Application version v1.3-1.png]] | |
| − | + | | |
| − | + | == <span class="mw-headline" id="Audit_Report"><span class="mw-headline" id="Audit_Report"><span class="mw-headline" id="Audit_Report"><span class="mw-headline" id="Audit_Report"><span class="mw-headline" id="Audit_Report">Audit Report</span></span></span></span></span> == | |
| − | + | '''How to use Audit Report Portlet''' | |
| − | + | | |
| − | + | [[File:Snapshot14-1-1.png|509x398px|Snapshot14-1-1.png]] | |
| − | + | <br/> '''Type:'''actions of user, '''such as''':log-in/log-out | |
| + | |||
| + | '''User Name:'''Screen name of user or last_name+first_name, '''such as''':mike_huang | ||
| + | |||
| + | '''User ID: '''ID of the user in the database, '''such as''':10191 | ||
| + | |||
| + | '''Resource Name: N/A''' | ||
| + | |||
| + | '''Resource ID: N/A''' | ||
| + | |||
| + | '''Session ID: N/A''' | ||
| + | |||
| + | '''Client IP: '''User client IP''', such as:'''172.26.28.82 | ||
| + | |||
| + | '''Server IP: '''Portal server IP''', such as:'''172.18.72.210 | ||
| + | |||
| + | | ||
| + | |||
| + | == <span class="mw-headline" id="References"><span class="mw-headline" id="References"><span class="mw-headline" id="References"><span class="mw-headline" id="References"><span class="mw-headline" id="References">References</span></span></span></span></span> == | ||
| + | |||
| + | [http://docs.liferay.com/portal/5.2/official/liferay-administrator-guide-5.2.pdf Liferay Administrator Guide] | ||
| + | |||
| + | ---- | ||
| + | |||
| + | | ||
Latest revision as of 17:52, 29 September 2021
42Q
Version MES15.69
This is 42Q’s corporate standard.
This document is under revision control.
Once printed it is an uncontrolled copy. Changes to this document require approval.
Contact 42Q to submit suggested alterations and or updates.
Contents
Introduction
This page covers common functionalities of the MES Portal, from how to log in, setup User Maintenance, Plant Maintenance, Site Maintenance, Profile Maintenance, System Log, Server Information, Audit Report, Application Version, and how to sign out the application, which is intended to guide administrators on how to manage and maintain local MES Portal, as well as to provide specific user groups a common sense of portal operation.
Accessing MES Portal
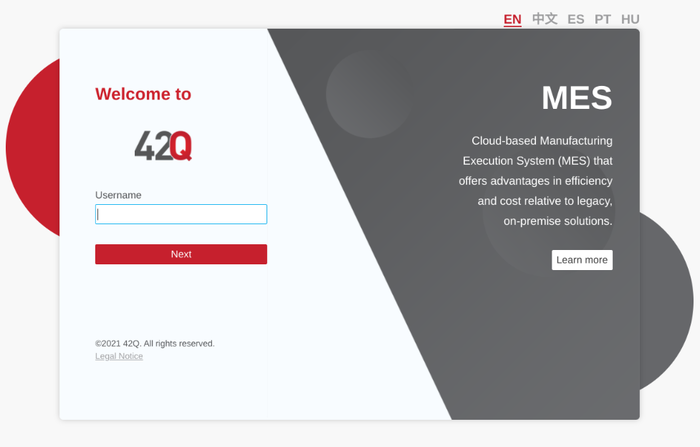
To access the MES Portal using the following URL:https://portal-uat.42-q.com the Welcome page will be shown as Figure 1 below describes.
Figure 1: Welcome Page
Note: The portal supports multi-languages as shown in the top right corner of the below image.
To log in, users must type their user_name and click Next, the screen will change and request the Password as Figure 2 shows.
- Enter valid Username and Password;
- Click on Sign In.
Figure 2: Password
Note: The options Back and Forgot Password are available as well as Learn More.
If users want to know more about 42Q this option will redirect to the 42Q official site https://www.42-q.com/
Figure 3: 42Q
MES Portal Overview
After signed in, the main menu of the MES Portal will be activated, the Welcome Page picture includes all the official Welcome words according to different countries where deployed or will deploy the MES Portal.
Let's overview a little bit and pay attention to the highlights in below figure:
Figure 4: Welcome Menu
The Welcome Menu Bar contains the following sections:
- Account Services
- Application version
- Audit Report
- System Log
The Administrator Menu Bar contains the following sections:
- User Maintenance
- Site Maintenance
- Plant Maintenance
- Profile Maintenance
- Migration Assistant
- Andriod Package Maintenance
- + Multimedia Admin
- + LaunchPad
Figure 5: Administrator
Note: The modules displayed are different depending on the user roles in MES Portal.
Setup User Maintenance
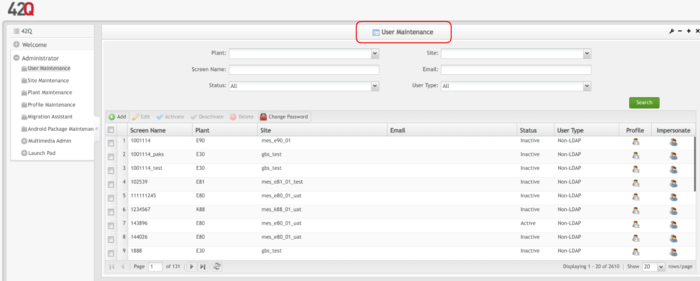
User Maintenance allows the administrator to add, edit, activate, deactivate, and delete users. Non-LDAP users can also change their passwords with the User Maintenance portlet.
To access the User Maintenance page, navigate to Administration> User Maintenance.
All available users will be listed alphabetically.
Figure 6: Add User
Please visit SOP-5-I-MES0034-C RA1 Admin User Maintenance for more information.
Setup Plant Maintenance
This section covers how to perform plant maintenance in MES Portal, including how to create or maintain plants.
Clicking on the Plant Maintenance from vertical menu, the Plant Maintenance page will be displayed, refer to below figure:
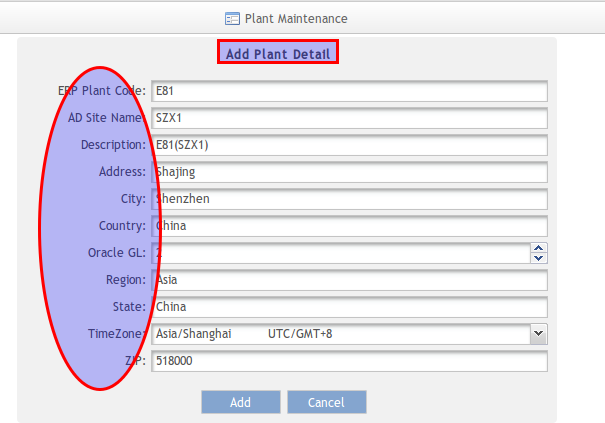
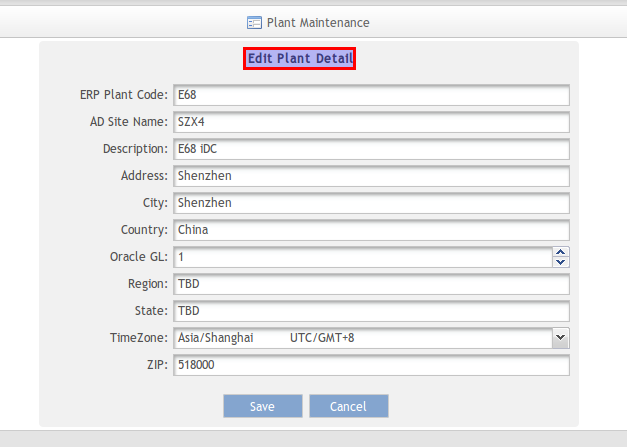
Click on Add button to create a new plant detail. Refer to the figure below as an example.
If user wants to edit plant information, please select one plant first:
After selecting specified plant to edit:
Click Save to save modification, Otherwise Click Cancel to exit.
Once Plant detail had been saved successfully in Plant Maintenance,refer to the figure below:

Setup Site Maintenance
This section covers how to perform Site Maintenance in MES Portal, including how to add/edit a site, how to assign user to the site and manage site's page.
How to use site maintenance
First click Add highlighted with red panel in bottom right.

Add a site:
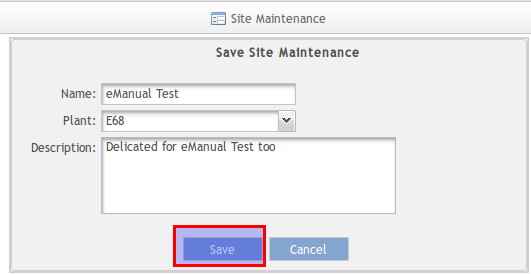
Click Add, the following page will appear:
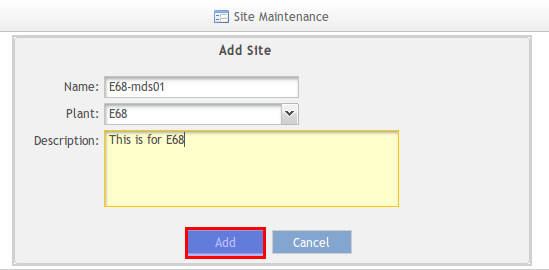
Name: stand for the name of the site. such asplant code + server: E68-mds01
Plant: Which plant that site is belong to. such as E68.
Description: stand for the description of the site.
Click Add to create a site or click Cancel to discard.
Edit a site
User can select one site to edit site's details.
Once selected, Click Edit, the following page will appear.
Click Save to effect modification or click Cancel to discard.
Assign User
Once E68-mds01 site is generated. Click the Assign User button to assign Alice Zhong into the site"E68-mds01".
Once selected, user can be assigned to this site:
Make sure the Site Admin checkbox is checked, Otherwise Alice Zhong can't add page and portlet for site E68-mds01.
Then, Click Save to effect the configuration or click Cancel to disacard.
Manage Pages
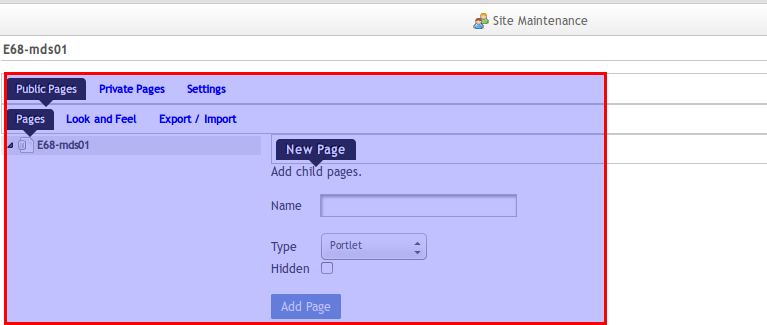
Admin user can create page and portlet for sites. Here's the step:
Then User create or import page or portlet.
A site must have at least page unless the site can't be displayed for the user to go to.
Setup Profile Maintenance
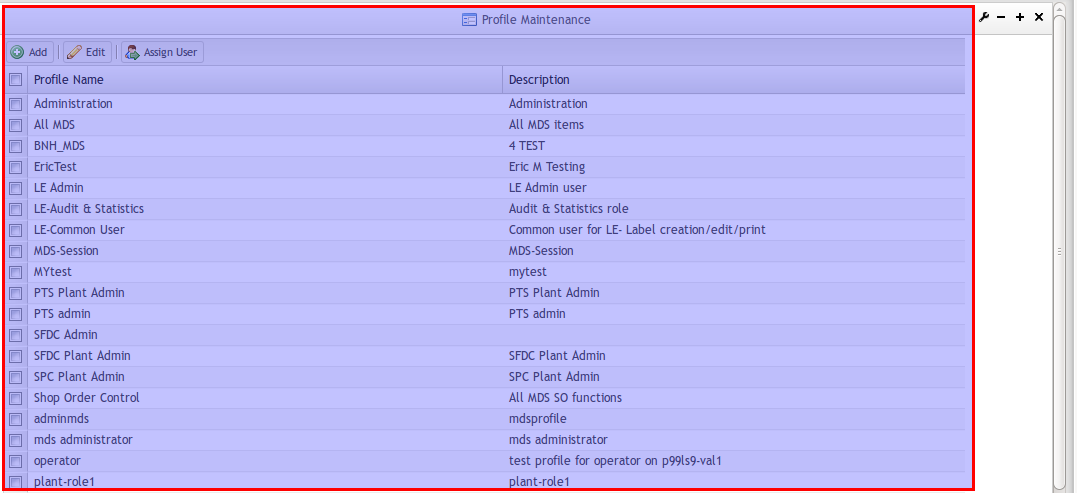
This section covers how to setup Profile Maintenance in MES Portal, including how to add/edit the role and assign user to the role.
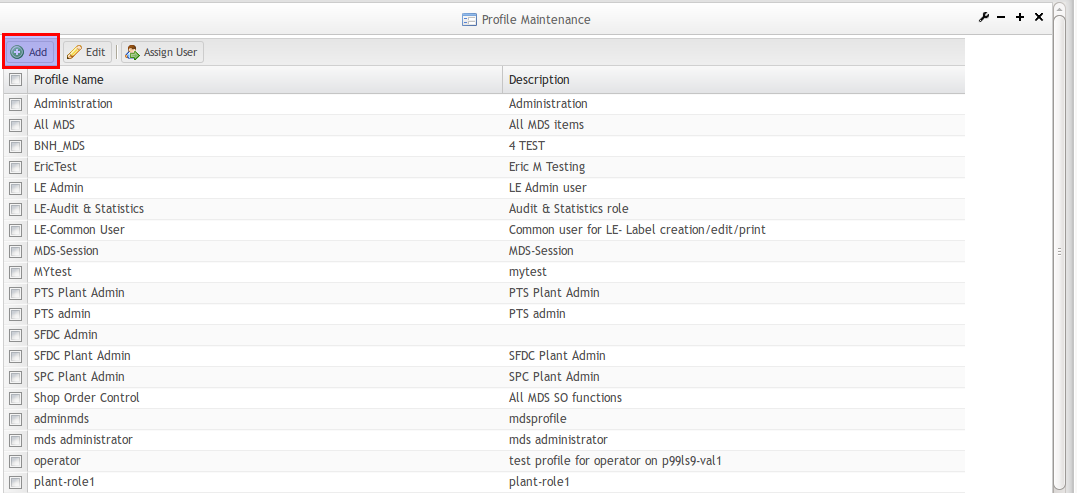
Click the Profile Maintenance portlet. All the Roles will list out.
Add Role
Click the Add button in top right to create a new role.
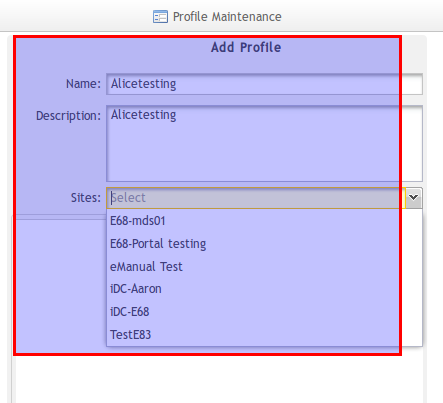
Key in a Name for the role to be created. Fill in more details in Description field if possible. And select which Site that role is belong to. Such as E68-mds01.
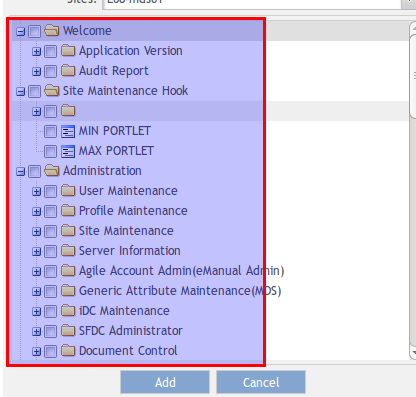
Each action which belong to E68-mds01 are shown. For example, grant access of MDS and Server Information action to the role Alicetesting. Then click Add button at the bottom to save the roleAlicetesting.
Alicetesting role is saved successfully after clicking Add. Or user can click Cancel to exit.
Assign User
After selecting one role, click Assign User button to assign alice_zhong to this role.
Ps: Role is able to be edited by clicking on the Edit button.
Select Site, Click on alice_zhong and save it.
Click Save to take effect, and then click Back to profile maintenance portlet.
Server Information
This section covers how to add, edit and delete server info details of SFDC/SPC/PTS/JMDS to server information portlet.
How to use server Infomation Portlet (Admin only)
Through this portlet, Admin can add, edit and delete a server.
First click edit highlighted with red pane in Options.
To Edit or Delete a server info, please select one server and then click edit or delete.
Here please note that, if user wants to edit or delete a server, it is required to select one server first. Otherwise, the following message will promp up.
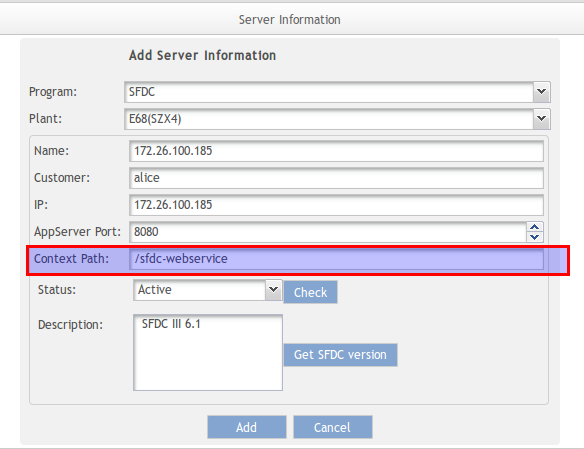
To add a server, please select add, then the following will appear. Here we'll take SFDC programe as an example.
Program:which program is applicated in the host.such as:SFDC Plant: Which plant the users belong to. such as:E68(SZX4)
Name: stand for the name of the host. such as:172.26.100.185
Customer:stand for Customer name that the host belong to. such as:alice
IP:stand for the internet protocol address. such as:172.26.100.185
AppServer Port:which internet port the host user. such as:8080
Context Path:to locate the program position in host address. such as:/sfdc-webservice
Status:stand for the status of the program applied in the host. such as:Active
Description:the version of the program applied in the host. such as:SFDC III6.1
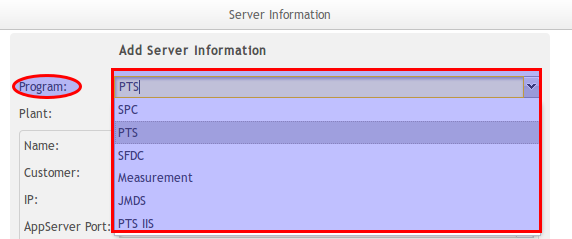
Each program selected have different configuration, please refer to separeate application.
For PTS server info configuration, please refer to PTS User Guide (WIP, PTS Team will provide after server info configuration post to wiki)
For SPC server info configuration, please refer to Create SPC Server under SPC User Guide
For SFDC server info configuration, please refer to SFDC Admin under eManual User Guide
For Measurement server info configuration, please refer to Measurement Guide (TBD)
For JMDS server info configuration, please refer to MDS Guide (TBD)
For PTS IIS server info configuration, please refer to PTS IIIS User Guide (WIP, PTS Team will provide after server info configuration post to wiki)
System Log
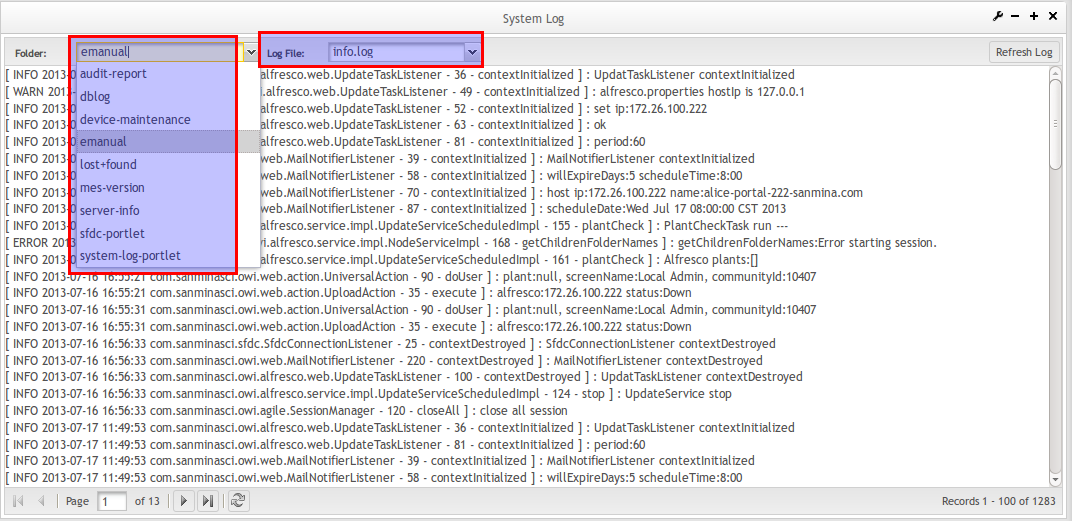
This section covers display log of each applications in a portlet which include “info.log” “error.log” “tomcat” etc.
Select Log Folder and then Log file to display each application's log.
Application Version
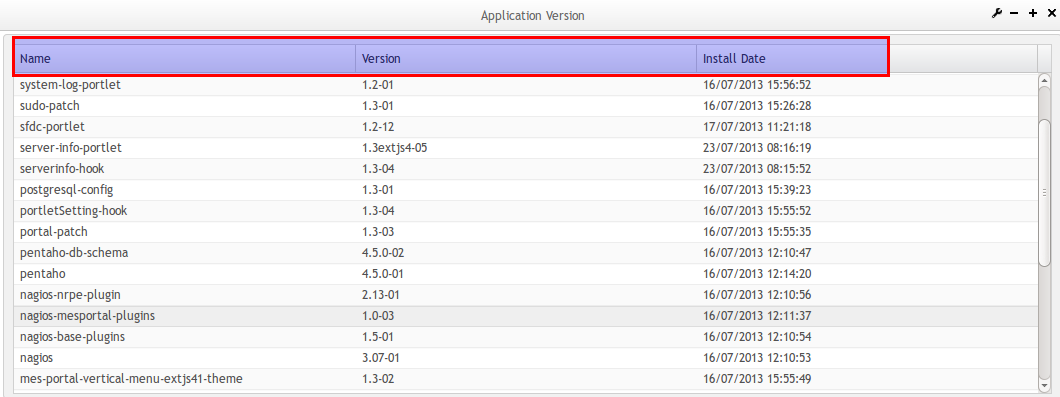
This section covers what rpm packages included in current MES Portal 1.3 server by applicaiton name, application version and its install date.
Click on Application Versions.The following screen will appear. User can clearly know which application had been installed and its related information.
Audit Report
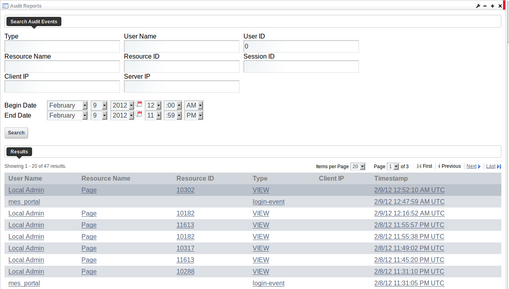
How to use Audit Report Portlet
Type:actions of user, such as:log-in/log-out
User Name:Screen name of user or last_name+first_name, such as:mike_huang
User ID: ID of the user in the database, such as:10191
Resource Name: N/A
Resource ID: N/A
Session ID: N/A
Client IP: User client IP, such as:172.26.28.82
Server IP: Portal server IP, such as:172.18.72.210
References
