Difference between revisions of "SOP-MES0038 Notification & Escalation"
| Line 16: | Line 16: | ||
| | ||
| + | | ||
| − | = <span class="mw-headline" id="Administration"><span class="mw-headline" id="Administration">Administration</span></span> = | + | = <span class="mw-headline" id="Administration"><span class="mw-headline" id="Administration"><span class="mw-headline" id="Administration">Administration</span></span></span> = |
Administrative privileges in '''42Q''' are located in the '''Administration''' menu heading. | Administrative privileges in '''42Q''' are located in the '''Administration''' menu heading. | ||
| Line 35: | Line 36: | ||
<br/> '''Figure 1: User Sign-In''' | <br/> '''Figure 1: User Sign-In''' | ||
| − | [[File:ADC User SignIn.png|700px]] | + | [[File:ADC User SignIn.png|700px|ADC User SignIn.png]] |
| | ||
| − | = <span class="mw-headline" id="Notification_and_Escalation">Notification and Escalation</span> = | + | = <span class="mw-headline" id="Notification_and_Escalation"><span class="mw-headline" id="Notification_and_Escalation">Notification and Escalation</span></span> = |
Notification and Escalation was created to simplify the alert process (SMS, e-mail, and portal notification). Corporate Administrators can access a single instance (DB) that contains all previously stored events. | Notification and Escalation was created to simplify the alert process (SMS, e-mail, and portal notification). Corporate Administrators can access a single instance (DB) that contains all previously stored events. | ||
| Line 61: | Line 62: | ||
*'''Rule- '''Defines the parameters for the notification. | *'''Rule- '''Defines the parameters for the notification. | ||
| − | <br/> '''Figure | + | <br/> '''Figure 2: Notification and Escalation''' |
[[File:Notification-Escalationmain page .jpg|900px|Notification-Escalationmain page .jpg]] | [[File:Notification-Escalationmain page .jpg|900px|Notification-Escalationmain page .jpg]] | ||
| Line 67: | Line 68: | ||
| | ||
| − | === <span class="mw-headline" id="Module">Module</span> === | + | === <span class="mw-headline" id="Module"><span class="mw-headline" id="Module">Module</span></span> === |
The '''Module '''portlet defines from where the notification is coming. In this portlet, the user can define the third-party application and its version to be used when the notification or escalation is created. The modules that are created can be assigned to instances in the '''Instance '''portlet. | The '''Module '''portlet defines from where the notification is coming. In this portlet, the user can define the third-party application and its version to be used when the notification or escalation is created. The modules that are created can be assigned to instances in the '''Instance '''portlet. | ||
| Line 73: | Line 74: | ||
1. To access the Moduleportlet, navigate to '''Administration '''>'''Notification and Escalation''', and then select the '''Module '''icon. | 1. To access the Moduleportlet, navigate to '''Administration '''>'''Notification and Escalation''', and then select the '''Module '''icon. | ||
| − | '''Figure | + | '''Figure 3: Notification and Escalation - Module''' |
[[File:Notification-Escalation-Module.jpg|900px|Notification-Escalation-Module.jpg]] | [[File:Notification-Escalation-Module.jpg|900px|Notification-Escalation-Module.jpg]] | ||
| Line 79: | Line 80: | ||
2. The Module List displays: | 2. The Module List displays: | ||
| − | '''Figure | + | '''Figure 4: Module List''' |
[[File:05NotificationEscal module list.jpg|900px|05NotificationEscal module list.jpg]] | [[File:05NotificationEscal module list.jpg|900px|05NotificationEscal module list.jpg]] | ||
| Line 87: | Line 88: | ||
| | ||
| − | ==== <span class="mw-headline" id="Filter">Filter</span> ==== | + | ==== <span class="mw-headline" id="Filter"><span class="mw-headline" id="Filter">Filter</span></span> ==== |
The Module List displays all created modules. Each module's description and status (Active or Inactive) is also displayed. The user can filter the list by '''Name '''or '''Active '''status. | The Module List displays all created modules. Each module's description and status (Active or Inactive) is also displayed. The user can filter the list by '''Name '''or '''Active '''status. | ||
| Line 95: | Line 96: | ||
2. Select '''Filter''' to filter the list, or '''Clear '''to clear the fields. | 2. Select '''Filter''' to filter the list, or '''Clear '''to clear the fields. | ||
| − | '''Figure | + | '''Figure 5: Filter Modules''' |
[[File:SOP-5-I-MES0038-C RA1 Notification and Escalation Final 04.png|900px|SOP-5-I-MES0038-C RA1 Notification and Escalation Final 04.png]] | [[File:SOP-5-I-MES0038-C RA1 Notification and Escalation Final 04.png|900px|SOP-5-I-MES0038-C RA1 Notification and Escalation Final 04.png]] | ||
| Line 101: | Line 102: | ||
| | ||
| − | ==== <span class="mw-headline" id="Add_Module">Add Module</span> ==== | + | ==== <span class="mw-headline" id="Add_Module"><span class="mw-headline" id="Add_Module">Add Module</span></span> ==== |
The '''Add '''function allows the user to add third-party applications to the Notification and Escalation database. When adding an application, the user must provide a description and version to aid in the module selection process. | The '''Add '''function allows the user to add third-party applications to the Notification and Escalation database. When adding an application, the user must provide a description and version to aid in the module selection process. | ||
| Line 109: | Line 110: | ||
2. The '''Module Element '''form displays: | 2. The '''Module Element '''form displays: | ||
| − | '''Figure | + | '''Figure 6: Add Module''' |
[[File:07NotificationEscal add module.jpg|900px|07NotificationEscal add module.jpg]] | [[File:07NotificationEscal add module.jpg|900px|07NotificationEscal add module.jpg]] | ||
| Line 117: | Line 118: | ||
4. Select '''Active''' to display the module in the '''Rule''' and '''Instance''' portlets. | 4. Select '''Active''' to display the module in the '''Rule''' and '''Instance''' portlets. | ||
| − | '''Note''': If this flag is not selected, the application and version will not display in the subsequent steps in the Notification and Escalation process. | + | <u>'''Note''':</u> If this flag is not selected, the application and version will not display in the subsequent steps in the Notification and Escalation process. |
5. Select '''Save '''to create the module. "Are you sure you want to save the changes?" confirmation message displays. Select '''Yes '''to confirm or '''No '''to cancel. | 5. Select '''Save '''to create the module. "Are you sure you want to save the changes?" confirmation message displays. Select '''Yes '''to confirm or '''No '''to cancel. | ||
| − | ===== <span class="mw-headline" id="Add_Version">Add Version</span> ===== | + | ===== <span class="mw-headline" id="Add_Version"><span class="mw-headline" id="Add_Version">Add Version</span></span> ===== |
The user can add a version to an application when creating a module. It is important to have versions identified for each application. There can be many versions for a single application. If the version is included in the module, it is easier to identify the specific application to which the notification applies. | The user can add a version to an application when creating a module. It is important to have versions identified for each application. There can be many versions for a single application. If the version is included in the module, it is easier to identify the specific application to which the notification applies. | ||
| Line 133: | Line 134: | ||
4. Mark the '''Active '''flag to make the version available in the '''Instance '''and '''Rule '''portlets. | 4. Mark the '''Active '''flag to make the version available in the '''Instance '''and '''Rule '''portlets. | ||
| − | '''Figure | + | '''Figure 7: Add Version''' |
[[File:08NotificationEscal Add Version.jpg|700px|08NotificationEscal Add Version.jpg]] | [[File:08NotificationEscal Add Version.jpg|700px|08NotificationEscal Add Version.jpg]] | ||
| Line 141: | Line 142: | ||
| | ||
| − | ===== <span class="mw-headline" id="Delete_Version">Delete Version</span> ===== | + | ===== <span class="mw-headline" id="Delete_Version"><span class="mw-headline" id="Delete_Version">Delete Version</span></span> ===== |
If a version is no longer supported or applicable, the user can delete it from the version list. This will remove the version from the application and it will no longer be available in the '''Instance '''or '''Rule '''portlet. | If a version is no longer supported or applicable, the user can delete it from the version list. This will remove the version from the application and it will no longer be available in the '''Instance '''or '''Rule '''portlet. | ||
| Line 147: | Line 148: | ||
1. To delete an application version, select the version from the list, and then select '''Delete'''. | 1. To delete an application version, select the version from the list, and then select '''Delete'''. | ||
| − | '''Figure | + | '''Figure 8: Delete Version''' |
[[File:09NotificationEscal module delete version.jpg|900px|09NotificationEscal module delete version.jpg]] | [[File:09NotificationEscal module delete version.jpg|900px|09NotificationEscal module delete version.jpg]] | ||
| Line 155: | Line 156: | ||
Note: If '''Save '''is not selected, the version will not be deleted and cannot be re-entered. The following prompt will display: | Note: If '''Save '''is not selected, the version will not be deleted and cannot be re-entered. The following prompt will display: | ||
| − | '''Figure | + | '''Figure 9: Error Message''' |
[[File:10NotificationEscal module message.png|400px|10NotificationEscal module message.png]] | [[File:10NotificationEscal module message.png|400px|10NotificationEscal module message.png]] | ||
| − | ===== <span class="mw-headline" id="Edit_Version">Edit Version</span> ===== | + | ===== <span class="mw-headline" id="Edit_Version"><span class="mw-headline" id="Edit_Version">Edit Version</span></span> ===== |
1. To edit a version, double-click on the version in the '''Version''' list. | 1. To edit a version, double-click on the version in the '''Version''' list. | ||
| Line 169: | Line 170: | ||
| | ||
| − | ==== <span class="mw-headline" id="Edit_Module">Edit Module</span> ==== | + | ==== <span class="mw-headline" id="Edit_Module"><span class="mw-headline" id="Edit_Module">Edit Module</span></span> ==== |
The '''Edit '''function allows the user to update any of the module's information (Name, Description, Active status, or Version). | The '''Edit '''function allows the user to update any of the module's information (Name, Description, Active status, or Version). | ||
| Line 177: | Line 178: | ||
2. The '''Module Element '''form displays: | 2. The '''Module Element '''form displays: | ||
| − | '''Figure | + | '''Figure 10: Edit Module''' |
[[File:11NotificationEscal edit module.jpg|900px|11NotificationEscal edit module.jpg]] | [[File:11NotificationEscal edit module.jpg|900px|11NotificationEscal edit module.jpg]] | ||
| Line 185: | Line 186: | ||
4. "Are you sure you want to save the changes?" confirmation message displays. Select '''Yes '''to confirm or '''No '''to cancel. | 4. "Are you sure you want to save the changes?" confirmation message displays. Select '''Yes '''to confirm or '''No '''to cancel. | ||
| − | ==== <span class="mw-headline" id="Delete_Module">Delete Module</span> ==== | + | ==== <span class="mw-headline" id="Delete_Module"><span class="mw-headline" id="Delete_Module">Delete Module</span></span> ==== |
If a Module is no longer supported or applicable, the user can delete it from the module list. This will remove it from the Notification and Escalation tool, and it will no longer be available in the '''Instance '''or '''Rule '''portlet. | If a Module is no longer supported or applicable, the user can delete it from the module list. This will remove it from the Notification and Escalation tool, and it will no longer be available in the '''Instance '''or '''Rule '''portlet. | ||
| Line 193: | Line 194: | ||
2. "Are you sure you want to delete (xxxx)?" confirmation message displays. Select '''Yes '''to confirm or '''No '''to cancel. | 2. "Are you sure you want to delete (xxxx)?" confirmation message displays. Select '''Yes '''to confirm or '''No '''to cancel. | ||
| − | '''Figure | + | '''Figure 11: Delete Module''' |
[[File:12NotificationEscal module delete.jpg|900px|12NotificationEscal module delete.jpg]] | [[File:12NotificationEscal module delete.jpg|900px|12NotificationEscal module delete.jpg]] | ||
| − | === <span class="mw-headline" id="Instance">Instance</span> === | + | === <span class="mw-headline" id="Instance"><span class="mw-headline" id="Instance">Instance</span></span> === |
The '''Instance '''portlet defines which modules to use at a specific site. In this portlet, the user can choose which third-party application and its version to be used when the notification or escalation is created. | The '''Instance '''portlet defines which modules to use at a specific site. In this portlet, the user can choose which third-party application and its version to be used when the notification or escalation is created. | ||
| Line 203: | Line 204: | ||
1. To access the Instanceportlet, navigate to '''Administration'''>'''Notification and Escalation''',and then select the '''Instance '''icon. | 1. To access the Instanceportlet, navigate to '''Administration'''>'''Notification and Escalation''',and then select the '''Instance '''icon. | ||
| − | '''Figure | + | '''Figure 12: Notification and Escalation - Instance''' |
[[File:13NotificationEscal instance.jpg|900px|13NotificationEscal instance.jpg]] | [[File:13NotificationEscal instance.jpg|900px|13NotificationEscal instance.jpg]] | ||
| Line 211: | Line 212: | ||
| | ||
| − | '''Figure | + | '''Figure 13: Deployed Element List''' |
[[File:14NotificationEscal instance main page.jpg|900px|14NotificationEscal instance main page.jpg]] | [[File:14NotificationEscal instance main page.jpg|900px|14NotificationEscal instance main page.jpg]] | ||
| Line 219: | Line 220: | ||
| | ||
| − | === <span class="mw-headline" id="Add_Deployed_Elements">Add Deployed Elements</span> === | + | === <span class="mw-headline" id="Add_Deployed_Elements"><span class="mw-headline" id="Add_Deployed_Elements">Add Deployed Elements</span></span> === |
This function allows the user to add modules to specific sites. The modules that are available to the user are pre-configured in the Module portlet. The Application and Version must be set to Active in the Module portlet in order to be displayed in the Instance portlet. | This function allows the user to add modules to specific sites. The modules that are available to the user are pre-configured in the Module portlet. The Application and Version must be set to Active in the Module portlet in order to be displayed in the Instance portlet. | ||
| Line 227: | Line 228: | ||
2. The Deployed Element form displays: | 2. The Deployed Element form displays: | ||
| − | '''Figure | + | '''Figure 14:Add Deployed Element''' |
[[File:15NotificationEscal Deployed Elem Add.jpg|900px|15NotificationEscal Deployed Elem Add.jpg]] | [[File:15NotificationEscal Deployed Elem Add.jpg|900px|15NotificationEscal Deployed Elem Add.jpg]] | ||
| Line 241: | Line 242: | ||
| | ||
| − | === <span class="mw-headline" id="Edit_Deployed_Elements">Edit Deployed Elements</span> === | + | === <span class="mw-headline" id="Edit_Deployed_Elements"><span class="mw-headline" id="Edit_Deployed_Elements">Edit Deployed Elements</span></span> === |
To Edit a Deployed Element from the list, select the element and them, select the Edit button. | To Edit a Deployed Element from the list, select the element and them, select the Edit button. | ||
| − | '''Figure | + | '''Figure 15: Edit a Deployed Element''' |
[[File:16NotificationEscal Deployed Elem Edit.jpg|900px|16NotificationEscal Deployed Elem Edit.jpg]] | [[File:16NotificationEscal Deployed Elem Edit.jpg|900px|16NotificationEscal Deployed Elem Edit.jpg]] | ||
| Line 251: | Line 252: | ||
| | ||
| − | === <span class="mw-headline" id="Delete_Deployed_Elements">Delete Deployed Elements</span> === | + | === <span class="mw-headline" id="Delete_Deployed_Elements"><span class="mw-headline" id="Delete_Deployed_Elements">Delete Deployed Elements</span></span> === |
1. To delete a deployed element, select the module from the list and then select '''Delete'''. | 1. To delete a deployed element, select the module from the list and then select '''Delete'''. | ||
| Line 259: | Line 260: | ||
3. Select '''Save''' to confirm the delete command, or '''Close '''to exit. | 3. Select '''Save''' to confirm the delete command, or '''Close '''to exit. | ||
| − | '''Figure | + | '''Figure 16: Delete a Deployed Element''' |
[[File:17NotificationEscal Deployed Elem Delete.jpg|900px|17NotificationEscal Deployed Elem Delete.jpg]] | [[File:17NotificationEscal Deployed Elem Delete.jpg|900px|17NotificationEscal Deployed Elem Delete.jpg]] | ||
| Line 265: | Line 266: | ||
| | ||
| − | == <span class="mw-headline" id="Rule">Rule</span> == | + | == <span class="mw-headline" id="Rule"><span class="mw-headline" id="Rule">Rule</span></span> == |
The '''Rule '''portlet defines the parameters for the notification. When adding a rule, the user can add Flow Steps, Action Steps and specific parameters to define retry times and quantities. When a notification is created, the parameters set up in the Rule portlet dictate the options that will be available in the '''Notification and Escalation – Operation '''portlet. | The '''Rule '''portlet defines the parameters for the notification. When adding a rule, the user can add Flow Steps, Action Steps and specific parameters to define retry times and quantities. When a notification is created, the parameters set up in the Rule portlet dictate the options that will be available in the '''Notification and Escalation – Operation '''portlet. | ||
| Line 271: | Line 272: | ||
1. To access the Rule portlet, navigate to '''Administration'''>'''Notification and Escalation''', and then select the '''Rule '''icon. | 1. To access the Rule portlet, navigate to '''Administration'''>'''Notification and Escalation''', and then select the '''Rule '''icon. | ||
| − | '''Figure | + | '''Figure 17: Notification and Escalation - Rule''' |
[[File:18NotificationEscal rule.jpg|900px|18NotificationEscal rule.jpg]] | [[File:18NotificationEscal rule.jpg|900px|18NotificationEscal rule.jpg]] | ||
| Line 277: | Line 278: | ||
2. The '''Rule '''main page displays: | 2. The '''Rule '''main page displays: | ||
| − | '''Figure | + | '''Figure 18: Rule List''' |
[[File:19NotificationEscal rule list.jpg|900px|19NotificationEscal rule list.jpg]] | [[File:19NotificationEscal rule list.jpg|900px|19NotificationEscal rule list.jpg]] | ||
| Line 283: | Line 284: | ||
The user can filter, add, edit, delete, or copy rules in this portlet. | The user can filter, add, edit, delete, or copy rules in this portlet. | ||
| − | === <span class="mw-headline" id="Filter_2">Filter</span> === | + | === <span class="mw-headline" id="Filter_2"><span class="mw-headline" id="Filter_2">Filter</span></span> === |
The Rule list can be filtered by '''Rule Key''','''Rule ID''','''Description''','''Instance''','''Element''',or '''Active Status'''. | The Rule list can be filtered by '''Rule Key''','''Rule ID''','''Description''','''Instance''','''Element''',or '''Active Status'''. | ||
| Line 291: | Line 292: | ||
2. Select '''Clear '''to empty all fields and start a new filter. | 2. Select '''Clear '''to empty all fields and start a new filter. | ||
| − | '''Figure | + | '''Figure 19: Filter Rules''' |
[[File:20NotificationEscal rule filter.jpg|900px|20NotificationEscal rule filter.jpg]] | [[File:20NotificationEscal rule filter.jpg|900px|20NotificationEscal rule filter.jpg]] | ||
| Line 299: | Line 300: | ||
| | ||
| − | === <span class="mw-headline" id="Add_Rule">Add Rule</span> === | + | === <span class="mw-headline" id="Add_Rule"><span class="mw-headline" id="Add_Rule">Add Rule</span></span> === |
1. To add a rule, select the '''Add '''icon from the tool bar. | 1. To add a rule, select the '''Add '''icon from the tool bar. | ||
| Line 305: | Line 306: | ||
2. The '''Rule Template '''form displays: | 2. The '''Rule Template '''form displays: | ||
| − | '''Figure | + | '''Figure 20: Add Rule''' |
[[File:21NotificationEscal rule add.jpg|900px|21NotificationEscal rule add.jpg]] | [[File:21NotificationEscal rule add.jpg|900px|21NotificationEscal rule add.jpg]] | ||
| Line 317: | Line 318: | ||
6. "Rule Template (Rule ID) was successfully created" message displays. | 6. "Rule Template (Rule ID) was successfully created" message displays. | ||
| − | ==== <span class="mw-headline" id="Add_Flow_Step">Add Flow Step</span> ==== | + | ==== <span class="mw-headline" id="Add_Flow_Step"><span class="mw-headline" id="Add_Flow_Step">Add Flow Step</span></span> ==== |
Flow steps need to be defined for each rule. These steps define the parameters that the notification will follow once created. | Flow steps need to be defined for each rule. These steps define the parameters that the notification will follow once created. | ||
| Line 323: | Line 324: | ||
1. To add a Flow Step, select the '''Add '''icon from the '''Flow Steps '''panel in the '''Rule Template'''. | 1. To add a Flow Step, select the '''Add '''icon from the '''Flow Steps '''panel in the '''Rule Template'''. | ||
| − | '''Figure | + | '''Figure 21: Add Flow Step''' |
[[File:SOP-5-I-MES0038-C RA1 Notification and Escalation Final 20.png|900px|SOP-5-I-MES0038-C RA1 Notification and Escalation Final 20.png]] | [[File:SOP-5-I-MES0038-C RA1 Notification and Escalation Final 20.png|900px|SOP-5-I-MES0038-C RA1 Notification and Escalation Final 20.png]] | ||
| Line 329: | Line 330: | ||
2. The '''Flow Steps '''form displays: | 2. The '''Flow Steps '''form displays: | ||
| − | '''Figure | + | '''Figure 22: Flow Step Form''' |
[[File:SOP-5-I-MES0038-C RA1 Notification and Escalation Final 21.png|900px|SOP-5-I-MES0038-C RA1 Notification and Escalation Final 21.png]] | [[File:SOP-5-I-MES0038-C RA1 Notification and Escalation Final 21.png|900px|SOP-5-I-MES0038-C RA1 Notification and Escalation Final 21.png]] | ||
| Line 349: | Line 350: | ||
7. Select '''OK '''to save the flow step, or '''Close '''to exit. | 7. Select '''OK '''to save the flow step, or '''Close '''to exit. | ||
| − | ==== <span class="mw-headline" id="Edit_Flow_Step">Edit Flow Step</span> ==== | + | ==== <span class="mw-headline" id="Edit_Flow_Step"><span class="mw-headline" id="Edit_Flow_Step">Edit Flow Step</span></span> ==== |
1. To edit a Flow Step, select the step from the list and then select '''Edit'''. | 1. To edit a Flow Step, select the step from the list and then select '''Edit'''. | ||
| − | '''Figure | + | '''Figure 23: Edit Flow Step''' |
[[File:SOP-5-I-MES0038-C RA1 Notification and Escalation Final 22.png|900px|SOP-5-I-MES0038-C RA1 Notification and Escalation Final 22.png]] | [[File:SOP-5-I-MES0038-C RA1 Notification and Escalation Final 22.png|900px|SOP-5-I-MES0038-C RA1 Notification and Escalation Final 22.png]] | ||
| Line 361: | Line 362: | ||
3. Update the desired information and then select '''OK'''. | 3. Update the desired information and then select '''OK'''. | ||
| − | ==== <span class="mw-headline" id="Delete_Flow_Step">Delete Flow Step</span> ==== | + | ==== <span class="mw-headline" id="Delete_Flow_Step"><span class="mw-headline" id="Delete_Flow_Step">Delete Flow Step</span></span> ==== |
1. To delete a Flow Step, select the step from the list, and then select '''Delete'''. | 1. To delete a Flow Step, select the step from the list, and then select '''Delete'''. | ||
| − | '''Figure | + | '''Figure 24: Delete Flow Step''' |
[[File:SOP-5-I-MES0038-C RA1 Notification and Escalation Final 23.png|900px|SOP-5-I-MES0038-C RA1 Notification and Escalation Final 23.png]] | [[File:SOP-5-I-MES0038-C RA1 Notification and Escalation Final 23.png|900px|SOP-5-I-MES0038-C RA1 Notification and Escalation Final 23.png]] | ||
| Line 373: | Line 374: | ||
| | ||
| − | ==== <span class="mw-headline" id="Add_Action_Step">Add Action Step</span> ==== | + | ==== <span class="mw-headline" id="Add_Action_Step"><span class="mw-headline" id="Add_Action_Step">Add Action Step</span></span> ==== |
The user has the option to add Action Steps to Flow Steps. Action Steps allow the user to define the notification type (Email/SMS/portal notification), the information that the notification will contain, as well as the recipients. | The user has the option to add Action Steps to Flow Steps. Action Steps allow the user to define the notification type (Email/SMS/portal notification), the information that the notification will contain, as well as the recipients. | ||
| Line 379: | Line 380: | ||
1. To add an Action Step, select the '''Add '''icon from the tool bar under the '''Action Steps '''panel in the '''Flow Steps '''form. | 1. To add an Action Step, select the '''Add '''icon from the tool bar under the '''Action Steps '''panel in the '''Flow Steps '''form. | ||
| − | '''Figure | + | '''Figure 25: Add Action Step''' |
[[File:SOP-5-I-MES0038-C RA1 Notification and Escalation Final 24.png|900px|SOP-5-I-MES0038-C RA1 Notification and Escalation Final 24.png]] | [[File:SOP-5-I-MES0038-C RA1 Notification and Escalation Final 24.png|900px|SOP-5-I-MES0038-C RA1 Notification and Escalation Final 24.png]] | ||
| Line 385: | Line 386: | ||
2. The '''Action Steps '''form displays: | 2. The '''Action Steps '''form displays: | ||
| − | '''Figure | + | '''Figure 26: Action Steps Form''' |
[[File:SOP-5-I-MES0038-C RA1 Notification and Escalation Final 25.png|900px|SOP-5-I-MES0038-C RA1 Notification and Escalation Final 25.png]] | [[File:SOP-5-I-MES0038-C RA1 Notification and Escalation Final 25.png|900px|SOP-5-I-MES0038-C RA1 Notification and Escalation Final 25.png]] | ||
| Line 397: | Line 398: | ||
6. In the '''Body Template''', the user can create and use parameters that will be replaced by the value defined in the Create Event portlet. For example, a parameter could be replaced by a list of users defined. The format for the parameter must be {¶meter_name} | 6. In the '''Body Template''', the user can create and use parameters that will be replaced by the value defined in the Create Event portlet. For example, a parameter could be replaced by a list of users defined. The format for the parameter must be {¶meter_name} | ||
| − | '''Note''': It is allowed to use parameters in any field of the Action Step. | + | <u>'''Note''':</u> It is allowed to use parameters in any field of the Action Step. |
7. Enter recipient credentials into the '''To: '''field. Multiple recipients can be added if they are separated by a comma. Add any additional recipients that need to be copied to the notification should be placed into the '''CC: '''and '''Bcc:''' fields. | 7. Enter recipient credentials into the '''To: '''field. Multiple recipients can be added if they are separated by a comma. Add any additional recipients that need to be copied to the notification should be placed into the '''CC: '''and '''Bcc:''' fields. | ||
| − | '''Note:''' Format for phone numbers is: Country Calling Code + Prefix + 7 digit number (no hyphens and no spaces). '''Example''': 12058384821 with 1 being the international calling code for the United States in this example. | + | <u>'''Note:'''</u> Format for phone numbers is: Country Calling Code + Prefix + 7 digit number (no hyphens and no spaces). '''Example''': 12058384821 with 1 being the international calling code for the United States in this example. |
8. Select '''OK '''to save the Action Step. | 8. Select '''OK '''to save the Action Step. | ||
| Line 407: | Line 408: | ||
9. Select '''OK '''from the '''Flow Steps '''form to confirm the addition of the Action Step. | 9. Select '''OK '''from the '''Flow Steps '''form to confirm the addition of the Action Step. | ||
| − | ==== <span class="mw-headline" id="Edit_Action_Step">Edit Action Step</span> ==== | + | ==== <span class="mw-headline" id="Edit_Action_Step"><span class="mw-headline" id="Edit_Action_Step">Edit Action Step</span></span> ==== |
1. To edit an Action Step, select the step from the Action List from the '''Flow Steps '''form, and then select '''Edit'''. | 1. To edit an Action Step, select the step from the Action List from the '''Flow Steps '''form, and then select '''Edit'''. | ||
| Line 413: | Line 414: | ||
2. The '''Action Steps '''form displays: | 2. The '''Action Steps '''form displays: | ||
| − | '''Figure | + | '''Figure 27: Edit Action Step''' |
[[File:SOP-5-I-MES0038-C RA1 Notification and Escalation Final 26.png|900px|SOP-5-I-MES0038-C RA1 Notification and Escalation Final 26.png]] | [[File:SOP-5-I-MES0038-C RA1 Notification and Escalation Final 26.png|900px|SOP-5-I-MES0038-C RA1 Notification and Escalation Final 26.png]] | ||
| Line 421: | Line 422: | ||
4. Select '''OK '''from the '''Flow Steps '''form to confirm the editing of the Action Step. | 4. Select '''OK '''from the '''Flow Steps '''form to confirm the editing of the Action Step. | ||
| − | ==== <span class="mw-headline" id="Delete_Action_Step">Delete Action Step</span> ==== | + | ==== <span class="mw-headline" id="Delete_Action_Step"><span class="mw-headline" id="Delete_Action_Step">Delete Action Step</span></span> ==== |
1. To delete an Action Step, select the step from the Action List from the '''Flow Steps '''form, and then select '''Delete'''. | 1. To delete an Action Step, select the step from the Action List from the '''Flow Steps '''form, and then select '''Delete'''. | ||
| Line 427: | Line 428: | ||
2. Select '''OK '''to confirm the delete command of the step from the '''Flow Steps '''form. | 2. Select '''OK '''to confirm the delete command of the step from the '''Flow Steps '''form. | ||
| − | '''Figure | + | '''Figure 28: Delete Action Step''' |
[[File:SOP-5-I-MES0038-C RA1 Notification and Escalation Final 27.png|900px|SOP-5-I-MES0038-C RA1 Notification and Escalation Final 27.png]] | [[File:SOP-5-I-MES0038-C RA1 Notification and Escalation Final 27.png|900px|SOP-5-I-MES0038-C RA1 Notification and Escalation Final 27.png]] | ||
| Line 433: | Line 434: | ||
| | ||
| − | === <span class="mw-headline" id="Edit_Rule">Edit Rule</span> === | + | === <span class="mw-headline" id="Edit_Rule"><span class="mw-headline" id="Edit_Rule">Edit Rule</span></span> === |
Rules can be edited or updated when needed. All fields except for the '''Rule Key '''can be changed. | Rules can be edited or updated when needed. All fields except for the '''Rule Key '''can be changed. | ||
| Line 441: | Line 442: | ||
2. The '''Rule Template '''form displays: | 2. The '''Rule Template '''form displays: | ||
| − | '''Figure | + | '''Figure 29: Edit Rule''' |
[[File:30NotificationEscal rule edit.jpg|900px|30NotificationEscal rule edit.jpg]] | [[File:30NotificationEscal rule edit.jpg|900px|30NotificationEscal rule edit.jpg]] | ||
| Line 449: | Line 450: | ||
| | ||
| − | === <span class="mw-headline" id="Delete_Rule">Delete Rule</span> === | + | === <span class="mw-headline" id="Delete_Rule"><span class="mw-headline" id="Delete_Rule">Delete Rule</span></span> === |
Rules can be deleted when they are no longer needed. All information contained within the Rule will be deleted as well. | Rules can be deleted when they are no longer needed. All information contained within the Rule will be deleted as well. | ||
| Line 457: | Line 458: | ||
2. A '''Confirm '''pop-up displays. Select '''Yes''' to confirm or '''No '''to cancel. | 2. A '''Confirm '''pop-up displays. Select '''Yes''' to confirm or '''No '''to cancel. | ||
| − | '''Figure | + | '''Figure 30: Delete Rule''' |
[[File:31NotificationEscal rule delete.jpg|900px|31NotificationEscal rule delete.jpg]] | [[File:31NotificationEscal rule delete.jpg|900px|31NotificationEscal rule delete.jpg]] | ||
| − | === <span class="mw-headline" id="Copy_Rule">Copy Rule</span> === | + | === <span class="mw-headline" id="Copy_Rule"><span class="mw-headline" id="Copy_Rule">Copy Rule</span></span> === |
Rules can be copied to make the Rule creation process more efficient. When Rules are copied, all information within the Rule will be copied as well. Only the Action Steps have the option to be excluded. | Rules can be copied to make the Rule creation process more efficient. When Rules are copied, all information within the Rule will be copied as well. Only the Action Steps have the option to be excluded. | ||
| Line 469: | Line 470: | ||
2. The '''Copy Rule '''form displays: | 2. The '''Copy Rule '''form displays: | ||
| − | '''Figure | + | '''Figure 31: Copy Rule''' |
[[File:32NotificationEscal rule copy.jpg|900px|32NotificationEscal rule copy.jpg]] | [[File:32NotificationEscal rule copy.jpg|900px|32NotificationEscal rule copy.jpg]] | ||
| Line 481: | Line 482: | ||
| | ||
| − | == <span class="mw-headline" id="Notification_and_Escalation_.E2.80.93_Operation">Notification and Escalation – Operation</span> == | + | == <span class="mw-headline" id="Notification_and_Escalation_.E2.80.93_Operation"><span class="mw-headline" id="Notification_and_Escalation_.E2.80.93_Operation">Notification and Escalation – Operation</span></span> == |
The '''Notification and Escalation – Operation''' portlet allows users to '''Create''', '''View''', '''Pause''', '''Resume''', or '''Complete '''events. | The '''Notification and Escalation – Operation''' portlet allows users to '''Create''', '''View''', '''Pause''', '''Resume''', or '''Complete '''events. | ||
| Line 487: | Line 488: | ||
1. To access '''Notification and Escalation – Operation''', navigate to '''Shop Floor Control'''>'''Production Control'''>'''Notification and Escalation – Operation'''. | 1. To access '''Notification and Escalation – Operation''', navigate to '''Shop Floor Control'''>'''Production Control'''>'''Notification and Escalation – Operation'''. | ||
| − | '''Figure | + | '''Figure 32: Notification and Escalation Operation''' |
[[File:33N&E OP.jpg|900px|33N&E OP.jpg]] | [[File:33N&E OP.jpg|900px|33N&E OP.jpg]] | ||
| Line 493: | Line 494: | ||
| | ||
| − | === <span class="mw-headline" id="Filter_3">Filter</span> === | + | === <span class="mw-headline" id="Filter_3"><span class="mw-headline" id="Filter_3">Filter</span></span> === |
The Event list can be filtered by '''Event Key''','''Instance''','''Element''', '''Rule''', or '''Status'''. | The Event list can be filtered by '''Event Key''','''Instance''','''Element''', '''Rule''', or '''Status'''. | ||
| Line 503: | Line 504: | ||
3. The results will display in the '''Event '''list. | 3. The results will display in the '''Event '''list. | ||
| − | '''Figure | + | '''Figure 33: Notification and Escalation - Operation - Filter''' |
[[File:34N&E OP Filter.jpg|900px|34N&E OP Filter.jpg]] | [[File:34N&E OP Filter.jpg|900px|34N&E OP Filter.jpg]] | ||
| Line 509: | Line 510: | ||
| | ||
| − | === <span class="mw-headline" id="Create_Event">Create Event</span> === | + | === <span class="mw-headline" id="Create_Event"><span class="mw-headline" id="Create_Event">Create Event</span></span> === |
When a configured Element triggers a rule, an event is created. This is a real-time instance of a rule which will be executed according to the rule steps and will expire when the Event has been successfully executed one way or another. | When a configured Element triggers a rule, an event is created. This is a real-time instance of a rule which will be executed according to the rule steps and will expire when the Event has been successfully executed one way or another. | ||
| Line 515: | Line 516: | ||
1. To create an Event, select the '''Create''' icon from the tool bar under the Event List. | 1. To create an Event, select the '''Create''' icon from the tool bar under the Event List. | ||
| − | '''Figure | + | '''Figure 34: Event List''' |
[[File:SOP-5-I-MES0038-C RA1 Notification and Escalation Final 33.png|900px|SOP-5-I-MES0038-C RA1 Notification and Escalation Final 33.png]] | [[File:SOP-5-I-MES0038-C RA1 Notification and Escalation Final 33.png|900px|SOP-5-I-MES0038-C RA1 Notification and Escalation Final 33.png]] | ||
| Line 521: | Line 522: | ||
2. The '''Create Event '''form displays: | 2. The '''Create Event '''form displays: | ||
| − | '''Figure | + | '''Figure 35: Create Event''' |
[[File:SOP-5-I-MES0038-C RA1 Notification and Escalation Final 34.png|900px|SOP-5-I-MES0038-C RA1 Notification and Escalation Final 34.png]] | [[File:SOP-5-I-MES0038-C RA1 Notification and Escalation Final 34.png|900px|SOP-5-I-MES0038-C RA1 Notification and Escalation Final 34.png]] | ||
| Line 529: | Line 530: | ||
4. Add the necessary parameters by selecting the '''Add''' button. | 4. Add the necessary parameters by selecting the '''Add''' button. | ||
| − | '''Note''': The created parameter(s) value(s) will be used to replace the parameter(s) defined in the body template. | + | <u>'''Note''':</u> The created parameter(s) value(s) will be used to replace the parameter(s) defined in the body template. |
| − | '''Figure | + | '''Figure 36: Add Params Form''' |
[[File:SOP-5-I-MES0038-C RA1 Notification and Escalation Final 35.png|800px|SOP-5-I-MES0038-C RA1 Notification and Escalation Final 35.png]] | [[File:SOP-5-I-MES0038-C RA1 Notification and Escalation Final 35.png|800px|SOP-5-I-MES0038-C RA1 Notification and Escalation Final 35.png]] | ||
| Line 541: | Line 542: | ||
7. The created event is displayed at the '''Event List '''as Initializing status. After some minutes, the status becomes Active and the user is able to Pause, complete, or resume the event. | 7. The created event is displayed at the '''Event List '''as Initializing status. After some minutes, the status becomes Active and the user is able to Pause, complete, or resume the event. | ||
| − | === <span class="mw-headline" id="View_Event">View Event</span> === | + | === <span class="mw-headline" id="View_Event"><span class="mw-headline" id="View_Event">View Event</span></span> === |
The View action allows the users to view the event data, as status, creation data, rule, instance, and the event steps previously defined. In this step, the user is not able to update data. | The View action allows the users to view the event data, as status, creation data, rule, instance, and the event steps previously defined. In this step, the user is not able to update data. | ||
| − | '''Figure | + | '''Figure 37: Event Form''' |
[[File:SOP-5-I-MES0038-C RA1 Notification and Escalation Final 36.png|800px|SOP-5-I-MES0038-C RA1 Notification and Escalation Final 36.png]] | [[File:SOP-5-I-MES0038-C RA1 Notification and Escalation Final 36.png|800px|SOP-5-I-MES0038-C RA1 Notification and Escalation Final 36.png]] | ||
| − | === <span class="mw-headline" id="Pause_or_Resume_Event">Pause or Resume Event</span> === | + | === <span class="mw-headline" id="Pause_or_Resume_Event"><span class="mw-headline" id="Pause_or_Resume_Event">Pause or Resume Event</span></span> === |
The user is able to pause an event if necessary. To start a paused event, select the event in the list and select '''Resume'''. | The user is able to pause an event if necessary. To start a paused event, select the event in the list and select '''Resume'''. | ||
| − | '''Figure | + | '''Figure 38: Pause Events''' |
[[File:SOP-5-I-MES0038-C RA1 Notification and Escalation Final 37.png|800px|SOP-5-I-MES0038-C RA1 Notification and Escalation Final 37.png]] | [[File:SOP-5-I-MES0038-C RA1 Notification and Escalation Final 37.png|800px|SOP-5-I-MES0038-C RA1 Notification and Escalation Final 37.png]] | ||
| Line 561: | Line 562: | ||
Once the event is paused, the user needs to select Resume to start the event again. | Once the event is paused, the user needs to select Resume to start the event again. | ||
| − | '''Figure | + | '''Figure 39: Resume Events''' |
[[File:SOP-5-I-MES0038-C RA1 Notification and Escalation Final 38.png|800px|SOP-5-I-MES0038-C RA1 Notification and Escalation Final 38.png]] | [[File:SOP-5-I-MES0038-C RA1 Notification and Escalation Final 38.png|800px|SOP-5-I-MES0038-C RA1 Notification and Escalation Final 38.png]] | ||
| Line 567: | Line 568: | ||
| | ||
| − | === <span class="mw-headline" id="Complete_Event">Complete Event</span> === | + | === <span class="mw-headline" id="Complete_Event"><span class="mw-headline" id="Complete_Event">Complete Event</span></span> === |
An event is completed after all defined steps are executed or the user selects '''Compete'''. | An event is completed after all defined steps are executed or the user selects '''Compete'''. | ||
| − | '''Figure | + | '''Figure 40: Complete Events''' |
[[File:SOP-5-I-MES0038-C RA1 Notification and Escalation Final 39.png|800px|SOP-5-I-MES0038-C RA1 Notification and Escalation Final 39.png]] | [[File:SOP-5-I-MES0038-C RA1 Notification and Escalation Final 39.png|800px|SOP-5-I-MES0038-C RA1 Notification and Escalation Final 39.png]] | ||
| Line 577: | Line 578: | ||
| | ||
| − | == <span class="mw-headline" id="Glossary">Glossary</span> == | + | == <span class="mw-headline" id="Glossary"><span class="mw-headline" id="Glossary">Glossary</span></span> == |
'''C''' | '''C''' | ||
Revision as of 22:05, 1 July 2021
42Q Home > Administration > Notification & Escalation
This edition applies to MES 15 Portal 1.0 Application and all subsequent releases and modifications until otherwise indicated in new revisions.
Contents
Administration
Administrative privileges in 42Q are located in the Administration menu heading.
With the portal, Administrators are able to access privileges from one convenient location.
Privileges include:
- User Maintenance
- Plant Maintenance
- Site Maintenance
- Profile Maintenance
- Generic Attribute Maintenance
Also located in the Administration menu heading are Shop Floor Control Administrator, Document Control, Traceability Administrator, Notification & Escalation, Meas Instance Admin, and Label Engine Admin.
To access any of the Administration Portlet, the user must sign to 42Q and then select the Administration expandable heading located in the menu on the left of the screen.
Figure 1: User Sign-In
Notification and Escalation
Notification and Escalation was created to simplify the alert process (SMS, e-mail, and portal notification). Corporate Administrators can access a single instance (DB) that contains all previously stored events.
The application is divided into two modules: Notification and Escalation (Administration) and Notification and Escalation Operation (Shop Floor Control > Production Control).
Notification and Escalation can be accessed by the following paths:
1. Administration>Notification & Escalation
2. Shop Floor Control>Production Control>Notification and Escalation – Operation
This module located under the Administration node was developed to create an event template. The event template is configured in the Module, Instance and Rule sub-modules.
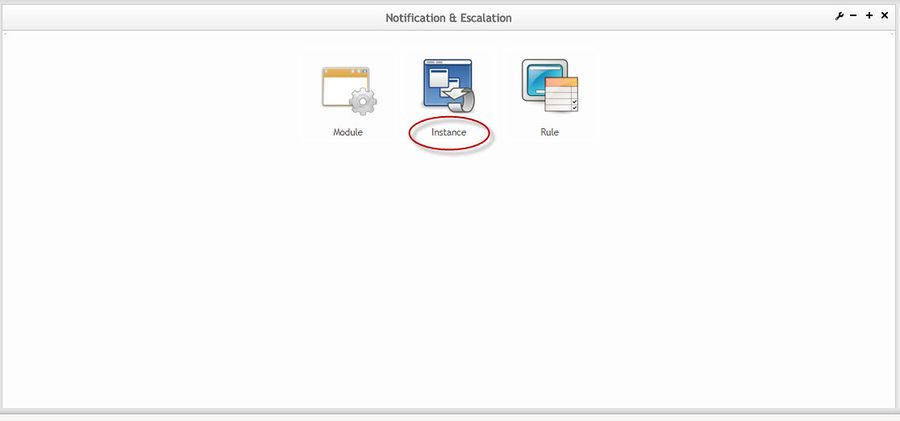
1. To access Notification and Escalation, navigate to Administration>Notification & Escalation.
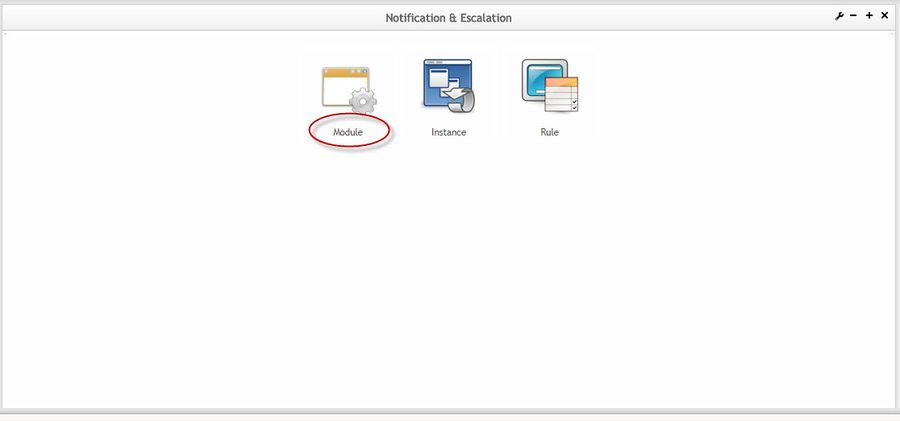
2. The Notification and Escalation main page displays with the following sub-modules available:
- Module- Defines the application and the version for the notification.
- Instance- Defines which modules to use at a specific site.
- Rule- Defines the parameters for the notification.
Figure 2: Notification and Escalation
Notification-Escalationmain page .jpg
Module
The Module portlet defines from where the notification is coming. In this portlet, the user can define the third-party application and its version to be used when the notification or escalation is created. The modules that are created can be assigned to instances in the Instance portlet.
1. To access the Moduleportlet, navigate to Administration >Notification and Escalation, and then select the Module icon.
Figure 3: Notification and Escalation - Module
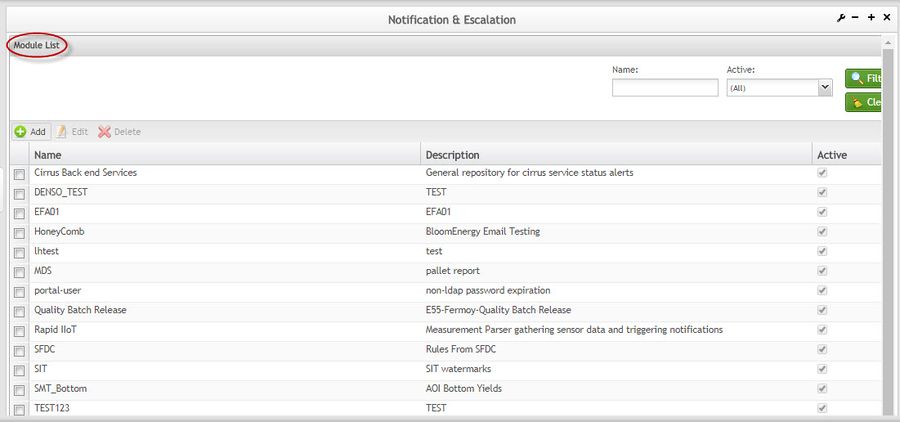
2. The Module List displays:
Figure 4: Module List
From the Module List main page, the user can filter by Name or Active status. Modules can also be configured with the Add, Edit, and Delete functions.
Filter
The Module List displays all created modules. Each module's description and status (Active or Inactive) is also displayed. The user can filter the list by Name or Active status.
1. To filter the list, enter a module name and/or select the active status from the Active drop down box.
2. Select Filter to filter the list, or Clear to clear the fields.
Figure 5: Filter Modules
Add Module
The Add function allows the user to add third-party applications to the Notification and Escalation database. When adding an application, the user must provide a description and version to aid in the module selection process.
1. To add a module, select the Add icon from the toolbar above the Name list.
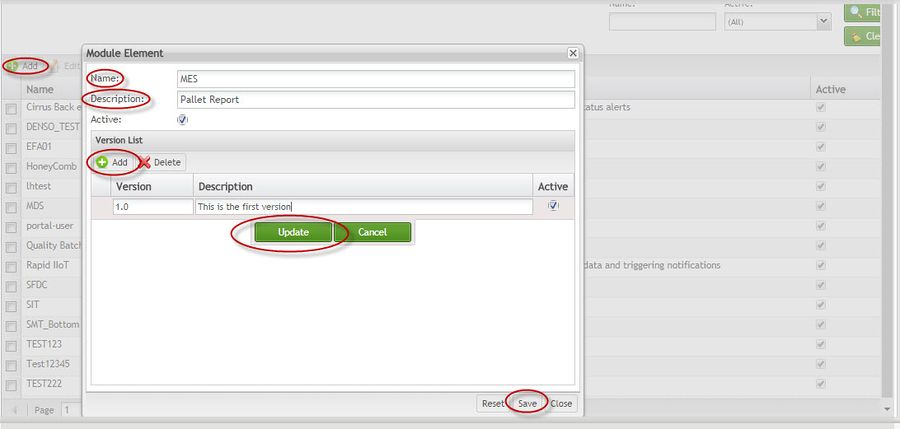
2. The Module Element form displays:
Figure 6: Add Module
3. Enter the Name and Description of the application into the mandatory fields.
4. Select Active to display the module in the Rule and Instance portlets.
Note: If this flag is not selected, the application and version will not display in the subsequent steps in the Notification and Escalation process.
5. Select Save to create the module. "Are you sure you want to save the changes?" confirmation message displays. Select Yes to confirm or No to cancel.
Add Version
The user can add a version to an application when creating a module. It is important to have versions identified for each application. There can be many versions for a single application. If the version is included in the module, it is easier to identify the specific application to which the notification applies.
1. To add an application version while creating a module, select the Add icon from the Version List panel in the Module Element form.
2. The Version and Description fields become available.
3. Enter the version and the description into the applicable fields, and then select Update.
4. Mark the Active flag to make the version available in the Instance and Rule portlets.
Figure 7: Add Version
Delete Version
If a version is no longer supported or applicable, the user can delete it from the version list. This will remove the version from the application and it will no longer be available in the Instance or Rule portlet.
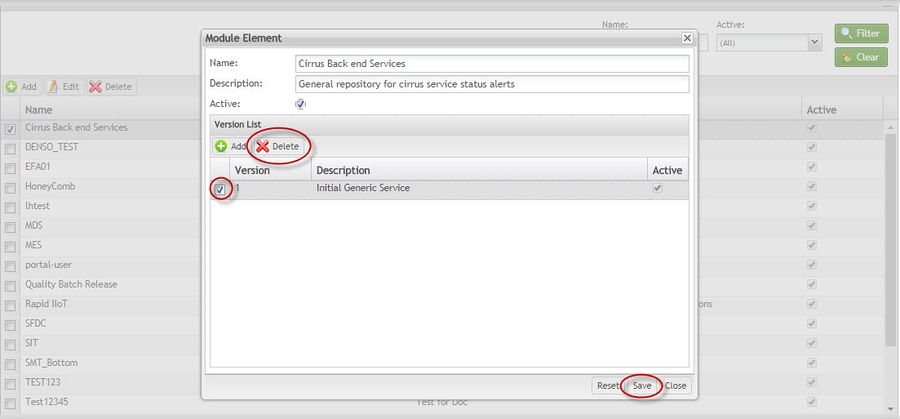
1. To delete an application version, select the version from the list, and then select Delete.
Figure 8: Delete Version
2. Select Save to confirm the delete action. "Are you sure you want to save the changes?" confirmation message displays. Select Yes to confirm or No to cancel.
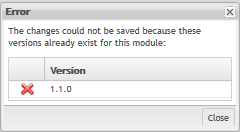
Note: If Save is not selected, the version will not be deleted and cannot be re-entered. The following prompt will display:
Figure 9: Error Message
Edit Version
1. To edit a version, double-click on the version in the Version list.
2. Edit the information, and then select Update.
3. Select Save to confirm.
Edit Module
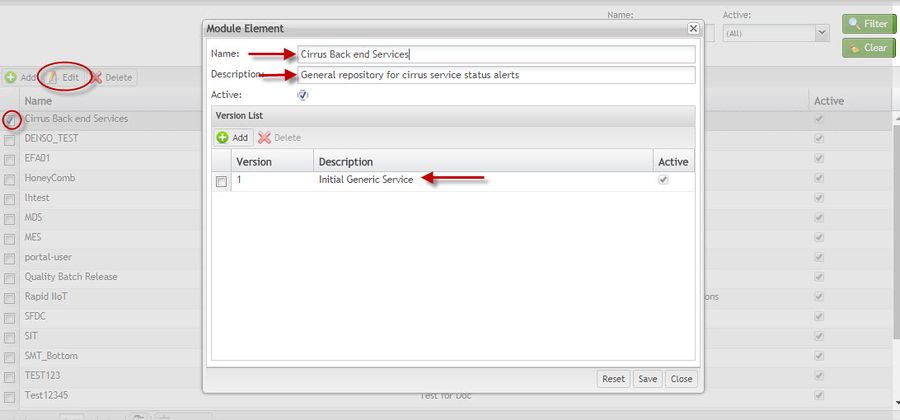
The Edit function allows the user to update any of the module's information (Name, Description, Active status, or Version).
1. To edit a module, select the module from the Name list, and then select Edit.
2. The Module Element form displays:
Figure 10: Edit Module
3. Update the Name and/or Description (or the active status), and add or remove versions, and then select Save.
4. "Are you sure you want to save the changes?" confirmation message displays. Select Yes to confirm or No to cancel.
Delete Module
If a Module is no longer supported or applicable, the user can delete it from the module list. This will remove it from the Notification and Escalation tool, and it will no longer be available in the Instance or Rule portlet.
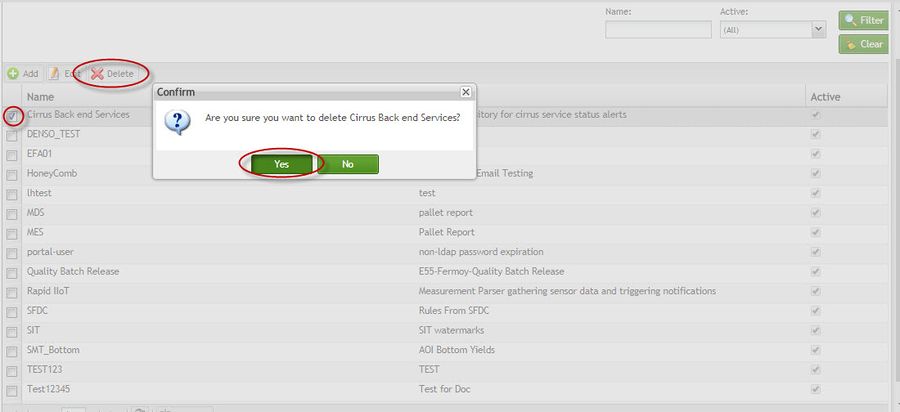
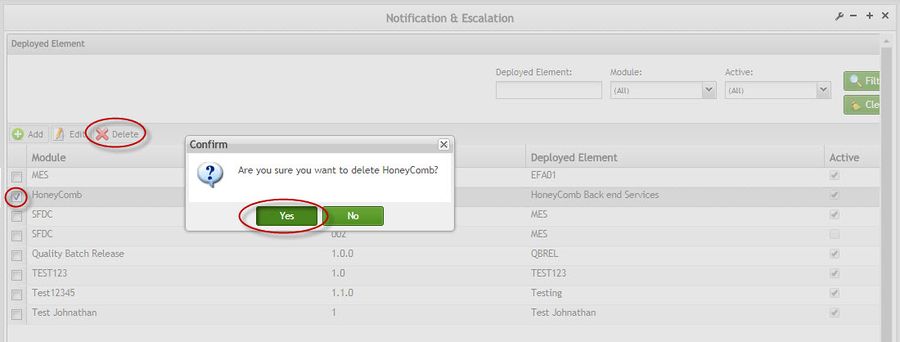
1. To delete a module, select the module from the Name list and then select Delete.
2. "Are you sure you want to delete (xxxx)?" confirmation message displays. Select Yes to confirm or No to cancel.
Figure 11: Delete Module
Instance
The Instance portlet defines which modules to use at a specific site. In this portlet, the user can choose which third-party application and its version to be used when the notification or escalation is created.
1. To access the Instanceportlet, navigate to Administration>Notification and Escalation,and then select the Instance icon.
Figure 12: Notification and Escalation - Instance
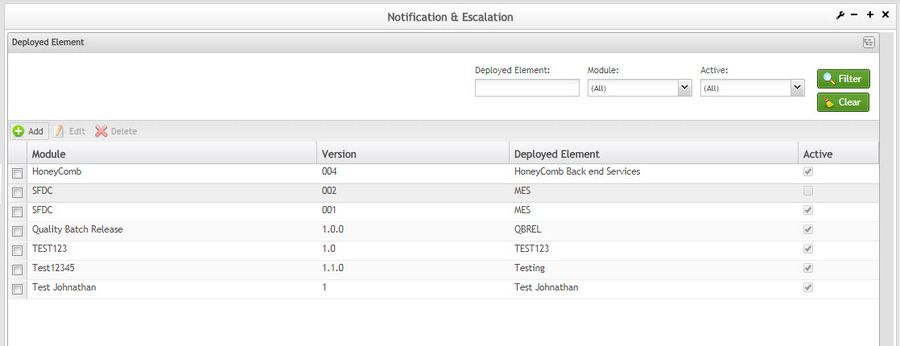
2. The Instance main page displays:
Figure 13: Deployed Element List
Only pre-configured instances will display. The user can add modules (applications/versions) to specific sites from the Instance portlet.
Add Deployed Elements
This function allows the user to add modules to specific sites. The modules that are available to the user are pre-configured in the Module portlet. The Application and Version must be set to Active in the Module portlet in order to be displayed in the Instance portlet.
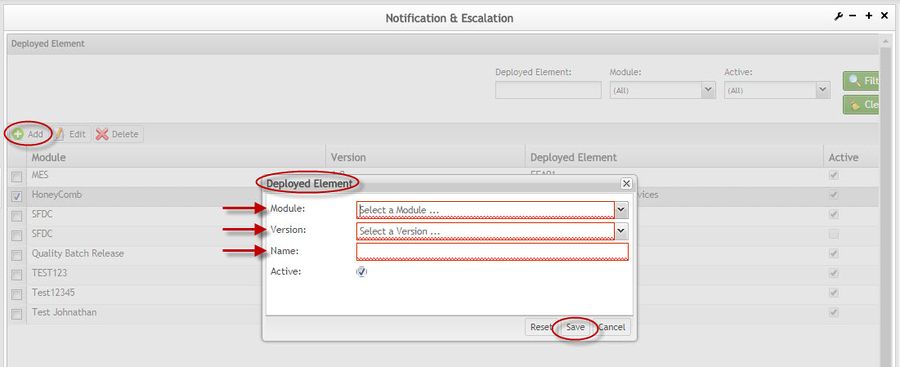
1. To add a module to an instance, select Add in the Deployed Element page.
2. The Deployed Element form displays:
Figure 14:Add Deployed Element
All previously added modules are displayed in the Module list.
1. Select a Module and Version, enter the Deployed Element Name and then mark the Active radio button to make the module available for notifications in the Rule portlet.
2. Select Save to confirm the module addition, or Cancel to exit.
Edit Deployed Elements
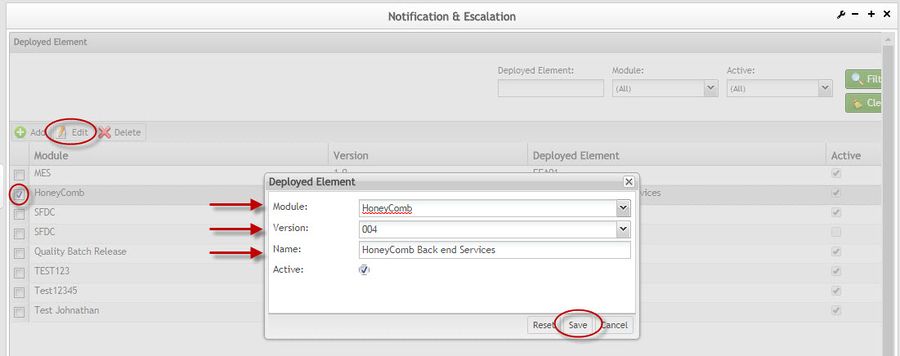
To Edit a Deployed Element from the list, select the element and them, select the Edit button.
Figure 15: Edit a Deployed Element
Delete Deployed Elements
1. To delete a deployed element, select the module from the list and then select Delete.
2. "Are you sure you want to delete (xxxx)?" confirmation message displays. Select Yes to confirm or No to cancel.
3. Select Save to confirm the delete command, or Close to exit.
Figure 16: Delete a Deployed Element
Rule
The Rule portlet defines the parameters for the notification. When adding a rule, the user can add Flow Steps, Action Steps and specific parameters to define retry times and quantities. When a notification is created, the parameters set up in the Rule portlet dictate the options that will be available in the Notification and Escalation – Operation portlet.
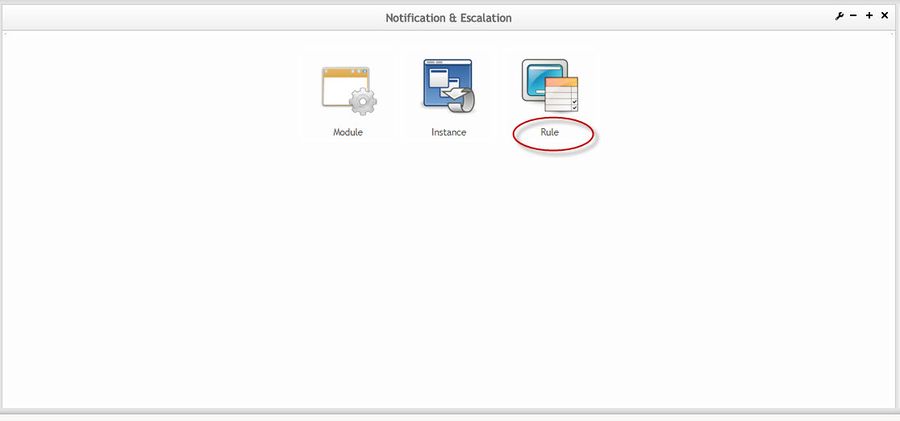
1. To access the Rule portlet, navigate to Administration>Notification and Escalation, and then select the Rule icon.
Figure 17: Notification and Escalation - Rule
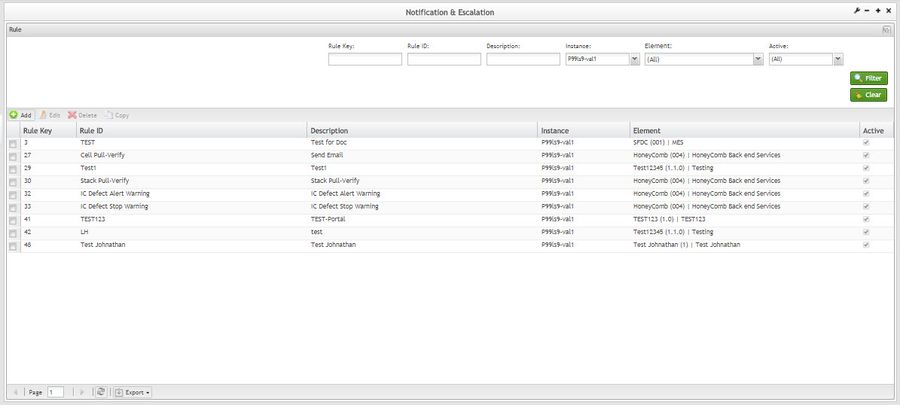
2. The Rule main page displays:
Figure 18: Rule List
The user can filter, add, edit, delete, or copy rules in this portlet.
Filter
The Rule list can be filtered by Rule Key,Rule ID,Description,Instance,Element,or Active Status.
1. To filter the rule list, enter information into the filter fields and/or select from the drop down boxes provided, and then select Filter.
2. Select Clear to empty all fields and start a new filter.
Figure 19: Filter Rules
3. The results will display in the Rule Key list.
Add Rule
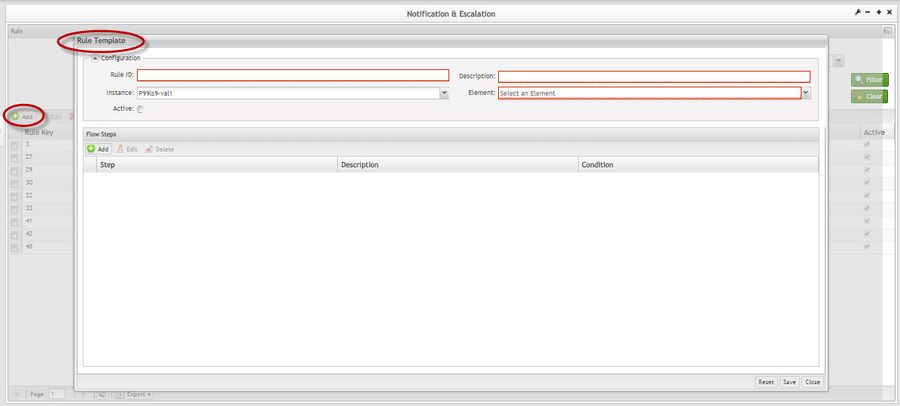
1. To add a rule, select the Add icon from the tool bar.
2. The Rule Template form displays:
Figure 20: Add Rule
3. Enter a Rule ID and a Description.
4. Select an Element from the drop down list provided.
5. Select Save to confirm, or Close to cancel.
6. "Rule Template (Rule ID) was successfully created" message displays.
Add Flow Step
Flow steps need to be defined for each rule. These steps define the parameters that the notification will follow once created.
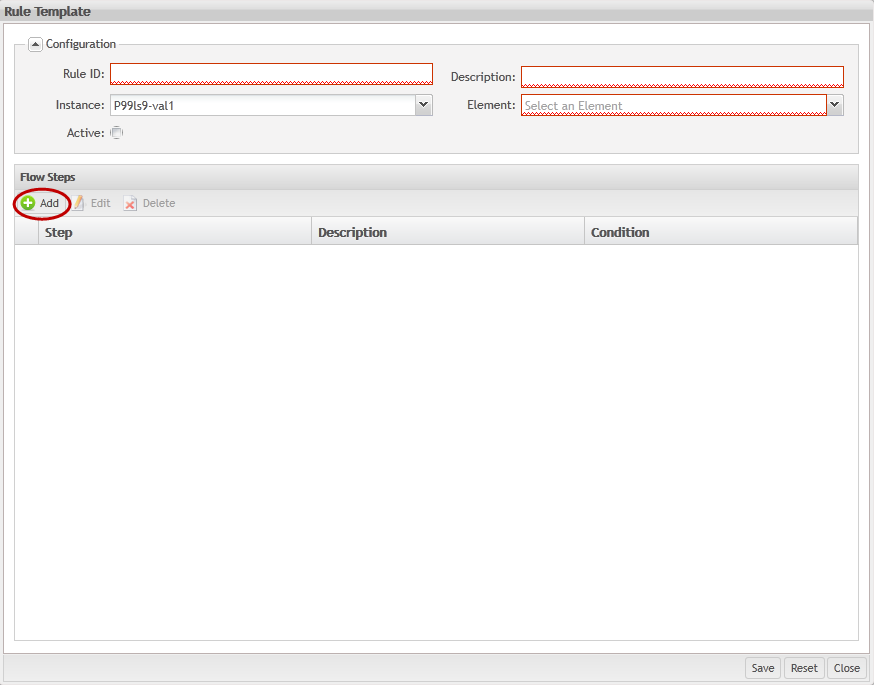
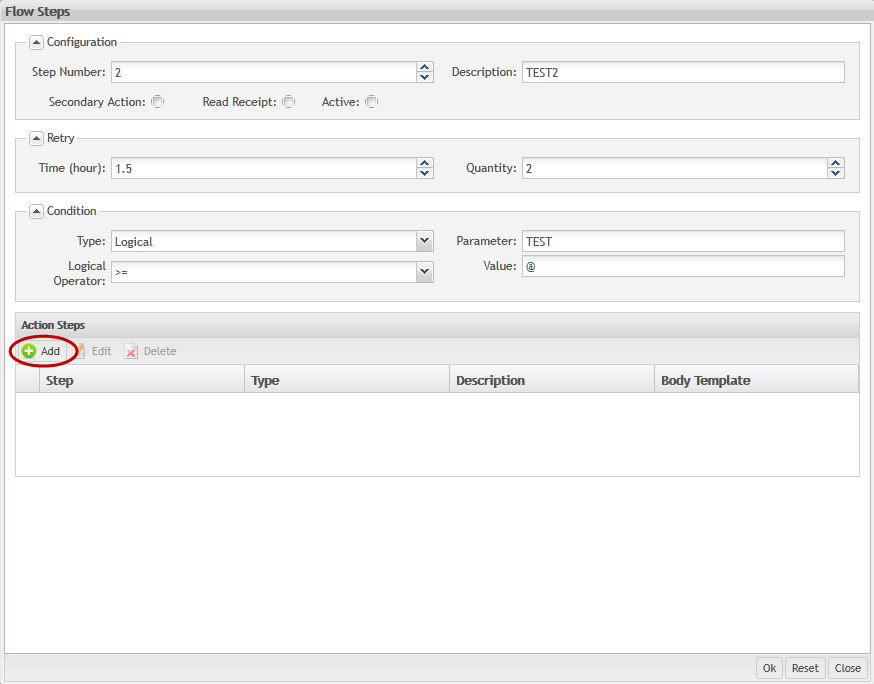
1. To add a Flow Step, select the Add icon from the Flow Steps panel in the Rule Template.
Figure 21: Add Flow Step
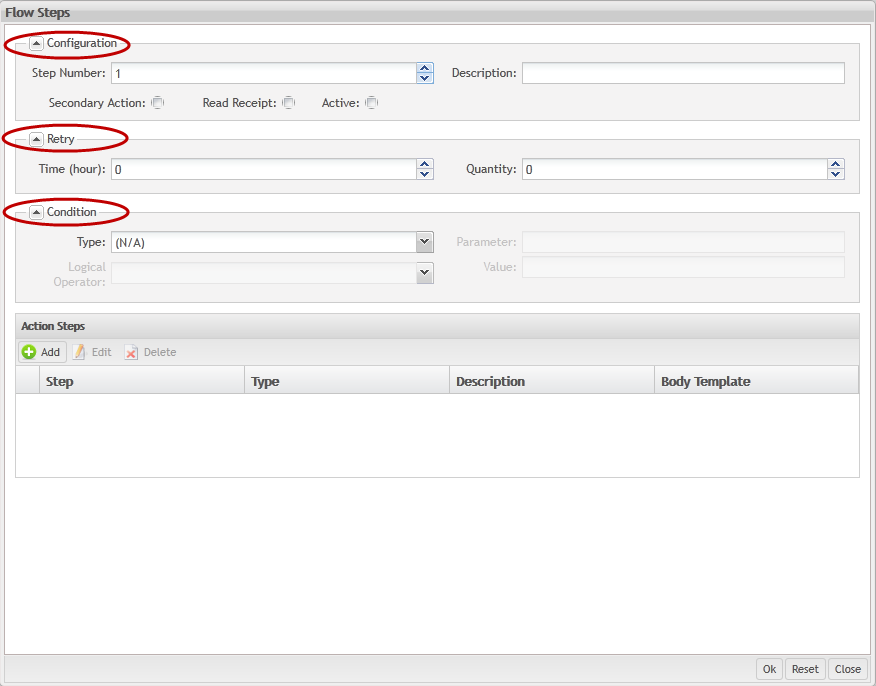
2. The Flow Steps form displays:
Figure 22: Flow Step Form
There are three panels in the Flow Steps form:
- Configuration
- Retry
- Condition
3. Select a Step Number and then enter a Description from the Configuration panel.
4. Select the radio button to the right of Secondary Action or Read Receipt if applicable. Select the radio to the right of Active to make the Rule available in the Notification and Escalation – Operation portlet.
5. In the Retry panel, select the Time (hour) and the Quantity. This defines how often and how many times the notification will be sent before an escalation is required.
6. In the Condition panel, select the Type (Logical or Timed). If Logical is selected, define the Parameter, Logical Operator, and Value of the rule. If Timed is selected, select the Time (hour).
7. Select OK to save the flow step, or Close to exit.
Edit Flow Step
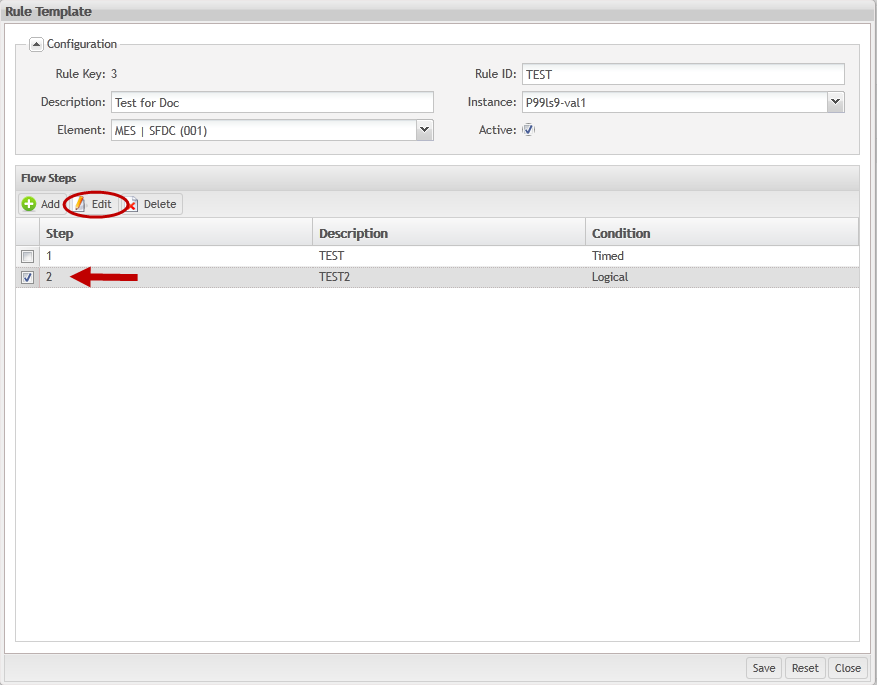
1. To edit a Flow Step, select the step from the list and then select Edit.
Figure 23: Edit Flow Step
2. The Flow Steps form displays. All fields are available to edit.
3. Update the desired information and then select OK.
Delete Flow Step
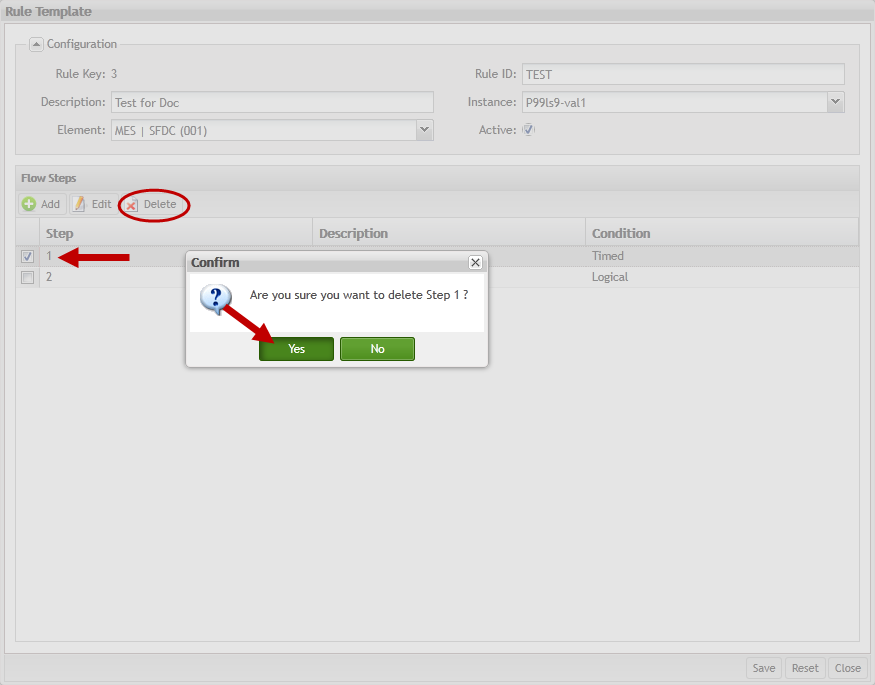
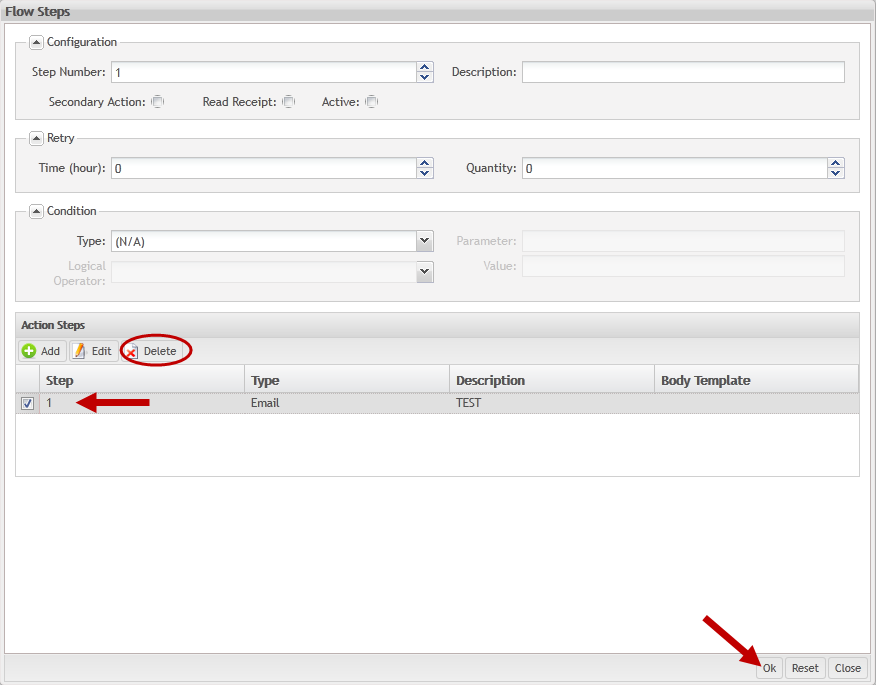
1. To delete a Flow Step, select the step from the list, and then select Delete.
Figure 24: Delete Flow Step
2. "Are you sure you want to delete Step (n)?" displays. Select Yes to confirm or No to cancel.
Add Action Step
The user has the option to add Action Steps to Flow Steps. Action Steps allow the user to define the notification type (Email/SMS/portal notification), the information that the notification will contain, as well as the recipients.
1. To add an Action Step, select the Add icon from the tool bar under the Action Steps panel in the Flow Steps form.
Figure 25: Add Action Step
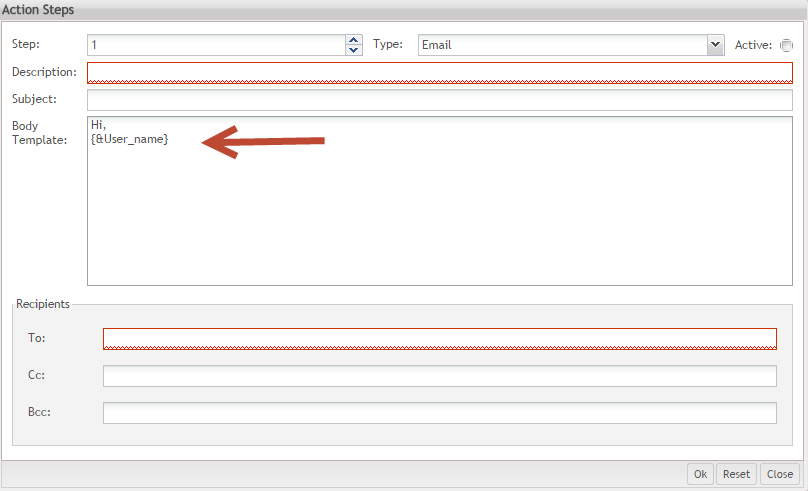
2. The Action Steps form displays:
Figure 26: Action Steps Form
3. Select a Type for the action step (Email, SMS, portal notification).
4. Select the Active radio button to make the Action Step available in the Notification and Escalation – Operation portlet.
5. Enter a Description and a Subject.
6. In the Body Template, the user can create and use parameters that will be replaced by the value defined in the Create Event portlet. For example, a parameter could be replaced by a list of users defined. The format for the parameter must be {¶meter_name}
Note: It is allowed to use parameters in any field of the Action Step.
7. Enter recipient credentials into the To: field. Multiple recipients can be added if they are separated by a comma. Add any additional recipients that need to be copied to the notification should be placed into the CC: and Bcc: fields.
Note: Format for phone numbers is: Country Calling Code + Prefix + 7 digit number (no hyphens and no spaces). Example: 12058384821 with 1 being the international calling code for the United States in this example.
8. Select OK to save the Action Step.
9. Select OK from the Flow Steps form to confirm the addition of the Action Step.
Edit Action Step
1. To edit an Action Step, select the step from the Action List from the Flow Steps form, and then select Edit.
2. The Action Steps form displays:
Figure 27: Edit Action Step
3. Update the Action Step and then select OK.
4. Select OK from the Flow Steps form to confirm the editing of the Action Step.
Delete Action Step
1. To delete an Action Step, select the step from the Action List from the Flow Steps form, and then select Delete.
2. Select OK to confirm the delete command of the step from the Flow Steps form.
Figure 28: Delete Action Step
Edit Rule
Rules can be edited or updated when needed. All fields except for the Rule Key can be changed.
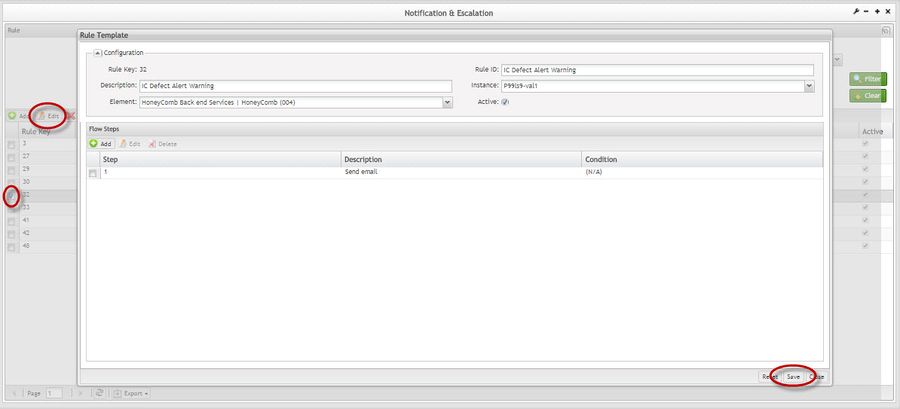
1. To edit a rule, select the rule from the Rule Key list on the Rule main page, and then select Edit from the tool bar.
2. The Rule Template form displays:
Figure 29: Edit Rule
3. Edit/update the information, and then select Save to confirm.
Delete Rule
Rules can be deleted when they are no longer needed. All information contained within the Rule will be deleted as well.
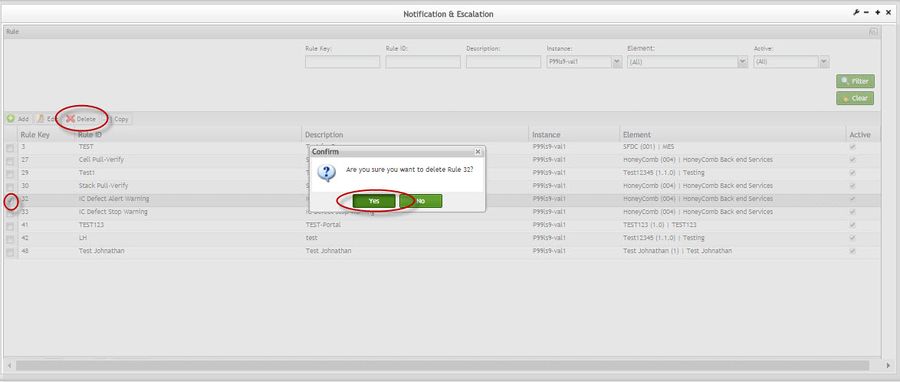
1. To delete a Rule, select the rule from the Rule Key list on the Rule main page, and then select Delete from the tool bar.
2. A Confirm pop-up displays. Select Yes to confirm or No to cancel.
Figure 30: Delete Rule
Copy Rule
Rules can be copied to make the Rule creation process more efficient. When Rules are copied, all information within the Rule will be copied as well. Only the Action Steps have the option to be excluded.
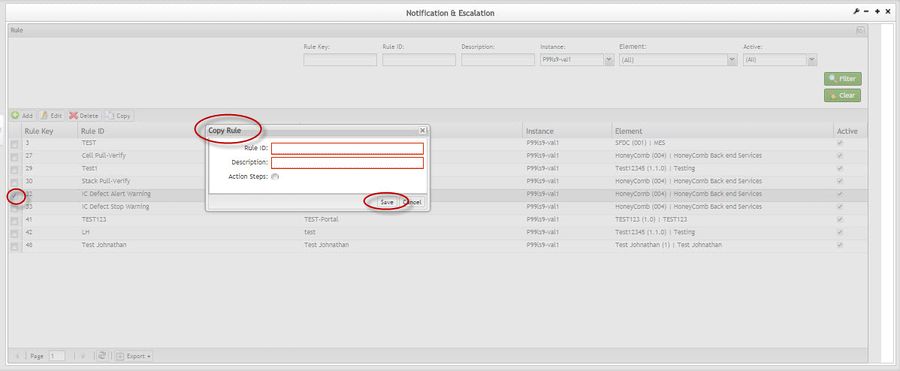
1. To copy a Rule, select the rule from the Rule Key list on the Rule main page, and then select Copy from the tool bar.
2. The Copy Rule form displays:
Figure 31: Copy Rule
3. Enter a Rule ID, and a Description.
4. Select the Action Steps radio button to include all created Action Steps in the new Rule Key.
5. Select Save to confirm or Cancel to exit.
Notification and Escalation – Operation
The Notification and Escalation – Operation portlet allows users to Create, View, Pause, Resume, or Complete events.
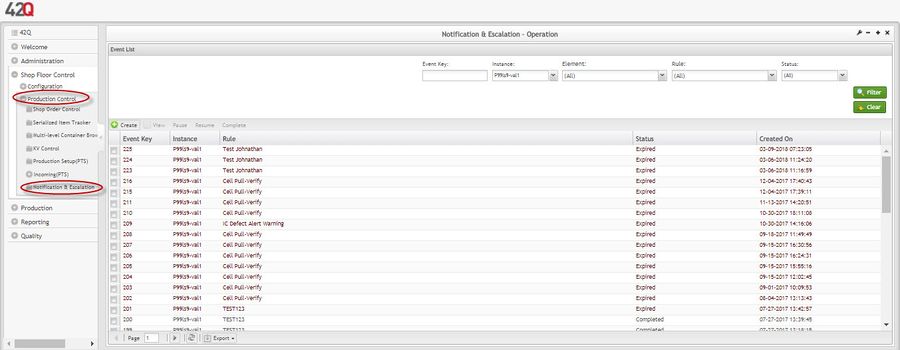
1. To access Notification and Escalation – Operation, navigate to Shop Floor Control>Production Control>Notification and Escalation – Operation.
Figure 32: Notification and Escalation Operation
Filter
The Event list can be filtered by Event Key,Instance,Element, Rule, or Status.
1. To filter the event list, enter information into the filter fields and/or select from the drop down boxes provided, and then select Filter.
2. Select Clear to empty all fields and start a new filter.
3. The results will display in the Event list.
Figure 33: Notification and Escalation - Operation - Filter
Create Event
When a configured Element triggers a rule, an event is created. This is a real-time instance of a rule which will be executed according to the rule steps and will expire when the Event has been successfully executed one way or another.
1. To create an Event, select the Create icon from the tool bar under the Event List.
Figure 34: Event List
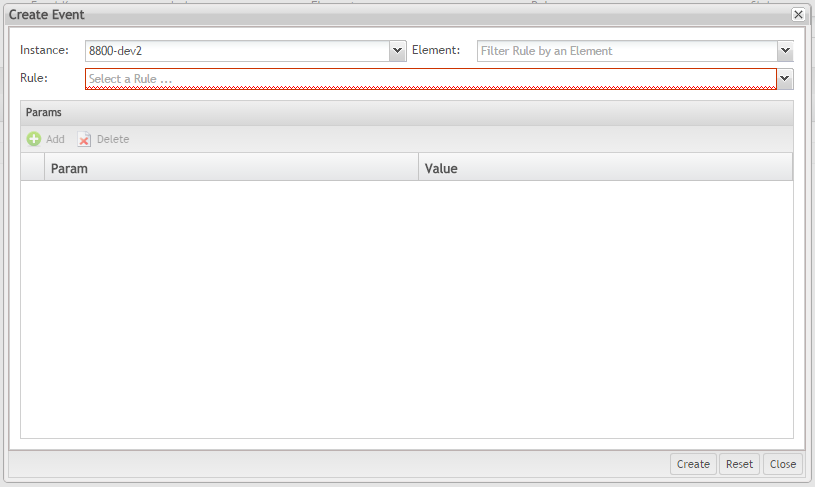
2. The Create Event form displays:
Figure 35: Create Event
3. Select a Rule (already configured) in the combo box.
4. Add the necessary parameters by selecting the Add button.
Note: The created parameter(s) value(s) will be used to replace the parameter(s) defined in the body template.
Figure 36: Add Params Form
5. Enter the parameters name and value (these defined parameters will be used in the body template) and select Update.
6. Select Create to save the Event.
7. The created event is displayed at the Event List as Initializing status. After some minutes, the status becomes Active and the user is able to Pause, complete, or resume the event.
View Event
The View action allows the users to view the event data, as status, creation data, rule, instance, and the event steps previously defined. In this step, the user is not able to update data.
Figure 37: Event Form
Pause or Resume Event
The user is able to pause an event if necessary. To start a paused event, select the event in the list and select Resume.
Figure 38: Pause Events
Select Yes to pause the Event.
Once the event is paused, the user needs to select Resume to start the event again.
Figure 39: Resume Events
Complete Event
An event is completed after all defined steps are executed or the user selects Compete.
Figure 40: Complete Events
Glossary
C
Configured Element: A specific user-configured instance of a Deployed Element. For example: a user identifies, for a module (SPC, PTS), a specific set or group of line/part/route/route step which it is monitoring. Or: equally it could be a global rule for a specific business/site/department. This should reference a core element but have its own unique ID for the specific configuration.
Configured Rule: A user creates a specific rule through a combination of Rule Template, Configured Element, and email recipients.
D
Deployed Element: A real-world installed instance of any Master element. Each will have a unique identifier.
E
Event: When a configured Element triggers a rule, an event is created. This is a real-time instance of a rule which will be executed according to the rule steps and will expire when the Event has been successfully executed one way or another.
Event Flow: Series of steps that the deciding logic resides within. In real terms this could be regarded as a series of escalation levels based on timed execution and logical rules.
M
Master Element: A module/Component of 42Q, whether SFDC/PTS/SPC or another element of the product portfolio or a sub-component of each. Each will have a unique identifier and descriptor.
O
Operation: Series of steps which are always executed if the event flow is called.
R
Rule Template: An outline series of steps to be followed when an event occurs. This would be a basic set of rule steps without a configured trigger source; and without email recipients
