Difference between revisions of "SOP-42Q-MES0045 Labor Tracking"
Disha Sharma (talk | contribs) |
|||
| Line 1: | Line 1: | ||
| + | <small>[[42Q Cloud-Based MES/MOMS|42Q Home]] > [[Production|Production]] > Labor Tracking</small><br> [[Image:42Q Logo.jpg]] | ||
| − | + | <br> | |
| − | |||
| − | |||
== Labor Tracking Functions == | == Labor Tracking Functions == | ||
Revision as of 15:38, 9 June 2017
42Q Home > Production > Labor Tracking

Contents
Labor Tracking Functions
The Labor Tracking module was developed to allow users to log labor and absent hours. It is used to manage employee work time. These instructions explain how to operate the Labor Tracking module. It displays all portlets and actions that can be performed by users and supervisors.
1. To access the Labor Tracking, navigate to Shop Floor Control > Configuration > Labor Tracking Maintenance. The Labor Tracking Maintenance main screen is displayed.
Figure 1: MES Labor Tracking Modules
2. Select a Labor Tracking sub-module.
NOTE: Only Supervisor users have access to Labor Tracking Maintenance.
Labor Tracking
The instructions for this section are applicable when Labor Tracking is selected from the Labor Tracking modules page.
The Labor Tracking page allows the user to log worked hours. Follow the steps below to Clock In.
1. Select the Attendance Type:
Figure 2: Attendance Type
- Absence: to log the labor absence hours.
- Labor: to log the employee worked hours.
2. Select Labor and select the Labor Type:
- Direct Attendance: Concerns specific activities. For this labor type, enter the job number (e.g., work order) in the Job field generated when the labor type is selected.
Figure 3: Direct Labor Type
- Indirect Attendance: For generic activity. For this labor type, select the Department and the Indirect Labor Type from the drop-down boxes generated when the labor type is selected.
3. Once the fields have been completed, select Clock In.
Managing Department and Indirect Labor Type Fields
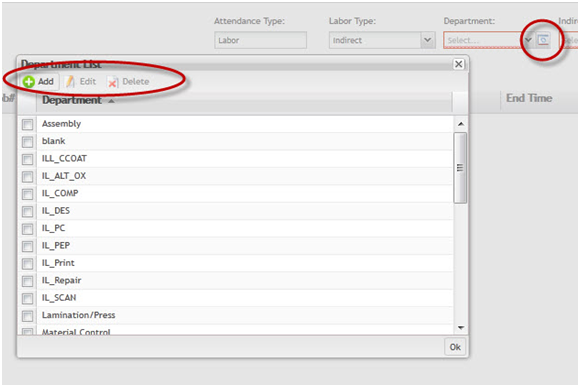
When Indirect is selected from the Labor Type drop-down box, the Department and Indirect Labor Type fields are both displayed with management icons that, if selected, allow users to perform Add, Edit, and Delete functions on items in the Department and Indirect Labor Type lists.
Managing Indirect Labor Type:
1. To manage the Indirect Labor Type (Add, Edit, or Delete), click on the respective icons; then complete, update, or delete information from the fields and click Ok.
2. Select Clock In. The data will be displayed in the Labor History. If you need to change any value, select the value and click on Change button.
3. Click on Clock Out at the end of the work shift.
Figure 5: Managing Department
Figure 6: Indirect Labor Type
Labor Tracking Maintenance
Users can select the Labor Tracking Maintenance sub-module to manage employees, add labor, and apply search filters in the Labor History.
Filter
1. To filter, complete the mandatory fields (i.e., Employee Name, Start Date, and End Date) and click Filter. The results are displayed in the Labor History.
Figure 7: Filter Settings
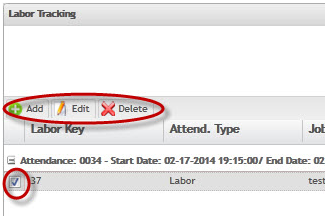
It is possible to add, edit, or delete labor entered by selecting the respective icons.
Figure 8: Add, Edit, and Delete Labor
NOTE: Only supervisors may update the date and time ranges.
Add Labor
The Add portlet allows the supervisor to log the work hours of the employee. It is possible to maintain the Employee #, Department, and Indirect Labor Type if Indirect Attendance is selected.
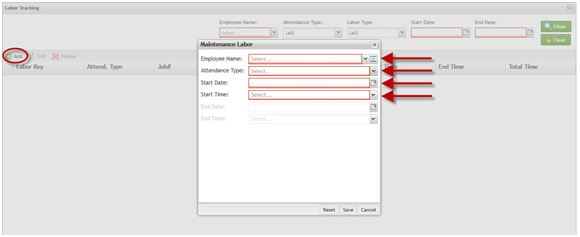
1. To Add Labor, click on Add Labor task in the on the page. The Maintenance Labor pop-up is displayed.
Figure 9: Add Labor
2. Enter the mandatory fields and select Save. The result now appears in the Labor History.
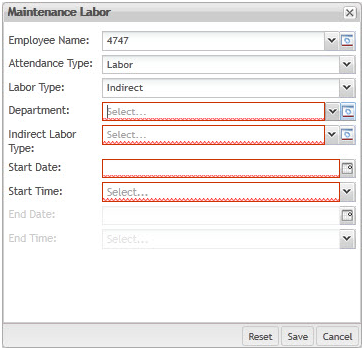
NOTE: When Labor is entered into the Attendance Type field, the Labor Type field will appear in the list, which is also mandatory. Likewise, selecting Direct or Indirect in the Labor Type field will cause the Job or Department and Indirect Labor Types to appear. An example of a more expanded Maintenance Labor pop-up is shown in the following figure.
Figure 10: Maintenance Labor - Expanded Menu
Edit labor
The Edit function can be used to modify the Maintenance Labor information of a previous entry.
1. First search for an entry by using the Filter function (cf. Filter functions above).
2. Select an entry from the list by clicking the "+" to expand the entry and then click the checkbox for the entry.
3. The Edit function now becomes available; so select Edit. This will bring up the Maintenance Labor pop-up, under which the provided fields can then be edited. The pop-up is nearly identical to the one in the Add function.
4. Make the desired changes to the information in the fields.
NOTE: The Employee Name cannot be edited.
5. Once the desired changes have been made, select Save to finish or Cancel to abort.
Figure 11: Edit Labor
Delete Labor
Finally, users may delete labor entries using the Delete function. To perform this operation
1. Search for the entry you wish to delete using the Filter function (cf. Filter instructions above).
2. Select the entry by clicking the "+" to expand the entry’s information. Click the checkbox. This selects the entry, and the Delete function becomes available for selection.
3. Select Delete. A dialogue box appears asking the user to confirm the deletion. Select Yes to continue.
Labor Tracking – Using SFDC Commands
The clock-in command is run at a data collector at any time after the operator logs in.
It is run as a !!2 command, which means that it is entered at the Serial Number prompt.
If an operator is already clocked in, running the command again will automatically end the previous labor record, and begin a new record.
The format of the command is:
!!2clockin.labor_type.labor_data
labor_type labor_data
1 (direct labor) job_number (shop order)
2 (indirect labor) partment
For example, to start a labor record for Shop Order 100501, scan:
!!2clockin.1.100501
The clockout command is run at a data collector at any time after the operator logs in when there is an open labor record.
It is run as a !!2 command, which means that it is entered at the Serial Number prompt.
The format of the command is:
!!2clockout
Further Information
This information completes the MDS Labor Tracking Manual. For further information on a specific functional area, refer to MDS WIKI page.
Document Revision History
| Date | Author | Title | Version | Change Reference |
| 04/09/12 | Elaine Fonaro | BRDC Technical Writer | 1.0 | Initial User’s Guide |
| 07/04/12 | Keith Fuqua | MDS Business Analyst | 1.0 | Minor corrects, verbage changes. |
| 03/19/14 | Dane Parker | Technical Writer | Updated for MES15 | |
| 10/08/14 | Dane Parker | Technical Writer | Revised Content | |


