Difference between revisions of "SOP-42Q-MES0075 CMMS Spare Parts"
(Created page with "<small>Cirrus > Production > CMMS Spare Parts</small><br> 130px|Sanmina logo.png <br> <center>'''CMMS Spare Parts''' </ce...") |
|||
| Line 1: | Line 1: | ||
| − | <small>[[Cirrus]] | + | <small>[[Cirrus]] > [[Cirrus Production|Production]] > CMMS Spare Parts</small><br> |
[[Image:Sanmina logo.png|130px|Sanmina logo.png]] | [[Image:Sanmina logo.png|130px|Sanmina logo.png]] | ||
| Line 7: | Line 7: | ||
<br> | <br> | ||
<center>This Work Instruction is Sanmina's corporate standard.</center> <center>This document is under revision control. The latest revision is located on SanminaNet.</center> <center>Once printed it is an uncontrolled copy. All alterations to this work instruction require approval.</center> <center>Contact the IT Global Education and Training Department to submit suggested alterations and or updates.</center> | <center>This Work Instruction is Sanmina's corporate standard.</center> <center>This document is under revision control. The latest revision is located on SanminaNet.</center> <center>Once printed it is an uncontrolled copy. All alterations to this work instruction require approval.</center> <center>Contact the IT Global Education and Training Department to submit suggested alterations and or updates.</center> | ||
| − | ''This edition applies to Cirrus and all subsequent releases and modifications until otherwise indicated in new revisions.'' | + | ''This edition applies to Cirrus and all subsequent releases and modifications until otherwise indicated in new revisions.'' |
| − | == Spare Parts == | + | == Spare Parts == |
| − | The main purpose of this feature is to create, delete and edit Companies to identify them as suppliers or manufactures and use it inside Work Orders. | + | The main purpose of this feature is to create, delete and edit Companies to identify them as suppliers or manufactures and use it inside Work Orders. |
| − | There are 2 sub-modules under Spare Parts: | + | There are 2 sub-modules under Spare Parts: |
| − | * Part List | + | *Part List |
| − | * Company | + | *Company |
| − | |||
| − | + | '''Figure 1: Spare Parts Module''' | |
| − | + | [[Image:SpareParts01.jpg|700px]]<br> | |
| − | |||
| − | === | + | === Company === |
| − | |||
| − | + | In the company sub-module page, users can search, add, edit and delete vendor and manufacturer company information. | |
| − | + | ==== Searching the Company List ==== | |
| − | + | To search the company list | |
| − | + | 1. Enter a partial or complete company name into the search field at the top of the page and select the Find button. | |
| − | + | '''Figure 2: Search Company''' | |
| − | |||
| − | + | [[Image:SpareParts02.jpg|700px]]<br> | |
| − | 2. | + | 2. Only the result or results meeting the search parameters entered are displayed. |
| − | + | ==== Adding a Company ==== | |
| − | |||
| − | |||
| − | |||
| − | + | To add a company | |
| − | + | 1. From the '''Company List''' page select '''Add'''. The '''Add Company''' page appears and includes the following tabs: '''Address''' and '''Contact'''. | |
| − | + | 2. Under the main '''Add Company''' page, complete the fields provided: | |
| − | * ''' | + | *'''ID: '''Company ID |
| − | * | + | *'''Name: '''Name given to the company |
| − | + | *'''Category''': Category given to the company: Manufacturer, Supplier or both | |
| − | + | *'''Active: '''if register is active, should display marked | |
| − | + | '''Figure3: Add Company''' | |
| − | + | [[Image:SpareParts03.jpg|700px]]<br> | |
| − | + | 3. Under the '''Address '''tab, add, edit, or delete address information: | |
| − | + | *'''Adding Address:''' | |
| + | *To add an address information select '''Add'''. The '''Add Address''' pop-up appears. | ||
| + | *Complete the fields provided: | ||
| − | + | 1. '''Address''' – company<nowiki>’</nowiki>s address | |
| − | ''' | + | 2. '''State''' – company<nowiki>’</nowiki>s state |
| − | + | 3. '''City''' - company<nowiki>’</nowiki>s city | |
| − | + | 4. '''Country''' - company<nowiki>’</nowiki>s country | |
| − | |||
| − | |||
| − | |||
| − | |||
| − | |||
| − | |||
| − | |||
| − | + | 5. '''Zip/Code '''– company<nowiki>’</nowiki>s zip code | |
| − | + | Select '''Save''' to finish or '''Close''' to abort. | |
| − | |||
| − | |||
| − | |||
| − | + | '''Figure 4: Add Company – Address Tab''' | |
| − | + | [[Image:SpareParts04.jpg|700px]]<br> | |
| − | + | *'''Editing Address List:''' | |
| + | *To edit an address, select an address from the Company Address list. The Edit function should now be available. | ||
| + | *Select '''Edit'''. The Edit Company Address pop-up appears. | ||
| + | *Edit any of the fields as needed. | ||
| + | *Select '''Save''' to finish; otherwise select '''Close''' to abort. | ||
| + | *'''Deleting an Address List:''' | ||
| + | *To delete an address, select an address from the Company Address list. The function should now be available. | ||
| + | *Select Delete. The selected address in now removed from the Company Address list. | ||
| − | + | 4. Under the '''Company Contact''' Tab, the user may add, edit, or enable (active)/disable contacts. | |
| − | + | *'''Adding Company Contacts:''' | |
| + | *To add a company contact, select '''Add''' from the '''Company Contact List''' menu. The '''Add Contact''' pop-up appears. | ||
| + | *Complete the fields provided: | ||
| − | + | 1. '''Contact Person''' | |
| − | + | 2. '''Email''' | |
| − | ''' | ||
| − | + | 3. '''Title''' | |
| − | + | 4. '''Work Phone''' | |
| − | |||
| − | |||
| − | |||
| − | |||
| − | |||
| − | |||
| − | |||
| − | |||
| − | + | 5. '''Fax''' | |
| − | + | 6. '''Mobile''' | |
| − | + | 7. '''Active <nowiki>[</nowiki>checkbox<nowiki>]</nowiki>''' | |
| − | * ''' | + | *Select '''Save''' to complete or '''Close''' to abort. |
| − | |||
| − | |||
| − | |||
| − | |||
| − | + | '''Figure 5: Add Company Contact''' | |
| − | 5. | + | [[Image:SOP-5-I-MES0075-C CMMS Spare Parts-WIKI 05.jpg|700px]] |
| − | + | *'''Editing Company Contacts:''' | |
| − | To | + | *To edit a company contact, select '''Edit''' from the '''Company Contact List''' menu. The '''Edit Contact''' pop-up appears. |
| + | *Edit any of the fields as needed. | ||
| + | *Select '''Save''' to finish; otherwise select '''Close''' to abort. | ||
| + | *'''Enabling/Disabling Company Contacts:''' | ||
| + | *To enable or disable a company contact, select a company contact from the '''Company Contact List'''. The Enable/Disable function should now be available. | ||
| + | *Select '''Enable/Disable'''. Any selected company contacts that were disabled are now enabled, whereas any select contacts that were enabled are now disabled. | ||
| − | + | ==== Editing a Company ==== | |
| − | + | To edit a company | |
| − | + | 1. From the '''Company List''' sub-module page select a company from the list. The Edit function should now be available. | |
| − | + | 2. Select '''Edit'''. The '''Edit Company''' pop-up appears. The '''Edit Company''' pop-up included two tabs: '''Address '''and '''Contact'''. | |
| − | |||
| − | + | 3. Under the Company tab, edit any of the provided fields as needed: | |
| − | |||
| − | |||
| − | |||
| − | + | *'''Company ID''' | |
| + | *'''Company Name''' | ||
| + | *'''Category''' | ||
| + | *'''Active <nowiki>[</nowiki>checkbox<nowiki>]</nowiki>''' | ||
| − | + | NOTE: if a company is being used in the configuration of "Part list" or in the "AVL" list, category cannot be changed for a specific one, only to the generic "Both" option. | |
| − | |||
| − | |||
| − | |||
| − | |||
| − | |||
| − | ''' | + | 4. Under the '''Address''' tab, add, edit, or delete and company address listings as needed. <u>NOTE</u>: Please refer to the Add Company instructions above for additional information about the Address tab. |
| − | + | 5. Under the '''Contact''' tab, add, edit, or disable/enable company contacts as needed. <u>NOTE</u>: Please refer to the Add Company instructions above for additional information about the Address tab. | |
| − | ==== | + | ==== Deleting a Company ==== |
| − | |||
| − | + | To delete a company | |
| − | + | 1. From the '''Company List''' sub-module page select a company from the list. The Delete function should now be available. | |
| − | + | 2. Select '''Delete'''. The Delete confirmation message appears. Click '''Yes''' to finish or '''Cancel''' to abort. | |
| − | |||
| − | |||
| − | |||
| − | |||
| − | |||
| − | |||
| − | |||
| − | |||
| − | |||
| − | |||
| − | |||
| − | |||
| − | |||
| − | |||
| − | |||
| − | + | NOTE: The system verifies if company register is being used in another table. If so, it is not possible to delete. | |
| − | + | === Part List === | |
| − | + | Under the Part List sub-module, the user can view all parts listed for the site and perform various functions. Functions that can be performed by the user include search/filtering part entries, adding parts, editing parts, and deleting parts. NOTE: With regard to the abbreviations in the sub-module list note that QOH denotes Quantity on Hand, QIT denotes Quantity in Transit, and Qty UOM denotes Quantity<nowiki>’</nowiki>s Units of Measure. | |
| − | + | NOTE: AVL qty in the list should display color: red if <nowiki><</nowiki> 2 lines. Green if <nowiki>></nowiki> 2 and Yellow if =2. | |
| − | |||
| − | |||
| − | |||
| − | |||
| − | |||
| − | |||
| − | |||
| − | |||
| − | |||
| − | + | ==== Search/Filter Parts ==== | |
| − | + | Users can search and filter the list of parts that are displayed in the list. | |
| − | + | 1. To search entries, use the filters provided: | |
| − | |||
| − | |||
| − | |||
| − | + | *Enter a partial or complete '''Part Number'''. | |
| + | *Enter a partial or complete '''Part Name'''. | ||
| + | *Select a '''Manufacturer''' from the drop-down list. | ||
| + | *Enter a '''MFG PN''' (i.e., the part ID of the manufacturer). | ||
| + | *Select Active Part or Inactive | ||
| − | + | 2. Select the '''Filter''' button to filter and search the list. Only entries consistent with the filter parameters that were entered should now be displayed in the list. | |
| − | + | '''Figure 6: Search Part List''' | |
| − | 5. | + | [[Image:SOP-5-I-MES0075-C CMMS Spare Parts-WIKI 06.jpg|700px]] |
| − | + | ==== Add a Part ==== | |
| − | + | To add a part to the part list | |
| − | + | 1. Select '''Add''' from the '''Part List''' menu. The '''Add Part '''pop-up appears which is comprised of three tabs: '''Alternative Parts''', '''Machine Type''' and '''AVL'''. | |
| − | |||
| − | ''' | ||
| − | + | 2. Complete the fields provided: | |
| − | * ''' | + | *Enter a '''Part Number'''. |
| − | * | + | *Enter a '''Part Name'''. |
| − | * The user may | + | *Enter a '''Manufacturer'''. NOTE: This field lists all available companies, if you want to add, edit, or delete a company, go to Spare Parts <nowiki>></nowiki> Company. When users enter information into the field, all company names that match the input parameters are listed. |
| − | + | *Enter '''MFG PN'''. This field denotes the part number—that is, the part ID for the manufacturer. | |
| + | *Enter '''Max Inv'''. NOTE: This field denotes the maximum inventory. Max value should be higher or equal than minimum and minimum should be higher or equal than safe. | ||
| + | *Enter '''Min Inv'''. NOTE: This field denotes the minimum inventory. | ||
| + | *Enter '''Safe Inv'''. NOTE: This field denotes the safety stock. | ||
| + | *Enter '''QTY UOM '''from the drop-down list. NOTE: This field denotes the units and measurements used here. | ||
| + | *Enter '''Part Type''' from the drop-down list. Select whether the part is "Easy-expendable" or "Non-easy-expendable." | ||
| + | *Check whether '''Is Stock''' | ||
| + | *Select '''Status''' from the drop-down list. The user may select from the options: Active, Inactive, or Obsolete. | ||
| + | *Select '''Source Type''' from the drop-down list. | ||
| + | *Check if '''Reused.''' | ||
| + | *Check if '''Active.''' | ||
| + | *Enter a '''Description.''' | ||
| − | + | NOTE: '''QOH''' and '''QIT''' should use Inventory values: <font color="#FF0000">not developed yet</font>. | |
| − | + | '''Figure 7: Add a New Part Number Page''' | |
| − | + | [[Image:SOP-5-I-MES0075-C CMMS Spare Parts-WIKI 07.jpg|700px]] | |
| − | + | 3. Under the '''Alternative Parts''' tab, add or delete alternative parts. The main purpose of this feature is associate parts with parts to define alternative choices. These actions refer to the selection of fungible parts. | |
| − | + | *'''Adding alternative parts:''' | |
| + | *To add an alternative part select '''Add''' from the '''Alternative Parts''' menu. The '''Alternative Part List''' pop-up appears. | ||
| + | *Search a part number or select items from the list. | ||
| + | *Select '''Add''' to finish or select '''Close''' to abort. | ||
| + | *'''Deleting alternative parts:''' | ||
| + | *Select an alternative part from the list. | ||
| + | *Select delete from the Alternative Part menu. This removes the selected alternative part from the list. | ||
| + | *The alternative parts are displayed in the list. | ||
| + | *Select '''Save''' to finish or '''Close''' to abort. | ||
| − | + | '''Figure 8: Add an Alternative Part Pop-Up''' | |
| − | + | [[Image:SOP-5-I-MES0075-C CMMS Spare Parts-WIKI 08.jpg|700px]] | |
| − | + | 4. Under '''the Authorized Vendor List (AVL)''' tab, users may add, edit, or delete AVLs. The main purpose of this feature is to configure companies in charge of the Part Number. | |
| − | * ''' | + | *'''Adding an AVL:''' |
| − | * To | + | *To add an AVL, from the AVL tab select '''Add''' from the menu. The '''Add Authorized Vendor''' pop-up appears. |
| − | + | *Complete the fields provided: | |
| − | + | 1. Select a'''Company''': drop-down list from company configuration where category is Both or Supplier – mandatory field. | |
| − | + | 2. Enter a'''MFG PN''': free text – manufacture PN - optional | |
| − | |||
| − | |||
| − | |||
| − | ''' | + | 3. Enter a '''Lead Time''': This refers to the delivery time (in days) of the given part- optional. |
| − | |||
| − | |||
| − | + | 4. Selecta '''Currency''': drop-down list with the currencies- optional. | |
| − | |||
| − | |||
| − | + | 5. Enter a '''Currency Price''': optional. | |
| − | |||
| − | + | 6. Enter a '''Previous Price''': optional | |
| − | + | 7. Check to '''Approve''': default is checked. | |
| − | ''' | + | *Enter a '''Remark''': free additional text- optional. |
| + | *Select '''Save''' to finish or '''Cancel''' to abort. | ||
| − | ''' | + | '''Figure 9: Add an AVL Pop-Up Window''' |
| − | |||
| − | ''' | ||
| − | + | [[Image:SpareParts09.jpg|700px]]<br> | |
| − | + | *'''Editing an AVL:''' | |
| + | *To edit an AVL, select an AVL from the list and click '''Edit'''. | ||
| + | *The user may edit any of the fields provided: | ||
| − | + | 1. '''Company''' | |
| − | + | 2. '''MFG PN''' | |
| − | + | 3. '''Lead Time''' | |
| − | + | 4. '''Currency''' | |
| − | + | 5. '''Current Price''' | |
| − | |||
| − | |||
| − | |||
| − | |||
| − | |||
| + | 6. '''Previous Price''' | ||
| + | |||
| + | 7. '''Approve''' | ||
| + | |||
| + | 8. '''Remark''' | ||
| + | |||
| + | *Select '''Save''' to finish or '''Close''' to abort. | ||
| + | |||
| + | *'''Deleting an AVL:''' | ||
| + | *To delete an AVL, select an AVL from the list and click '''Delete'''. This removes the AVL from the list. | ||
| + | *Select '''Save''' to finish or '''Close''' to abort. | ||
| + | |||
| + | 5. Under the '''Machine Type''' tab, users can add and delete machine types. | ||
| + | |||
| + | *'''Adding machine types''' | ||
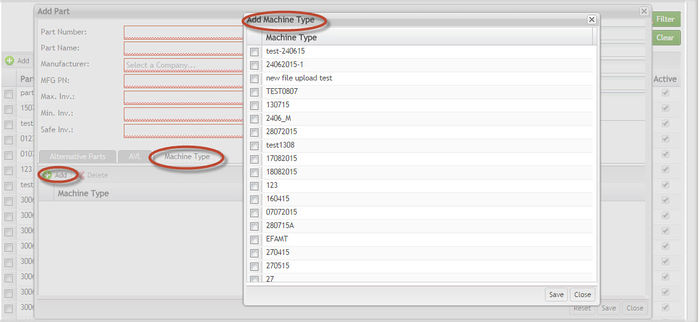
| + | *Select '''Add''' from the '''Machine Type''' Tab menu. The '''Add Machine Type''' pop-up appears. | ||
| + | *From the '''Add Machine Type''' page, select items from the list. Select '''Save''' to finish, or '''Close''' to abort. | ||
| + | |||
| + | '''Figure 10: Add Machine Type''' | ||
| + | |||
| + | [[Image:SpareParts10.jpg|700px]]<br> | ||
| + | |||
| + | *'''Deleting a Machine Type:''' | ||
| + | *To delete a Machine Type, select a Machine Type from the list and click '''Delete'''. This removes the Machine Type from the list. | ||
| + | *Select '''Save''' to finish or '''Close''' to abort. | ||
| + | |||
| + | ==== Edit a Part List ==== | ||
| + | |||
| + | Part lists can be edited in the '''Part List''' sub-module page. To edit a part list | ||
| + | |||
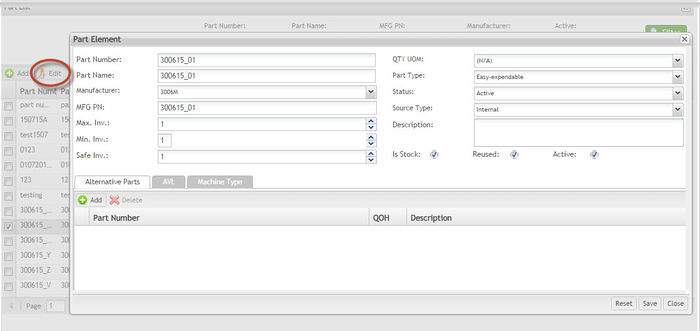
| + | 1. Select a part from the list. The Edit function should become available. | ||
| + | |||
| + | 2. Select '''Edit'''. The Part Properties pop-up appears which is comprised of three tabs: '''Alternative Parts''', '''AVL''', and '''Machine Type'''. | ||
| + | |||
| + | '''Figure 11: Edit a Part List Pop-Up Window General Tab''' | ||
| + | |||
| + | [[Image:SpareParts11.jpg|700px]]<br> | ||
| + | |||
| + | NOTE: All rules for '''Add Part''' are applicable for '''Edit Part'''. Please, refer to '''Add Part''' topic for further information. | ||
| + | |||
| + | ==== Delete Part ==== | ||
| + | |||
| + | To delete the part | ||
| + | |||
| + | 1. Select a Part from the list and click '''Delete'''. This removes the Part from the list. | ||
| + | |||
| + | 2. Select '''Save '''to finish or '''Close''' to abort. | ||
| + | |||
| + | == Document Revision History == | ||
| + | |||
| + | {| border="2" cellspacing="0" cellpadding="4" width="100%" | ||
|- | |- | ||
| − | |09/09/15 | + | | align="center" bgcolor="#00FFFF" | <font color="#FFFFFF">Date</font> |
| − | |Elaine Fonaro | + | | align="center" bgcolor="#00FFFF" | <font color="#FFFFFF">Author</font> |
| − | |Technical Writer | + | | align="center" bgcolor="#00FFFF" | <font color="#FFFFFF">Title</font> |
| − | |v 1.0 | + | | align="center" bgcolor="#00FFFF" | <font color="#FFFFFF">Version</font> |
| − | |This is the first revision of CMMS Spare Part for Cirrus | + | | align="center" bgcolor="#00FFFF" | <font color="#FFFFFF">Change Reference</font> |
| − | + | |- | |
| + | | 09/09/15 | ||
| + | | Elaine Fonaro | ||
| + | | Technical Writer | ||
| + | | v 1.0 | ||
| + | | This is the first revision of CMMS Spare Part for Cirrus | ||
|} | |} | ||
| − | [[ | + | [[Category:Uncategorized]] |
Revision as of 18:01, 9 December 2015
Cirrus > Production > CMMS Spare Parts
This edition applies to Cirrus and all subsequent releases and modifications until otherwise indicated in new revisions.
Contents
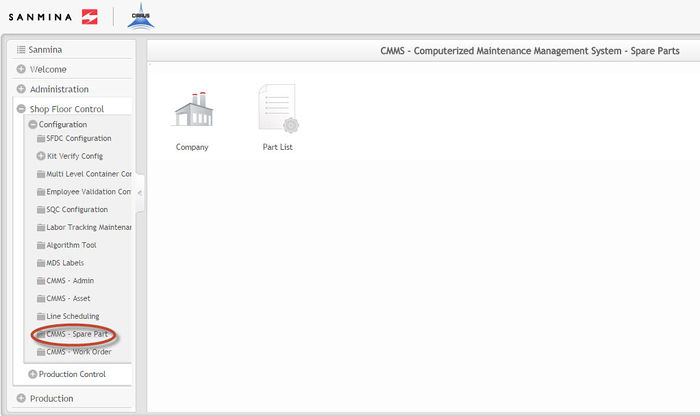
Spare Parts
The main purpose of this feature is to create, delete and edit Companies to identify them as suppliers or manufactures and use it inside Work Orders.
There are 2 sub-modules under Spare Parts:
- Part List
- Company
Figure 1: Spare Parts Module
Company
In the company sub-module page, users can search, add, edit and delete vendor and manufacturer company information.
Searching the Company List
To search the company list
1. Enter a partial or complete company name into the search field at the top of the page and select the Find button.
Figure 2: Search Company
2. Only the result or results meeting the search parameters entered are displayed.
Adding a Company
To add a company
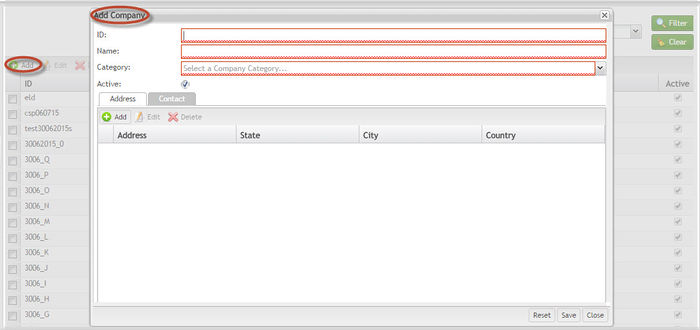
1. From the Company List page select Add. The Add Company page appears and includes the following tabs: Address and Contact.
2. Under the main Add Company page, complete the fields provided:
- ID: Company ID
- Name: Name given to the company
- Category: Category given to the company: Manufacturer, Supplier or both
- Active: if register is active, should display marked
Figure3: Add Company
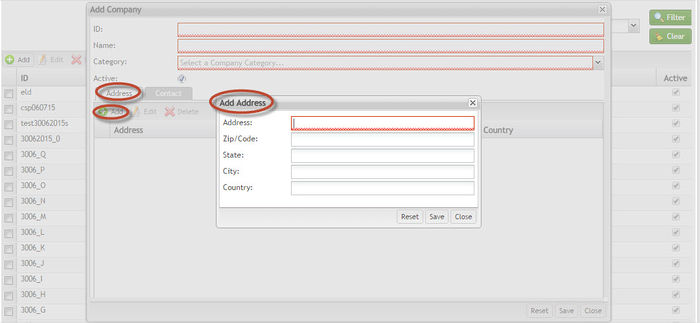
3. Under the Address tab, add, edit, or delete address information:
- Adding Address:
- To add an address information select Add. The Add Address pop-up appears.
- Complete the fields provided:
1. Address – company’s address
2. State – company’s state
3. City - company’s city
4. Country - company’s country
5. Zip/Code – company’s zip code
Select Save to finish or Close to abort.
Figure 4: Add Company – Address Tab
- Editing Address List:
- To edit an address, select an address from the Company Address list. The Edit function should now be available.
- Select Edit. The Edit Company Address pop-up appears.
- Edit any of the fields as needed.
- Select Save to finish; otherwise select Close to abort.
- Deleting an Address List:
- To delete an address, select an address from the Company Address list. The function should now be available.
- Select Delete. The selected address in now removed from the Company Address list.
4. Under the Company Contact Tab, the user may add, edit, or enable (active)/disable contacts.
- Adding Company Contacts:
- To add a company contact, select Add from the Company Contact List menu. The Add Contact pop-up appears.
- Complete the fields provided:
1. Contact Person
2. Email
3. Title
4. Work Phone
5. Fax
6. Mobile
7. Active [checkbox]
- Select Save to complete or Close to abort.
Figure 5: Add Company Contact
- Editing Company Contacts:
- To edit a company contact, select Edit from the Company Contact List menu. The Edit Contact pop-up appears.
- Edit any of the fields as needed.
- Select Save to finish; otherwise select Close to abort.
- Enabling/Disabling Company Contacts:
- To enable or disable a company contact, select a company contact from the Company Contact List. The Enable/Disable function should now be available.
- Select Enable/Disable. Any selected company contacts that were disabled are now enabled, whereas any select contacts that were enabled are now disabled.
Editing a Company
To edit a company
1. From the Company List sub-module page select a company from the list. The Edit function should now be available.
2. Select Edit. The Edit Company pop-up appears. The Edit Company pop-up included two tabs: Address and Contact.
3. Under the Company tab, edit any of the provided fields as needed:
- Company ID
- Company Name
- Category
- Active [checkbox]
NOTE: if a company is being used in the configuration of "Part list" or in the "AVL" list, category cannot be changed for a specific one, only to the generic "Both" option.
4. Under the Address tab, add, edit, or delete and company address listings as needed. NOTE: Please refer to the Add Company instructions above for additional information about the Address tab.
5. Under the Contact tab, add, edit, or disable/enable company contacts as needed. NOTE: Please refer to the Add Company instructions above for additional information about the Address tab.
Deleting a Company
To delete a company
1. From the Company List sub-module page select a company from the list. The Delete function should now be available.
2. Select Delete. The Delete confirmation message appears. Click Yes to finish or Cancel to abort.
NOTE: The system verifies if company register is being used in another table. If so, it is not possible to delete.
Part List
Under the Part List sub-module, the user can view all parts listed for the site and perform various functions. Functions that can be performed by the user include search/filtering part entries, adding parts, editing parts, and deleting parts. NOTE: With regard to the abbreviations in the sub-module list note that QOH denotes Quantity on Hand, QIT denotes Quantity in Transit, and Qty UOM denotes Quantity’s Units of Measure.
NOTE: AVL qty in the list should display color: red if < 2 lines. Green if > 2 and Yellow if =2.
Search/Filter Parts
Users can search and filter the list of parts that are displayed in the list.
1. To search entries, use the filters provided:
- Enter a partial or complete Part Number.
- Enter a partial or complete Part Name.
- Select a Manufacturer from the drop-down list.
- Enter a MFG PN (i.e., the part ID of the manufacturer).
- Select Active Part or Inactive
2. Select the Filter button to filter and search the list. Only entries consistent with the filter parameters that were entered should now be displayed in the list.
Figure 6: Search Part List
Add a Part
To add a part to the part list
1. Select Add from the Part List menu. The Add Part pop-up appears which is comprised of three tabs: Alternative Parts, Machine Type and AVL.
2. Complete the fields provided:
- Enter a Part Number.
- Enter a Part Name.
- Enter a Manufacturer. NOTE: This field lists all available companies, if you want to add, edit, or delete a company, go to Spare Parts > Company. When users enter information into the field, all company names that match the input parameters are listed.
- Enter MFG PN. This field denotes the part number—that is, the part ID for the manufacturer.
- Enter Max Inv. NOTE: This field denotes the maximum inventory. Max value should be higher or equal than minimum and minimum should be higher or equal than safe.
- Enter Min Inv. NOTE: This field denotes the minimum inventory.
- Enter Safe Inv. NOTE: This field denotes the safety stock.
- Enter QTY UOM from the drop-down list. NOTE: This field denotes the units and measurements used here.
- Enter Part Type from the drop-down list. Select whether the part is "Easy-expendable" or "Non-easy-expendable."
- Check whether Is Stock
- Select Status from the drop-down list. The user may select from the options: Active, Inactive, or Obsolete.
- Select Source Type from the drop-down list.
- Check if Reused.
- Check if Active.
- Enter a Description.
NOTE: QOH and QIT should use Inventory values: not developed yet.
Figure 7: Add a New Part Number Page
3. Under the Alternative Parts tab, add or delete alternative parts. The main purpose of this feature is associate parts with parts to define alternative choices. These actions refer to the selection of fungible parts.
- Adding alternative parts:
- To add an alternative part select Add from the Alternative Parts menu. The Alternative Part List pop-up appears.
- Search a part number or select items from the list.
- Select Add to finish or select Close to abort.
- Deleting alternative parts:
- Select an alternative part from the list.
- Select delete from the Alternative Part menu. This removes the selected alternative part from the list.
- The alternative parts are displayed in the list.
- Select Save to finish or Close to abort.
Figure 8: Add an Alternative Part Pop-Up
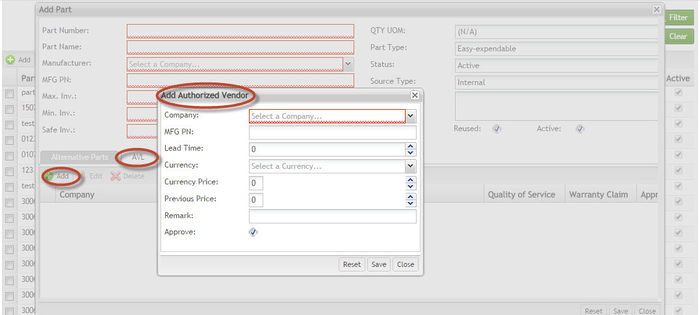
4. Under the Authorized Vendor List (AVL) tab, users may add, edit, or delete AVLs. The main purpose of this feature is to configure companies in charge of the Part Number.
- Adding an AVL:
- To add an AVL, from the AVL tab select Add from the menu. The Add Authorized Vendor pop-up appears.
- Complete the fields provided:
1. Select aCompany: drop-down list from company configuration where category is Both or Supplier – mandatory field.
2. Enter aMFG PN: free text – manufacture PN - optional
3. Enter a Lead Time: This refers to the delivery time (in days) of the given part- optional.
4. Selecta Currency: drop-down list with the currencies- optional.
5. Enter a Currency Price: optional.
6. Enter a Previous Price: optional
7. Check to Approve: default is checked.
- Enter a Remark: free additional text- optional.
- Select Save to finish or Cancel to abort.
Figure 9: Add an AVL Pop-Up Window
- Editing an AVL:
- To edit an AVL, select an AVL from the list and click Edit.
- The user may edit any of the fields provided:
1. Company
2. MFG PN
3. Lead Time
4. Currency
5. Current Price
6. Previous Price
7. Approve
8. Remark
- Select Save to finish or Close to abort.
- Deleting an AVL:
- To delete an AVL, select an AVL from the list and click Delete. This removes the AVL from the list.
- Select Save to finish or Close to abort.
5. Under the Machine Type tab, users can add and delete machine types.
- Adding machine types
- Select Add from the Machine Type Tab menu. The Add Machine Type pop-up appears.
- From the Add Machine Type page, select items from the list. Select Save to finish, or Close to abort.
Figure 10: Add Machine Type
- Deleting a Machine Type:
- To delete a Machine Type, select a Machine Type from the list and click Delete. This removes the Machine Type from the list.
- Select Save to finish or Close to abort.
Edit a Part List
Part lists can be edited in the Part List sub-module page. To edit a part list
1. Select a part from the list. The Edit function should become available.
2. Select Edit. The Part Properties pop-up appears which is comprised of three tabs: Alternative Parts, AVL, and Machine Type.
Figure 11: Edit a Part List Pop-Up Window General Tab
NOTE: All rules for Add Part are applicable for Edit Part. Please, refer to Add Part topic for further information.
Delete Part
To delete the part
1. Select a Part from the list and click Delete. This removes the Part from the list.
2. Select Save to finish or Close to abort.
Document Revision History
| Date | Author | Title | Version | Change Reference |
| 09/09/15 | Elaine Fonaro | Technical Writer | v 1.0 | This is the first revision of CMMS Spare Part for Cirrus |

