SOP-42Q-MES0013 Record Components Maintenance
42Q Home > Shop Floor Control > Configuration > Record Components Maintenance
Contents
Introduction
42Q’s powerful data collection system collects critical information from a plant’s shop floor, utilizing shop floor data collector, an intuitive tool developed by 42Q’s experienced manufacturing team. The aggregate information is stored in a cloud database, and available to MESWeb, where quality reports are generated. The 42Q system uses manual and automated barcode scanning to collect data for a product line or plant. Thus, 42Q plays an important role in maintaining unit histories and directing product movement on the manufacturing floor. The current version of 42Q includes configuration capabilities, which provide access to all sub-modules pages and their functionalities (view, add, edit, print/generate output files).
Record Components
This application allows the user to add/modify components of another unit. It is used to record the added components during the part assembly.
The features of this module are as follows:
- Allow selection by serial number or by the workstation.
- Record the Step of the component.
- Record a standard MASK for the component.
- Record a User Prompt to be used for the component.
- Record the component ID.
This module notifies the process of a particular component that its serial number is connecting with the serial number of the final product.
To access the Record Components Maintenance, navigate to Shop Floor Control > Configuration > Shop Floor Configuration > Record Components.
Figure 1: MES Record Components Maintenance
Note: A user only has access to the modules assigned to his or her profile.
The main Record Components page is displayed.
Recording Components - Filtering
1. To Record Components, enter a Serial Number and select Filter. The Recording Components List is displayed.
Figure 2: Record Components List
Recording Components – Editing Component ID
1. From the list, double-click the Component ID field to edit it.
Figure 3: Edit Component ID
2. Enter changes and select Update to save, or Cancel to abort.
Recording Components – Deleting Component ID
1. From the list, select a step line and click the Delete icon to delete the component ID.
Figure 4: Delete Component ID
2. To undo a delete, check the box of the item that was deleted (which should now be highlighted in red).
3. Select Unremove. The item will no longer be listed as deleted.
Figure 5: Undo Delete
Recording Components - Export List
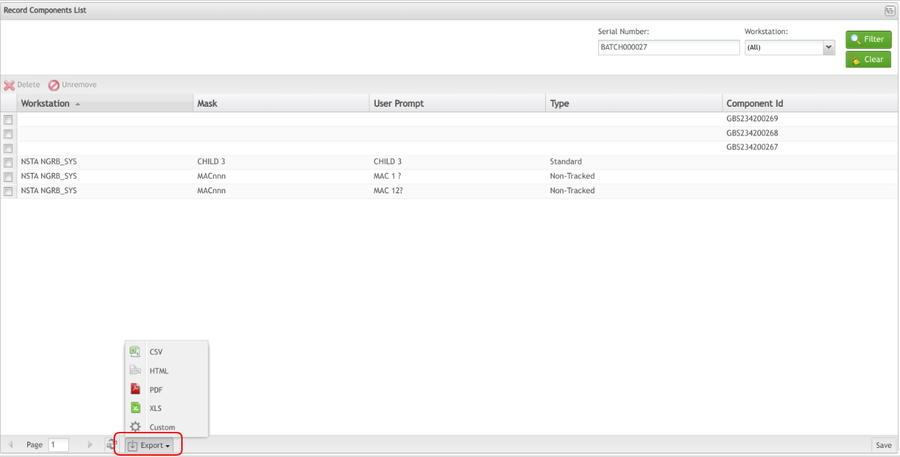
1. The record component list can be exported as CSV, HTML, PDF, and XLS files.
2. Select Export and choose the required file type to download the list
Figure 6: Export List
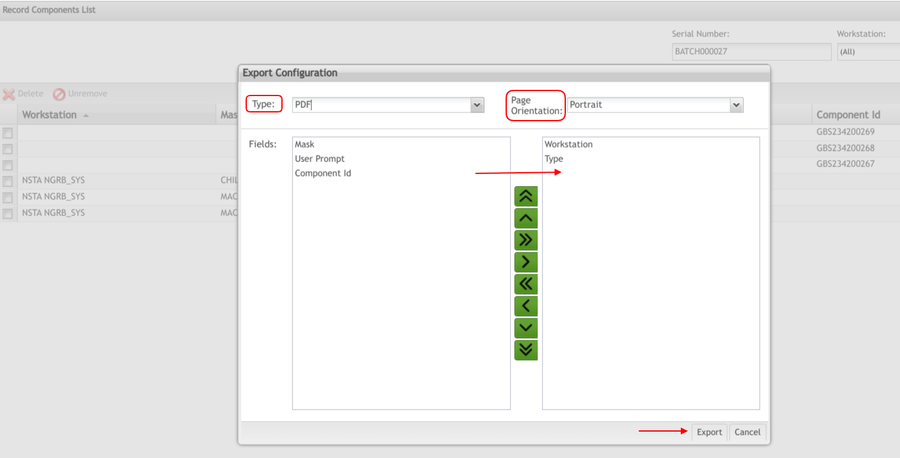
3. Users can customize the record component list by selecting Custom.
4. Choose the File type, select the required Page Orientation (Portrait or Landscape), and double-click or use the navigation buttons to add the required fields to be exported in the file.
Figure 7: Custom Export List


