SOP-5-I-MDS0028-C-CMMS Touch & Mobile\SOP-5-I-CMMS Touch & Mobile
42Q Home > Tools > CMMS Touch & Mobile
CMMS Touch and Mobile
The CMMS Touch and Mobile tools manage work orders and machine down/up times from an android tablet application on the production area’s shop floor. The present application requires Android version 4.4 or below.
- Launch the application on the mobile tablet.
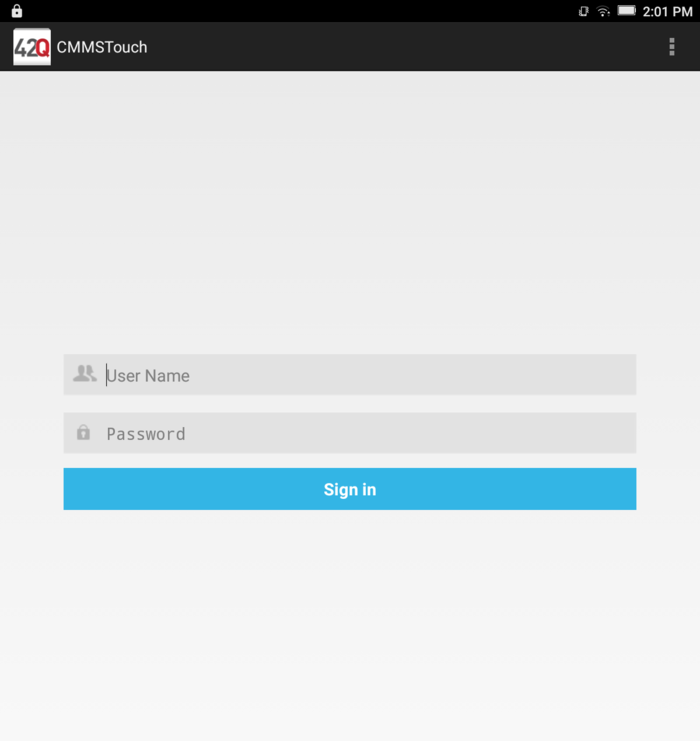
- Enter User Name and Password at the Login Screen.
NOTE: User Names/Passwords are case sensitive.
Figure 1: Touch Login Screen
CMMS Touch
CMMS Touch is a mobile application used by plant administrators to manage CMMS Work Orders. CMMS Touch is an abbreviated version of the CMMS Work Request tool available in the portal (Production > CMMS Work Request).
Work Order
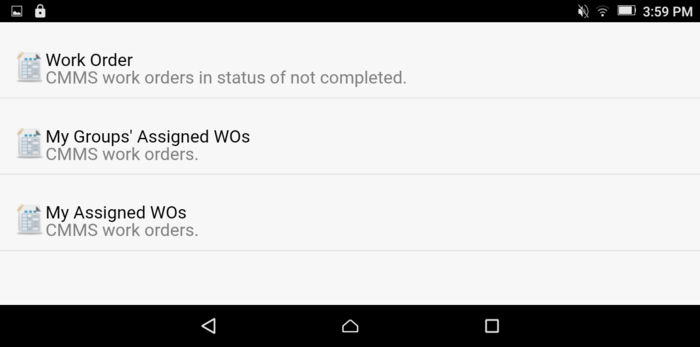
There are three distinct modules available in CMMS Touch, allowing users to quickly access information.
- Work Order: Complete list of all work orders assigned to the plant’s assets
- My Groups’ Assigned WOs: List of work orders assigned to the current user’s group
- My Assigned WOs: List of work orders assigned to the current user
Each module allows users to view work order details, change the status of a work order, send a Work Log, record Labor hours, or complete a Checklist.
Figure 2: Touch Main Menu
View Work Order
- Select the Work Order icon.
- The Work Order List displays. Work Orders are listed vertically, across the full page, according to date. NOTE: Closed Work Orders are not included in the CMMS Mobile Work Order List.
- The following Work Order information is available for view:
- Line No: Line Number assigned to the asset associated with the Work Order
- Create Date: Date the Work Order was created
- Assigned Group: Group assigned to repair the asset
- Status: Status of the Work Order. Status is noted on the far right of the screen. Options include: Assigned, Work in Progress (WIP), Waiting for Parts (WFP), Waiting for Buy Off (WFBO), Rejected (R), Canceled (C).
NOTE: Work orders in Closed status are not available in the CMMS Touch Application. Users may view Closed Work Orders in the CMMS Work Order portal under Production > CMMS Work Order.
Figure 3: Work Order List
- Tap a Work Order entry from the Work Order List. The work order details page displays, consisting of the following four tabs: General, Work Log, Labor, Checklist.
Change Work Order Status
Work Order: General Tab
Figure 4: Work Order: General Tab
Within the General Tab, users may edit the status or view details of the selected Work Order. The following data is available for view only:
- 'WO I'D: The ID number assigned to the Work Order
- Description: Description or Title included in the Work Order
- Priority: Priority number assigned to the Work Order (1-3)
- Production Line: Line Number assigned to the asset associated with the Work Order
- Asset ID: The ID number assigned to the Asset
- Asset Name: Name assigned to the Asset
- Down Time: The time the asset was noted as down
- Assignees: Refers to technicians assigned to complete the Work Order repair or maintenance
- Requester: Employee who opened/created the Work Order
- Requester Group: The group to which the Requester belongs
- Assigned Group: Name of the group assigned to complete the Work Order repair or maintenance
- Category: Problem Category assigned to the Work Order
- Problem: Problem assigned to the Work Order
- PM ID: If the Work order is preventive maintenance, the PM ID # will be included
- Create Date: Notes the date and time the Work Order was created
- Reject Remark: The reason included if the Work Order was rejected by the Approver
NOTE: All fields may not be complete, as not all are mandatory fields when creating a Work Order.
Figure 5: Change Work Order Status
Work Order: Work Log Tab
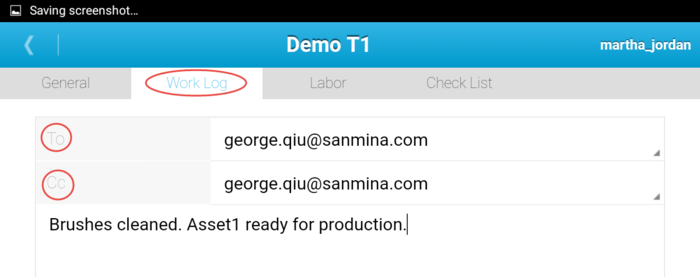
The Work Log Tab allows users to view the original Work Log communication associated with the selected Work Order. Users may also Add additional comments to the existing Work Log. Once added, an email notification will automatically forward to the users defined in the original Work Order. The following categories are available:
- To
- CC
- Date
- Content
NOTE: Like most email correspondence, Work Logs cannot be deleted once they are created.
Figure 6: Work Log Tab
Work Order: Labor Tab
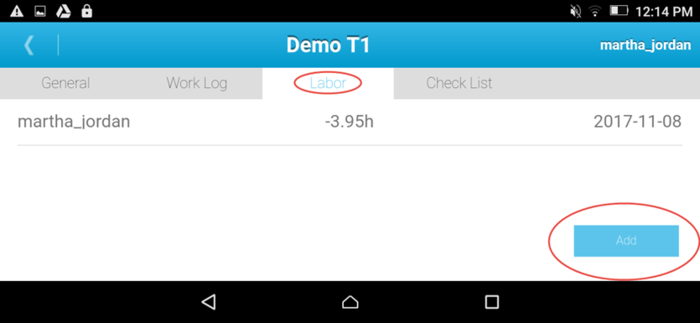
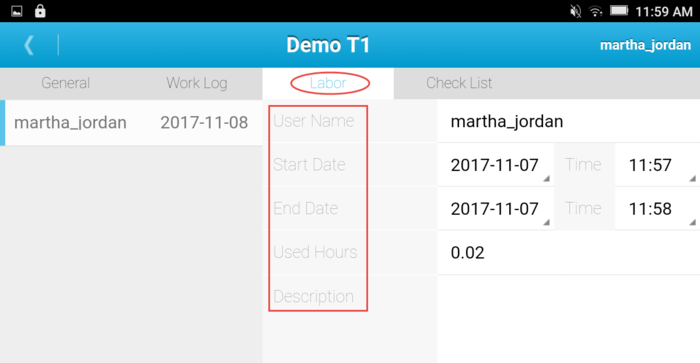
The Labor Tab allows users to view labor performed on the selected Work Order. Users who are part of the Work Order’s Assigned Group may also add, edit, or delete labor hours to/from the Work Order. NOTE: Work Orders cannot move to complete status until labor hours are recorded by the technician completing the maintenance repair.
- Select the labor Tab.
- Select the Add icon on the bottom of the page.
Figure 7: Add Labor
3. A pop-up window displays, allowing the user to add or adjust the date and time for the labor performed.
4. The following fields are available for edit. Drop-down menus are provided.
- Start Date
- End Date
- Used Hours
- Description
Figure 8: Labor Tab
Work Order: Checklist Tab
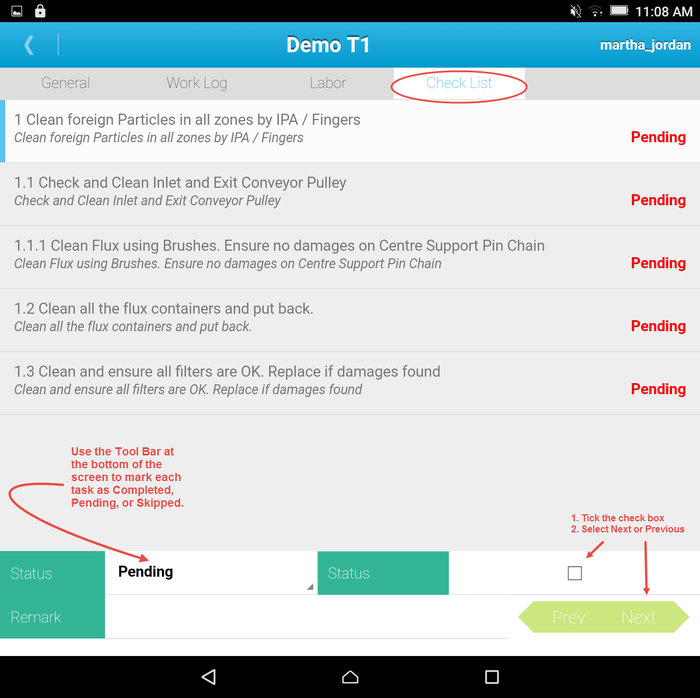
The Checklist Tab is an interactive tool used by shop floor technicians to perform each step in the repair process. The interface allows users to systematically complete and mark each task from the convenience of a single screen (see Figure 9, below).
Figure 9: Checklist Tab
Edit the Checklist
NOTE: Only users who are part of the Assigned Group may edit the Checklist.
- Tap the preferred checklist.
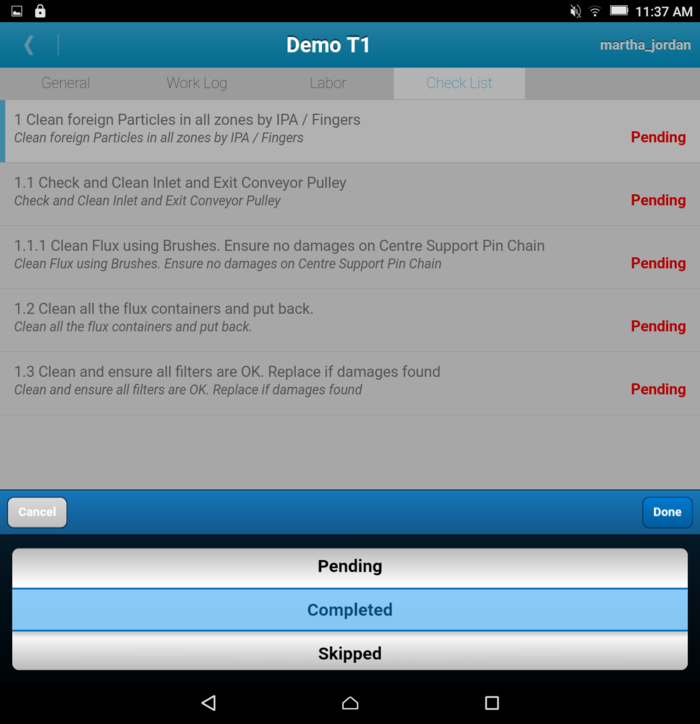
- Edit the Status from the drop-down menu on the bottom of the tablet. Choices include: Completed, Pending, or Skipped.
- Tick the checkbox. NOTE: Checking the box will automatically set the status.
- Add any additional comments in the Remark field.
- Select Save.
- Use the Previous/Next button to mark the status of other steps in the Checklist.
- Users may also add or edit a single step in the Checklist using the drop-down menu (see below).
NOTE: Checklists are associated with assets in the CMMMS configuration portal (Shop Floor Control > Configuration > CMMS Asset > Checklist).
Figure 10: Mark Single Checklist Step
CMMS Mobile
The CMMS Mobile application is used to manage machine downtime and repair from the production floor location. CMMS Mobile is an abbreviated version of the CMMS Work Order tool available in 42Q’s portal (Production > CMMS Work Order). The following features are available in the CMMS Mobile application:
- Create Work Order
- Record Machine Downtime
CMMS Mobile Configuration
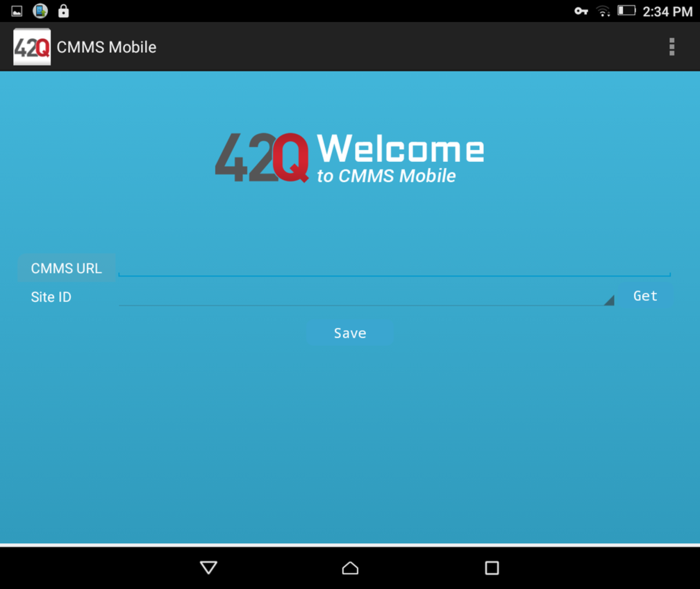
- After installing CMMS Mobile, it will show the following image (See Figure 11, below).
- Enter the CMMS URL.
- Select Get.
- If URL is correct, it will extract the Site IDs.
- Select your Site ID from the list provided in the drop-down menu.
- Select Save to save configurations to your device.
Figure 11: CMMS URL/Site ID
Create Work Order
The user is directed to the Welcome page, which is comprised of two features: Create Work Order or Change Machine Status.
Figure 12: Welcome Screen - Create Work Order./Change Machine Status
Figure 13: Create Work Order Screen
The following modules are available in CMMS Mobile: Basic, Group, and Down Time.
1. Basic: Select Asset
- Asset ID: Select the ID# for the machine (asset) being repaired by scanning its barcode: NOTE: Users may also enter the Asset Name in the text field (case sensitive).
- Asset Name: Asset Name automatically populates when the Asset ID# is selected.
- Status: Status of the machine automatically populates when the Asset ID# is entered. Status displays in color as Running/Down/Repair.
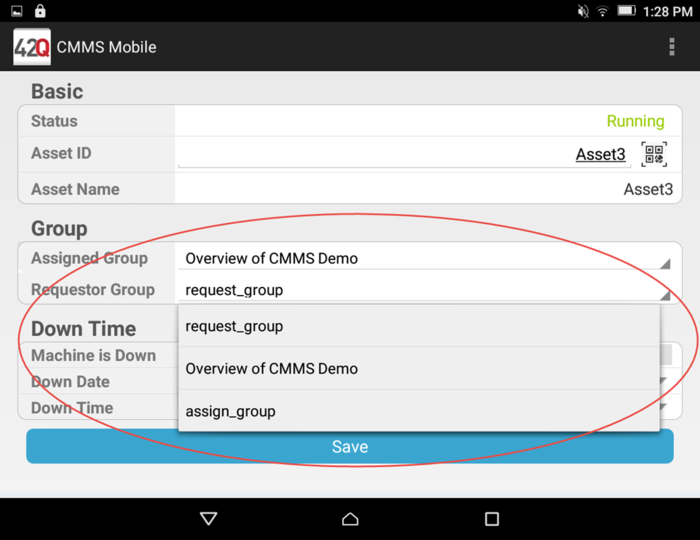
2. Group: Edit Assigned Group/Requestor Group
NOTE: If the Groups responsible for repair remain the same and the user only needs to record a machine as down/up, this field is not needed.
- Assigned Group: Change the Assigned Group from the list provided in the drop-down menu.
- Requestor Group: Change the Requestor Group from the list provided in the drop-down menu.
NOTE: Only Requestors have edit permission.
Figure 14: Edit Group
3. Downtime: Note Date/Time of Machine Stoppage
- Machine is Down: Select Yes/No
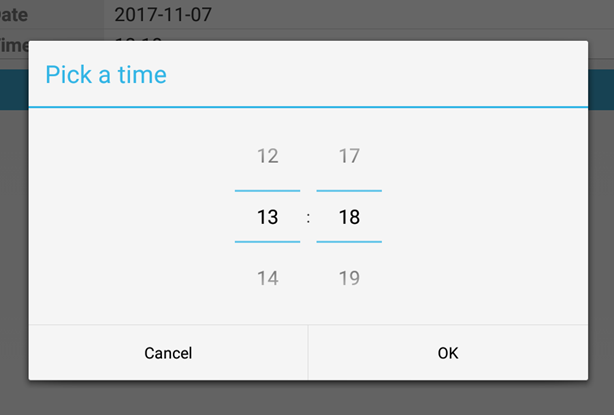
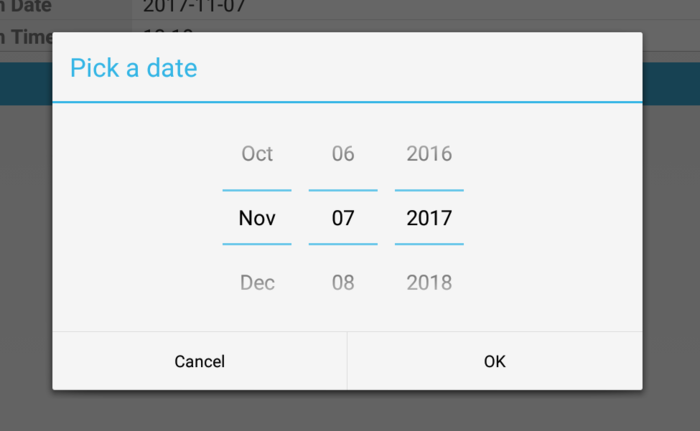
- Down Date: Select the machine Down Date and Down Time.
- Save/Cancel: Select Save to finish or Back to abort.
Figure 15: Machine Down Time Selection
Figure 16: Machine Down Date Selection
- If all fields have been completed correctly, a success message will appear. Select OK.
Figure 17: Success Message
Change Machine Status
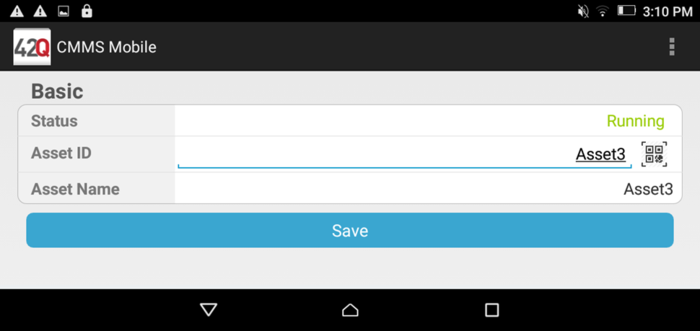
The Change Machine Status features allows users to edit the status of a given asset. Change Machine Status is a simplified version of the Basic Step available in Create Work Order.
Figure 18: Change Machine Status
To change Machine Status:
- Asset ID: Scan the Asset’s barcode or enter the Asset ID into the Asset ID field. NOTE: Entry is case sensitive.
- Asset Name: The Asset Name automatically populates when the Asset ID is entered.
- Status: The current Status displays when the Asset ID is populated. Users may select the following status options from the drop-down menu provided. Options are color-coded for ease of selection:
- Repair
- Down
- Running
4. Tap the current status
5. A pop-up menu displays
6. Select Save.
7. A success message displays with the Asset ID Information.
8. Select OK.
Note: Anyone may change a Machine Status; they do not have to have Requester or Assigned rights.
Revision History
| Revision | Date | Editor | Comment |
| Document Creation: Revision A | 2/05/17 | Helena Wang | First version of CMMS Mobile Touch |
| Edit for 42Q New Release: Revision B | 11/8/17 | Martha Jordan | Update for 42Q New Release |
